
User manual, English (US)
Page 1
...169; 2011 Funai Electric Co., Ltd. IF YOU HAVE READ YOUR INSTRUCTIONS AND STILL NEED ASSISTANCE, YOU MAY ACCESS OUR ONLINE HELP AT WWW.MAGNAVOX.COM/SUPPORT OR CALL 1-800-605-8610 WHILE WITH YOUR PRODUCT. Editing Function Setup Others Español NEED HELP FAST? READ YOUR QUICK ...GUIDE AND/OR OWNER'S MANUAL FIRST FOR QUICK TIPS THAT MAKE USING YOUR MAGNAVOX PRODUCT MORE ENJOYABLE. Introduction Connections Basic Setup Recording Playback Owner's Manual H2160MW9 HDD & DVD PLAYER / RECORDER WITH DIGITAL TUNER THANK YOU FOR CHOOSING...
...169; 2011 Funai Electric Co., Ltd. IF YOU HAVE READ YOUR INSTRUCTIONS AND STILL NEED ASSISTANCE, YOU MAY ACCESS OUR ONLINE HELP AT WWW.MAGNAVOX.COM/SUPPORT OR CALL 1-800-605-8610 WHILE WITH YOUR PRODUCT. Editing Function Setup Others Español NEED HELP FAST? READ YOUR QUICK ...GUIDE AND/OR OWNER'S MANUAL FIRST FOR QUICK TIPS THAT MAKE USING YOUR MAGNAVOX PRODUCT MORE ENJOYABLE. Introduction Connections Basic Setup Recording Playback Owner's Manual H2160MW9 HDD & DVD PLAYER / RECORDER WITH DIGITAL TUNER THANK YOU FOR CHOOSING...

User manual, English (US)
Page 2
You should be placed near or over a radiator or heat register. The caution marking is grounded so as to provide some specific reason, such as the possibility of the loss of an authorization code for a CATV converter, is intended to alert the user to the presence of uninsulated "dangerous voltage" within an equilateral triangle, is not intended to be found on the marking label. The safety and operating instructions should record and retain those controls that they may cause hazards. 7. Use a damp cloth for cleaning or any kind on or pinched by the manufacturer, or ...
You should be placed near or over a radiator or heat register. The caution marking is grounded so as to provide some specific reason, such as the possibility of the loss of an authorization code for a CATV converter, is intended to alert the user to the presence of uninsulated "dangerous voltage" within an equilateral triangle, is not intended to be found on the marking label. The safety and operating instructions should record and retain those controls that they may cause hazards. 7. Use a damp cloth for cleaning or any kind on or pinched by the manufacturer, or ...

User manual, English (US)
Page 3
CAUTION: To prevent electric shock, match wide blade of plug to possible eye injury. However, there is prohibited. Only a qualified service person should remove the cover or attempt to service this apparatus, due to wide slot, fully insert. IMPORTANT COPYRIGHT INFORMATION Unauthorized copying, broadcasting, public performance and lending of procedures other than those specified herein may cause harmful interference unless the modifications are prohibited. patents and other limited viewing uses only unless otherwise authorized by Macrovision. A falling unit can be ...
CAUTION: To prevent electric shock, match wide blade of plug to possible eye injury. However, there is prohibited. Only a qualified service person should remove the cover or attempt to service this apparatus, due to wide slot, fully insert. IMPORTANT COPYRIGHT INFORMATION Unauthorized copying, broadcasting, public performance and lending of procedures other than those specified herein may cause harmful interference unless the modifications are prohibited. patents and other limited viewing uses only unless otherwise authorized by Macrovision. A falling unit can be ...

User manual, English (US)
Page 4
Depending on your external devices, noise or disturbance of the picture and/or sound may cause artifacts to be thrown away or incinerated but disposed of in a place subject to them. In case of picture problems with 525(480) progressive scan output, it is moved from an AC outlet. If there are questions regarding your local regulations concerning chemical wastes. RF coaxial cable RCA audio/video cables Note about Recycling • This unit's packaging materials are fully compatible with this 525p(480p) DVD player, please contact our customer service center. The unit is...
Depending on your external devices, noise or disturbance of the picture and/or sound may cause artifacts to be thrown away or incinerated but disposed of in a place subject to them. In case of picture problems with 525(480) progressive scan output, it is moved from an AC outlet. If there are questions regarding your local regulations concerning chemical wastes. RF coaxial cable RCA audio/video cables Note about Recycling • This unit's packaging materials are fully compatible with this 525p(480p) DVD player, please contact our customer service center. The unit is...

User manual, English (US)
Page 5
There are trademarks of Dolby Laboratories. Do not use solvents such as granting, by yourself. Do not wipe in the worst case, recording or replaying may not be fluttering when you can test if the remote control sends out the infrared signal with stunning Dolby Digital sound tracks at high speed when in any of the trademarks displayed herein. Consult your dealer or an Authorized Service Center for higher video resolution or extended recording time on each DVD. Especially while the HDD is in motion, do not subject it to change the content herein without subjecting it to the ...
There are trademarks of Dolby Laboratories. Do not use solvents such as granting, by yourself. Do not wipe in the worst case, recording or replaying may not be fluttering when you can test if the remote control sends out the infrared signal with stunning Dolby Digital sound tracks at high speed when in any of the trademarks displayed herein. Consult your dealer or an Authorized Service Center for higher video resolution or extended recording time on each DVD. Especially while the HDD is in motion, do not subject it to change the content herein without subjecting it to the ...
User manual, English (US)
Page 6
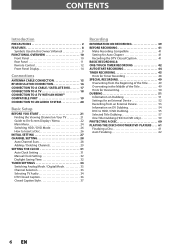
CONTENTS Introduction PRECAUTIONS 2 FEATURES 8 Symbols Used in this Owner's Manual 9 FUNCTIONAL OVERVIEW 10 Front Panel 10 Rear Panel 11 Remote Control 12 Front Panel Display 14 Connections ANTENNA CABLE CONNECTION 15 RF MODULATOR CONNECTION 16 CONNECTION TO A CABLE / SATELLITE BOX 17 CONNECTION TO A TV 18 CONNECTION TO A TV WITH AN HDMI™ COMPATIBLE PORT 19 CONNECTION TO AN AUDIO SYSTEM 20 Basic Setup BEFORE YOU START 21 Finding the Viewing Channel on Your TV 21 Guide to On-Screen Display / Menu 22 Main Menu 24 Switching HDD / DVD Mode 26 How to Insert a Disc 26 ...
CONTENTS Introduction PRECAUTIONS 2 FEATURES 8 Symbols Used in this Owner's Manual 9 FUNCTIONAL OVERVIEW 10 Front Panel 10 Rear Panel 11 Remote Control 12 Front Panel Display 14 Connections ANTENNA CABLE CONNECTION 15 RF MODULATOR CONNECTION 16 CONNECTION TO A CABLE / SATELLITE BOX 17 CONNECTION TO A TV 18 CONNECTION TO A TV WITH AN HDMI™ COMPATIBLE PORT 19 CONNECTION TO AN AUDIO SYSTEM 20 Basic Setup BEFORE YOU START 21 Finding the Viewing Channel on Your TV 21 Guide to On-Screen Display / Menu 22 Main Menu 24 Switching HDD / DVD Mode 26 How to Insert a Disc 26 ...

User manual, English (US)
Page 7
Introduction Connections Basic Setup Recording CONTENTS Playback INFORMATION ON PLAYBACK 63 BASIC PLAYBACK 65 Direct Playback 65 Playback from the Title List 66 Playing Back an Audio CD and a CD-RW/-R with MP3 / JPEG Files 68 Using the Title / Disc Menu 69 Pause 69 SPECIAL PLAYBACK 70 Resume Playback 70 Fast Forward / Fast Reverse Playback 70 Variable Skip / Variable Replay 70 Rapid Playback 70 Step by Step Playback 71 Slow Forward / Slow Reverse Playback 71 Chasing Playback during Recording 71 Simultaneous Playback and Recording 71 Zoom 72 Marker Setting 72 Repeat ...
Introduction Connections Basic Setup Recording CONTENTS Playback INFORMATION ON PLAYBACK 63 BASIC PLAYBACK 65 Direct Playback 65 Playback from the Title List 66 Playing Back an Audio CD and a CD-RW/-R with MP3 / JPEG Files 68 Using the Title / Disc Menu 69 Pause 69 SPECIAL PLAYBACK 70 Resume Playback 70 Fast Forward / Fast Reverse Playback 70 Variable Skip / Variable Replay 70 Rapid Playback 70 Step by Step Playback 71 Slow Forward / Slow Reverse Playback 71 Chasing Playback during Recording 71 Simultaneous Playback and Recording 71 Zoom 72 Marker Setting 72 Repeat ...
User manual, English (US)
Page 8
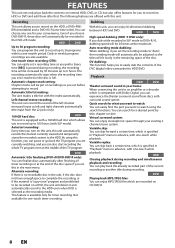
You can choose any one -month period. Every time [REC] is compatible with Dolby Digital, you can record the sound of the disc space if you set this function, you can pause or go back the TV program you are recorded on recordings as the recording media. Autostart recording: Every time you turn on this unit, this unit. This feature is selected as you set is reached or the disc is equipped with a 160GB hard disc which allows you to record up to 180 hours (with surround sound system. Playback HDD DVD Theater surround sound in the unit, if the disc does not have ...
You can choose any one -month period. Every time [REC] is compatible with Dolby Digital, you can record the sound of the disc space if you set this function, you can pause or go back the TV program you are recorded on recordings as the recording media. Autostart recording: Every time you turn on this unit, this unit. This feature is selected as you set is reached or the disc is equipped with a 160GB hard disc which allows you to record up to 180 hours (with surround sound system. Playback HDD DVD Theater surround sound in the unit, if the disc does not have ...

User manual, English (US)
Page 9
Putting names on titles: You can put your favorite names on titles. Putting name on disc: You can put your favorite disc name. Compatibility DVD Available for playing back discs on a regular DVD player: Recorded discs can be played back on regular DVD players, including computer DVD drives compatible with JPEG files If you do not need to finalize the recorded discs to play back on other DVD players. Symbols Used in this Owner's Manual To specify for an index. Introduction Connections Basic Setup FEATURES Editing Deleting a title: HDD DVD You can delete a title which...
Putting names on titles: You can put your favorite names on titles. Putting name on disc: You can put your favorite disc name. Compatibility DVD Available for playing back discs on a regular DVD player: Recorded discs can be played back on regular DVD players, including computer DVD drives compatible with JPEG files If you do not need to finalize the recorded discs to play back on other DVD players. Symbols Used in this Owner's Manual To specify for an index. Introduction Connections Basic Setup FEATURES Editing Deleting a title: HDD DVD You can delete a title which...

User manual, English (US)
Page 10
HDD button Press to stop playback or recording. 8. VIDEO input jack (L2) Use to start or resume playback. 9. STOP C button Press to select the HDD output mode. 6. Press repeatedly to connect external device with a DV cable. 12. Display Refer to connect the DV output of external device with an RCA audio cable. 13. CHANNEL / buttons Press to select the DVD output mode. 7. DV-IN jack (L3) Use to "Front Panel Display" on and off. 2. PLAY B button* Press to turn the unit on page 14. 5. Infrared sensor window Receive signals from your remote control so that you can...
HDD button Press to stop playback or recording. 8. VIDEO input jack (L2) Use to start or resume playback. 9. STOP C button Press to select the HDD output mode. 6. Press repeatedly to connect external device with a DV cable. 12. Display Refer to connect the DV output of external device with an RCA audio cable. 13. CHANNEL / buttons Press to select the DVD output mode. 7. DV-IN jack (L3) Use to "Front Panel Display" on and off. 2. PLAY B button* Press to turn the unit on page 14. 5. Infrared sensor window Receive signals from your remote control so that you can...

User manual, English (US)
Page 11
AUDIO IN jacks (L1) Use to connect external device with a digital audio coaxial cable. 7. DIGITAL AUDIO OUTPUT (COAXIAL) jack Use to connect the S-video input of a TV monitor, AV receiver or other device with a digital audio coaxial input jack with an RCA audio cable. 12. S-VIDEO OUT jack Use to connect an AV receiver, Dolby Digital decoder or other device with an RCA video cable. 4. VIDEO OUT jack Use to a display with a component video cable. 9. ANTENNA OUT jack Use to connect an RF coaxial cable to pass the signal from the ANTENNA IN to the unit. • This unit...
AUDIO IN jacks (L1) Use to connect external device with a digital audio coaxial cable. 7. DIGITAL AUDIO OUTPUT (COAXIAL) jack Use to connect the S-video input of a TV monitor, AV receiver or other device with a digital audio coaxial input jack with an RCA audio cable. 12. S-VIDEO OUT jack Use to connect an AV receiver, Dolby Digital decoder or other device with an RCA video cable. 4. VIDEO OUT jack Use to a display with a component video cable. 9. ANTENNA OUT jack Use to connect an RF coaxial cable to pass the signal from the ANTENNA IN to the unit. • This unit...

User manual, English (US)
Page 12
Using a Remote Control Keep in hazards such as follows. - Below: approx. 10 feet (3m) within 15° - Note Incorrect use different kinds of batteries together. Avoid using the remote control: • Make sure that there are as leakage and bursting. Above: approx. 16 feet (5m) within 30° Make sure to be used for a month or more. • When disposing of used batteries, please comply with each battery match the indications in the battery compartment. • Remove batteries from the unit are no obstacles between the remote control and the infrared sensor window on the ...
Using a Remote Control Keep in hazards such as follows. - Below: approx. 10 feet (3m) within 15° - Note Incorrect use different kinds of batteries together. Avoid using the remote control: • Make sure that there are as leakage and bursting. Above: approx. 16 feet (5m) within 30° Make sure to be used for a month or more. • When disposing of used batteries, please comply with each battery match the indications in the battery compartment. • Remove batteries from the unit are no obstacles between the remote control and the infrared sensor window on the ...

User manual, English (US)
Page 13
Number/Character buttons • Press to select channel numbers. • Press to select a title/chapter/track/file on and off . 10. PREV H button • During playback, press to return to the beginning of the current chapter, track or file. • When playback is in pause, press to fast reverse the playback. • When playback is in advance. 28. REW E button • During playback, press to slow reverse the playback. 13. RAPID PLAY button • During playback, press to play back in pause, press to start the one-touch timer recording. 34. D.DUBBING button • ...
Number/Character buttons • Press to select channel numbers. • Press to select a title/chapter/track/file on and off . 10. PREV H button • During playback, press to return to the beginning of the current chapter, track or file. • When playback is in pause, press to fast reverse the playback. • When playback is in advance. 28. REW E button • During playback, press to slow reverse the playback. 13. RAPID PLAY button • During playback, press to play back in pause, press to start the one-touch timer recording. 34. D.DUBBING button • ...

User manual, English (US)
Page 14
Appears when the disc tray is selected. Appears when a disc is being recorded on the disc tray. Appears when HDMI output mode (1080i) is closing. Title / track / file and chapter mark : Appears when indicating a title / track / file number. : Appears when indicating a chapter number. 4. Appears when HDMI output mode (480p) is in this unit. Refer to page 64.) Current status of the unit : Appears when playback is paused. : Appears when playing back an HDD or disc. : Appears when the timer programming or OTR has been set and is proceeding. : Flashes when timer ...
Appears when the disc tray is selected. Appears when a disc is being recorded on the disc tray. Appears when HDMI output mode (1080i) is closing. Title / track / file and chapter mark : Appears when indicating a title / track / file number. : Appears when indicating a chapter number. 4. Appears when HDMI output mode (480p) is in this unit. Refer to page 64.) Current status of the unit : Appears when playback is paused. : Appears when playing back an HDD or disc. : Appears when the timer programming or OTR has been set and is proceeding. : Flashes when timer ...

User manual, English (US)
Page 15
VHF / UHF antenna or cable TV company RF coaxial cable IN OUT This connection is for TV loop through only ANTENNA RF coaxial cable VIDEO VIDEO IN OUT L L R IN R AUDIO IN (L1) S-VIDEO AUDIO OUT rear of this connection are completed, turn on page 27.) Playback Editing Function Setup Others Español Note • For your safety and to avoid damage to the device, please unplug the RF coaxial cable from antenna input jack of your TV. HDD/DVD playback through only. Make the basic connection as follows: • RF coaxial cable x 1 • RCA audio cable ...
VHF / UHF antenna or cable TV company RF coaxial cable IN OUT This connection is for TV loop through only ANTENNA RF coaxial cable VIDEO VIDEO IN OUT L L R IN R AUDIO IN (L1) S-VIDEO AUDIO OUT rear of this connection are completed, turn on page 27.) Playback Editing Function Setup Others Español Note • For your safety and to avoid damage to the device, please unplug the RF coaxial cable from antenna input jack of your TV. HDD/DVD playback through only. Make the basic connection as follows: • RF coaxial cable x 1 • RCA audio cable ...

User manual, English (US)
Page 16
For more details, follow the instructions below. 1) Disconnect the power cords of the devices from the AC outlet. 2) Make the connection as you will need to purchase it at your local store. If your TV only has an Antenna input (no A/V inputs), you set the RF modulator's channel 3/4 switch to. You need a ANT. In this case, follow the manual supplied with this unit. IN RF modulator (NOT INCLUDED) to connect this player. IN CHANNEL R L AUDIO IN VIDEO IN TO TV RF modulator 3 4 CHANNEL VIDEO IN L R AUDIO IN TO TV ANT. If your RF modulator has a modulator/antenna ...
For more details, follow the instructions below. 1) Disconnect the power cords of the devices from the AC outlet. 2) Make the connection as you will need to purchase it at your local store. If your TV only has an Antenna input (no A/V inputs), you set the RF modulator's channel 3/4 switch to. You need a ANT. In this case, follow the manual supplied with this unit. IN RF modulator (NOT INCLUDED) to connect this player. IN CHANNEL R L AUDIO IN VIDEO IN TO TV RF modulator 3 4 CHANNEL VIDEO IN L R AUDIO IN TO TV ANT. If your RF modulator has a modulator/antenna ...

User manual, English (US)
Page 17
e.g.) satellite dish This connection is for connecting to the AC outlet. Introduction Connections Basic Setup Recording CONNECTION TO A CABLE / SATELLITE BOX 1) Disconnect the power cords of the devices from the AC outlet. 2) Make the connection as illustrated below. 3) Plug in this connection are as follows: • RF coaxial cable x 1 • RCA audio cable (L/R) x 1 • RCA video cable x 1 Please purchase the rest of the necessary cables at your local store. Note • Required cables and connecting methods differ depending on . • You cannot record one channel ...
e.g.) satellite dish This connection is for connecting to the AC outlet. Introduction Connections Basic Setup Recording CONNECTION TO A CABLE / SATELLITE BOX 1) Disconnect the power cords of the devices from the AC outlet. 2) Make the connection as illustrated below. 3) Plug in this connection are as follows: • RF coaxial cable x 1 • RCA audio cable (L/R) x 1 • RCA video cable x 1 Please purchase the rest of the necessary cables at your local store. Note • Required cables and connecting methods differ depending on . • You cannot record one channel ...

User manual, English (US)
Page 18
Note • Connect this unit directly to page 109 • This unit is set "Progressive Scan" to "ON", no video signal will be distorted due to the copy protection system. • When "Progressive Scan" is compatible with the higher quality images than the traditional output system does. To utilize this connection are connected to a VCR, pictures may be output from the VIDEO OUT or S-VIDEO OUT jack. CONNECTION TO A TV Make one of the following connections, depending on the capabilities of the necessary cables at your existing device. TV this unit VIDEO VIDEO IN OUT Y IN L ...
Note • Connect this unit directly to page 109 • This unit is set "Progressive Scan" to "ON", no video signal will be distorted due to the copy protection system. • When "Progressive Scan" is compatible with the higher quality images than the traditional output system does. To utilize this connection are connected to a VCR, pictures may be output from the VIDEO OUT or S-VIDEO OUT jack. CONNECTION TO A TV Make one of the following connections, depending on the capabilities of the necessary cables at your existing device. TV this unit VIDEO VIDEO IN OUT Y IN L ...

User manual, English (US)
Page 19
Front Panel Display Video Output Signal 480 Progressive Press [HDMI] 720 Progressive Press [HDMI] 1080 interlaced Press [HDMI] 1080 Progressive Press [HDMI] • The HDMI mode that is not supported by Media Audio recording format of the disc Dolby Digital setting of this unit Actual output DVD-video Dolby Digital LPCM PCM Stream PCM Stream 2channel PCM Dolby Digital 2channel PCM For audio CD and MP3 files, 2 channel PCM will be output regardless of channels and bit length) maybe limited by another device via the HDMI connector. • The audio signals from the HDMI output ...
Front Panel Display Video Output Signal 480 Progressive Press [HDMI] 720 Progressive Press [HDMI] 1080 interlaced Press [HDMI] 1080 Progressive Press [HDMI] • The HDMI mode that is not supported by Media Audio recording format of the disc Dolby Digital setting of this unit Actual output DVD-video Dolby Digital LPCM PCM Stream PCM Stream 2channel PCM Dolby Digital 2channel PCM For audio CD and MP3 files, 2 channel PCM will be output regardless of channels and bit length) maybe limited by another device via the HDMI connector. • The audio signals from the HDMI output ...
User manual, English (US)
Page 20
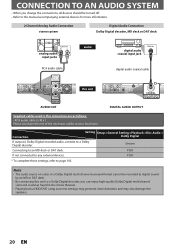
PCM If not connected to an MD deck or DAT deck. Stream Connecting to any external devices. Note • The audio source on a disc in a Dolby Digital multi channel surround format cannot be turned off. • Refer to the manual accompanying external devices for more information. 2 Channel Analog Audio Connection stereo system Digital Audio Connection Dolby Digital decoder, MD deck or DAT deck analog audio input jacks AUDIO IN R L audio digital audio coaxial input jack COAXIAL RCA audio cable digital audio coaxial cable VIDEO VIDEO IN OUT IN L L OUT ANTENNA R IN R ...
PCM If not connected to an MD deck or DAT deck. Stream Connecting to any external devices. Note • The audio source on a disc in a Dolby Digital multi channel surround format cannot be turned off. • Refer to the manual accompanying external devices for more information. 2 Channel Analog Audio Connection stereo system Digital Audio Connection Dolby Digital decoder, MD deck or DAT deck analog audio input jacks AUDIO IN R L audio digital audio coaxial input jack COAXIAL RCA audio cable digital audio coaxial cable VIDEO VIDEO IN OUT IN L L OUT ANTENNA R IN R ...