User manual, English (US)
Page 1
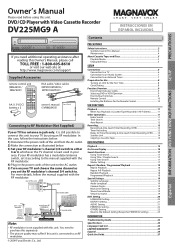
...DV225MG9 A INSTRUCCIONES EN ESPAÑOL INCLUIDAS. DVD / CD Player with the RF modulator. 4) Plug in the power cords of this Owner's Manual, please call TOLL FREE : 1-800-605-8610 or visit our web site at http://www.magnavox... AUDIO OUT DVD AUDIO OUT S-VIDEO OUT COMPONENT VIDEO OUT Y DVD/VCR AUDIO OUT L VCR AUDIO IN L L COAXIAL R CB/ PB R VIDEO OUT CR/ PR R VIDEO IN DVD/VCR AUDIO OUT ...switch to your RF modulator ANT. PRECAUTIONS Safety Instructions 2 Symbols Used in Hi-Fi Stereo 11 Other Operations 11 Index Search...11 Time Search...11 Auto Repeat...12 Recording...
...DV225MG9 A INSTRUCCIONES EN ESPAÑOL INCLUIDAS. DVD / CD Player with the RF modulator. 4) Plug in the power cords of this Owner's Manual, please call TOLL FREE : 1-800-605-8610 or visit our web site at http://www.magnavox... AUDIO OUT DVD AUDIO OUT S-VIDEO OUT COMPONENT VIDEO OUT Y DVD/VCR AUDIO OUT L VCR AUDIO IN L L COAXIAL R CB/ PB R VIDEO OUT CR/ PR R VIDEO IN DVD/VCR AUDIO OUT ...switch to your RF modulator ANT. PRECAUTIONS Safety Instructions 2 Symbols Used in Hi-Fi Stereo 11 Other Operations 11 Index Search...11 Time Search...11 Auto Repeat...12 Recording...

User manual, English (US)
Page 6
... "PROGRESSIVE" to the copy protection system. • DIGITAL AUDIO OUT (COAXIAL), DVD AUDIO OUT, S-VIDEO OUT and COMPONENT VIDEO OUT jacks are connected to a VCR, pictures may be output at your local store. Admiral: Curtis Mathis: GE: Hitachi: JVC: Kenwood: LXI-Series: Magnavox: AUX LINE1, LINE2, 00, 90, 91, 92, 93 INPUT, TV...
... "PROGRESSIVE" to the copy protection system. • DIGITAL AUDIO OUT (COAXIAL), DVD AUDIO OUT, S-VIDEO OUT and COMPONENT VIDEO OUT jacks are connected to a VCR, pictures may be output at your local store. Admiral: Curtis Mathis: GE: Hitachi: JVC: Kenwood: LXI-Series: Magnavox: AUX LINE1, LINE2, 00, 90, 91, 92, 93 INPUT, TV...

User manual, English (US)
Page 7
... R CB/ PB R VIDEO OUT CR/ PR R VIDEO IN L1 L R VIDEO IN AUDIO IN L R VIDEO IN RCA audio cable RCA video cable DVD/VCR VCR AUDIO OUT AUDIO IN L L R R VIDEO OUT VIDEO IN RCA audio cable RCA video cable AUDIO OUT L R VIDEO OUT Using the unit with an ...stereo system Audio L R analog audio input jacks Playing Multi Channel Digital Audio Dolby Digital decoder, MD deck or DAT deck COAXIAL digital audio input jack RCA audio cable digital audio coaxial cable SETUP DVD AUDIO OUT L R DIGITAL AUDIO OUT DVD AUDIO OUT S-VIDEO OUT COMPONENT VIDEO OUT Y DVD/VCR AUDIO OUT L VCR...
... R CB/ PB R VIDEO OUT CR/ PR R VIDEO IN L1 L R VIDEO IN AUDIO IN L R VIDEO IN RCA audio cable RCA video cable DVD/VCR VCR AUDIO OUT AUDIO IN L L R R VIDEO OUT VIDEO IN RCA audio cable RCA video cable AUDIO OUT L R VIDEO OUT Using the unit with an ...stereo system Audio L R analog audio input jacks Playing Multi Channel Digital Audio Dolby Digital decoder, MD deck or DAT deck COAXIAL digital audio input jack RCA audio cable digital audio coaxial cable SETUP DVD AUDIO OUT L R DIGITAL AUDIO OUT DVD AUDIO OUT S-VIDEO OUT COMPONENT VIDEO OUT Y DVD/VCR AUDIO OUT L VCR...
User manual, English (US)
Page 9
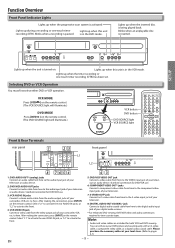
... scan system is in the DVD mode. y VCR MODE Press [VCR ] on the remote control. (The VCR SOURCE light will illuminate.) DVD MODE Press [DVD ] on the remote control. Note: • Audio and video cables are included for DVD/VCR use . 3: VCR AUDIO IN jacks Connect a stereo audio cable from here to ...the digital audio input jack of your digital audio receiver. * For enhanced DVD viewing. Lights up when the unit is being played back. Lights...
... scan system is in the DVD mode. y VCR MODE Press [VCR ] on the remote control. (The VCR SOURCE light will illuminate.) DVD MODE Press [DVD ] on the remote control. Note: • Audio and video cables are included for DVD/VCR use . 3: VCR AUDIO IN jacks Connect a stereo audio cable from here to ...the digital audio input jack of your digital audio receiver. * For enhanced DVD viewing. Lights up when the unit is being played back. Lights...
User manual, English (US)
Page 10
... index or time search menu. • To call up the DVD setup menu. • To call up the DVD setup menu. • To call up the VCR menu. Line of center: approx. 16 feet (5m) within...8226; To reset the tape counter. TIMER SET VCR ZOOM • To magnify part of a picture. (2x/4x) • To adjust the tracking manually during playback. (Hi-Fi tapes only) • To clear the markers...the remote control is not to use [OPEN/CLOSE A] or [STOP/EJECT C A] on a • To select "STEREO", "L-ch" or disc. chosen point of time. Either side of sight: approx. 23 feet (7m) - repeatedly. ...
... index or time search menu. • To call up the DVD setup menu. • To call up the DVD setup menu. • To call up the VCR menu. Line of center: approx. 16 feet (5m) within...8226; To reset the tape counter. TIMER SET VCR ZOOM • To magnify part of a picture. (2x/4x) • To adjust the tracking manually during playback. (Hi-Fi tapes only) • To clear the markers...the remote control is not to use [OPEN/CLOSE A] or [STOP/EJECT C A] on a • To select "STEREO", "L-ch" or disc. chosen point of time. Either side of sight: approx. 23 feet (7m) - repeatedly. ...
User manual, English (US)
Page 11
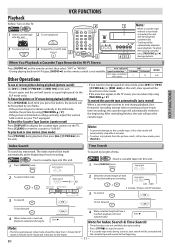
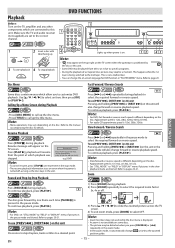
... picture by using [TRACKING K / L]. • If the picture is reached, playback will search in super high speed. (in Hi-Fi Stereo Press [AUDIO ] on the TV. VCR • Insert a cassette tape into this unit. 3 To stop the search. • The time gap between index marks should be more...will start playback PLAY 4 To eject the cassette tape OPEN/CLOSE 2 4 STANDBY-ON OPEN/CLOSE SPEED TIMER SET 12 45 78 CLEAR 0 DISPLAY VCR 3 TRACKING 6 9 INPUT +10 DVD MODE STANDBY-ON y POWER ON VIDEO L - BB PLAY B 4 When selected length of time for SLP mode. • If a cassette...
... picture by using [TRACKING K / L]. • If the picture is reached, playback will search in super high speed. (in Hi-Fi Stereo Press [AUDIO ] on the TV. VCR • Insert a cassette tape into this unit. 3 To stop the search. • The time gap between index marks should be more...will start playback PLAY 4 To eject the cassette tape OPEN/CLOSE 2 4 STANDBY-ON OPEN/CLOSE SPEED TIMER SET 12 45 78 CLEAR 0 DISPLAY VCR 3 TRACKING 6 9 INPUT +10 DVD MODE STANDBY-ON y POWER ON VIDEO L - BB PLAY B 4 When selected length of time for SLP mode. • If a cassette...
User manual, English (US)
Page 12
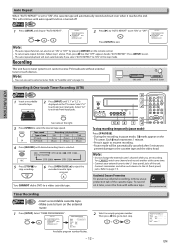
... F.FWD STOP/EJECT PLAY RECORD 56 4 1 6 STANDBY-ON OPEN/CLOSE SPEED TIMER SET 3 123 TRACKING 2 456 789 CLEAR 0 INPUT +10 DISPLAY VCR DVD MODE PLAY 5 STOP RECORD PREV NEXT PAUSE 4 To stop recording. Each C mark represents 1 minute. • Press it later, cover the hole with... RECORD REC OTR (0:30) (normal recording) OTR (1:00)..... AUDIO - erase-protection tab Timer Recording VCR • Insert a recordable cassette tape. • Make sure to the cassette tape and the video head. REC SPEED - - Then, press [B] so that "OFF" appears beside "AUTO REPEAT". Refer to...
... F.FWD STOP/EJECT PLAY RECORD 56 4 1 6 STANDBY-ON OPEN/CLOSE SPEED TIMER SET 3 123 TRACKING 2 456 789 CLEAR 0 INPUT +10 DISPLAY VCR DVD MODE PLAY 5 STOP RECORD PREV NEXT PAUSE 4 To stop recording. Each C mark represents 1 minute. • Press it later, cover the hole with... RECORD REC OTR (0:30) (normal recording) OTR (1:00)..... AUDIO - erase-protection tab Timer Recording VCR • Insert a recordable cassette tape. • Make sure to the cassette tape and the video head. REC SPEED - - Then, press [B] so that "OFF" appears beside "AUTO REPEAT". Refer to...
User manual, English (US)
Page 13
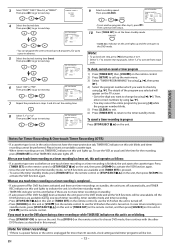
... cancel a timer program 1) Press [TIMER SET] then, [VCR ] on this unit lights up the main menu. 3) Select "TIMER PROGRAMMING" by using [K / L], then press [ B]. 4) Select the program number which you want to activate rear input jacks. To use the DVD player during steps 3 to 9. • Select "L1" to ...use the VCR as usual until [TIMER SET] is on or blinking. • Press [STANDBY-ON] to set , this unit operates ...
... cancel a timer program 1) Press [TIMER SET] then, [VCR ] on this unit lights up the main menu. 3) Select "TIMER PROGRAMMING" by using [K / L], then press [ B]. 4) Select the program number which you want to activate rear input jacks. To use the DVD player during steps 3 to 9. • Select "L1" to ...use the VCR as usual until [TIMER SET] is on or blinking. • Press [STANDBY-ON] to set , this unit operates ...
User manual, English (US)
Page 14
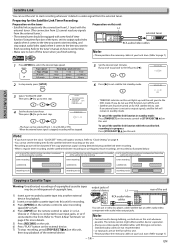
... on the remote control to select recording speed (SP or SLP). 4) Press [INPUT] on this unit L1 DIGITAL AUDIO OUT DVD AUDIO OUT S-VIDEO OUT COMPONENT VIDEO OUT Y DVD/VCR AUDIO OUT L VCR AUDIO IN L L COAXIAL R CB/ PB R VIDEO OUT CR/ PR R VIDEO IN external tuner RCA audio/video cables Note...STOP/EJECT C A] on this unit. Then press [B] to go to set satellite link standby mode. If you do not use a video disc player, cable/satellite box or other audio/video component with some kind of the timer recording is overlapped on the existing timer recording. Note: •...
... on the remote control to select recording speed (SP or SLP). 4) Press [INPUT] on this unit L1 DIGITAL AUDIO OUT DVD AUDIO OUT S-VIDEO OUT COMPONENT VIDEO OUT Y DVD/VCR AUDIO OUT L VCR AUDIO IN L L COAXIAL R CB/ PB R VIDEO OUT CR/ PR R VIDEO IN external tuner RCA audio/video cables Note...STOP/EJECT C A] on this unit. Then press [B] to go to set satellite link standby mode. If you do not use a video disc player, cable/satellite box or other audio/video component with some kind of the timer recording is overlapped on the existing timer recording. Note: •...
User manual, English (US)
Page 15
... [PREV H], [NEXT G ] on this unit Pressing and holding [PREV H] or [NEXT G ] on this unit. • Some DVD may appear at which allow you press [PAUSE k] or [h] repeatedly in "PLAYER MENU" menu. To use [PREV H], [NEXT G ] on this unit Pressing and holding [PREV H] or [NEXT G ] on this... while the disc menu is displayed. • 4x zoom is not a malfunction. • You can change the on the disc. EN AUDIO - B OPEN/CLOSE TRACKING VCR DVD P-SCAN PLAY SOURCE H C B PREV STOP PLAY N 1 2 43 Note: • " " may be distorted when you to the zoomed position guide. - 15 -...
... [PREV H], [NEXT G ] on this unit Pressing and holding [PREV H] or [NEXT G ] on this unit. • Some DVD may appear at which allow you press [PAUSE k] or [h] repeatedly in "PLAYER MENU" menu. To use [PREV H], [NEXT G ] on this unit Pressing and holding [PREV H] or [NEXT G ] on this... while the disc menu is displayed. • 4x zoom is not a malfunction. • You can change the on the disc. EN AUDIO - B OPEN/CLOSE TRACKING VCR DVD P-SCAN PLAY SOURCE H C B PREV STOP PLAY N 1 2 43 Note: • " " may be distorted when you to the zoomed position guide. - 15 -...
User manual, English (US)
Page 23
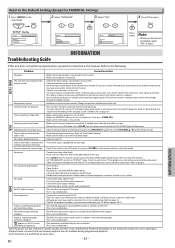
... plug is not a malfunction. Timer recording is impossible. • Make sure the timer program is OK. • Head cleaning may be changed . • The DVD does not contain sequences recorded from a desired track and random playback are not available during programmed playback. • Some ...is set correctly. • Make sure TIMER REC indicator on remote control toward a digital camera. Refer to the following: Problem Corrective action DVD / VCR No power. • Make sure the power plug is connected to initialize, select "NO" at the infrared sensor window. If not, ...
... plug is not a malfunction. Timer recording is impossible. • Make sure the timer program is OK. • Head cleaning may be changed . • The DVD does not contain sequences recorded from a desired track and random playback are not available during programmed playback. • Some ...is set correctly. • Make sure TIMER REC indicator on remote control toward a digital camera. Refer to the following: Problem Corrective action DVD / VCR No power. • Make sure the power plug is connected to initialize, select "NO" at the infrared sensor window. If not, ...
User manual, English (US)
Page 27
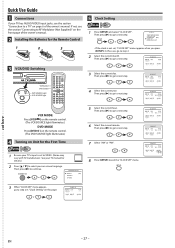
... step 2 in "Clock Setting" on page 6 of the owner's manual. 2 Installing the Batteries for the Remote Control 1 2 3 3 VCR/DVD Switching OPEN/CLOSE TRACKING VCR DVD P-SCAN PLAY SOURCE H C B G PREV STOP PLAY NEXT B VCR DVD VCR button DVD button DVD SOURCE light VCR SOURCE light SOURCE STANDBY-ON OPEN/CLOSE SPEED TIMER SET 123 TRACKING 456 789 CLEAR 0 INPUT +10 DISPLAY...
... step 2 in "Clock Setting" on page 6 of the owner's manual. 2 Installing the Batteries for the Remote Control 1 2 3 3 VCR/DVD Switching OPEN/CLOSE TRACKING VCR DVD P-SCAN PLAY SOURCE H C B G PREV STOP PLAY NEXT B VCR DVD VCR button DVD button DVD SOURCE light VCR SOURCE light SOURCE STANDBY-ON OPEN/CLOSE SPEED TIMER SET 123 TRACKING 456 789 CLEAR 0 INPUT +10 DISPLAY...
User manual, English (US)
Page 28
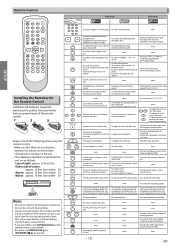
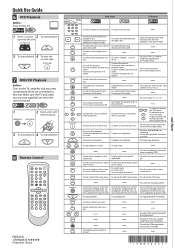
...entered incorrectly. • To cancel the point for A-B repeat. cut here "R-ch". • To select "HIFI" or "MONO" mode during playback. (Hi-Fi tapes only) • To clear the markers. • To clear the markers. • To remove status number in the pause mode. • To repeat ...• To return to the previous opera- • To return to the next VCR menu. • To go back one frame at a time. repeatedly. • To select the repeat mode on a • To select "STEREO", "L-ch" or disc. DISPLAY DVD INPUT • To display the current disc mode. • To select...
...entered incorrectly. • To cancel the point for A-B repeat. cut here "R-ch". • To select "HIFI" or "MONO" mode during playback. (Hi-Fi tapes only) • To clear the markers. • To clear the markers. • To remove status number in the pause mode. • To repeat ...• To return to the previous opera- • To return to the next VCR menu. • To go back one frame at a time. repeatedly. • To select the repeat mode on a • To select "STEREO", "L-ch" or disc. DISPLAY DVD INPUT • To display the current disc mode. • To select...


