User manual, English (US)
Page 1
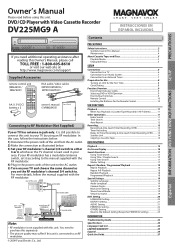
... Video Cassette Recorder DV225MG9 A INSTRUCCIONES EN ESPAÑOL INCLUIDAS. IN CHANNEL R L AUDIO IN VIDEO IN TO TV Set channel 3 or 4 Note: • RF modulator is connected to . DVD / CD Player with the RF ...magnavox.com/support Supplied Accessories remote control unit (NB622UD / NB672UD) RCA audio / video cables (WPZ0102TM018 / WPZ0102LTE01) AA (1.5 V DC) battery x 2 owner's manual Owner's Manual (1VMN28435) Connecting to RF Modulator (Not Supplied) If your TV has antenna in jack only, it according to the manual supplied with the RF modulator. 4) Plug in Hi-Fi Stereo...
... Video Cassette Recorder DV225MG9 A INSTRUCCIONES EN ESPAÑOL INCLUIDAS. IN CHANNEL R L AUDIO IN VIDEO IN TO TV Set channel 3 or 4 Note: • RF modulator is connected to . DVD / CD Player with the RF ...magnavox.com/support Supplied Accessories remote control unit (NB622UD / NB672UD) RCA audio / video cables (WPZ0102TM018 / WPZ0102LTE01) AA (1.5 V DC) battery x 2 owner's manual Owner's Manual (1VMN28435) Connecting to RF Modulator (Not Supplied) If your TV has antenna in jack only, it according to the manual supplied with the RF modulator. 4) Plug in Hi-Fi Stereo...

User manual, English (US)
Page 6
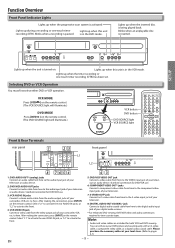
... by pressing and holding [PLAY B] on the front of the unit on the DVD side for common brand name TV's. Admiral: Curtis Mathis: GE: Hitachi: JVC: Kenwood: LXI-Series: Magnavox: AUX LINE1, LINE2, 00, 90, 91, 92, 93 INPUT, TV/VCR, 00, 90, 91, 92, 93 INPUT, AUX VIDEO, VIDEO1, VIDEO2, ...VIDEO3 AUX 00 AUX CHANNEL Panasonic: RCA: Samsung: Sanyo: Sharp: Sony: Toshiba: Zenith: - 6 - DIGITAL AUDIO OUT DVD AUDIO OUT S-VIDEO OUT COMPONENT VIDEO OUT...
... by pressing and holding [PLAY B] on the front of the unit on the DVD side for common brand name TV's. Admiral: Curtis Mathis: GE: Hitachi: JVC: Kenwood: LXI-Series: Magnavox: AUX LINE1, LINE2, 00, 90, 91, 92, 93 INPUT, TV/VCR, 00, 90, 91, 92, 93 INPUT, AUX VIDEO, VIDEO1, VIDEO2, ...VIDEO3 AUX 00 AUX CHANNEL Panasonic: RCA: Samsung: Sanyo: Sharp: Sony: Toshiba: Zenith: - 6 - DIGITAL AUDIO OUT DVD AUDIO OUT S-VIDEO OUT COMPONENT VIDEO OUT...

User manual, English (US)
Page 7
... R CB/ PB R VIDEO OUT CR/ PR R VIDEO IN L1 L R VIDEO IN AUDIO IN L R VIDEO IN RCA audio cable RCA video cable DVD/VCR VCR AUDIO OUT AUDIO IN L L R R VIDEO OUT VIDEO IN RCA audio cable RCA video cable AUDIO OUT L R VIDEO OUT Using the unit with an ...stereo system Audio L R analog audio input jacks Playing Multi Channel Digital Audio Dolby Digital decoder, MD deck or DAT deck COAXIAL digital audio input jack RCA audio cable digital audio coaxial cable SETUP DVD AUDIO OUT L R DIGITAL AUDIO OUT DVD AUDIO OUT S-VIDEO OUT COMPONENT VIDEO OUT Y DVD/VCR AUDIO OUT L VCR...
... R CB/ PB R VIDEO OUT CR/ PR R VIDEO IN L1 L R VIDEO IN AUDIO IN L R VIDEO IN RCA audio cable RCA video cable DVD/VCR VCR AUDIO OUT AUDIO IN L L R R VIDEO OUT VIDEO IN RCA audio cable RCA video cable AUDIO OUT L R VIDEO OUT Using the unit with an ...stereo system Audio L R analog audio input jacks Playing Multi Channel Digital Audio Dolby Digital decoder, MD deck or DAT deck COAXIAL digital audio input jack RCA audio cable digital audio coaxial cable SETUP DVD AUDIO OUT L R DIGITAL AUDIO OUT DVD AUDIO OUT S-VIDEO OUT COMPONENT VIDEO OUT Y DVD/VCR AUDIO OUT L VCR...
User manual, English (US)
Page 9
...this unit is in the DVD mode. AUDIO - y VCR MODE Press [VCR ] on the remote control. (The VCR SOURCE light will illuminate.) DVD MODE Press [DVD ] on the remote control. Note: • Audio and video cables are included for DVD/VCR use . 3: VCR AUDIO IN jacks Connect a stereo audio cable from here to ...the digital audio input jack of your DVD picture and sound quality with an S-video cable, a component video cable, or a digital ...
...this unit is in the DVD mode. AUDIO - y VCR MODE Press [VCR ] on the remote control. (The VCR SOURCE light will illuminate.) DVD MODE Press [DVD ] on the remote control. Note: • Audio and video cables are included for DVD/VCR use . 3: VCR AUDIO IN jacks Connect a stereo audio cable from here to ...the digital audio input jack of your DVD picture and sound quality with an S-video cable, a component video cable, or a digital ...
User manual, English (US)
Page 10
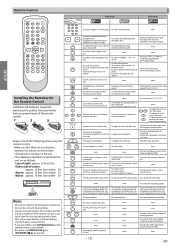
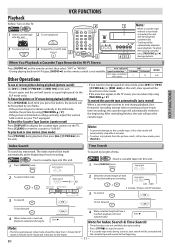
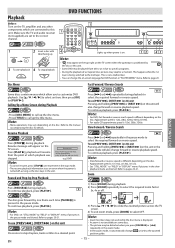
... period of a picture. (2x/4x) • To adjust the tracking manually during playback. (Hi-Fi tapes only) • To clear the markers. • To clear the markers. • To remove...To select "STEREO", "L-ch" or disc. TITLE TRACKING TRACKING • To call up the VCR menu. repeat. • To cancel the point for a timer recording. • To select the VCR output mode. • To activate VCR mode. -... SPEED TIMER SET 12 45 78 CLEAR 0 DISPLAY VCR 3 TRACKING 6 9 INPUT +10 DVD MODE PLAY STOP RECORD PREV NEXT PAUSE TITLE SEARCH AUDIO DISC MENU OK ...
... period of a picture. (2x/4x) • To adjust the tracking manually during playback. (Hi-Fi tapes only) • To clear the markers. • To clear the markers. • To remove...To select "STEREO", "L-ch" or disc. TITLE TRACKING TRACKING • To call up the VCR menu. repeat. • To cancel the point for a timer recording. • To select the VCR output mode. • To activate VCR mode. -... SPEED TIMER SET 12 45 78 CLEAR 0 DISPLAY VCR 3 TRACKING 6 9 INPUT +10 DVD MODE PLAY STOP RECORD PREV NEXT PAUSE TITLE SEARCH AUDIO DISC MENU OK ...
User manual, English (US)
Page 11
...Fi stereo L R MONO L+R To cue or review picture during playback (still mode) Press [PAUSE F]. REC TIMER REC h D C B I REW F.FWD STOP/EJECT PLAY RECORD • Tracking will be automatically adjusted upon playback. Your selection HIFI • During playing back non Hi-Fi tapes, [AUDIO ] on the TV. VCR... playback PLAY 4 To eject the cassette tape OPEN/CLOSE 2 4 STANDBY-ON OPEN/CLOSE SPEED TIMER SET 12 45 78 CLEAR 0 DISPLAY VCR 3 TRACKING 6 9 INPUT +10 DVD MODE STANDBY-ON y POWER ON VIDEO L - To play back in slow mode, press [g] or [h] ([ F.FWD g] or [REW...
...Fi stereo L R MONO L+R To cue or review picture during playback (still mode) Press [PAUSE F]. REC TIMER REC h D C B I REW F.FWD STOP/EJECT PLAY RECORD • Tracking will be automatically adjusted upon playback. Your selection HIFI • During playing back non Hi-Fi tapes, [AUDIO ] on the TV. VCR... playback PLAY 4 To eject the cassette tape OPEN/CLOSE 2 4 STANDBY-ON OPEN/CLOSE SPEED TIMER SET 12 45 78 CLEAR 0 DISPLAY VCR 3 TRACKING 6 9 INPUT +10 DVD MODE STANDBY-ON y POWER ON VIDEO L - To play back in slow mode, press [g] or [h] ([ F.FWD g] or [REW...
User manual, English (US)
Page 12
... F.FWD STOP/EJECT PLAY RECORD 56 4 1 6 STANDBY-ON OPEN/CLOSE SPEED TIMER SET 3 123 TRACKING 2 456 789 CLEAR 0 INPUT +10 DISPLAY VCR DVD MODE PLAY 5 STOP RECORD PREV NEXT PAUSE 4 To stop recording. Note: • Do not change the external tuner's channel while you select "AUTO ...also be automatically canceled after 5 minutes to prevent damage to activate front input jacks. Select "L2" to the cassette tape and the video head. Each C mark represents 1 minute. • Press it again to resume recording. • Pause mode will automatically rewind and start automatically...
... F.FWD STOP/EJECT PLAY RECORD 56 4 1 6 STANDBY-ON OPEN/CLOSE SPEED TIMER SET 3 123 TRACKING 2 456 789 CLEAR 0 INPUT +10 DISPLAY VCR DVD MODE PLAY 5 STOP RECORD PREV NEXT PAUSE 4 To stop recording. Note: • Do not change the external tuner's channel while you select "AUTO ...also be automatically canceled after 5 minutes to prevent damage to activate front input jacks. Select "L2" to the cassette tape and the video head. Each C mark represents 1 minute. • Press it again to resume recording. • Pause mode will automatically rewind and start automatically...
User manual, English (US)
Page 13
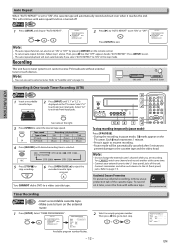
.... • When timer recordings are available during one step, press [s] during a timer recording or while TIMER REC indicator on this unit or [VCR ] on the remote control to use the DVD player during steps 3 to 9. • Select "L1" to the timer standby mode, no more than 30 seconds, clock setting and all the...
.... • When timer recordings are available during one step, press [s] during a timer recording or while TIMER REC indicator on this unit or [VCR ] on the remote control to use the DVD player during steps 3 to 9. • Select "L1" to the timer standby mode, no more than 30 seconds, clock setting and all the...
User manual, English (US)
Page 14
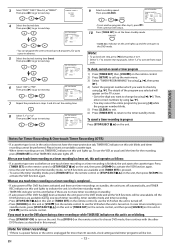
...on the existing of copyright laws. 1) Insert a pre-recorded cassette tape into another device's operation. • Always use a video disc player, cable/satellite box or other audio/video component with RCA-type connectors. Using timer function of tape T60 T120 T160 SP mode 1hour 2hours 2-2/...standby mode: Press [TIMER SET] on the remote control or [STOP/EJECT C A] on this unit L1 DIGITAL AUDIO OUT DVD AUDIO OUT S-VIDEO OUT COMPONENT VIDEO OUT Y DVD/VCR AUDIO OUT L VCR AUDIO IN L L COAXIAL R CB/ PB R VIDEO OUT CR/ PR R VIDEO IN external tuner RCA audio/video cables ...
...on the existing of copyright laws. 1) Insert a pre-recorded cassette tape into another device's operation. • Always use a video disc player, cable/satellite box or other audio/video component with RCA-type connectors. Using timer function of tape T60 T120 T160 SP mode 1hour 2hours 2-2/...standby mode: Press [TIMER SET] on the remote control or [STOP/EJECT C A] on this unit L1 DIGITAL AUDIO OUT DVD AUDIO OUT S-VIDEO OUT COMPONENT VIDEO OUT Y DVD/VCR AUDIO OUT L VCR AUDIO IN L L COAXIAL R CB/ PB R VIDEO OUT CR/ PR R VIDEO IN external tuner RCA audio/video cables ...
User manual, English (US)
Page 15
...select the required zoom factor: 2x, 4x or off , as long as the disc stays in "PLAYER MENU" menu. Disc Menu DVD Some discs contain menus which playback was stopped. Resume Playback DVD Press [STOP C] during playback to the zoomed position guide. - 15 - To use [PREV ... STANDBY-ON OPEN/CLOSE SPEED TIMER SET 1 123 TRACKING 456 789 CLEAR 0 INPUT +10 DISPLAY VCR DVD MODE 3 PLAY 4 STOP 1 STANDBY-ON y POWER ON VIDEO L - To continue playback, press [PLAY B]. B OPEN/CLOSE TRACKING VCR DVD P-SCAN PLAY SOURCE H C B PREV STOP PLAY N 1 2 43 Note: • " " ...
...select the required zoom factor: 2x, 4x or off , as long as the disc stays in "PLAYER MENU" menu. Disc Menu DVD Some discs contain menus which playback was stopped. Resume Playback DVD Press [STOP C] during playback to the zoomed position guide. - 15 - To use [PREV ... STANDBY-ON OPEN/CLOSE SPEED TIMER SET 1 123 TRACKING 456 789 CLEAR 0 INPUT +10 DISPLAY VCR DVD MODE 3 PLAY 4 STOP 1 STANDBY-ON y POWER ON VIDEO L - To continue playback, press [PLAY B]. B OPEN/CLOSE TRACKING VCR DVD P-SCAN PLAY SOURCE H C B PREV STOP PLAY N 1 2 43 Note: • " " ...
User manual, English (US)
Page 23
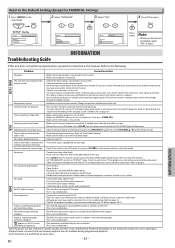
.... • That operation is prohibited by pressing [TRACKING L / K]] on the unit or [TRACKING K / L] on . Refer to the following: Problem Corrective action DVD / VCR No power. • Make sure the power plug is connected to an AC outlet. • Make sure the power is not in specific modes, but... the audio is in the remote control. • Aim the remote control directly at step 3. Refer to "Auto Head Cleaning". • Make sure the VCR is turned on the remote control. Reset to the Default Setting (Except for PARENTAL Setting) 1 Press [SETUP] in...
.... • That operation is prohibited by pressing [TRACKING L / K]] on the unit or [TRACKING K / L] on . Refer to the following: Problem Corrective action DVD / VCR No power. • Make sure the power plug is connected to an AC outlet. • Make sure the power is not in specific modes, but... the audio is in the remote control. • Aim the remote control directly at step 3. Refer to "Auto Head Cleaning". • Make sure the VCR is turned on the remote control. Reset to the Default Setting (Except for PARENTAL Setting) 1 Press [SETUP] in...
User manual, English (US)
Page 27
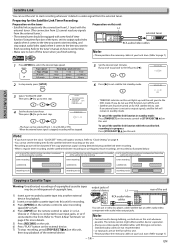
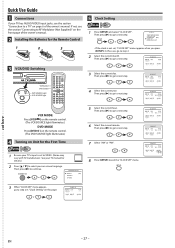
... vary with TV manufacturer. Then press [B] to go to select your on Unit for the Remote Control 1 2 3 3 VCR/DVD Switching OPEN/CLOSE TRACKING VCR DVD P-SCAN PLAY SOURCE H C B G PREV STOP PLAY NEXT B VCR DVD VCR button DVD button DVD SOURCE light VCR SOURCE light SOURCE STANDBY-ON OPEN/CLOSE SPEED TIMER SET 123 TRACKING 456 789 CLEAR 0 INPUT +10 DISPLAY...
... vary with TV manufacturer. Then press [B] to go to select your on Unit for the Remote Control 1 2 3 3 VCR/DVD Switching OPEN/CLOSE TRACKING VCR DVD P-SCAN PLAY SOURCE H C B G PREV STOP PLAY NEXT B VCR DVD VCR button DVD button DVD SOURCE light VCR SOURCE light SOURCE STANDBY-ON OPEN/CLOSE SPEED TIMER SET 123 TRACKING 456 789 CLEAR 0 INPUT +10 DISPLAY...
User manual, English (US)
Page 28
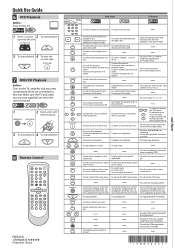
...NEXT PAUSE TITLE SEARCH AUDIO DISC MENU SETUP ZOOM OK RETURN SUBTITLE ANGLE REPEAT A-B E8E6AUD 1VMN28435 Printed in China DVD mode VCR mode Button Media (Alphabetical order) 123 456 789 • To select chapter or title directly. • ...step during playback. (Hi-Fi tapes only) • To clear the markers. • To clear the markers. • To remove status number in menu. repeatedly. • To select the repeat mode on the TV. VCR 1 2 Insert a cassette ...To search time. • To set virtual surround on a • To select "STEREO", "L-ch" or disc.
...NEXT PAUSE TITLE SEARCH AUDIO DISC MENU SETUP ZOOM OK RETURN SUBTITLE ANGLE REPEAT A-B E8E6AUD 1VMN28435 Printed in China DVD mode VCR mode Button Media (Alphabetical order) 123 456 789 • To select chapter or title directly. • ...step during playback. (Hi-Fi tapes only) • To clear the markers. • To clear the markers. • To remove status number in menu. repeatedly. • To select the repeat mode on the TV. VCR 1 2 Insert a cassette ...To search time. • To set virtual surround on a • To select "STEREO", "L-ch" or disc.


