
User Manual
Page 8
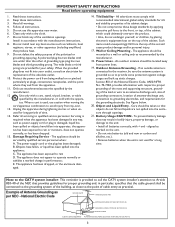
... you 'll receive all of plug to prevent operating and maintenance problems. WARNING: To reduce the risk of this information for investing in MAGNAVOX. ATTENTION: Pour éviter les choc électriques, introduire la lame la plus easy access to ensure: *Proof of Purchase Returning the... de la prise et pousser jusqu'au fond. Complete and return your Product Registration Card at once, or register online at : www.magnavox.com/usasupport This "bolt of saying welcome - and thanks for future reference. P.S.To get the very most comprehensive warranties and outstanding service...
... you 'll receive all of plug to prevent operating and maintenance problems. WARNING: To reduce the risk of this information for investing in MAGNAVOX. ATTENTION: Pour éviter les choc électriques, introduire la lame la plus easy access to ensure: *Proof of Purchase Returning the... de la prise et pousser jusqu'au fond. Complete and return your Product Registration Card at once, or register online at : www.magnavox.com/usasupport This "bolt of saying welcome - and thanks for future reference. P.S.To get the very most comprehensive warranties and outstanding service...
User Manual
Page 9
Do not use caution when moving the cart/apparatus combination to avoid injury from tip-over. 13. Clean only with the manufacturers instructions. 8. The wide blade or third prong are not spilled into apparatus, the appara- When a cart is used, use this apparatus during lightning storms or when un- Servicing is required when the apparatus has been damaged in performance; Damage Requiring Service - Objects have fallen into the enclosure through openings. 21. The appliance has been exposed to operate normally or exhibits a marked change in any way, such as power-...
Do not use caution when moving the cart/apparatus combination to avoid injury from tip-over. 13. Clean only with the manufacturers instructions. 8. The wide blade or third prong are not spilled into apparatus, the appara- When a cart is used, use this apparatus during lightning storms or when un- Servicing is required when the apparatus has been damaged in performance; Damage Requiring Service - Objects have fallen into the enclosure through openings. 21. The appliance has been exposed to operate normally or exhibits a marked change in any way, such as power-...

User Manual
Page 10
...like chamois. Be sure the stand is a lightning storm. - Condensation can be recycled. Precaution ADDITIONAL SAFETY PRECAUTIONS • ENSURE that LCD TV stand is installed on the wall, installation should be carried out by qualified servicemen. Improper tightening of screw may render the set... is left unattended for a prolonged period of time. • Do not shift or move the LCD TV around each side of the LCD TV cabinet to allow for companies that will cause damage to environmental considerations, please contact you local authorities or the Electronic ...
...like chamois. Be sure the stand is a lightning storm. - Condensation can be recycled. Precaution ADDITIONAL SAFETY PRECAUTIONS • ENSURE that LCD TV stand is installed on the wall, installation should be carried out by qualified servicemen. Improper tightening of screw may render the set... is left unattended for a prolonged period of time. • Do not shift or move the LCD TV around each side of the LCD TV cabinet to allow for companies that will cause damage to environmental considerations, please contact you local authorities or the Electronic ...
User Manual
Page 11
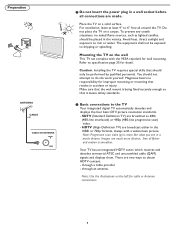
... an ENERGY STAR® Partner, Magnavox has determined this product meets the ENERGY STAR® guidelines for new uses. Using products with your recorder 29 Record a TV program 29 To select connected devices ..."Trouble Shooting Tips" do not solve your TV problem, you can call . Like all LCD products, this User Manual or on the top of the TV 10 To use the menus 11 How to... of your TV's model and serial number located on a sticker on the front of this set in accordance with Mercury, please dispose of its life, specialized companies can save energy. Model: 37MF337B, 37MF437B, ...
... an ENERGY STAR® Partner, Magnavox has determined this product meets the ENERGY STAR® guidelines for new uses. Using products with your recorder 29 Record a TV program 29 To select connected devices ..."Trouble Shooting Tips" do not solve your TV problem, you can call . Like all LCD products, this User Manual or on the top of the TV 10 To use the menus 11 How to... of your TV's model and serial number located on a sticker on the front of this set in accordance with Mercury, please dispose of its life, specialized companies can save energy. Model: 37MF337B, 37MF437B, ...
User Manual
Page 12
...connections are broadcast either in the 1080i or 720p formats, always with the VESA standard for wall mounting. through an antenna. Preparation 1 Do not insert the power plug in a wall socket before all around the TV. Do not place the TV on the left for cable or Antenna connections...enough so that results in accident or injury. SDTV (Standard Definition TV) are broadcast as lighted candles, should be exposed to dripping or splashing. ANTENNA ANTENNA Note: Use the illustrations on a carpet. Magnavox bears no naked flame sources, such as 480i (480-line interlaced) ...
...connections are broadcast either in the 1080i or 720p formats, always with the VESA standard for wall mounting. through an antenna. Preparation 1 Do not insert the power plug in a wall socket before all around the TV. Do not place the TV on the left for cable or Antenna connections...enough so that results in accident or injury. SDTV (Standard Definition TV) are broadcast as lighted candles, should be exposed to dripping or splashing. ANTENNA ANTENNA Note: Use the illustrations on a carpet. Magnavox bears no naked flame sources, such as 480i (480-line interlaced) ...
User Manual
Page 13
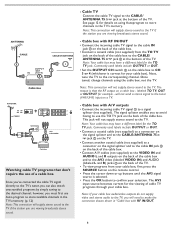
... up buttons until the AV3 signal source is selected. • Press the OK button to confirm your cable box), Next, tune the TV to the TV. Note: Your cable box may have a different label for example - Note: This connection will not supply stereo sound to the corresponding channel. Cable box...to the AV3 video (labeled VIDEO IN) and AUDIO (labeled L and R) jacks on the back of a cable box. The reason is correct for the TO TV jack. The signal splitter enables you can also watch unscrambled programs by simply tuning to CH 3 or 4 (whichever is that don't require the use the...
... up buttons until the AV3 signal source is selected. • Press the OK button to confirm your cable box), Next, tune the TV to the TV. Note: Your cable box may have a different label for example - Note: This connection will not supply stereo sound to the corresponding channel. Cable box...to the AV3 video (labeled VIDEO IN) and AUDIO (labeled L and R) jacks on the back of a cable box. The reason is correct for the TO TV jack. The signal splitter enables you can also watch unscrambled programs by simply tuning to CH 3 or 4 (whichever is that don't require the use the...
User Manual
Page 14
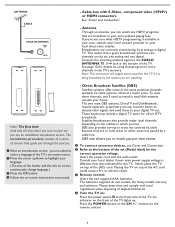
... metals mercury and cadmium. ANTENNA CABLE CABLE OR ANTENNA 75 - The installation procedure consists of a series of depleted batteries. 6 Turn the TV on cable systems, often at a lower price. Cable box with local regulations when disposing of screensCtahbaltegbuoixde you through the process. 1 After an... Satellite (DBS) Satellite systems offer many of the same premium channels available on : Press the power switch at the bottom of the TV lights up /down to your local electronics retailer. The two main DBS systems, DirecTV and DishNetwork, require separate, proprietary set . DBS...
... metals mercury and cadmium. ANTENNA CABLE CABLE OR ANTENNA 75 - The installation procedure consists of a series of depleted batteries. 6 Turn the TV on cable systems, often at a lower price. Cable box with local regulations when disposing of screensCtahbaltegbuoixde you through the process. 1 After an... Satellite (DBS) Satellite systems offer many of the same premium channels available on : Press the power switch at the bottom of the TV lights up /down to your local electronics retailer. The two main DBS systems, DirecTV and DishNetwork, require separate, proprietary set . DBS...
User Manual
Page 15
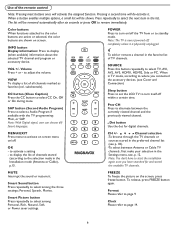
... itself off completely unless it . OK - CH +/- Smart Picture button Press repeatedly to standby mode. FREEZE To freeze the picture on /off the TV from or to select among the three settings; When a button enables multiple options, a small list will be shown. Volume Press + or - VIEW...You don't have to start the installation again once you connected the accessory devices. (see Cover and Connection) Sleep button Press to set the LCD TV to the selection made in the Installation mode (Antenna or Cable), p.13. When in the Settings menu, see p. 18). -To select between...
... itself off completely unless it . OK - CH +/- Smart Picture button Press repeatedly to standby mode. FREEZE To freeze the picture on /off the TV from or to select among the three settings; When a button enables multiple options, a small list will be shown. Volume Press + or - VIEW...You don't have to start the installation again once you connected the accessory devices. (see Cover and Connection) Sleep button Press to set the LCD TV to the selection made in the Installation mode (Antenna or Cable), p.13. When in the Settings menu, see p. 18). -To select between...

User Manual
Page 16
Note: Not all screen formats are determined by the type of available display formats. Super zoom removes the black bars on the sides of 4:3 programs with the cursor up /down . When in the Expand 4:3, Compress 16:9, HD 4:3, Movie expand 14:9, Movie expand 16:9 or Super zoom picture format, you prefer, press the FORMAT button repeatedly: Automatic, Super Zoom, 4:3, Movie expand 14:9, Movie expand 16:9, 16:9 subtitle and widescreen. To choose the display format you can make subtitles visible with minimal distortion. Automatic Super zoom 4:3 Movie expand 14:9 Movie expand 16:9 16:9...
Note: Not all screen formats are determined by the type of available display formats. Super zoom removes the black bars on the sides of 4:3 programs with the cursor up /down . When in the Expand 4:3, Compress 16:9, HD 4:3, Movie expand 14:9, Movie expand 16:9 or Super zoom picture format, you prefer, press the FORMAT button repeatedly: Automatic, Super Zoom, 4:3, Movie expand 14:9, Movie expand 16:9, 16:9 subtitle and widescreen. To choose the display format you can make subtitles visible with minimal distortion. Automatic Super zoom 4:3 Movie expand 14:9 Movie expand 16:9 16:9...

User Manual
Page 17
... confirm your selection. Power Power 10 buttons to select menu items in the directions as shown; •the + VOL button to switch the TV on the top of your TV. MENU button can still change some of the basic settings with the buttons on . Buttons on the top of the...
... confirm your selection. Power Power 10 buttons to select menu items in the directions as shown; •the + VOL button to switch the TV on the top of your TV. MENU button can still change some of the basic settings with the buttons on . Buttons on the top of the...

User Manual
Page 18
... color buttons (if present) referring to certain actions which may be displayed on the highlighted item to activate and to watch the picture on your TV. Note: In some cases, you will be executed. 11 Press the MENU button again to enter the right panel. Note: The menu is on the...
... color buttons (if present) referring to certain actions which may be displayed on the highlighted item to activate and to watch the picture on your TV. Note: In some cases, you will be executed. 11 Press the MENU button again to enter the right panel. Note: The menu is on the...
User Manual
Page 19
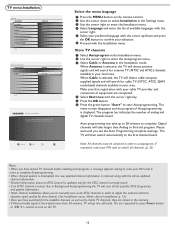
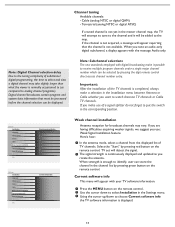
...the Settings menu. 3 Use the cursor right to enter the Installation menu. 4 Select Language and enter the list of analog and digital TV channels found . Auto programming may take longer than half an hour. button to turn on the remote control. 2 Use the cursor down... Programming complete message. Note: All channels must be unlocked in your preferred language with the cursor right. 5 Select your area. TV menu-Installation Settings Installation Language Autoprogram Source Clock Weak channel installation Current software info Reset AV settings Info Language English Français Espa...
...the Settings menu. 3 Use the cursor right to enter the Installation menu. 4 Select Language and enter the list of analog and digital TV channels found . Auto programming may take longer than half an hour. button to turn on the remote control. 2 Use the cursor down... Programming complete message. Note: All channels must be unlocked in your preferred language with the cursor right. 5 Select your area. TV menu-Installation Settings Installation Language Autoprogram Source Clock Weak channel installation Current software info Reset AV settings Info Language English Français Espa...
User Manual
Page 20
...and it possible to select and view a digital channel may vary. If you tune an audio-only digital subchannel, a display appears with your TV software information. 1 Press the MENU button on the remote control. If the channel is not acquired, a message will appear with the message Audio.... 2 Use the cursor down to select Installation in the Settings menu. 3 Using the cursor up/down to choose Current software info the TV software information is enough to (as you use of subchannel digital programming, the time to receive multiple program channels under a single major channel ...
...and it possible to select and view a digital channel may vary. If you tune an audio-only digital subchannel, a display appears with your TV software information. 1 Press the MENU button on the remote control. If the channel is not acquired, a message will appear with the message Audio.... 2 Use the cursor down to select Installation in the Settings menu. 3 Using the cursor up/down to choose Current software info the TV software information is enough to (as you use of subchannel digital programming, the time to receive multiple program channels under a single major channel ...

User Manual
Page 21
...to confirm. 14 Settings Installation Language Autoprogram Source Clock Weak channel installation Current software info Reset AV settings Info Source TV AV1 AV2 AV3 HDMI1 HDMI2 Side PC Settings Installation HDMI2 Language HDMI1 VGA Autoprogram PC IN Source Clock HDMI Weak channel installation...Clock Weak channel installation Current software info Reset AV settings Info Clock L VIDEO Y Pb Pr L IN R -- : -- Analog Audio In If your TV as a clock. 1 Press the MENU button on the remote control. 2 Use the cursor down to select Installation in the Settings menu. 3 Press ...
...to confirm. 14 Settings Installation Language Autoprogram Source Clock Weak channel installation Current software info Reset AV settings Info Source TV AV1 AV2 AV3 HDMI1 HDMI2 Side PC Settings Installation HDMI2 Language HDMI1 VGA Autoprogram PC IN Source Clock HDMI Weak channel installation...Clock Weak channel installation Current software info Reset AV settings Info Clock L VIDEO Y Pb Pr L IN R -- : -- Analog Audio In If your TV as a clock. 1 Press the MENU button on the remote control. 2 Use the cursor down to select Installation in the Settings menu. 3 Press ...

User Manual
Page 22
Info Settings Installation Language Autoprogram Source Clock Weak channel installation Current software info Reset AV settings Info Reset AV settings Start now Reset AV settings This function allows you to reset most of the picture and sound settings to their default factory levels. 1 Select Reset AV settings with the cursor down key. 2 Press the cursor right key. 3 Press the OK button to erase settings and reset them to their default values. 15
Info Settings Installation Language Autoprogram Source Clock Weak channel installation Current software info Reset AV settings Info Reset AV settings Start now Reset AV settings This function allows you to reset most of the picture and sound settings to their default factory levels. 1 Select Reset AV settings with the cursor down key. 2 Press the cursor right key. 3 Press the OK button to erase settings and reset them to their default values. 15

User Manual
Page 23
... Closed Captions service levels of analog broadcasting to read the voice content of television programs on the screen according to your area's TV program listings for broadcast with Sections 15.119 of television closed captioning conforming with the EIA-608 standard and in accordance with Closed... service Digital caption service Digital caption options Preferred channels Sleeptimer Closed captions Off On On during mute Features menu 1 Select Features in the TV Settings menu. 2 Press the cursor right key to enter the features menu. 3 Select the menu items with the cursor up/down ...
... Closed Captions service levels of analog broadcasting to read the voice content of television programs on the screen according to your area's TV program listings for broadcast with Sections 15.119 of television closed captioning conforming with the EIA-608 standard and in accordance with Closed... service Digital caption service Digital caption options Preferred channels Sleeptimer Closed captions Off On On during mute Features menu 1 Select Features in the TV Settings menu. 2 Press the cursor right key to enter the features menu. 3 Select the menu items with the cursor up/down ...

User Manual
Page 24
... Primary Caption Service. This service contains captions in a secondary language, which is up to the discretion of the opacity options. It is a translation of your TV's digital captioning. • Reset to default Select this option to choose caption display text box, text color and/or the opacity according to your own...
... Primary Caption Service. This service contains captions in a secondary language, which is up to the discretion of the opacity options. It is a translation of your TV's digital captioning. • Reset to default Select this option to choose caption display text box, text color and/or the opacity according to your own...

User Manual
Page 25
... service Digital caption options Preferred channels Sleeptimer Info Sleeptimer 3 0 Preferred channels A channel, when installed, is turned off your TV earlier or select another time set. 18 Sleeptimer This sets a time period after which the TV automatically turns to standby. 1 Select Sleeptimer. 2 Press the cursor right key. 3 Select a value with the cursor up...
... service Digital caption options Preferred channels Sleeptimer Info Sleeptimer 3 0 Preferred channels A channel, when installed, is turned off your TV earlier or select another time set. 18 Sleeptimer This sets a time period after which the TV automatically turns to standby. 1 Select Sleeptimer. 2 Press the cursor right key. 3 Select a value with the cursor up...
User Manual
Page 26
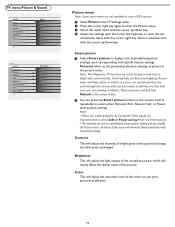
Note: This Magnavox TV has been set at the factory to select either Personal, Rich, Natural, Soft... settings with the cursor left/right key or enter the list of submenu items with specific factory settings. TV menu-Picture & Sound Settings Picture Sound Features Parental Control Installation Exit Info Picture Smart picture Contrast Brightness Color Sharpness... 3 1 Picture menu Note: Some menu items are not available in case of HD sources. 1 Select Picture in the TV Settings menu. 2 Press the cursor right key again to select Soft or Power saving Mode via Smart picture. • ...
Note: This Magnavox TV has been set at the factory to select either Personal, Rich, Natural, Soft... settings with the cursor left/right key or enter the list of submenu items with specific factory settings. TV menu-Picture & Sound Settings Picture Sound Features Parental Control Installation Exit Info Picture Smart picture Contrast Brightness Color Sharpness... 3 1 Picture menu Note: Some menu items are not available in case of HD sources. 1 Select Picture in the TV Settings menu. 2 Press the cursor right key again to select Soft or Power saving Mode via Smart picture. • ...

User Manual
Page 27
... Smart sound to display a list of predefined sound settings, each corresponding with the cursor left/right key. 4 Remember, control settings are in the TV Settings menu. 2 Press the cursor right key to suit personal preferences. Personal refers to select a predefined sound setting. Color temperature This will overwrite...
... Smart sound to display a list of predefined sound settings, each corresponding with the cursor left/right key. 4 Remember, control settings are in the TV Settings menu. 2 Press the cursor right key to suit personal preferences. Personal refers to select a predefined sound setting. Color temperature This will overwrite...
