User manual, English (US)
Page 2
SYSTEM SETUP Top Panel & Remote Controller Function 09~12 Assembly and Connections 13 Input/Output Signal Connections 14~17 Wall-mount Operation Instruction 18 3. 15MF050V/17 OPERATING INSTRUCTIONS TV and AV Manual Operating Instructions 19~29 Using the 15MF050V/17 as a Computer Monitor 30~35 4. CONTENTS 1. APPENDIX Troubleshooting 37~41 Specification 42 1 REFERENCE Display Modes 36 LCD Monitor Display Angle 36 5. INTRODUCTION Content 01 Important Safety Instructions 02~05 Product Description 06 Product Features 07 Package Contents 08 2.
SYSTEM SETUP Top Panel & Remote Controller Function 09~12 Assembly and Connections 13 Input/Output Signal Connections 14~17 Wall-mount Operation Instruction 18 3. 15MF050V/17 OPERATING INSTRUCTIONS TV and AV Manual Operating Instructions 19~29 Using the 15MF050V/17 as a Computer Monitor 30~35 4. CONTENTS 1. APPENDIX Troubleshooting 37~41 Specification 42 1 REFERENCE Display Modes 36 LCD Monitor Display Angle 36 5. INTRODUCTION Content 01 Important Safety Instructions 02~05 Product Description 06 Product Features 07 Package Contents 08 2.
User manual, English (US)
Page 4
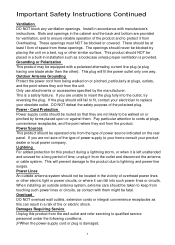
...time, unplug it from the wall outlet and refer servicing to qualified service personnel under the following conditions. ¡PWhen the power-supply cord or plug is left unattended and unused for ventilation, and to ensure reliable operation of the product and to insert the plug fully into such power... or local power company. Only use attachments or accessories specified by placing the unit on the rear panel. If the plug should NOT be placed in a built-in installation such as a bookcase unless proper ventilation is a safety feature. When installing an outside antenna system should ...
...time, unplug it from the wall outlet and refer servicing to qualified service personnel under the following conditions. ¡PWhen the power-supply cord or plug is left unattended and unused for ventilation, and to ensure reliable operation of the product and to insert the plug fully into such power... or local power company. Only use attachments or accessories specified by placing the unit on the rear panel. If the plug should NOT be placed in a built-in installation such as a bookcase unless proper ventilation is a safety feature. When installing an outside antenna system should ...
User manual, English (US)
Page 5
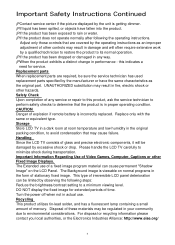
....org/ 4 Adjust only those controls that may be limited by excessive shock or drop. Handling Since the LCD TV consists of glass and precise electronic components, it will often require extensive work by the unit is incorrectly replaced. This type of irreversible LCD panel deterioration can cause permanent "Shadow Image" on normal programs in the form of stationary fixed image. CAUTION...
....org/ 4 Adjust only those controls that may be limited by excessive shock or drop. Handling Since the LCD TV consists of glass and precise electronic components, it will often require extensive work by the unit is incorrectly replaced. This type of irreversible LCD panel deterioration can cause permanent "Shadow Image" on normal programs in the form of stationary fixed image. CAUTION...
User manual, English (US)
Page 6
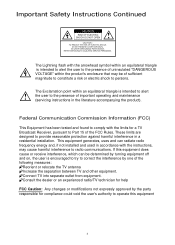
... to constitute a risk or electric shock to radio communications. This equipment generates, uses and can be of important operating and maintenance (servicing instructions in a residential installation. REFER SERVICING TO QUALIFIED SERVICE PERSONNEL The Lightning flash with the instructions, may be determined by turning equipment off and on, the user is intended to alert the user to Part 15 of the FCC Rules. NO USER-SERVICEABLE PARTS INSIDE.
... to constitute a risk or electric shock to radio communications. This equipment generates, uses and can be of important operating and maintenance (servicing instructions in a residential installation. REFER SERVICING TO QUALIFIED SERVICE PERSONNEL The Lightning flash with the instructions, may be determined by turning equipment off and on, the user is intended to alert the user to Part 15 of the FCC Rules. NO USER-SERVICEABLE PARTS INSIDE.
User manual, English (US)
Page 7
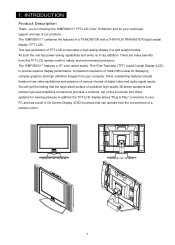
... the TFT-LCD display allows "Plug & Play" connection to provide superior display performance. 1. The 15MF050V/17 features a 15" color-active matrix, Thin-Film-Transistor (TFT) Liquid Crystal Display (LCD) to your PC and has a built-in a light weight module. You will get the feeling that the large-sized surface of operation high-quality 3D stereo speakers and remote high-level amplifiers connections,provides a coherent, top-of digital video and audio signal inputs. Other...
... the TFT-LCD display allows "Plug & Play" connection to provide superior display performance. 1. The 15MF050V/17 features a 15" color-active matrix, Thin-Film-Transistor (TFT) Liquid Crystal Display (LCD) to your PC and has a built-in a light weight module. You will get the feeling that the large-sized surface of operation high-quality 3D stereo speakers and remote high-level amplifiers connections,provides a coherent, top-of digital video and audio signal inputs. Other...
User manual, English (US)
Page 8
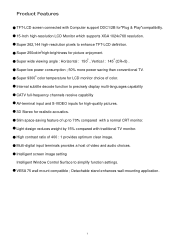
... optimum clear image. Super 9300 color temperature for "Plug & Play"compatibility. 15-Inch high-resolution LCD Monitor which supports XGA 1024x768 resolution. Multi-digital input terminals provides a host of color. Product Features TFT-LCD screen connected with a normal CRT monitor. Light design reduces weight by 15% compared with traditional TV monitor. Internal subtitle decode function to 70% compared with Computer support DDC1/2B for LCD monitor choice of video and audio choices. High contrast ratio of up...
... optimum clear image. Super 9300 color temperature for "Plug & Play"compatibility. 15-Inch high-resolution LCD Monitor which supports XGA 1024x768 resolution. Multi-digital input terminals provides a host of color. Product Features TFT-LCD screen connected with a normal CRT monitor. Light design reduces weight by 15% compared with traditional TV monitor. Internal subtitle decode function to 70% compared with Computer support DDC1/2B for LCD monitor choice of video and audio choices. High contrast ratio of up...
User manual, English (US)
Page 9
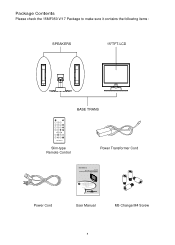
Package Contents Please check the 15MF050 V/17 Package to make sure it contains the following items : SPEAKERS 15"TFT-LCD BASE TRANS Slim-type Remote Control Power Transformer Cord 15" LCD TV Operating Instructions Model No. 15MF050V/17 Power Cord User Manual M5 Change M4 Screw 8
Package Contents Please check the 15MF050 V/17 Package to make sure it contains the following items : SPEAKERS 15"TFT-LCD BASE TRANS Slim-type Remote Control Power Transformer Cord 15" LCD TV Operating Instructions Model No. 15MF050V/17 Power Cord User Manual M5 Change M4 Screw 8
User manual, English (US)
Page 15
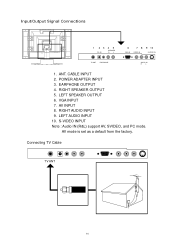
Input/Output Signal Connections 1 23 4 5 DC-IN SPEAKER R L 6 VGA IN 78 VIDEO IN 9 10 S-VIDEO IN TV-ANT EARPHONE AUDIO IN RL 1. POWER ADAPTER INPUT 3. VGA INPUT 7. S-VIDEO INPUT Note : Audio IN (R&L) support AV, SVIDEO, and PC mode. RIGHT SPEAKER OUTPUT 5. ANT. AV INPUT 8. Connecting TV Cable TV ANT 14 CABLE INPUT 2. AV mode is set as a default from the factory. EARPHONE OUTPUT 4. RIGHT AUDIO INPUT 9. LEFT SPEAKER OUTPUT 6. LEFT AUDIO INPUT 10.
Input/Output Signal Connections 1 23 4 5 DC-IN SPEAKER R L 6 VGA IN 78 VIDEO IN 9 10 S-VIDEO IN TV-ANT EARPHONE AUDIO IN RL 1. POWER ADAPTER INPUT 3. VGA INPUT 7. S-VIDEO INPUT Note : Audio IN (R&L) support AV, SVIDEO, and PC mode. RIGHT SPEAKER OUTPUT 5. ANT. AV INPUT 8. Connecting TV Cable TV ANT 14 CABLE INPUT 2. AV mode is set as a default from the factory. EARPHONE OUTPUT 4. RIGHT AUDIO INPUT 9. LEFT SPEAKER OUTPUT 6. LEFT AUDIO INPUT 10.
User manual, English (US)
Page 19
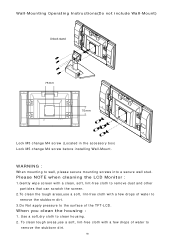
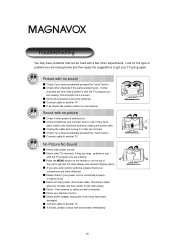
... t- When you clean the housing : 1. fr e e clo th with a fe w d r o p s o f wa te r to the surface of the TFT-LCD. fr e e clo th with a fe w d r o p s o f water to remove the stubborn dirt. 3.Do Not apply pressure to remove the stubborn dirt. 18 Wall-Mounting Operating Instructions(Do not include Wall-Mount) Unlock stand 75mm 75mm Lock M5 change M4 screw (Located in the accessory box) Lock M5 change M4 screw betore installing Wall-Mount.
... t- When you clean the housing : 1. fr e e clo th with a fe w d r o p s o f wa te r to the surface of the TFT-LCD. fr e e clo th with a fe w d r o p s o f water to remove the stubborn dirt. 3.Do Not apply pressure to remove the stubborn dirt. 18 Wall-Mounting Operating Instructions(Do not include Wall-Mount) Unlock stand 75mm 75mm Lock M5 change M4 screw (Located in the accessory box) Lock M5 change M4 screw betore installing Wall-Mount.
User manual, English (US)
Page 20
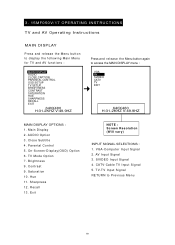
... 3. 3. 15MF050V/17 OPERATING INSTRUCTIONS TV and AV Operating Instructions MAIN DISPLAY Press and release the Menu button to display the following Main Menu for TV and AV functions : MAIN DISPLAY AUDIO CLOSE CAPTION PARENTAL CONTROL OSD SETUP TV SETUP BRIGHTNESS CONTRAST SATURATION HUE SHARPNESS RECALL EXIT 640X480 H:31.2KHZ V:49.9HZ Press and releas e the Menu button again to Previous Menu 19 CATV-Cable TV Input Signal 5. Main Display 2. Contrast 9. VGA-Computer Input Signal 2. TV Mode Option 7. Exit NOTE : Screen Resolution...
... 3. 3. 15MF050V/17 OPERATING INSTRUCTIONS TV and AV Operating Instructions MAIN DISPLAY Press and release the Menu button to display the following Main Menu for TV and AV functions : MAIN DISPLAY AUDIO CLOSE CAPTION PARENTAL CONTROL OSD SETUP TV SETUP BRIGHTNESS CONTRAST SATURATION HUE SHARPNESS RECALL EXIT 640X480 H:31.2KHZ V:49.9HZ Press and releas e the Menu button again to Previous Menu 19 CATV-Cable TV Input Signal 5. Main Display 2. Contrast 9. VGA-Computer Input Signal 2. TV Mode Option 7. Exit NOTE : Screen Resolution...
User manual, English (US)
Page 21
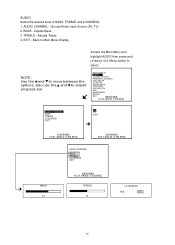
... desired level of BASS, TREBLE and LOUDNESS. 1. Adjusts Treble 4. EXIT - Back to Main Menu Display Access the Main Menu and highlight AUDIO then press and releas e the Menu button to adjust progress bar. Adjusts Bass 3. TREBLE - MAIN DISPLAY AUDIO CLOSE CAPTION PARENTAL CONTROL OSD SETUP TV SETUP BRIGHTNESS CONTRAST SATURATION HUE SHARPNESS RECALL EXIT 640X480 H:31.4KHZ V:59.8HZ AUDIO CHANNEL BASS TREBLE LOUDNESS EXIT AV TV EXIT 640X480 H:31.4KHZ...
... desired level of BASS, TREBLE and LOUDNESS. 1. Adjusts Treble 4. EXIT - Back to Main Menu Display Access the Main Menu and highlight AUDIO then press and releas e the Menu button to adjust progress bar. Adjusts Bass 3. TREBLE - MAIN DISPLAY AUDIO CLOSE CAPTION PARENTAL CONTROL OSD SETUP TV SETUP BRIGHTNESS CONTRAST SATURATION HUE SHARPNESS RECALL EXIT 640X480 H:31.4KHZ V:59.8HZ AUDIO CHANNEL BASS TREBLE LOUDNESS EXIT AV TV EXIT 640X480 H:31.4KHZ...
User manual, English (US)
Page 23
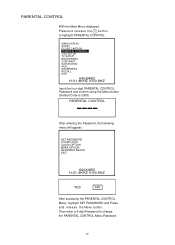
... DISPLAY AUDIO CLOSE CAPTION PARENTAL CONTROL OSD SETUP TV SETUP BRIGHTNESS CONTRAST SATURATION HUE SHARPNESS RECALL EXIT 640X480 H:31.4KHZ V:59.8HZ Input the four-digit PARENTAL CONTROL Password and confirm using the Menu button (Default Code is 3308) PARENTAL CONTROL After entering the Password, the following menu will appear : SET PASSWORD V-CHIP LOCK CLASS OPTION MPAA OPTION AV/SVIDEO BLOCK EXIT 640X480 H:31.4KHZ V:59.8HZ YES NO After accessing the PARENTAL CONTROL Menu, highlight SET PASSWORD and Press a n d r e l e as e the Menu button. PARENTAL CONTROL...
... DISPLAY AUDIO CLOSE CAPTION PARENTAL CONTROL OSD SETUP TV SETUP BRIGHTNESS CONTRAST SATURATION HUE SHARPNESS RECALL EXIT 640X480 H:31.4KHZ V:59.8HZ Input the four-digit PARENTAL CONTROL Password and confirm using the Menu button (Default Code is 3308) PARENTAL CONTROL After entering the Password, the following menu will appear : SET PASSWORD V-CHIP LOCK CLASS OPTION MPAA OPTION AV/SVIDEO BLOCK EXIT 640X480 H:31.4KHZ V:59.8HZ YES NO After accessing the PARENTAL CONTROL Menu, highlight SET PASSWORD and Press a n d r e l e as e the Menu button. PARENTAL CONTROL...
User manual, English (US)
Page 27
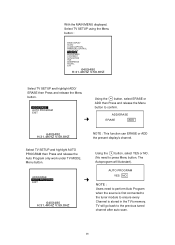
... MAIN MENU displayed, Select TV SETUP using the Menu button : MAIN DISPLAY AUDIO CLOSE CAPTION PARENTAL CONTROL OSD SETUP TV SETUP BRIGHTNESS CONTRAST SATURATION HUE SHARPNESS RECALL EXIT 640X480 H:31.4KHZ V:59.8HZ Select TV SETUP and highlight ADD/ ERASE then Press and release the Menu button. ADD/ERASE ERASE ADD 640X480 H:31.4KHZ V:59.8HZ Select TV SETUP and highlight AUTO PROGRAM then Press and release the Auto Program only work under TV MODE.
... MAIN MENU displayed, Select TV SETUP using the Menu button : MAIN DISPLAY AUDIO CLOSE CAPTION PARENTAL CONTROL OSD SETUP TV SETUP BRIGHTNESS CONTRAST SATURATION HUE SHARPNESS RECALL EXIT 640X480 H:31.4KHZ V:59.8HZ Select TV SETUP and highlight ADD/ ERASE then Press and release the Menu button. ADD/ERASE ERASE ADD 640X480 H:31.4KHZ V:59.8HZ Select TV SETUP and highlight AUTO PROGRAM then Press and release the Auto Program only work under TV MODE.
User manual, English (US)
Page 31
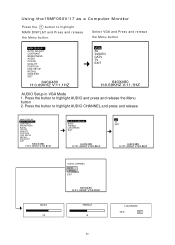
... release the Menu button 2. Select VGA and Press and release the Menu button. MAIN DISPLAY AUTO ADJUST CONTRAST BRIGHTNESS AUDIO COLOR QUALITY POSITION OSD SETUP RECALL SAVE EXIT EXIT 640X480 H:0.69KHZ V:11.1HZ VGA AV SVIDEO CATV TV EXIT 640X480 H:0.69KHZ V:11.1HZ AUDIO Setup in VGA Mode 1. Press the button to highlight AUDIO CHANNEL and press and release MAIN DISPLAY AUTO ADJUST CONTRAST BRIGHTNESS AUDIO COLOR QUALITY POSITION OSD SETUP RECALL SAVE EXIT...
... release the Menu button 2. Select VGA and Press and release the Menu button. MAIN DISPLAY AUTO ADJUST CONTRAST BRIGHTNESS AUDIO COLOR QUALITY POSITION OSD SETUP RECALL SAVE EXIT EXIT 640X480 H:0.69KHZ V:11.1HZ VGA AV SVIDEO CATV TV EXIT 640X480 H:0.69KHZ V:11.1HZ AUDIO Setup in VGA Mode 1. Press the button to highlight AUDIO CHANNEL and press and release MAIN DISPLAY AUTO ADJUST CONTRAST BRIGHTNESS AUDIO COLOR QUALITY POSITION OSD SETUP RECALL SAVE EXIT...
User manual, English (US)
Page 32
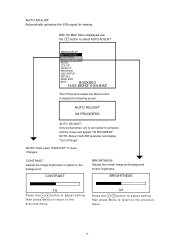
... AUTO ADJUST MAIN DISPLAY AUTO ADJUST CONTRAST BRIGHTNESS AUDIO COLOR QUALITY POSITION OSD SETUP RECALL SAVE EXIT EXIT 800X600 H:53.6KHZ V:84.8HZ Then Press and release the Menu button to display the following screen : AUTO ADJUST IN PROGRESS AUTO ADJUST: Only worked when unit is connected to computer and the screen will appear "IN PROGRESS" NOTE: Above 1024x768 resolution will display "Out of Range" NOTE: Must press "SAVE EXIT" to Save Changes...
... AUTO ADJUST MAIN DISPLAY AUTO ADJUST CONTRAST BRIGHTNESS AUDIO COLOR QUALITY POSITION OSD SETUP RECALL SAVE EXIT EXIT 800X600 H:53.6KHZ V:84.8HZ Then Press and release the Menu button to display the following screen : AUTO ADJUST IN PROGRESS AUTO ADJUST: Only worked when unit is connected to computer and the screen will appear "IN PROGRESS" NOTE: Above 1024x768 resolution will display "Out of Range" NOTE: Must press "SAVE EXIT" to Save Changes...
User manual, English (US)
Page 33
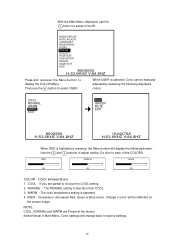
... manually adjusted by selecting the following screen : Use the and buttons to choose the COOL setting. 2. WARM - NOTE : COOL, NORMAL and WARM are partial to adjust setting. With the Main Menu displayed, use the button to select USER. RED GREEN BLUE 39 39 39 COLOR - If you are Preset at the factory. Color temperature 1. COOL - NORMAL - The color temperature setting is less blue than COOL. 3. Change in Main Menu, Color settings will display the following displayed colors...
... manually adjusted by selecting the following screen : Use the and buttons to choose the COOL setting. 2. WARM - NOTE : COOL, NORMAL and WARM are partial to adjust setting. With the Main Menu displayed, use the button to select USER. RED GREEN BLUE 39 39 39 COLOR - If you are Preset at the factory. Color temperature 1. COOL - NORMAL - The color temperature setting is less blue than COOL. 3. Change in Main Menu, Color settings will display the following displayed colors...
User manual, English (US)
Page 38
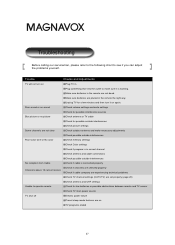
... chart to operate remote Check for low batteries or possible obstructions between remote and TV sensor Check TV main power source TV shut off Electric power failure Preset sleep mode features are not clear Check outdoor antenna and make necessary adjustments Check possible outside interferences Poor Color tone or No color Check memory settings Check Color settings Check if program is in correct channel Check antenna and cable connections Check possible...
... chart to operate remote Check for low batteries or possible obstructions between remote and TV sensor Check TV main power source TV shut off Electric power failure Preset sleep mode features are not clear Check outdoor antenna and make necessary adjustments Check possible outside interferences Poor Color tone or No color Check memory settings Check Color settings Check if program is in correct channel Check antenna and cable connections Check possible...
User manual, English (US)
Page 40
... main power source Check other channels if the same problem exist. This shouldn't be loose Switch off main power, disconnect cable. Picture with no sound Check if you are viewing. Look for the type of the unit to get your connections are firmly attached. Please check if your power cord is switched on the main power Check if the antenna or cable are well connected Check your Remote Control Check power adapter and power cord...
... main power source Check other channels if the same problem exist. This shouldn't be loose Switch off main power, disconnect cable. Picture with no sound Check if you are viewing. Look for the type of the unit to get your connections are firmly attached. Please check if your power cord is switched on the main power Check if the antenna or cable are well connected Check your Remote Control Check power adapter and power cord...
User manual, English (US)
Page 41
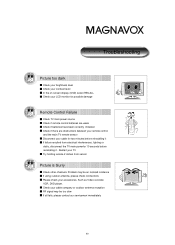
... cable company or outdoor antenna reception RF signal may be too slow If all fails, please contact our serviceman immediately 40 Check your accessories. Such as V ideo recorder, VCR, DVD player. Troubleshooting Picture too dark Check your brightness level Check your contrast level In the on screen display (OSD) select RECALL Check your LCD monitor for possible damage Remote Control Failure Check TV main power source...
... cable company or outdoor antenna reception RF signal may be too slow If all fails, please contact our serviceman immediately 40 Check your accessories. Such as V ideo recorder, VCR, DVD player. Troubleshooting Picture too dark Check your brightness level Check your contrast level In the on screen display (OSD) select RECALL Check your LCD monitor for possible damage Remote Control Failure Check TV main power source...
User manual, English (US)
Page 43
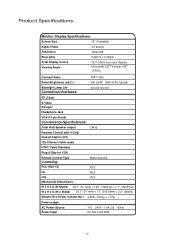
...min RF (Coax) S-Video AV input Headphone Jack VGA (15 pin D-sub) Convenience Specifications: Total Watt Speaker output 2Wx2 Parental Control with V-Chip Closed Caption (CC) 125 Channel Cable ready NTSC Cable Standard Plug & Play for VGA Remote Control Type Licensing: Model specific FCC (Part 15) YES UL YES cUL Mechanical Dimensions: YES W x H x D (W/Stand) 20.1" (511mm) x 14.1" (360mm) x 7.1" (182.5mm) W x H x D (W/o Stand) 20.1" (511mm) x 12" (305.5mm) x 2.2" (58mm) Weight (W/o Power transformer) 9.5LB / 4315g (+/- 5%) Power usage: AC Power Source Power Input 110 - 240V...
...min RF (Coax) S-Video AV input Headphone Jack VGA (15 pin D-sub) Convenience Specifications: Total Watt Speaker output 2Wx2 Parental Control with V-Chip Closed Caption (CC) 125 Channel Cable ready NTSC Cable Standard Plug & Play for VGA Remote Control Type Licensing: Model specific FCC (Part 15) YES UL YES cUL Mechanical Dimensions: YES W x H x D (W/Stand) 20.1" (511mm) x 14.1" (360mm) x 7.1" (182.5mm) W x H x D (W/o Stand) 20.1" (511mm) x 12" (305.5mm) x 2.2" (58mm) Weight (W/o Power transformer) 9.5LB / 4315g (+/- 5%) Power usage: AC Power Source Power Input 110 - 240V...


