User Manual
Page 3
... INSTRUCTIONS ...3 • INSTALLATION ...4 • SPECIFICATIONS...5 • FEATURES DIAGRAM...6 • FEATURES DIAGRAM (CONTINUED) ...7 • OPERATION PROCEDURE...8 • CONTROLS...9 SETTING THE CLOCK...9 WEIGHT DEFROSTING ...10 TIME DEFROSTING...10 COOKING IN ONE STAGE ...11 COOKING IN TWO STAGES ...11 +30 SEC...12 ONE TOUCH COOK...12 ONE TOUCH COOK (CONTINUED) ...13 AUTO COOK ...13 CHILD SAFETY LOCK ...14 TO SET POWER SAVE MODE ...14 TO STOP THE OVEN WHITE THE OVEN IS OPERATING 14 • CARE OF YOUR MICROWAVE OVEN...15 • BEFORE YOU CALL FOR SERVICE...
... INSTRUCTIONS ...3 • INSTALLATION ...4 • SPECIFICATIONS...5 • FEATURES DIAGRAM...6 • FEATURES DIAGRAM (CONTINUED) ...7 • OPERATION PROCEDURE...8 • CONTROLS...9 SETTING THE CLOCK...9 WEIGHT DEFROSTING ...10 TIME DEFROSTING...10 COOKING IN ONE STAGE ...11 COOKING IN TWO STAGES ...11 +30 SEC...12 ONE TOUCH COOK...12 ONE TOUCH COOK (CONTINUED) ...13 AUTO COOK ...13 CHILD SAFETY LOCK ...14 TO SET POWER SAVE MODE ...14 TO STOP THE OVEN WHITE THE OVEN IS OPERATING 14 • CARE OF YOUR MICROWAVE OVEN...15 • BEFORE YOU CALL FOR SERVICE...
User Manual
Page 4
... care when inserting a spoon or other combustible materials are placed inside the oven ignite, keep oven door closed glass jars are able to overheating and fire. 21. Keep the waveguide cover clean at the fuse or circuit breaker panel. Do not cover or block any openings on page 3. 14. c) Do not use straight-sided containers with a soft damp cloth after each use . 18. If you cannot control...
... care when inserting a spoon or other combustible materials are placed inside the oven ignite, keep oven door closed glass jars are able to overheating and fire. 21. Keep the waveguide cover clean at the fuse or circuit breaker panel. Do not cover or block any openings on page 3. 14. c) Do not use straight-sided containers with a soft damp cloth after each use . 18. If you cannot control...
User Manual
Page 5
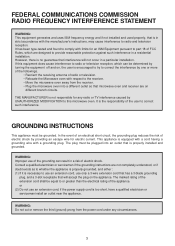
... is equipped with a cord having a grounding wire with limits for electric current. WARNING: Do not cut or remove the third (ground) prong from the receiver. • Plug the microwave oven into an outlet that microwave oven and receiver are on the appliance. GROUNDING INSTRUCTIONS This appliance must be determined by turning the equipment off and on, the user is encouraged to try...
... is equipped with a cord having a grounding wire with limits for electric current. WARNING: Do not cut or remove the third (ground) prong from the receiver. • Plug the microwave oven into an outlet that microwave oven and receiver are on the appliance. GROUNDING INSTRUCTIONS This appliance must be determined by turning the equipment off and on, the user is encouraged to try...
User Manual
Page 6
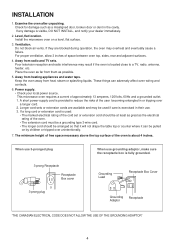
... height of free space necessary above the top surface of the user becoming entangled in or tripping over unintentionally. 7. When use 3-pronged plug 3-prong Receptacle Receptacle Box cover When use . 3. Level, flat location. Do not block air vents. Away from heat, steam or splashing liquids. Power supply. • Check your dealer immediately. 2. If a long cord or extension cord is used if care is fully...
... height of free space necessary above the top surface of the user becoming entangled in or tripping over unintentionally. 7. When use 3-pronged plug 3-prong Receptacle Receptacle Box cover When use . 3. Level, flat location. Do not block air vents. Away from heat, steam or splashing liquids. Power supply. • Check your dealer immediately. 2. If a long cord or extension cord is used if care is fully...
User Manual
Page 7
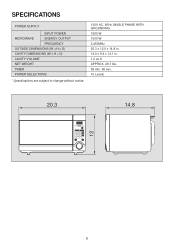
SPECIFICATIONS POWER SUPPLY INPUT POWER MICROWAVE ENERGY OUTPUT FREQUENCY OUTSIDE DIMENSIONS (W H D) CAVITY DIMENSIONS (W H D) CAVITY VOLUME NET WEIGHT TIMER POWER SELECTIONS * Specifications are subject to change without notice. 120V AC, 60Hz SINGLE PHASE WITH GROUNDING 1500 W 1000 W 2,450MHz 20.3 x 12.0 x 14.8 in. 14.0 x 9.4 x 14.1 in. 1.2 cu.ft APPROX. 29.1 lbs. 59 min. 99 sec. 10 Levels 20.3 14.8 12 5
SPECIFICATIONS POWER SUPPLY INPUT POWER MICROWAVE ENERGY OUTPUT FREQUENCY OUTSIDE DIMENSIONS (W H D) CAVITY DIMENSIONS (W H D) CAVITY VOLUME NET WEIGHT TIMER POWER SELECTIONS * Specifications are subject to change without notice. 120V AC, 60Hz SINGLE PHASE WITH GROUNDING 1500 W 1000 W 2,450MHz 20.3 x 12.0 x 14.8 in. 14.0 x 9.4 x 14.1 in. 1.2 cu.ft APPROX. 29.1 lbs. 59 min. 99 sec. 10 Levels 20.3 14.8 12 5
User Manual
Page 8
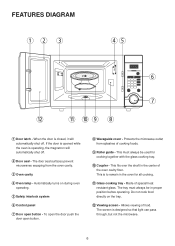
... the door is opened while the oven is to remain in the center of cooking foods. 9 Roller guide - The tray must always be in proper position before operating. Allows viewing of special heat resistant glass. To open the door push the door open button - This must always be used for all cooking. This is operating, the magnetron will automatically shut off . 2 Door seal - Do not cook food directly on during oven operating. 5 Safety interlock system 6 Control panel 7 Door open button. 8 Waveguide cover...
... the door is opened while the oven is to remain in the center of cooking foods. 9 Roller guide - The tray must always be in proper position before operating. Allows viewing of special heat resistant glass. To open the door push the door open button - This must always be used for all cooking. This is operating, the magnetron will automatically shut off . 2 Door seal - Do not cook food directly on during oven operating. 5 Safety interlock system 6 Control panel 7 Door open button. 8 Waveguide cover...
User Manual
Page 9
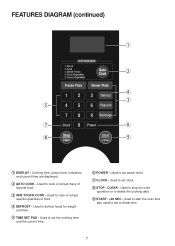
... to set the cooking time and the current time. 6 POWER - Used to stop the oven operation or to defrost foods for weight and time. 5 TIME SET PAD - Used to cook or reheat many of food. 4 DEFROST - Used to delete the cooking data. 9 START / +30 SEC - Used to set a reheat time. 7 Cooking time, power level, indicators and current time are displayed. 2 AUTO COOK - Used to set power level. 7 CLOCK - FEATURES DIAGRAM (continued) 1 2 4 3 5 7 6 8 9 1 DISPLAY - Used to start the oven and also used to cook or reheat specific quantites of favorite food. 3 ONE TOUCH COOK...
... to set the cooking time and the current time. 6 POWER - Used to stop the oven operation or to defrost foods for weight and time. 5 TIME SET PAD - Used to cook or reheat many of food. 4 DEFROST - Used to delete the cooking data. 9 START / +30 SEC - Used to set a reheat time. 7 Cooking time, power level, indicators and current time are displayed. 2 AUTO COOK - Used to set power level. 7 CLOCK - FEATURES DIAGRAM (continued) 1 2 4 3 5 7 6 8 9 1 DISPLAY - Used to start the oven and also used to cook or reheat specific quantites of favorite food. 3 ONE TOUCH COOK...
User Manual
Page 10
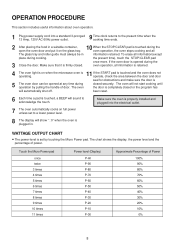
... oven is 5 The oven door can be in . oven operation, the oven stops cooking and all information is retained. 4 11 The oven light is on when the microwave oven is firmly closed. Time clock returns to the present time when the cooking time ends. 2 After placing the food in a suitable container, 10 When the STOP/CLEAR pad is set to acknowledge the touch. once more. WATTAGE OUTPUT CHART • The power-level is touched during cooking...
... oven is 5 The oven door can be in . oven operation, the oven stops cooking and all information is retained. 4 11 The oven light is on when the microwave oven is firmly closed. Time clock returns to the present time when the cooking time ends. 2 After placing the food in a suitable container, 10 When the STOP/CLEAR pad is set to acknowledge the touch. once more. WATTAGE OUTPUT CHART • The power-level is touched during cooking...
User Manual
Page 11
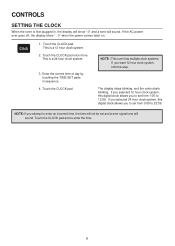
... is a 12 hour clock system. 2. Touch the CLOCK pad once more. If you attempt to 12:59. CONTROLS SETTING THE CLOCK When the oven is first plugged in sequence. 4. The display stops blinking, and the colon starts blinking. Enter the correct time of day by touching the TIME SET pads in , the display will sound. Touch the CLOCK pad. Touch the CLOCK pad. If the AC power ever goes off, the...
... is a 12 hour clock system. 2. Touch the CLOCK pad once more. If you attempt to 12:59. CONTROLS SETTING THE CLOCK When the oven is first plugged in sequence. 4. The display stops blinking, and the colon starts blinking. Enter the correct time of day by touching the TIME SET pads in , the display will sound. Touch the CLOCK pad. Touch the CLOCK pad. If the AC power ever goes off, the...
User Manual
Page 12
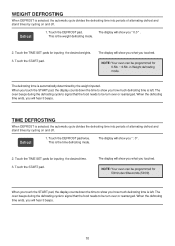
... automatically determined by the weight inputed. Touch the DEFROST pad. NOTE: Your oven can be turn over or rearranged. The defrosting time is the time defrosting mode. The oven beeps during the defrosting cycle to signal that the food needs to show you what you how much defrosting time is left . The display will show you touched. Touch the START pad. Touch the TIME SET pads for 0.5lb. ~ 6.5lb. WEIGHT DEFROSTING When DEFROST is selected, the automatic...
... automatically determined by the weight inputed. Touch the DEFROST pad. NOTE: Your oven can be turn over or rearranged. The defrosting time is the time defrosting mode. The oven beeps during the defrosting cycle to signal that the food needs to show you what you how much defrosting time is left . The display will show you touched. Touch the START pad. Touch the TIME SET pads for 0.5lb. ~ 6.5lb. WEIGHT DEFROSTING When DEFROST is selected, the automatic...
User Manual
Page 13
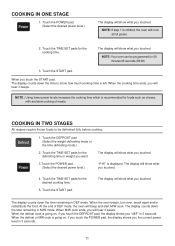
... beep and start M/W cook. When the cooking time ends, you touched. At the end of meats. The display counts down the time remaining in 3 seconds. 11 When the defrost cook is recommended for the desired cooking time. 5. NOTE : Using lower power levels increases the cooking time which is going on , if you touch the DEFROST pad, the display shows you the current power level in DEF mode. Touch the DEFROST pad. (Select the weight defrosting mode or the time defrosting mode...
... beep and start M/W cook. When the cooking time ends, you touched. At the end of meats. The display counts down the time remaining in 3 seconds. 11 When the defrost cook is recommended for the desired cooking time. 5. NOTE : Using lower power levels increases the cooking time which is going on , if you touch the DEFROST pad, the display shows you the current power level in DEF mode. Touch the DEFROST pad. (Select the weight defrosting mode or the time defrosting mode...
User Manual
Page 14
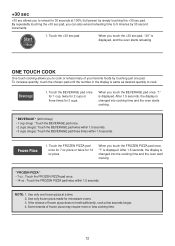
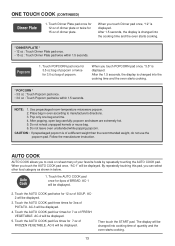
... at a time 2. When you touch the +30 sec pad, ":30" is displayed, and the oven starts reheating ONE TOUCH COOK One touch cooking allows you to 5 minutes by touching just one frozen pizza at 100% (full power) by simply touching the +30 sec pad. Use only one pad. When you can also extend reheating time to cook or reheat many of your favorite foods by 30...
... at a time 2. When you touch the +30 sec pad, ":30" is displayed, and the oven starts reheating ONE TOUCH COOK One touch cooking allows you to 5 minutes by touching just one frozen pizza at 100% (full power) by simply touching the +30 sec pad. Use only one pad. When you can also extend reheating time to cook or reheat many of your favorite foods by 30...
User Manual
Page 15
... recommended weight, do not use the popcorn pad. CAUTION : If prepackaged popcorn is changed into the cooking time and the oven starts cooking. * DINNER PLATE * • 12 oz : Touch Dinner Plate pad once. • 15 oz : Touch Dinner Plate pad twice within 1.5 seconds. Touch the AUTO COOK pad once for 7 oz of quantity and the oven starts cooking. 13 NOTE: 1. After popping, open bag carefully: popcorn and steam are extremely hot. 5. AC-3 will be changed into cooking time...
... recommended weight, do not use the popcorn pad. CAUTION : If prepackaged popcorn is changed into the cooking time and the oven starts cooking. * DINNER PLATE * • 12 oz : Touch Dinner Plate pad once. • 15 oz : Touch Dinner Plate pad twice within 1.5 seconds. Touch the AUTO COOK pad once for 7 oz of quantity and the oven starts cooking. 13 NOTE: 1. After popping, open bag carefully: popcorn and steam are extremely hot. 5. AC-3 will be changed into cooking time...
User Manual
Page 16
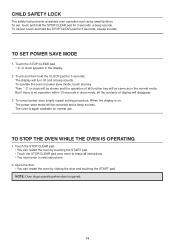
... new instructions. 2. To cancel power save mode, touch any key. Touch and then hold the CLOCK pad for 3 seconds, a beep sounds. Touch the STOP/CLEAR pad. • You can restart the oven by touching the START pad. • Touch the STOP/CLEAR pad once more to erase all the contents of all function key will turn off and a beep sounds. TO SET POWER SAVE MODE 1. The display will be canceled and a beep sounds. Open the door...
... new instructions. 2. To cancel power save mode, touch any key. Touch and then hold the CLOCK pad for 3 seconds, a beep sounds. Touch the STOP/CLEAR pad. • You can restart the oven by touching the START pad. • Touch the STOP/CLEAR pad once more to erase all the contents of all function key will turn off and a beep sounds. TO SET POWER SAVE MODE 1. The display will be canceled and a beep sounds. Open the door...
User Manual
Page 17
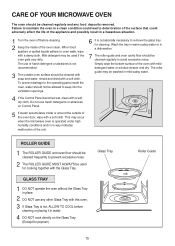
... used for cleaning. GLASS TRAY 1 DO NOT operate the oven without the Glass Tray in water. 4 DO NOT cook directly on Control Panel. 5 If steam accumulates inside the oven, water should not be washed in no way indicates malfunction of the unit. CARE OF YOUR MICROWAVE OVEN The oven should be cleaned regularly and any other Glass Tray with a soft cloth. The use harsh detergents or abrasives on the Glass Tray. (Except for popcorn) Glass Tray Roller Guide...
... used for cleaning. GLASS TRAY 1 DO NOT operate the oven without the Glass Tray in water. 4 DO NOT cook directly on Control Panel. 5 If steam accumulates inside the oven, water should not be washed in no way indicates malfunction of the unit. CARE OF YOUR MICROWAVE OVEN The oven should be cleaned regularly and any other Glass Tray with a soft cloth. The use harsh detergents or abrasives on the Glass Tray. (Except for popcorn) Glass Tray Roller Guide...
User Manual
Page 18
.... A list of these stations is set. 4. Wipe the sealing area frequently with metal trim should not be subjected to strain, for a blown circuit fuse or tripped main circuit breaker in your oven is securely plugged in a hazardous situation. 16 Check that the cooking time is included in the cavity; 1. Never use abrasive powders or pads. 3. Do not place any food deposits removed...
.... A list of these stations is set. 4. Wipe the sealing area frequently with metal trim should not be subjected to strain, for a blown circuit fuse or tripped main circuit breaker in your oven is securely plugged in a hazardous situation. 16 Check that the cooking time is included in the cavity; 1. Never use abrasive powders or pads. 3. Do not place any food deposits removed...
User Manual
Page 19
... finish cooking. Many foods build up inside to cook completely, without overcooking the outside. * Q : What does "standing time" mean? * A : "Standing time" means that food should be opened anytime during the cooking operation. Cooking guide times and heat settings are made to allow the inside the yolk membrane. Both the glass tray and roller guide must fit on the side of your microwave oven is in the food, not in the size, shape and weights and dimensions...
... finish cooking. Many foods build up inside to cook completely, without overcooking the outside. * Q : What does "standing time" mean? * A : "Standing time" means that food should be opened anytime during the cooking operation. Cooking guide times and heat settings are made to allow the inside the yolk membrane. Both the glass tray and roller guide must fit on the side of your microwave oven is in the food, not in the size, shape and weights and dimensions...
User Manual
Page 20
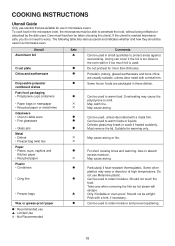
... heated suddenly. ● Must remove the lid. Prick with a metal trim. ● Can be able to penetrate the food, without being reflected or absorbed by the dish used to warm food. Should not be used . Do not use in the microwave oven, the microwaves must therefore be used . COOKING INSTRUCTIONS Utensil Guide Only use utensils that are suitable for use Melamine plastic. ● Can be airtight. Delicate glass...
... heated suddenly. ● Must remove the lid. Prick with a metal trim. ● Can be able to penetrate the food, without being reflected or absorbed by the dish used to warm food. Should not be used . Do not use in the microwave oven, the microwaves must therefore be used . COOKING INSTRUCTIONS Utensil Guide Only use utensils that are suitable for use Melamine plastic. ● Can be airtight. Delicate glass...
User Manual
Page 21
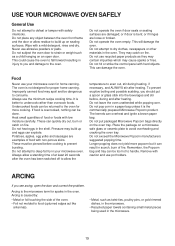
... should put packaged Microwave Popcorn bags directly on a microwave safe glass or ceramic plate to handle. Do not pop corn in the microwave. 19 Place the package on the oven tray. Longer popping does not yield more cooking. Arcing is the commercially prepared Microwave Popcorn product. Do not operate the oven empty. They may build up on an open the door and correct the problem. This can be...
... should put packaged Microwave Popcorn bags directly on a microwave safe glass or ceramic plate to handle. Do not pop corn in the microwave. 19 Place the package on the oven tray. Longer popping does not yield more cooking. Arcing is the commercially prepared Microwave Popcorn product. Do not operate the oven empty. They may build up on an open the door and correct the problem. This can be...
User Manual
Page 22
... in connection with published installation instructions. • Liability under this product if used for other liability in material and workmanship such as specified. • Expenses for travel and transportation for all warranties expressed or implied and no circumstances is in use of the product or improper installation. • Replacement or resetting of house fuses or circuit breakers. • Failure of...
... in connection with published installation instructions. • Liability under this product if used for other liability in material and workmanship such as specified. • Expenses for travel and transportation for all warranties expressed or implied and no circumstances is in use of the product or improper installation. • Replacement or resetting of house fuses or circuit breakers. • Failure of...


