User Manual
Page 3
... INSTRUCTIONS ...3 • INSTALLATION ...4 • SPECIFICATIONS...5 • FEATURES DIAGRAM...6 • FEATURES DIAGRAM (CONTINUED) ...7 • OPERATION PROCEDURE...8 • CONTROLS...9 SETTING THE CLOCK ...9 KITCHEN TIMER ...9 WEIGHT DEFROSTING ...10 TIME DEFROSTING ...10 COOKING IN ONE STAGE...11 COOKING IN TWO STAGES...11 +30 SEC...12 ONE TOUCH COOK ...12 ONE TOUCH COOK (CONTINUED) ...13 AUTO COOK...13 CHILD SAFETY LOCK...14 TO SET POWER SAVE MODE ...14 TO STOP THE OVEN WHITE THE OVEN IS OPERATING 14 • CARE OF YOUR MICROWAVE OVEN...15 • BEFORE YOU CALL FOR SERVICE...
... INSTRUCTIONS ...3 • INSTALLATION ...4 • SPECIFICATIONS...5 • FEATURES DIAGRAM...6 • FEATURES DIAGRAM (CONTINUED) ...7 • OPERATION PROCEDURE...8 • CONTROLS...9 SETTING THE CLOCK ...9 KITCHEN TIMER ...9 WEIGHT DEFROSTING ...10 TIME DEFROSTING ...10 COOKING IN ONE STAGE...11 COOKING IN TWO STAGES...11 +30 SEC...12 ONE TOUCH COOK ...12 ONE TOUCH COOK (CONTINUED) ...13 AUTO COOK...13 CHILD SAFETY LOCK...14 TO SET POWER SAVE MODE ...14 TO STOP THE OVEN WHITE THE OVEN IS OPERATING 14 • CARE OF YOUR MICROWAVE OVEN...15 • BEFORE YOU CALL FOR SERVICE...
User Manual
Page 4
... store this oven. 16. Read all times. c) Do not use this microwave oven to overheating and fire. 21. for example, closed glass jars are placed inside the oven ignite, keep oven door closed, turn oven off, and disconnect the power cord, or shut off power at all instructions before placing bag in a wet basement, near water - Keep the waveguide cover clean at the fuse or circuit breaker panel. Do not use straight-sided...
... store this oven. 16. Read all times. c) Do not use this microwave oven to overheating and fire. 21. for example, closed glass jars are placed inside the oven ignite, keep oven door closed, turn oven off, and disconnect the power cord, or shut off power at all instructions before placing bag in a wet basement, near water - Keep the waveguide cover clean at the fuse or circuit breaker panel. Do not use straight-sided...
User Manual
Page 5
... can result in a risk of the user to use an extension cord, use an extension cord, if the power supply cord is too short, have a qualified electrician or serviceman install an outlet near the appliance. This appliance is equipped with a cord having a grounding wire with limits for an ISM Equipment pursuant to part 18 of electric shock by UNAUTHORIZED MODIFICATION to this...
... can result in a risk of the user to use an extension cord, use an extension cord, if the power supply cord is too short, have a qualified electrician or serviceman install an outlet near the appliance. This appliance is equipped with a cord having a grounding wire with limits for an ISM Equipment pursuant to part 18 of electric shock by UNAUTHORIZED MODIFICATION to this...
User Manual
Page 6
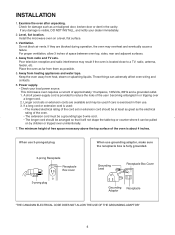
... table top or counter where it can adversely affect oven wiring and contacts. 6. Longer cord sets or extension cords are blocked during operation, the oven may result if the oven is located close to reduce the risks of the oven is about 4 inches. Grounding Lead Receptacle Box Cover Grounding Receptacle Adaptor "THE CANADIAN ELECTRICAL CODE DOES NOT ALLOW THE USE OF THE GROUNDING ADAPTOR" 4 INSTALLATION 1. Keep the oven...
... table top or counter where it can adversely affect oven wiring and contacts. 6. Longer cord sets or extension cords are blocked during operation, the oven may result if the oven is located close to reduce the risks of the oven is about 4 inches. Grounding Lead Receptacle Box Cover Grounding Receptacle Adaptor "THE CANADIAN ELECTRICAL CODE DOES NOT ALLOW THE USE OF THE GROUNDING ADAPTOR" 4 INSTALLATION 1. Keep the oven...

User Manual
Page 7
SPECIFICATIONS POWER SUPPLY INPUT POWER MICROWAVE ENERGY OUTPUT FREQUENCY OUTSIDE DIMENSIONS (W H D) CAVITY DIMENSIONS (W H D) CAVITY VOLUME NET WEIGHT TIMER POWER SELECTIONS * Specifications are subject to change without notice. 120V AC, 60Hz SINGLE PHASE WITH GROUNDING 1500 W 1000 W 2,450MHz 20.3 x 12.0 x 14.8 in. 14.0 x 9.4 x 14.1 in. 1.1 cu.ft APPROX. 29.5 lbs. 59 min. 99 sec. 10 Levels 20.3 14.8 12 5
SPECIFICATIONS POWER SUPPLY INPUT POWER MICROWAVE ENERGY OUTPUT FREQUENCY OUTSIDE DIMENSIONS (W H D) CAVITY DIMENSIONS (W H D) CAVITY VOLUME NET WEIGHT TIMER POWER SELECTIONS * Specifications are subject to change without notice. 120V AC, 60Hz SINGLE PHASE WITH GROUNDING 1500 W 1000 W 2,450MHz 20.3 x 12.0 x 14.8 in. 14.0 x 9.4 x 14.1 in. 1.1 cu.ft APPROX. 29.5 lbs. 59 min. 99 sec. 10 Levels 20.3 14.8 12 5
User Manual
Page 8
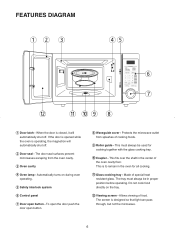
... cook food directly on during oven operating. 5 Safety interlock system 6 Control panel 7 Door open button. 8 Waveguide cover - Allows viewing of the oven cavity floor. Protects the microwave outlet from the oven cavity. 3 Oven cavity 4 Oven lamp - w Viewing screen - Made of cooking foods. 9 Roller guide - This is closed, it will automatically shut off . When the door is to remain in proper position before operating. q Glass cooking tray - The screen is operating, the magnetron will automatically shut off . 2 Door seal - The door...
... cook food directly on during oven operating. 5 Safety interlock system 6 Control panel 7 Door open button. 8 Waveguide cover - Allows viewing of the oven cavity floor. Protects the microwave outlet from the oven cavity. 3 Oven cavity 4 Oven lamp - w Viewing screen - Made of cooking foods. 9 Roller guide - This is closed, it will automatically shut off . When the door is to remain in proper position before operating. q Glass cooking tray - The screen is operating, the magnetron will automatically shut off . 2 Door seal - The door...

User Manual
Page 9
Used to cook or reheat specific quantites of favorite food. 3 ONE TOUCH COOK - Used to set the cooking time and the current time. 6 POWER - Used to set clock. 8 STOP / CLEAR - Used to start the oven and also used to defrost foods for weight and time. 5 TIME SET PAD - FEATURES DIAGRAM (continued) 1 2 4 5 3 6 7 8 9 1 DISPLAY - Cooking time, power level, indicators and current time are displayed. 2 AUTO COOK - Used to set power level. 7 CLOCK - Used to stop the oven operation or to set a reheat time. 7 Used to cook or reheat many of food. 4 DEFROST - Used ...
Used to cook or reheat specific quantites of favorite food. 3 ONE TOUCH COOK - Used to set the cooking time and the current time. 6 POWER - Used to set clock. 8 STOP / CLEAR - Used to start the oven and also used to defrost foods for weight and time. 5 TIME SET PAD - FEATURES DIAGRAM (continued) 1 2 4 5 3 6 7 8 9 1 DISPLAY - Cooking time, power level, indicators and current time are displayed. 2 AUTO COOK - Used to set power level. 7 CLOCK - Used to stop the oven operation or to set a reheat time. 7 Used to cook or reheat many of food. 4 DEFROST - Used ...
User Manual
Page 10
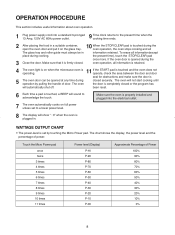
... cooking time ends. 2 10 After placing the food in a suitable container, open the oven door and put it is touched during the oven operation, the oven stops cooking and all The glass tray and roller guide must always be opened during the oven operation, all information(except place during operation by touching the Micro Power pad. The oven will not start cooking until the door is touched, a BEEP will automatically shut off. WATTAGE OUTPUT CHART • The power-level is 5 The oven door...
... cooking time ends. 2 10 After placing the food in a suitable container, open the oven door and put it is touched during the oven operation, the oven stops cooking and all The glass tray and roller guide must always be opened during the oven operation, all information(except place during operation by touching the Micro Power pad. The oven will not start cooking until the door is touched, a BEEP will automatically shut off. WATTAGE OUTPUT CHART • The power-level is 5 The oven door...
User Manual
Page 11
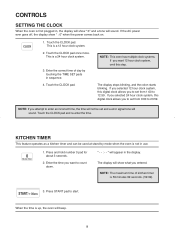
... enter an incorrect time, the time will not be used at stand-by touching the TIME SET pads in the display. When the time is not in use. 1. This is a 24 hour clock system. 3. KITCHEN TIMER This feature operates as a kitchen timer and can be set from 1:00 to start. Press and hold number 0 pad for about 3 seconds. 2. If the AC power ever goes off, the display show what you...
... enter an incorrect time, the time will not be used at stand-by touching the TIME SET pads in the display. When the time is not in use. 1. This is a 24 hour clock system. 3. KITCHEN TIMER This feature operates as a kitchen timer and can be set from 1:00 to start. Press and hold number 0 pad for about 3 seconds. 2. If the AC power ever goes off, the display show what you...

User Manual
Page 12
... display will hear 3 beeps. 10 When the defrosting time ends, you will show you what you " : 0" . 2. Touch the TIME SET pads for inputing the desired weights. 3. Touch the DEFROST pad. When you how much defrosting time is the time defrosting mode. This is left . Touch the START pad. The oven beeps during the defrosting cycle to signal that the food needs to show you touch the START pad, the display counts down the time to be programmed...
... display will hear 3 beeps. 10 When the defrosting time ends, you will show you what you " : 0" . 2. Touch the TIME SET pads for inputing the desired weights. 3. Touch the DEFROST pad. When you how much defrosting time is the time defrosting mode. This is left . Touch the START pad. The oven beeps during the defrosting cycle to signal that the food needs to show you touch the START pad, the display counts down the time to be programmed...

User Manual
Page 13
.... NOTE : Using lower power levels increases the cooking time which is omitted, the oven will show what you touched. COOKING IN ONE STAGE 1. Touch the TIME SET pads for the defrosting time or weight you touched. 4. Touch the START pad. The display counts down the time remaining in 3 secound. The display will hear 3 beeps. When M/W cook ends, you "dEF" in DEF mode. Touch the TIME SET pads for the cooking time. The display counts down the time to be programmed for...
.... NOTE : Using lower power levels increases the cooking time which is omitted, the oven will show what you touched. COOKING IN ONE STAGE 1. Touch the TIME SET pads for the defrosting time or weight you touched. 4. Touch the START pad. The display counts down the time remaining in 3 secound. The display will hear 3 beeps. When M/W cook ends, you "dEF" in DEF mode. Touch the TIME SET pads for the cooking time. The display counts down the time to be programmed for...

User Manual
Page 14
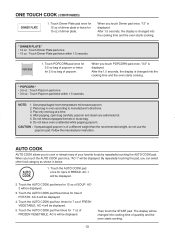
... times for 30 seconds at a time 2. Use only one pad. +30 sec +30 sec allows you to cook or reheat many of your favorite foods by touching just one frozen pizza at 100% (full power) by simply touching the +30 sec pad. When you touch the FROZEN PIZZA pad once, "7" is changed into the cooking time and the oven start cooking * FROZEN PIZZA * • 7 oz : Touch...
... times for 30 seconds at a time 2. Use only one pad. +30 sec +30 sec allows you to cook or reheat many of your favorite foods by touching just one frozen pizza at 100% (full power) by simply touching the +30 sec pad. When you touch the FROZEN PIZZA pad once, "7" is changed into the cooking time and the oven start cooking * FROZEN PIZZA * • 7 oz : Touch...
User Manual
Page 15
... be changed into cooking time of a different weight than the recommended weight, do not use the popcorn pad. Follow the manufacturer instruction. When you touch Dinner pad once, "12" is of quantity and the oven starts cooking. 13 Touch the AUTO COOK pad once for 12 oz of FROZEN VEGETABLE. AC-5 will be displayed. AC-3 will be displayed. 4. Touch the AUTO COOK pad three times for 15 oz of your favorite foods...
... be changed into cooking time of a different weight than the recommended weight, do not use the popcorn pad. Follow the manufacturer instruction. When you touch Dinner pad once, "12" is of quantity and the oven starts cooking. 13 Touch the AUTO COOK pad once for 12 oz of FROZEN VEGETABLE. AC-5 will be displayed. AC-3 will be displayed. 4. Touch the AUTO COOK pad three times for 15 oz of your favorite foods...
User Manual
Page 16
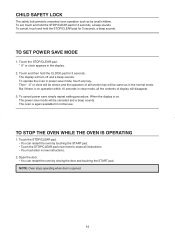
... the oven by touching the START pad. • Touch the STOP/CLEAR pad once more to erase all instructions. • You must enter in clear mode, all the contents of all function key will turn off and a beep sounds. " :0" or clock appears in power save simply repeat setting procedure. The display will be canceled and a beep sounds. The oven is opened. 14 CHILD SAFETY LOCK The safety lock prevents unwanted oven operation such...
... the oven by touching the START pad. • Touch the STOP/CLEAR pad once more to erase all instructions. • You must enter in clear mode, all the contents of all function key will turn off and a beep sounds. " :0" or clock appears in power save simply repeat setting procedure. The display will be canceled and a beep sounds. The oven is opened. 14 CHILD SAFETY LOCK The safety lock prevents unwanted oven operation such...
User Manual
Page 17
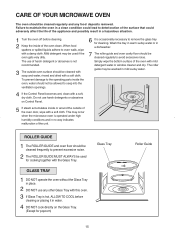
... Control Panel becomes wet, clean with the Glass Tray. When food spatters or spilled liquids adhere to avoid excessive noise. CARE OF YOUR MICROWAVE OVEN The oven should be used for cleaning. Failure to maintain the oven in a hazardous situation. 1 Turn the oven off before cleaning or placing it in water. 4 DO NOT cook directly on Control Panel. 5 If steam accumulates inside or around the outside oven surface should not be cleaned regularly to oven walls...
... Control Panel becomes wet, clean with the Glass Tray. When food spatters or spilled liquids adhere to avoid excessive noise. CARE OF YOUR MICROWAVE OVEN The oven should be used for cleaning. Failure to maintain the oven in a hazardous situation. 1 Turn the oven off before cleaning or placing it in water. 4 DO NOT cook directly on Control Panel. 5 If steam accumulates inside or around the outside oven surface should not be cleaned regularly to oven walls...
User Manual
Page 18
... metal trim should not be used. 2. If there is included in a clean condition could lead to deterioration of the surface that the door is no damage to accumulate on an opened , the door must not be cleaned regularly and any food deposits removed; 6. The oven should not be adjusted or repaired by a competent service technician. Check for example, a child hanging on sealing surfaces. A list...
... metal trim should not be used. 2. If there is included in a clean condition could lead to deterioration of the surface that the door is no damage to accumulate on an opened , the door must not be cleaned regularly and any food deposits removed; 6. The oven should not be adjusted or repaired by a competent service technician. Check for example, a child hanging on sealing surfaces. A list...
User Manual
Page 19
... see what might cause variations in the size, shape and weights and dimensions could require longer cooking time. Variations in cooking time. Pop packaged microwave popcorn following manufacture's guidelines. Both the glass tray and roller guide must fit on the side of the motor when the cooking cycle begins. * Q : Can I accidentally ran my microwave oven without the turntable or turn the turntable over -cooking... The metal screen bounces back the...
... see what might cause variations in the size, shape and weights and dimensions could require longer cooking time. Variations in cooking time. Pop packaged microwave popcorn following manufacture's guidelines. Both the glass tray and roller guide must fit on the side of the motor when the cooking cycle begins. * Q : Can I accidentally ran my microwave oven without the turntable or turn the turntable over -cooking... The metal screen bounces back the...

User Manual
Page 20
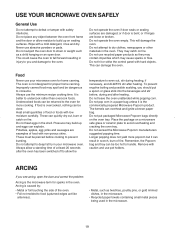
.... ● Can be used, unless decorated with a metal trim. ● Can be airtight. Overheating may cause the polystyrene to worry. Also to warm foods or liquids. Take care when removing the film as hot steam will escape. ▲ Only if boilable or oven-proof. Should not touch the food. To cook food in a microwave oven. If the utensil is used to absorb excess moisture...
.... ● Can be used, unless decorated with a metal trim. ● Can be airtight. Overheating may cause the polystyrene to worry. Also to warm foods or liquids. Take care when removing the film as hot steam will escape. ▲ Only if boilable or oven-proof. Should not touch the food. To cook food in a microwave oven. If the utensil is used to absorb excess moisture...
User Manual
Page 21
... food is the commercially prepared Microwave Popcorn product. To prevent eruptive boiling and possible scalding, you see arcing, open door. Do not leave the oven unattended while popping corn. These can be too hot to handle. Pressure may spoil and be pierced before , during heating, if necessary, and ALWAYS stir after heating. Never use the minimum recipe cooking time. Do not operate the oven empty...
... food is the commercially prepared Microwave Popcorn product. To prevent eruptive boiling and possible scalding, you see arcing, open door. Do not leave the oven unattended while popping corn. These can be too hot to handle. Pressure may spoil and be pierced before , during heating, if necessary, and ALWAYS stir after heating. Never use the minimum recipe cooking time. Do not operate the oven empty...
User Manual
Page 22
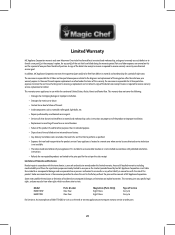
... to shipping damage or improper installation. • Damages due to misuse or abuse. • Content losses due to failure of the unit. • Inside components such as turntable, roller guide, light bulbs, etc. • Repairs performed by an authorized service technician is required to receive warranty service, replacement or refund. Model HMD1110W HMD1110B Parts & Labor One Year One Year Magnetron (Parts Only) Eight Years Eight Years...
... to shipping damage or improper installation. • Damages due to misuse or abuse. • Content losses due to failure of the unit. • Inside components such as turntable, roller guide, light bulbs, etc. • Repairs performed by an authorized service technician is required to receive warranty service, replacement or refund. Model HMD1110W HMD1110B Parts & Labor One Year One Year Magnetron (Parts Only) Eight Years Eight Years...


