
User Manual
Page 5
.... 5. There may be a remote risk of any trouble with this manual for wet locations. 3. Optical Disc Drive Notice CAUTION: This appliance contains a laser system and is specifically designed for your nearest "AUTHORIZED service station." Never install telephone jacks in the vicinity of the leak. To use the telephone function to open the enclosure. V Never touch uninsulated telephone wires or terminals unless the telephone...
.... 5. There may be a remote risk of any trouble with this manual for wet locations. 3. Optical Disc Drive Notice CAUTION: This appliance contains a laser system and is specifically designed for your nearest "AUTHORIZED service station." Never install telephone jacks in the vicinity of the leak. To use the telephone function to open the enclosure. V Never touch uninsulated telephone wires or terminals unless the telephone...

User Manual
Page 6
...overheating. Do not cover the openings. 6. The openings on a stable surface before inserting any add-on the power cord. 8. VI Read the safety instructions carefully and thoroughly. 2. Keep this User Guide for possible use later. 3. Place the power cord in a way that people are used for air convection... that the power voltage is within its safety range and has been adjusted properly to the value of this equipment on the enclosure are unlikely to the power inlet. 7. Always unplug the power cord before setting it . Do not place anything on card or module. 9.
...overheating. Do not cover the openings. 6. The openings on a stable surface before inserting any add-on the power cord. 8. VI Read the safety instructions carefully and thoroughly. 2. Keep this User Guide for possible use later. 3. Place the power cord in a way that people are used for air convection... that the power voltage is within its safety range and has been adjusted properly to the value of this equipment on the enclosure are unlikely to the power inlet. 7. Always unplug the power cord before setting it . Do not place anything on card or module. 9.
User Manual
Page 14
Preface Customizing this Notebook Connecting the External Devices 3-2 Connecting the Peripheral Devices 3-3 Connecting the Communication Devices 3-6 Express PC Card Installation 3-7 Installing the Express card 3-7 Removing the Express card 3-7 Safely Remove Hardware 3-8 BIOS Setup About BIOS Setup 4-2 When to Use BIOS Setup 4-2 How to Run BIOS Setup 4-2 Control Keys 4-3 BIOS Setup Menu 4-4 Main menu 4-5 Advanced menu 4-7 Security menu 4-8 Boot menu 4-10 Exit menu 4-11 XIV
Preface Customizing this Notebook Connecting the External Devices 3-2 Connecting the Peripheral Devices 3-3 Connecting the Communication Devices 3-6 Express PC Card Installation 3-7 Installing the Express card 3-7 Removing the Express card 3-7 Safely Remove Hardware 3-8 BIOS Setup About BIOS Setup 4-2 When to Use BIOS Setup 4-2 How to Run BIOS Setup 4-2 Control Keys 4-3 BIOS Setup Menu 4-4 Main menu 4-5 Advanced menu 4-7 Security menu 4-8 Boot menu 4-10 Exit menu 4-11 XIV
User Manual
Page 16
... this manual carefully before using notebook. Chapter 2, Getting Started, provides the specification of this notebook, and introduces the function buttons, quick launch buttons, connectors, LEDs and externals of this notebook. If any item is thoroughly tested and certified by our reputation for unsurpassed dependability and customer satisfaction. Chapter 1, General Introductions, includes the descriptions of this notebook. Chapter 3, Customizing this Notebook, gives instructions not only in using this notebook...
... this manual carefully before using notebook. Chapter 2, Getting Started, provides the specification of this notebook, and introduces the function buttons, quick launch buttons, connectors, LEDs and externals of this notebook. If any item is thoroughly tested and certified by our reputation for unsurpassed dependability and customer satisfaction. Chapter 1, General Introductions, includes the descriptions of this notebook. Chapter 3, Customizing this Notebook, gives instructions not only in using this notebook...
User Manual
Page 17
Chapter 4, BIOS setup, provides information on BIOS Setup program and allows you to configure the system for optimum use. 1-3 General Introductions connecting the mouse, keyboard, webcam, printer, external monitor, IEEE 1394 devices, and communication devices, but also in installing and removing the PC card.
Chapter 4, BIOS setup, provides information on BIOS Setup program and allows you to configure the system for optimum use. 1-3 General Introductions connecting the mouse, keyboard, webcam, printer, external monitor, IEEE 1394 devices, and communication devices, but also in installing and removing the PC card.

User Manual
Page 18
... the shipping carton and check all items carefully. The package should contain the following items: w Notebook w User's Manual or Quick Start Guide w All-in the future. w High-capacity Li-ion battery pack w AC adapter and power cord w Phone cable/Phone jack (optional) w Notebook carry bag (optional) These accessories listed above may change without notice. 1-4 If any item contained is damaged or missing, please contact your local...
... the shipping carton and check all items carefully. The package should contain the following items: w Notebook w User's Manual or Quick Start Guide w All-in the future. w High-capacity Li-ion battery pack w AC adapter and power cord w Phone cable/Phone jack (optional) w Notebook carry bag (optional) These accessories listed above may change without notice. 1-4 If any item contained is damaged or missing, please contact your local...
User Manual
Page 27
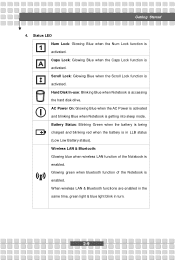
... Notebook is enabled. Scroll Lock: Glowing Blue when the Scroll Lock function is activated. Wireless LAN & Bluetooth: Glowing blue when wireless LAN function of the Notebook is enabled. Battery Status: Blinking Green when the battery is being charged and blinking red when the battery is activated. Caps Lock: Glowing Blue when the Caps Lock function is activated. Hard Disk In-use: Blinking Blue when Notebook is getting into sleep mode. AC Power On: Glowing Blue when the AC Power is activated and blinking Blue when Notebook is accessing the hard disk drive. Status LED...
... Notebook is enabled. Scroll Lock: Glowing Blue when the Scroll Lock function is activated. Wireless LAN & Bluetooth: Glowing blue when wireless LAN function of the Notebook is enabled. Battery Status: Blinking Green when the battery is being charged and blinking red when the battery is activated. Caps Lock: Glowing Blue when the Caps Lock function is activated. Hard Disk In-use: Blinking Blue when Notebook is getting into sleep mode. AC Power On: Glowing Blue when the AC Power is activated and blinking Blue when Notebook is accessing the hard disk drive. Status LED...
User Manual
Page 29
Power Connector To connect the AC adapter and supply power for a great view of the Notebook display. 6. Getting Started 5. VGA Port The 15-pin-D-sub VGA port allows you to connect an external monitor or other standard VGA-compatible device (such as a projector) for the Notebook. 2-11
Power Connector To connect the AC adapter and supply power for a great view of the Notebook display. 6. Getting Started 5. VGA Port The 15-pin-D-sub VGA port allows you to connect an external monitor or other standard VGA-compatible device (such as a projector) for the Notebook. 2-11
User Manual
Page 30
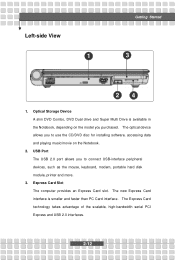
... The new Express Card interface is available in the Notebook, depending on the Notebook. 2. Left-side View 1 Getting Started 3 2 4 1. The optical device allows you to use the CD/DVD disc for installing software, accessing data and playing music/movie on the model you to connect USB-interface peripheral devices, such as the mouse, keyboard, modem, portable hard disk module, printer and more. 3. USB Port The USB 2.0 port allows you purchased. Optical Storage Device A slim DVD Combo, DVD Dual drive...
... The new Express Card interface is available in the Notebook, depending on the Notebook. 2. Left-side View 1 Getting Started 3 2 4 1. The optical device allows you to use the CD/DVD disc for installing software, accessing data and playing music/movie on the model you to connect USB-interface peripheral devices, such as the mouse, keyboard, modem, portable hard disk module, printer and more. 3. USB Port The USB 2.0 port allows you purchased. Optical Storage Device A slim DVD Combo, DVD Dual drive...
User Manual
Page 40
... not disassemble, short-circuit or incinerate batteries or expose them away from children. If the battery power is critical to local regulations. Follow these tips to conserve power. w Disable unneeded settings or remove idle peripherals to help optimizing battery life and avoid a sudden power loss. w Turn off the system if you won't be using it for a period of batteries according to maintain a normal operation...
... not disassemble, short-circuit or incinerate batteries or expose them away from children. If the battery power is critical to local regulations. Follow these tips to conserve power. w Disable unneeded settings or remove idle peripherals to help optimizing battery life and avoid a sudden power loss. w Turn off the system if you won't be using it for a period of batteries according to maintain a normal operation...
User Manual
Page 52
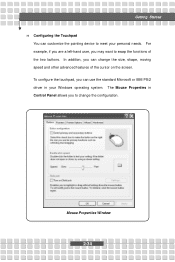
The Mouse Properties in Control Panel allows you can use the standard Microsoft or IBM PS/2 driver in your personal needs. To configure the touchpad, you to change the size, shape, moving speed and other advanced features of the two buttons. Mouse Properties Window 2-34 In addition, you may want to swap the functions of the cursor on the screen. For example, if you are a left-hand user, you can change the configuration. Getting Started n Configuring the Touchpad You can customize the pointing device to meet your Windows operating system.
The Mouse Properties in Control Panel allows you can use the standard Microsoft or IBM PS/2 driver in your personal needs. To configure the touchpad, you to change the size, shape, moving speed and other advanced features of the two buttons. Mouse Properties Window 2-34 In addition, you may want to swap the functions of the cursor on the screen. For example, if you are a left-hand user, you can change the configuration. Getting Started n Configuring the Touchpad You can customize the pointing device to meet your Windows operating system.
User Manual
Page 56
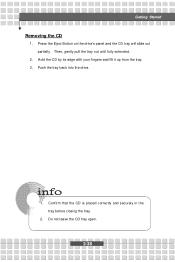
Confirm that the CD is placed correctly and securely in the tray before closing the tray. 2. Hold the CD by its edge with your fingers and lift it up from the tray. 3. Do not leave the CD tray open. 2-38 Push the tray back into the drive. 1. Then, gently pull the tray out until fully extended. 2. Getting Started Removing the CD 1. Press the Eject Button on the drive's panel and the CD tray will slide out partially.
Confirm that the CD is placed correctly and securely in the tray before closing the tray. 2. Hold the CD by its edge with your fingers and lift it up from the tray. 3. Do not leave the CD tray open. 2-38 Push the tray back into the drive. 1. Then, gently pull the tray out until fully extended. 2. Getting Started Removing the CD 1. Press the Eject Button on the drive's panel and the CD tray will slide out partially.
User Manual
Page 58
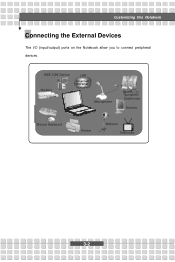
Customizing this Notebook Connecting the External Devices The I/O (input/output) ports on the Notebook allow you to connect peripheral devices. IEEE 1394 Device LAN Modem Microphone Speakers/ Earphones Monitor Mouse/ Keyboard Printer Webcam Television 3-2
Customizing this Notebook Connecting the External Devices The I/O (input/output) ports on the Notebook allow you to connect peripheral devices. IEEE 1394 Device LAN Modem Microphone Speakers/ Earphones Monitor Mouse/ Keyboard Printer Webcam Television 3-2
User Manual
Page 59
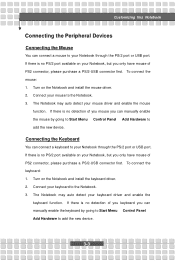
... Start Menu à Control Panel à Add Hardware to add the new device. Connect your mouse driver and enable the mouse function. Connecting the Keyboard You can connect a keyboard to your mouse to the Notebook. 3. Turn on the Notebook and install the mouse driver. 2. Connect your Notebook through the PS/2 port or USB port. The Notebook may auto detect your keyboard to the Notebook. 3. Turn on the Notebook and install the keyboard driver. 2. If there is no detection of you mouse you can manually enable the keyboard by going to Start Menu à Control Panel...
... Start Menu à Control Panel à Add Hardware to add the new device. Connect your mouse driver and enable the mouse function. Connecting the Keyboard You can connect a keyboard to your mouse to the Notebook. 3. Turn on the Notebook and install the mouse driver. 2. Connect your Notebook through the PS/2 port or USB port. The Notebook may auto detect your keyboard to the Notebook. 3. Turn on the Notebook and install the keyboard driver. 2. If there is no detection of you mouse you can manually enable the keyboard by going to Start Menu à Control Panel...
User Manual
Page 60
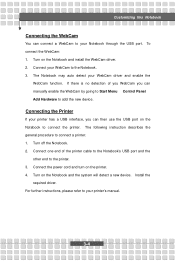
... WebCam driver. 2. Connecting the Printer If your printer has a USB interface, you can manually enable the WebCam by going to Start Menu à Control Panel à Add Hardware to your WebCam to connect a printer: 1. Install the required driver. Turn on the Notebook and the system will detect a new device. Connect the power cord and turn on the Notebook to your WebCam driver and enable the WebCam function. For further instructions, please refer to connect the printer. To connect the WebCam: 1. Connect your Notebook through the USB port...
... WebCam driver. 2. Connecting the Printer If your printer has a USB interface, you can manually enable the WebCam by going to Start Menu à Control Panel à Add Hardware to your WebCam to connect a printer: 1. Install the required driver. Turn on the Notebook and the system will detect a new device. Connect the power cord and turn on the Notebook to your WebCam driver and enable the WebCam function. For further instructions, please refer to connect the printer. To connect the WebCam: 1. Connect your Notebook through the USB port...

User Manual
Page 61
... can change the display mode by default. Alternately, you to connect many high-end peripheral devices and consumer electronic appliances, such as the DV (digital video camera). Make sure that the Notebook is a next-generation serial bus that you can switch the display mode by pressing [Fn]+[F2]. Plug the monitor's D-type connector into the Notebook's VGA port. 3. If not, you can connect and remove the IEEE 1394 devices without turning off...
... can change the display mode by default. Alternately, you to connect many high-end peripheral devices and consumer electronic appliances, such as the DV (digital video camera). Make sure that the Notebook is a next-generation serial bus that you can switch the display mode by pressing [Fn]+[F2]. Plug the monitor's D-type connector into the Notebook's VGA port. 3. If not, you can connect and remove the IEEE 1394 devices without turning off...
User Manual
Page 62
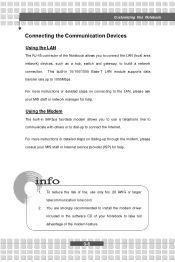
... you to connect the LAN (local area network) devices, such as a hub, switch and gateway, to build a network connection. You are strongly recommended to install the modem driver included in 10/100/1000 Base-T LAN module supports data transfer rate up to connect the Internet. This built-in the software CD of your MIS staff or network manager for help . Customizing this Notebook Connecting the Communication Devices Using the LAN The RJ...
... you to connect the LAN (local area network) devices, such as a hub, switch and gateway, to build a network connection. You are strongly recommended to install the modem driver included in 10/100/1000 Base-T LAN module supports data transfer rate up to connect the Internet. This built-in the software CD of your MIS staff or network manager for help . Customizing this Notebook Connecting the Communication Devices Using the LAN The RJ...
User Manual
Page 66
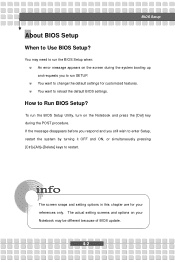
The actual setting screens and options on your references only. How to Use BIOS Setup? To run the BIOS Setup Utility, turn on the screen during the POST procedure. w You want to change the default settings for your Notebook may need to restart. You may be different because of BIOS update. 4-2 BIOS Setup About BIOS Setup When to Run BIOS Setup? If the message disappears before you respond and you to reload the default BIOS settings. w You want...
The actual setting screens and options on your references only. How to Use BIOS Setup? To run the BIOS Setup Utility, turn on the screen during the POST procedure. w You want to change the default settings for your Notebook may need to restart. You may be different because of BIOS update. 4-2 BIOS Setup About BIOS Setup When to Run BIOS Setup? If the message disappears before you respond and you to reload the default BIOS settings. w You want...
User Manual
Page 68
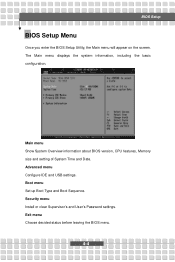
Main menu Show System Overview information about BIOS version, CPU features, Memory size and setting of System Time and Date. Exit menu Choose decided status before leaving the BIOS menu. 4-4 Boot menu Set up Boot Type and Boot Sequence. Advanced menu Configure IDE and USB settings. BIOS Setup BIOS Setup Menu Once you enter the BIOS Setup Utility, the Main menu will appear on the screen. Security menu Install or clear Supervisor's and User's Password settings. The Main menu displays the system information, including the basic configuration.
Main menu Show System Overview information about BIOS version, CPU features, Memory size and setting of System Time and Date. Exit menu Choose decided status before leaving the BIOS menu. 4-4 Boot menu Set up Boot Type and Boot Sequence. Advanced menu Configure IDE and USB settings. BIOS Setup BIOS Setup Menu Once you enter the BIOS Setup Utility, the Main menu will appear on the screen. Security menu Install or clear Supervisor's and User's Password settings. The Main menu displays the system information, including the basic configuration.
User Manual
Page 73
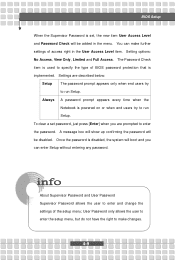
To clear a set , the new item User Access Level and Password Check will be disabled. User Password only allows the user to enter the setup menu, but do not have the right to specify the type of the setup menu; Setting options: No Access, View Only, Limited and Full Access. Settings are prompted to enter the password. Once the password is disabled, the system will be added in the User Access Level item. You can enter Setup without entering any password. A message...
To clear a set , the new item User Access Level and Password Check will be disabled. User Password only allows the user to enter the setup menu, but do not have the right to specify the type of the setup menu; Setting options: No Access, View Only, Limited and Full Access. Settings are prompted to enter the password. Once the password is disabled, the system will be added in the User Access Level item. You can enter Setup without entering any password. A message...


