User Guide
Page 3
... Intel Corporation. Award® is a registered trademark of American Megatrends Inc. Revision History Revision V1.0 V1.1 Revision History First release for PCB 1.X with nVidia nForce3 250 Gb (Platinum version) Update description of its contents. Copyright Notice The material in this document, but no guarantee is the intellectual property of MICRO-STAR INTERNATIONAL... is given as to make changes without notice. Our products are under continual improvement and we reserve the right to the correctness of BIOS & DigiCell (Platinum version) Date March 2004 May 2004 iii
... Intel Corporation. Award® is a registered trademark of American Megatrends Inc. Revision History Revision V1.0 V1.1 Revision History First release for PCB 1.X with nVidia nForce3 250 Gb (Platinum version) Update description of its contents. Copyright Notice The material in this document, but no guarantee is the intellectual property of MICRO-STAR INTERNATIONAL... is given as to make changes without notice. Our products are under continual improvement and we reserve the right to the correctness of BIOS & DigiCell (Platinum version) Date March 2004 May 2004 iii
User Guide
Page 5
... Connector: FDD1 2-15 Fan Power Connectors: C_FAN1/S_FAN1/S_FAN2/NB_FAN1 2-15 Hard Disk Connectors: IDE1 & IDE2 2-16 Serial ATA/Serial ATA RAID Connectors controlled by nForce3 250Gb: SATA1~SATA4 2-17 Front Panel Connectors: JFP1 & JFP2 2-18 v CONTENTS FCC-B Radio Frequency Interference Statement ii Copyright Notice ...iii Revision History ...iii Safety Instructions...
... Connector: FDD1 2-15 Fan Power Connectors: C_FAN1/S_FAN1/S_FAN2/NB_FAN1 2-15 Hard Disk Connectors: IDE1 & IDE2 2-16 Serial ATA/Serial ATA RAID Connectors controlled by nForce3 250Gb: SATA1~SATA4 2-17 Front Panel Connectors: JFP1 & JFP2 2-18 v CONTENTS FCC-B Radio Frequency Interference Statement ii Copyright Notice ...iii Revision History ...iii Safety Instructions...
User Guide
Page 7
Installation of Driver & Utility 6-1 Utility Installation ...6-2 Driver Installation ...6-3 NVIDIA nForce3 System Driver 6-3 Realtek AC97 Audio Driver 6-6 vii nVIDIA RAID Introduction 5-1 Introduction ...5-2 System Requirement 5-2 RAID Configuration ...5-3 Basic Configuration Instructions 5-3 Setting Up the NVRAID BIOS 5-3 NVIDIA RAID ...
Installation of Driver & Utility 6-1 Utility Installation ...6-2 Driver Installation ...6-3 NVIDIA nForce3 System Driver 6-3 Realtek AC97 Audio Driver 6-6 vii nVIDIA RAID Introduction 5-1 Introduction ...5-2 System Requirement 5-2 RAID Configuration ...5-3 Basic Configuration Instructions 5-3 Setting Up the NVRAID BIOS 5-3 NVIDIA RAID ...
User Guide
Page 9
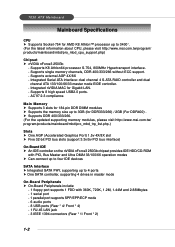
... to 3400+. (For the latest information about CPU, please visit http://www.msi.com.tw/program/ products/mainboard/mbd/pro_mbd_cpu_support.php) Chipset h nVIDIA nForce3 250Gb - Supports single memory channels, DDR 400/333/266 without ECC support. - 7030 ATX Mainboard Mainboard Specifications CPU h Supports Socket-754 for AMD K8 Athlon™...8X slot h Five 32-bit PCI bus slots (support 3.3v/5v PCI bus interface) On-Board IDE h An IDE controller on the nVIDIA nForce3 250Gb chipset provides IDE HDD/CD-ROM with PIO, Bus Master and Ultra DMA133/100/66 operation modes h Can connect up to four IDE ...
... to 3400+. (For the latest information about CPU, please visit http://www.msi.com.tw/program/ products/mainboard/mbd/pro_mbd_cpu_support.php) Chipset h nVIDIA nForce3 250Gb - Supports single memory channels, DDR 400/333/266 without ECC support. - 7030 ATX Mainboard Mainboard Specifications CPU h Supports Socket-754 for AMD K8 Athlon™...8X slot h Five 32-bit PCI bus slots (support 3.3v/5v PCI bus interface) On-Board IDE h An IDE controller on the nVIDIA nForce3 250Gb chipset provides IDE HDD/CD-ROM with PIO, Bus Master and Ultra DMA133/100/66 operation modes h Can connect up to four IDE ...
User Guide
Page 10
... and 1000Mb/s auto-negotiation operation. - Booting from RAID - Mounting and Dimension h ATX Form Factor: 24.4 cm (L) x 30.5 cm (W) h 9 mounting holes MSI Reminds You... 1. As the end user cannot boot without SP4, a combination installation CD must be used as a normal storage device. 2. Rebuilding on the Fly - ... created before attempting to the following website: http://www.microsoft.com/windows2000/downloads/ servicepacks/sp4/HFdeploy.htm 1-3 Getting Started LAN h nVIDIA nForce3 250Gb LAN controller - Integrated Fast Ethernet MAC and PHY in their SATA hard drive.
... and 1000Mb/s auto-negotiation operation. - Booting from RAID - Mounting and Dimension h ATX Form Factor: 24.4 cm (L) x 30.5 cm (W) h 9 mounting holes MSI Reminds You... 1. As the end user cannot boot without SP4, a combination installation CD must be used as a normal storage device. 2. Rebuilding on the Fly - ... created before attempting to the following website: http://www.microsoft.com/windows2000/downloads/ servicepacks/sp4/HFdeploy.htm 1-3 Getting Started LAN h nVIDIA nForce3 250Gb LAN controller - Integrated Fast Ethernet MAC and PHY in their SATA hard drive.

User Guide
Page 11
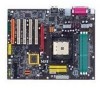
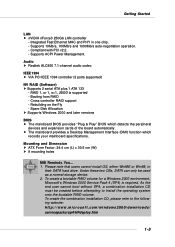
7030 ATX Mainboard Mainboard Layout Top : mouse Bottom: keyboard Top : Parallel Port Bottom: COM A 1394 Port SPDIF JPW1 DDR3 DDR2 DDR1 T: LAN jack B: USB ports B: USB ports T:Line-In M:Line-Out B:Mic T:RS-Out M:CS-Out B:SPDIFOut C_ FA N1 S ATA 3 S ATA 4 88E1111-RC VIA VT6306 AGP1 PCI Slot 1 PCI Slot2 PCI Slot3 PCI Slot 4 ALC 850 JCD1 JAUD1 J1394_1 PCI Slot 5 J1394_0 nForce3 250Gb NB_FAN1 S ATA 2 JCASE1 B AT T + J BAT 1 J IR 1 JUSB1 JUSB2 BIOS Winbond W83627HF FDD 1 JLED1 JFP1 JFP2 S_FAN2 S_FAN1 IDE 2 IDE 1 JWR1 K8N Neo (MS-7030) v1.X ATX Mainboard 1-4
7030 ATX Mainboard Mainboard Layout Top : mouse Bottom: keyboard Top : Parallel Port Bottom: COM A 1394 Port SPDIF JPW1 DDR3 DDR2 DDR1 T: LAN jack B: USB ports B: USB ports T:Line-In M:Line-Out B:Mic T:RS-Out M:CS-Out B:SPDIFOut C_ FA N1 S ATA 3 S ATA 4 88E1111-RC VIA VT6306 AGP1 PCI Slot 1 PCI Slot2 PCI Slot3 PCI Slot 4 ALC 850 JCD1 JAUD1 J1394_1 PCI Slot 5 J1394_0 nForce3 250Gb NB_FAN1 S ATA 2 JCASE1 B AT T + J BAT 1 J IR 1 JUSB1 JUSB2 BIOS Winbond W83627HF FDD 1 JLED1 JFP1 JFP2 S_FAN2 S_FAN1 IDE 2 IDE 1 JWR1 K8N Neo (MS-7030) v1.X ATX Mainboard 1-4

User Guide
Page 29
... fold the serial ATA cable in a 90-degree angle, which will cause the loss of this mainboard is nForce3 250Gb which supports four serial ATA connectors SATA1~SATA4. SATA1~SATA4 are fully compliant with Serial ATA 1.0 specifications.... Both connectors are dual high-speed Serial ATA interface ports. Hardware Setup Serial ATA/Serial ATA RAID Connectors controlled by nForce3 250Gb: SATA1~SATA4 The chipset of data during the transmission. 2-17 Each supports 1st generation serial ATA data rates ...ATA ports Take out the dust cover and connect to the hard disk devices MSI Reminds You...
... fold the serial ATA cable in a 90-degree angle, which will cause the loss of this mainboard is nForce3 250Gb which supports four serial ATA connectors SATA1~SATA4. SATA1~SATA4 are fully compliant with Serial ATA 1.0 specifications.... Both connectors are dual high-speed Serial ATA interface ports. Hardware Setup Serial ATA/Serial ATA RAID Connectors controlled by nForce3 250Gb: SATA1~SATA4 The chipset of data during the transmission. 2-17 Each supports 1st generation serial ATA data rates ...ATA ports Take out the dust cover and connect to the hard disk devices MSI Reminds You...
User Guide
Page 110
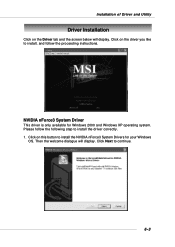
Click on this button to install the NVIDIA nForce3 System Drivers for Windows 2000 and Windows XP operating system. Click on the driver you like to install, and follow the following step to continue. 6-3 NVIDIA nForce3 System Driver This driver is only available for your Windows OS. Click Next to install the driver correctly. 1. Then the welcome dialogue will display. Please follow the proceeding instructions. Installation of Driver and Utility Driver Installation Click on the Driver tab and the screen below will display.
Click on this button to install the NVIDIA nForce3 System Drivers for Windows 2000 and Windows XP operating system. Click on the driver you like to install, and follow the following step to continue. 6-3 NVIDIA nForce3 System Driver This driver is only available for your Windows OS. Click Next to install the driver correctly. 1. Then the welcome dialogue will display. Please follow the proceeding instructions. Installation of Driver and Utility Driver Installation Click on the Driver tab and the screen below will display.