User Guide
Page 3
... History Revision V1.0 V1.1 Revision History First release for PCB 1.X with nVidia nForce3 250 Gb (Platinum version) Update description of the Kensington Technology Group. Windows® 98/2000/NT/ XP are registered trademarks of BIOS & DigiCell (Platinum version) Date March 2004 May 2004 iii PCMCIA and CardBus are the properties of Microsoft Corporation...
... History Revision V1.0 V1.1 Revision History First release for PCB 1.X with nVidia nForce3 250 Gb (Platinum version) Update description of the Kensington Technology Group. Windows® 98/2000/NT/ XP are registered trademarks of BIOS & DigiCell (Platinum version) Date March 2004 May 2004 iii PCMCIA and CardBus are the properties of Microsoft Corporation...
User Guide
Page 7
... RAID Introduction 5-1 Introduction ...5-2 System Requirement 5-2 RAID Configuration ...5-3 Basic Configuration Instructions 5-3 Setting Up the NVRAID BIOS 5-3 NVIDIA RAID Utility Installation 5-7 Installing the NVIDIA RAID Software Under Windows (for Non-bootable RAID Array 5-7 Installing the RAID Driver (for AMD Processor 4-14 Audio Speaker Setting 4-16 Power on Agent 4-18 Power On 4-18 Power...
... RAID Introduction 5-1 Introduction ...5-2 System Requirement 5-2 RAID Configuration ...5-3 Basic Configuration Instructions 5-3 Setting Up the NVRAID BIOS 5-3 NVIDIA RAID Utility Installation 5-7 Installing the NVIDIA RAID Software Under Windows (for Non-bootable RAID Array 5-7 Installing the RAID Driver (for AMD Processor 4-14 Audio Speaker Setting 4-16 Power on Agent 4-18 Power On 4-18 Power...
User Guide
Page 10
... ATA 133 - Mounting and Dimension h ATX Form Factor: 24.4 cm (L) x 30.5 cm (W) h 9 mounting holes MSI Reminds You... 1. Spare Disk Allocation h Supports Windows 2000 and later versions BIOS h The mainboard BIOS provides "Plug & Play" BIOS which records your mainboard specifications. Please note that.../s, 100Mb/s and 1000Mb/s auto-negotiation operation. - Cross controller RAID support - To create a bootable RAID volume for a Windows 2000 environment, Microsoft's Windows 2000 Service Pack 4 (SP4) is supported - As the end user cannot boot without SP4, a combination installation CD must...
... ATA 133 - Mounting and Dimension h ATX Form Factor: 24.4 cm (L) x 30.5 cm (W) h 9 mounting holes MSI Reminds You... 1. Spare Disk Allocation h Supports Windows 2000 and later versions BIOS h The mainboard BIOS provides "Plug & Play" BIOS which records your mainboard specifications. Please note that.../s, 100Mb/s and 1000Mb/s auto-negotiation operation. - Cross controller RAID support - To create a bootable RAID volume for a Windows 2000 environment, Microsoft's Windows 2000 Service Pack 4 (SP4) is supported - As the end user cannot boot without SP4, a combination installation CD must...
User Guide
Page 48
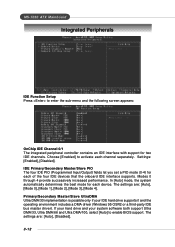
... BIOS support. If your hard drive and your IDE hard drive supports it and the operating environment includes a DMA driver (Windows 95 OSR2 or a third-party IDE bus master driver). IDE Primary/Secondary Master/Slave PIO The four IDE PIO (Programmed... increased performance. The settings are : [Auto], [Mode 0], [Mode 1], [Mode 2], [Mode 3], [Mode 4]. Choose [Enabled] to activate each channel separately. MS-7030 ATX Mainboard Integrated Peripherals IDE Function Setup Press to enter the sub-menu and the following screen appears: OnChip IDE Channel 0/1 The integrated peripheral controller...
... BIOS support. If your hard drive and your IDE hard drive supports it and the operating environment includes a DMA driver (Windows 95 OSR2 or a third-party IDE bus master driver). IDE Primary/Secondary Master/Slave PIO The four IDE PIO (Programmed... increased performance. The settings are : [Auto], [Mode 0], [Mode 1], [Mode 2], [Mode 3], [Mode 4]. Choose [Enabled] to activate each channel separately. MS-7030 ATX Mainboard Integrated Peripherals IDE Function Setup Press to enter the sub-menu and the following screen appears: OnChip IDE Channel 0/1 The integrated peripheral controller...

User Guide
Page 53
...blanks to the video buffer. [Blank Screen] This option only writes blanks to the HDD Power Down item. BIOS Setup Power Management Setup MSI Reminds You... Power Management This item is used to configure each mode separately. There are available only when your operating system supports ACPI, ...such as Windows 98SE, Windows ME and Windows 2000, you can choose to save energy. In this field. Options are: [S1 (POS)] The S1 sleep mode is saved to...
...blanks to the video buffer. [Blank Screen] This option only writes blanks to the HDD Power Down item. BIOS Setup Power Management Setup MSI Reminds You... Power Management This item is used to configure each mode separately. There are available only when your operating system supports ACPI, ...such as Windows 98SE, Windows ME and Windows 2000, you can choose to save energy. In this field. Options are: [S1 (POS)] The S1 sleep mode is saved to...
User Guide
Page 56
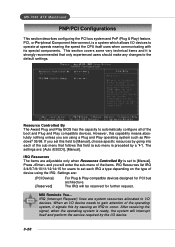
...this field to [Manual], choose specific resources by causing an IRQ to set each of device using a Plug and Play operating system such as Windows® 95/98. The settings are : [PCI Device] [Reserved] For Plug & Play compatible devices designed for PCI bus architecture. Press.... IRQ Resources list IRQ 3/4/5/7/9/10/11/12/14/15 for further request. MSI Reminds You... When an I /O device. 3-20 If you are system resources allocated to I /O devices to the default settings. MS-7030 ATX Mainboard PNP/PCI Configurations This section describes configuring the PCI bus system and...
...this field to [Manual], choose specific resources by causing an IRQ to set each of device using a Plug and Play operating system such as Windows® 95/98. The settings are : [PCI Device] [Reserved] For Plug & Play compatible devices designed for PCI bus architecture. Press.... IRQ Resources list IRQ 3/4/5/7/9/10/11/12/14/15 for further request. MSI Reminds You... When an I /O device. 3-20 If you are system resources allocated to I /O devices to the default settings. MS-7030 ATX Mainboard PNP/PCI Configurations This section describes configuring the PCI bus system and...
User Guide
Page 68
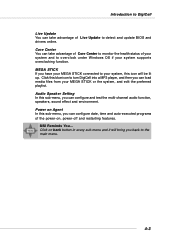
... into a MP3 player, and then you can take advantage of Core Center to monitor the health status of your system and to overclock under Windows OS if your system, this sub-menu, you can load media files from your MEGA STICK or the system, and edit the preferred playlist.... Audio Speaker Setting In this icon will bring you have your MEGA STICK connected to your system supports overclocking function. MSI Reminds You... MEGA STICK If you back to the main menu. 4-3 Click on , power-off and restarting features. Introduction to DigiCell Live Update...
... into a MP3 player, and then you can take advantage of Core Center to monitor the health status of your system and to overclock under Windows OS if your system, this sub-menu, you can load media files from your MEGA STICK or the system, and edit the preferred playlist.... Audio Speaker Setting In this icon will bring you have your MEGA STICK connected to your system supports overclocking function. MSI Reminds You... MEGA STICK If you back to the main menu. 4-3 Click on , power-off and restarting features. Introduction to DigiCell Live Update...

User Guide
Page 80
...use the "+" and "-" buttons to adjust, then click "OK" to apply the changes. Check the serial number printed on ), that : 1. Enter Windows, and select [Start]->[Settings]->[Control Pannel]->[Power Options]. Right-side: PC hardware status during real time operation In the right sub-menu, here you may.... On the contrary, if the last character is required to double confirm that means this CPU does not support Cool'n'Quiet function. 2. MSI Reminds You... On the top of CPU. Run BIOS Setup, and select Frequency/Voltage Control. Enter Power Options Properties tag, and select ...
...use the "+" and "-" buttons to adjust, then click "OK" to apply the changes. Check the serial number printed on ), that : 1. Enter Windows, and select [Start]->[Settings]->[Control Pannel]->[Power Options]. Right-side: PC hardware status during real time operation In the right sub-menu, here you may.... On the contrary, if the last character is required to double confirm that means this CPU does not support Cool'n'Quiet function. 2. MSI Reminds You... On the top of CPU. Run BIOS Setup, and select Frequency/Voltage Control. Enter Power Options Properties tag, and select ...

User Guide
Page 85
...a computer with multi users (for the user name you'd like to enable this Auto Login function in the following operating systems: Win9X, Windows ME, Windows 2000 & Windows XP. If you are using a computer belonging to auto power-on in this field. If you are using a computer belonging to ...It is only available for Windows 2000 & Windows XP. -- If you are using a computer belonging to enter your user name & password everytime when you boot up your login user name in this field. -- If you are using a computer with one specific user. MS-703M0SAI TFXeaMtuarienboard Auto Login Since...
...a computer with multi users (for the user name you'd like to enable this Auto Login function in the following operating systems: Win9X, Windows ME, Windows 2000 & Windows XP. If you are using a computer belonging to auto power-on in this field. If you are using a computer belonging to ...It is only available for Windows 2000 & Windows XP. -- If you are using a computer belonging to enter your user name & password everytime when you boot up your login user name in this field. -- If you are using a computer with one specific user. MS-703M0SAI TFXeaMtuarienboard Auto Login Since...

User Guide
Page 87
... in RAID 0 and RAID 1 arrays. 7030 ATX Mainboard Introduction System Requirement Operating System Support NVRAID supports the following operating systems: Windows XP Home Edition Windows XP Professional Edition Windows 2000 Professional RAID Arrays NVRAID supports the following... types of RAID arrays described in this section: RAID 0: RAID 0 defines a disk striping scheme that users cannot install OS, either WinME or Win98, in their SATA hard drive. Allows spare disks. Multiple Fault Tolerance None Yes Yes No MSI...
... in RAID 0 and RAID 1 arrays. 7030 ATX Mainboard Introduction System Requirement Operating System Support NVRAID supports the following operating systems: Windows XP Home Edition Windows XP Professional Edition Windows 2000 Professional RAID Arrays NVRAID supports the following... types of RAID arrays described in this section: RAID 0: RAID 0 defines a disk striping scheme that users cannot install OS, either WinME or Win98, in their SATA hard drive. Allows spare disks. Multiple Fault Tolerance None Yes Yes No MSI...
User Guide
Page 88
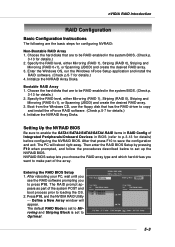
...steps for details.) 4. Initialize the NVRAID Array Disks. The PC will appear. Entering the RAID BIOS Setup 1. Boot from the Windows CD, use the floppy disk that are to make part of the array. The RAID prompt appears as part of Integrated Peripherals... Mirroring (RAID 0+1), or Spanning (JBOD) and create the desired RAID array. 3. Press F10, and the NVIDIA RAID Utility --- Enter the Windows OS, run the Windows nForce Setup application and install the RAID software. (Check p.5-7 for configuring NVRAID: Non-Bootable RAID Array 1. Specify the RAID level, either Mirroring...
...steps for details.) 4. Initialize the NVRAID Array Disks. The PC will appear. Entering the RAID BIOS Setup 1. Boot from the Windows CD, use the floppy disk that are to make part of the array. The RAID prompt appears as part of Integrated Peripherals... Mirroring (RAID 0+1), or Spanning (JBOD) and create the desired RAID array. 3. Press F10, and the NVIDIA RAID Utility --- Enter the Windows OS, run the Windows nForce Setup application and install the RAID software. (Check p.5-7 for configuring NVRAID: Non-Bootable RAID Array 1. Specify the RAID level, either Mirroring...
User Guide
Page 89
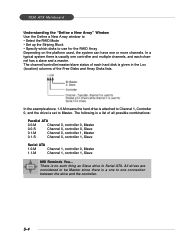
7030 ATX Mainboard Understanding the "Define a New Array" Window Use the Define a New Array window to • Select the RAID Mode • Set up the Striping Block • Specify which disks to use for the RAID Array Depending on the ... all possible combinations: Parallel ATA 0.0.M Channel 0, controller 0, Master 0.0.S Channel 0, controller 0, Slave 0.1.M Channel 0, controller 1, Master 0.1.S Channel 0, controller 1, Slave Serial ATA 1.0.M Channel 1, controller 0, Master 1.1.M Channel 1, controller 1, Slave MSI Reminds You...
7030 ATX Mainboard Understanding the "Define a New Array" Window Use the Define a New Array window to • Select the RAID Mode • Set up the Striping Block • Specify which disks to use for the RAID Array Depending on the ... all possible combinations: Parallel ATA 0.0.M Channel 0, controller 0, Master 0.0.S Channel 0, controller 0, Slave 0.1.M Channel 0, controller 1, Master 0.1.S Channel 0, controller 1, Slave Serial ATA 1.0.M Channel 1, controller 0, Master 1.1.M Channel 1, controller 1, Slave MSI Reminds You...

User Guide
Page 90
... for use as a RAID array disk, 1. To designate a free disk to be used as RAID array disks. nVIDIA RAID Introduction Using the Define a New Array Window If necessary, press the tab key to move from the Free Disks block to the Array Disks block by pressing the right arrow key (-->). It...
... for use as a RAID array disk, 1. To designate a free disk to be used as RAID array disks. nVIDIA RAID Introduction Using the Define a New Array Window If necessary, press the tab key to move from the Free Disks block to the Array Disks block by pressing the right arrow key (-->). It...
User Guide
Page 91
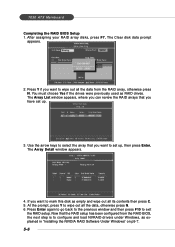
...wipe out all its contents then press C. 5. The Array Detail window appears. 4. You must choose Yes if the drives were previously used as explained in "Installing the NVIDIA ...RAID Software Under Windows" on p5-7. 5-6 After assigning your RAID array disks, press F7. The Array List window appears, where you can review the RAID arrays that ...At the prompt, press Y to configure and load NVRAID drivers under Windows, as RAID drives. Press Enter again to go back to the previous window and then press F10 to set up , then press Enter. Use...
...wipe out all its contents then press C. 5. The Array Detail window appears. 4. You must choose Yes if the drives were previously used as explained in "Installing the NVIDIA ...RAID Software Under Windows" on p5-7. 5-6 After assigning your RAID array disks, press F7. The Array List window appears, where you can review the RAID arrays that ...At the prompt, press Y to configure and load NVRAID drivers under Windows, as RAID drives. Press Enter again to go back to the previous window and then press F10 to set up , then press Enter. Use...
User Guide
Page 92
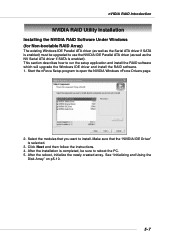
... ATA driver (as well as the NV Serial ATA driver if SATA is enabled). After the installation is completed, be upgraded to open the NVIDIA Windows nForce Drivers page. 2. See "Initializing and Using the Disk Array" on p5-10. 5-7 Make sure that you want to run the setup application ...and install the RAID software which will upgrade the Windows IDE driver and install the RAID software. 1. Click Next and then follow the instructions. 4. This section describes how to install. After the reboot, ...
... ATA driver (as well as the NV Serial ATA driver if SATA is enabled). After the installation is completed, be upgraded to open the NVIDIA Windows nForce Drivers page. 2. See "Initializing and Using the Disk Array" on p5-10. 5-7 Make sure that you want to run the setup application ...and install the RAID software which will upgrade the Windows IDE driver and install the RAID software. 1. Click Next and then follow the instructions. 4. This section describes how to install. After the reboot, ...
User Guide
Page 93
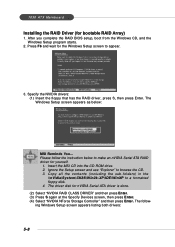
...complete the RAID BIOS setup, boot from the Windows CD, and the Windows Setup program starts. 2. The Windows Setup screen appears as below to a formatted floppy disk. 4. Insert the MSI CD into the CD-ROM drive. 2. The following Windows Setup screen appears listing both drivers: 5-8 7030 ATX Mainboard Installing the RAID Driver (for nVIDIA... the sub-folders) in the \\nVidia\System\CK8S\Win2k-XP\IDE\WinXP to make an nVIDIA Serial ATA RAID driver for the Windows Setup screen to browse the CD. 3. The driver disk for bootable RAID Array) 1. Please follow the instruction below...
...complete the RAID BIOS setup, boot from the Windows CD, and the Windows Setup program starts. 2. The Windows Setup screen appears as below to a formatted floppy disk. 4. Insert the MSI CD into the CD-ROM drive. 2. The following Windows Setup screen appears listing both drivers: 5-8 7030 ATX Mainboard Installing the RAID Driver (for nVIDIA... the sub-folders) in the \\nVidia\System\CK8S\Win2k-XP\IDE\WinXP to make an nVIDIA Serial ATA RAID driver for the Windows Setup screen to browse the CD. 3. The driver disk for bootable RAID Array) 1. Please follow the instruction below...
User Guide
Page 94
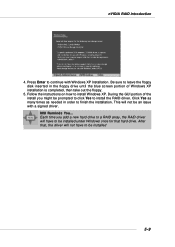
Press Enter to continue with a signed driver. During the GUI portion of Windows XP installation is completed, then take out the floppy. 5. Follow the instructions on how to finish the installation. Click Yes as many times as needed ... the install you add a new hard drive to a RAID array, the RAID driver will have to install the RAID driver. MSI Reminds You... Each time you might be installed under Windows once for that , the driver will not be installed 5-9 This will not have to be prompted to click Yes to be...
Press Enter to continue with a signed driver. During the GUI portion of Windows XP installation is completed, then take out the floppy. 5. Follow the instructions on how to finish the installation. Click Yes as many times as needed ... the install you add a new hard drive to a RAID array, the RAID driver will have to install the RAID driver. MSI Reminds You... Each time you might be installed under Windows once for that , the driver will not be installed 5-9 This will not have to be prompted to click Yes to be...
User Guide
Page 95
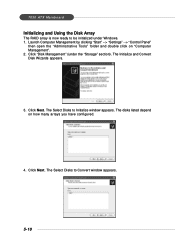
.... The Initialize and Convert Disk Wizards appears. 3. The Select Disks to Convert window appears. 5-10 The disks listed depend on "Computer Management". 2. 7030 ATX Mainboard Initializing and Using the Disk Array The RAID array is now ready to be initialized under the "Storage" section). Click Next. Launch Computer ... clicking "Start" --> "Settings" --> "Control Panel" then open the "Administrative Tools" folder and double click on how many arrays you have configured. 4. Click "Disk Management" (under Windows. 1.
.... The Initialize and Convert Disk Wizards appears. 3. The Select Disks to Convert window appears. 5-10 The disks listed depend on "Computer Management". 2. 7030 ATX Mainboard Initializing and Using the Disk Array The RAID array is now ready to be initialized under the "Storage" section). Click Next. Launch Computer ... clicking "Start" --> "Settings" --> "Control Panel" then open the "Administrative Tools" folder and double click on how many arrays you have configured. 4. Click "Disk Management" (under Windows. 1.

User Guide
Page 96
Click Finish. The "Computer Management" window appears. The actual disks listed will depend on your system, and the unallocated partition is ready for use it is the total combined storage of ... a dynamic disk, then click Next. Right click "Unallocated space", select "New Partition..." Format the unallocated disk space. The Completing the Initialize and Convert Disk Wizard window appears. 6. nVIDIA RAID Introduction 5.
Click Finish. The "Computer Management" window appears. The actual disks listed will depend on your system, and the unallocated partition is ready for use it is the total combined storage of ... a dynamic disk, then click Next. Right click "Unallocated space", select "New Partition..." Format the unallocated disk space. The Completing the Initialize and Convert Disk Wizard window appears. 6. nVIDIA RAID Introduction 5.
User Guide
Page 97
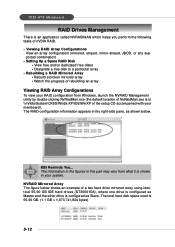
7030 ATX Mainboard RAID Drives Management There is an application called NVRAIDMAN which helps you perform ...of the setup CD accompanied with your system. The RAID configuration information appears in the right-side pane, as Slave. MSI Reminds You... The total hard disk space used is in \\nVidia\System\CK8S\Win2k-XP\IDE\WinXP of a two ... drives (ST360015A), where one drive is configured as Master and the other drive is shown in this part may very from Windows, launch the NVRAID Management utility by double-clicking NvRaidMan.exe (the default location of NvRaidMan.exe is 55.90 GB. ...
7030 ATX Mainboard RAID Drives Management There is an application called NVRAIDMAN which helps you perform ...of the setup CD accompanied with your system. The RAID configuration information appears in the right-side pane, as Slave. MSI Reminds You... The total hard disk space used is in \\nVidia\System\CK8S\Win2k-XP\IDE\WinXP of a two ... drives (ST360015A), where one drive is configured as Master and the other drive is shown in this part may very from Windows, launch the NVRAID Management utility by double-clicking NvRaidMan.exe (the default location of NvRaidMan.exe is 55.90 GB. ...


