
User Manual
Page 4
Preface 1-4 Installing the Expresscard ...3-29 Safely Remove Hardware ...3-31 BIOS Setup About BIOS Setup...4-2 When to Use BIOS Setup...4-2 How to Run BIOS Setup...4-2 Control Keys ...4-3 BIOS Setup Menu...4-4 Main menu...4-5 Advanced menu...4-7 Boot menu ...4-8 Security menu...4-10 Save & Exit menu...4-12
Preface 1-4 Installing the Expresscard ...3-29 Safely Remove Hardware ...3-31 BIOS Setup About BIOS Setup...4-2 When to Use BIOS Setup...4-2 How to Run BIOS Setup...4-2 Control Keys ...4-3 BIOS Setup Menu...4-4 Main menu...4-5 Advanced menu...4-7 Boot menu ...4-8 Security menu...4-10 Save & Exit menu...4-12
User Manual
Page 24
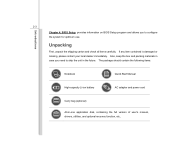
...: Notebook Quick Start Manual High-capacity Li-ion battery AC adapter and power cord Carry bag (optional) All-in the future. Introductions 2-3 Chapter 4, BIOS Setup, provides information on BIOS Setup program and allows you need to configure the system for optimum use. Unpacking First, unpack the shipping carton and check all items...
...: Notebook Quick Start Manual High-capacity Li-ion battery AC adapter and power cord Carry bag (optional) All-in the future. Introductions 2-3 Chapter 4, BIOS Setup, provides information on BIOS Setup program and allows you need to configure the system for optimum use. Unpacking First, unpack the shipping carton and check all items...

User Manual
Page 28
Supported HDMI Output 1.3 supported The best resolution may vary depending on the television connected. 17" LCD display (Optional) WUXGA+ (1920 x 1200) / non Glare WSXGA (1680 x 1050) / Glare WXGA+ (1440 x 900) / Glare Brightness controlled by K/B hot-keys 2.0/ 3.0 Mega Pixel (optional) Yes, USB floppy boot up DOS only Fast Boot Support --- Yes Introductions 2-7 Dual View Function CRT Output HDMI Output Display LCD Type Brightness WebCam CMOS Software & BIOS USB Flash Boot BIOS LCD and CRT will be auto detected when connected.
Supported HDMI Output 1.3 supported The best resolution may vary depending on the television connected. 17" LCD display (Optional) WUXGA+ (1920 x 1200) / non Glare WSXGA (1680 x 1050) / Glare WXGA+ (1440 x 900) / Glare Brightness controlled by K/B hot-keys 2.0/ 3.0 Mega Pixel (optional) Yes, USB floppy boot up DOS only Fast Boot Support --- Yes Introductions 2-7 Dual View Function CRT Output HDMI Output Display LCD Type Brightness WebCam CMOS Software & BIOS USB Flash Boot BIOS LCD and CRT will be auto detected when connected.

User Manual
Page 77
...wish to enter Setup, either restart the system by turning it OFF and ON, or simultaneously pressing [Ctrl]+[Alt]+[Delete] keys to reload the default BIOS settings. The actual setting screens and options on the notebook and press the [Del] key during the system booting up and is requested to run... SETUP. Š You want to change the default settings for your Notebook may need to run the BIOS Setup Utility, turn on your references only. You may be different because of BIOS update. To run the BIOS Setup when: Š An error message appears on the screen during the POST procedure...
...wish to enter Setup, either restart the system by turning it OFF and ON, or simultaneously pressing [Ctrl]+[Alt]+[Delete] keys to reload the default BIOS settings. The actual setting screens and options on the notebook and press the [Del] key during the system booting up and is requested to run... SETUP. Š You want to change the default settings for your Notebook may need to run the BIOS Setup Utility, turn on your references only. You may be different because of BIOS update. To run the BIOS Setup when: Š An error message appears on the screen during the POST procedure...
User Manual
Page 78
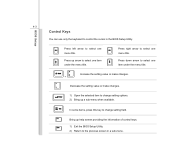
... the menu title. In some items, press this key to control the cursor in a sub-menu. Press left arrow to select one menu title. BIOS Setup 4-3 Control Keys You can use only the keyboard to change setting options. 2) Bring up a sub-menu when available. Bring up arrow to... select one item under the menu title. Press up help screen providing the information of control keys. 1) Exit the BIOS Setup Utility. 2) Return to change setting field. Increase the setting value or make changes. + Decrease the setting value or make changes. 1) Open the...
... the menu title. In some items, press this key to control the cursor in a sub-menu. Press left arrow to select one menu title. BIOS Setup 4-3 Control Keys You can use only the keyboard to change setting options. 2) Bring up a sub-menu when available. Bring up arrow to... select one item under the menu title. Press up help screen providing the information of control keys. 1) Exit the BIOS Setup Utility. 2) Return to change setting field. Increase the setting value or make changes. + Decrease the setting value or make changes. 1) Open the...
User Manual
Page 79
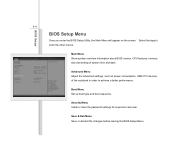
... Utility, the Main Menu will appear on the screen. Boot Menu Set up boot type and boot sequence. Main Menu Show system overview information about BIOS version, CPU features, memory size and setting of the notebook in order to enter the other menus. Save & Exit Menu Save or discard the ...changes before leaving the BIOS Setup Menu. Advanced Menu Adjust the advanced settings, such as power consumption, USB/ PCI devices, of system time and date. Security Menu Install or ...
... Utility, the Main Menu will appear on the screen. Boot Menu Set up boot type and boot sequence. Main Menu Show system overview information about BIOS version, CPU features, memory size and setting of the notebook in order to enter the other menus. Save & Exit Menu Save or discard the ...changes before leaving the BIOS Setup Menu. Advanced Menu Adjust the advanced settings, such as power consumption, USB/ PCI devices, of system time and date. Security Menu Install or ...
User Manual
Page 80
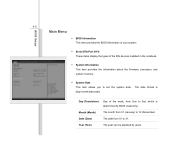
BIOS Setup 4-5 Main Menu Š BIOS Information This item provides the BIOS information of your system. Š Serial ATA Port 0/1/4 These items display the types of the week, from Sun to Sat, which is [day:month:date:...year]. Month (Month) The month from 01 to 31. Year (Year) The year can be adjusted by BIOS (read-only). Day (Translation) Day of the IDE devices installed in the notebook. Š System Information This item provides the information about the firmware, processor...
BIOS Setup 4-5 Main Menu Š BIOS Information This item provides the BIOS information of your system. Š Serial ATA Port 0/1/4 These items display the types of the week, from Sun to Sat, which is [day:month:date:...year]. Month (Month) The month from 01 to 31. Year (Year) The year can be adjusted by BIOS (read-only). Day (Translation) Day of the IDE devices installed in the notebook. Š System Information This item provides the information about the firmware, processor...
User Manual
Page 81
The time format is [hour:minute:second]. BIOS Setup 4-6 Š System Time This item allows you shut down the PC or get into sleep mode. The system clock will go on no matter you to set the system time.
The time format is [hour:minute:second]. BIOS Setup 4-6 Š System Time This item allows you shut down the PC or get into sleep mode. The system clock will go on no matter you to set the system time.
User Manual
Page 82
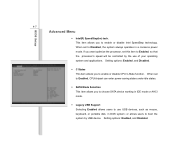
... operating system and applications. When set this item to enable or disable CPU C-State function. or allows users to enable or disable Intel SpeedStep technology. BIOS Setup 4-7 Advanced Menu Š Intel(R) SpeedStep(tm) tech. This item allows you to choose SATA device working in IDE mode or AHCI mode. Š Legacy...
... operating system and applications. When set this item to enable or disable CPU C-State function. or allows users to enable or disable Intel SpeedStep technology. BIOS Setup 4-7 Advanced Menu Š Intel(R) SpeedStep(tm) tech. This item allows you to choose SATA device working in IDE mode or AHCI mode. Š Legacy...
User Manual
Page 83
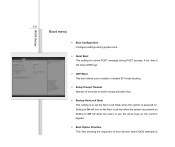
Setting to On will turn on the Num Lock key when the system is powered on . BIOS Setup 4-8 Boot menu Š Boot Configuration Configure settings during system boot. Š Quiet Boot This setting is to show POST message during POST process, if ... OEM logo. Š UEFI Boot This item allows you to enable or disable EFI mode booting. Š Setup Prompt Timeout Number of boot devices where BIOS attempts to Setting to Off will allow the users to use the arrow keys on the numeric keypad. Š Boot Option Priorities This item showing...
Setting to On will turn on the Num Lock key when the system is powered on . BIOS Setup 4-8 Boot menu Š Boot Configuration Configure settings during system boot. Š Quiet Boot This setting is to show POST message during POST process, if ... OEM logo. Š UEFI Boot This item allows you to enable or disable EFI mode booting. Š Setup Prompt Timeout Number of boot devices where BIOS attempts to Setting to Off will allow the users to use the arrow keys on the numeric keypad. Š Boot Option Priorities This item showing...
User Manual
Page 84
BIOS Setup 4-9 load the disk operating system. Š Boot Option #1/#2 The system is going to boot from other device if fails to boot from the 1st /2nd/3rd/4th boot device.
BIOS Setup 4-9 load the disk operating system. Š Boot Option #1/#2 The system is going to boot from other device if fails to boot from the 1st /2nd/3rd/4th boot device.
User Manual
Page 85
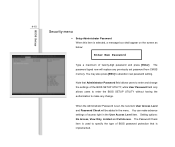
...selected, a message box shall appear on the screen as below: Enter New Password Type a maximum of BIOS password protection that Administrator Password field allows users to enter and change . BIOS Setup 4-10 Security menu Š Setup Administrator Password When this item is set password from CMOS memory.... the User Access Level item. You may also press [ESC] to make advance settings of the BIOS SETUP UTILITY, while User Password field only allows users to enter the BIOS SETUP UTILITY without having the authorization to abandon new password setting. You can make any previously set ...
...selected, a message box shall appear on the screen as below: Enter New Password Type a maximum of BIOS password protection that Administrator Password field allows users to enter and change . BIOS Setup 4-10 Security menu Š Setup Administrator Password When this item is set password from CMOS memory.... the User Access Level item. You may also press [ESC] to make advance settings of the BIOS SETUP UTILITY, while User Password field only allows users to enter the BIOS SETUP UTILITY without having the authorization to abandon new password setting. You can make any previously set ...
User Manual
Page 86
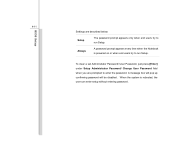
To clear a set Administrator Password/ User Password, just press [Enter] under Setup Administrator Password/ Change User Password field when you are described below: BIOS Setup Setup The password prompt appears only when end users try to enter the password. A message box will pop up confirming password will be disabled. When the system is powered on or when end users try to run Setup. Always A password prompt appears every time when the Notebook is rebooted, the user can enter setup without entering password. 4-11 Settings are prompted to run Setup.
To clear a set Administrator Password/ User Password, just press [Enter] under Setup Administrator Password/ Change User Password field when you are described below: BIOS Setup Setup The password prompt appears only when end users try to enter the password. A message box will pop up confirming password will be disabled. When the system is powered on or when end users try to run Setup. Always A password prompt appears every time when the Notebook is rebooted, the user can enter setup without entering password. 4-11 Settings are prompted to run Setup.
User Manual
Page 87
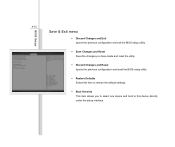
BIOS Setup 4-12 Save & Exit menu Š Discard Changes and Exit Ignore the previous configuration and exit the BIOS setup utility. Š Save Changes and Reset Save the changes you have made and reset the utility. Š Discard Changes and Reset Ignore the previous configuration and reset the BIOS setup utility. Š Restore Defaults Select this item to restore the default settings. Š Boot Override This item allows you to select one device and boot to this device directly under the setup interface.
BIOS Setup 4-12 Save & Exit menu Š Discard Changes and Exit Ignore the previous configuration and exit the BIOS setup utility. Š Save Changes and Reset Save the changes you have made and reset the utility. Š Discard Changes and Reset Ignore the previous configuration and reset the BIOS setup utility. Š Restore Defaults Select this item to restore the default settings. Š Boot Override This item allows you to select one device and boot to this device directly under the setup interface.


