User Guide
Page 9
Appendix A Realtek Audio A-1 Installing the Realtek HD Audio Driver A-2 Software Configuration A-4 Hardware Setup A-19 Appendix B Overclocking Center B-1 Activating Overclocking Center B-2 System Info ...B-3 DOT ...B-5 Appendix C SB750 SATA RAID C-1 RAID Configuration C-2 Appendix D Drive Booster Manager D-1 Introduction ...D-2 RAID Configuration D-3
Appendix A Realtek Audio A-1 Installing the Realtek HD Audio Driver A-2 Software Configuration A-4 Hardware Setup A-19 Appendix B Overclocking Center B-1 Activating Overclocking Center B-2 System Info ...B-3 DOT ...B-5 Appendix C SB750 SATA RAID C-1 RAID Configuration C-2 Appendix D Drive Booster Manager D-1 Introduction ...D-2 RAID Configuration D-3
User Guide
Page 11
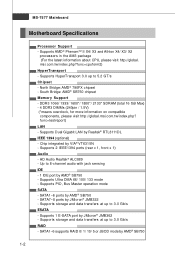
North Bridge: AMD® 790FX chipset - DDR3 1066/ 1333/ 1600*/ 1800*/ 2133* SDRAM (total 16 GB Max) - 4 DDR3 DIMMs (240pin / 1.5V) (*means overclock, for more information on compatible components, please visit http://global.msi.com.tw/index.php? Chip integrated by AMD®... chipset Memory Support - Supports Dual Gigabit LAN by JMicron® JMB362 - MS-7577 Mainboard Motherboard Specifications Processor Support - HD Audio Realtek® ALC889 - SATA1~6 ports by AMD® SB750 1-2 SATA1~6 supports RAID 0/ 1/ 10/ 5 or JBOD mode by AMD® SB750 - Supports HyperTransport 3.0 up...
North Bridge: AMD® 790FX chipset - DDR3 1066/ 1333/ 1600*/ 1800*/ 2133* SDRAM (total 16 GB Max) - 4 DDR3 DIMMs (240pin / 1.5V) (*means overclock, for more information on compatible components, please visit http://global.msi.com.tw/index.php? Chip integrated by AMD®... chipset Memory Support - Supports Dual Gigabit LAN by JMicron® JMB362 - MS-7577 Mainboard Motherboard Specifications Processor Support - HD Audio Realtek® ALC889 - SATA1~6 ports by AMD® SB750 1-2 SATA1~6 supports RAID 0/ 1/ 10/ 5 or JBOD mode by AMD® SB750 - Supports HyperTransport 3.0 up...
User Guide
Page 12
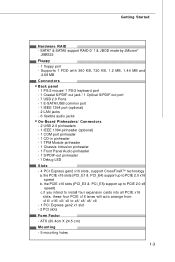
... x16 slots (PCI_E3 & PCI_E5) support up to x8/ x8/ x8/ x8 - 1 PCI Express gen2 x1 slot - 2 PCI slots Form Factor - ATX (30.4cm X 24.5 cm) Mounting - 9 mounting holes 1-3 SATA7 & SATA8 support RAID 0/ 1 & JBOD mode by JMicron® JMB322 Floppy - 1 floppy port - the PCIE x16 slots (PCI_E1 & PCI_E4) support up to PCIE 2.0 x8... pinheader - 1 Chassis Intrusion pinheader - 1 Front Panel Audio pinheader - 1 S/PDIF-out pinheader - 1 Debug LED Slots - 4 PCI Express gen2 x16 slots, support CrossFireXTM technology a. Getting Started Hardware RAID -
... x16 slots (PCI_E3 & PCI_E5) support up to x8/ x8/ x8/ x8 - 1 PCI Express gen2 x1 slot - 2 PCI slots Form Factor - ATX (30.4cm X 24.5 cm) Mounting - 9 mounting holes 1-3 SATA7 & SATA8 support RAID 0/ 1 & JBOD mode by JMicron® JMB322 Floppy - 1 floppy port - the PCIE x16 slots (PCI_E1 & PCI_E4) support up to PCIE 2.0 x8... pinheader - 1 Chassis Intrusion pinheader - 1 Front Panel Audio pinheader - 1 S/PDIF-out pinheader - 1 Debug LED Slots - 4 PCI Express gen2 x16 slots, support CrossFireXTM technology a. Getting Started Hardware RAID -
User Guide
Page 26
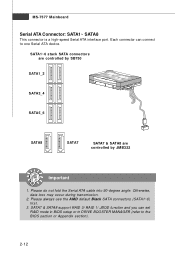
... Serial ATA Connector: SATA1~ SATA8 This connector is a high-speed Serial ATA interface port. Each connector can set RAID mode in BIOS setup or in DRIVE BOOSTER MANAGER (refer to one Serial ATA device. SATA7 & SATA8 support RAID 0/ RAID 1/ JBOD function and you can connect to the BIOS section or Appendix section). 2-12
... Serial ATA Connector: SATA1~ SATA8 This connector is a high-speed Serial ATA interface port. Each connector can set RAID mode in BIOS setup or in DRIVE BOOSTER MANAGER (refer to one Serial ATA device. SATA7 & SATA8 support RAID 0/ RAID 1/ JBOD function and you can connect to the BIOS section or Appendix section). 2-12
User Guide
Page 35
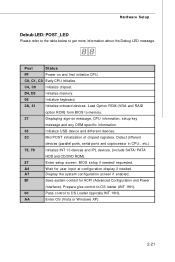
... specific information. 38 Initialize USB device and different devices. 3C Mid POST initialization of chipset registers. C4, C6 Initialize chipset. Load Option ROM (VGA and RAID option ROM) form BIOS to memory. 37 Displaying sign-on and first initialize CPU. A4 W ait for ACPI (Advanced Configuration and Power Interface). Hardware Setup...
... specific information. 38 Initialize USB device and different devices. 3C Mid POST initialization of chipset registers. C4, C6 Initialize chipset. Load Option ROM (VGA and RAID option ROM) form BIOS to memory. 37 Displaying sign-on and first initialize CPU. A4 W ait for ACPI (Advanced Configuration and Power Interface). Hardware Setup...
User Guide
Page 52
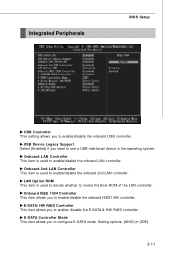
... This setting allows you to enable/disable the onboard IEEE1394 controller. Onboard IEEE 1394 Controller This item allows you to configure E-SATA mode. E-SATA/ HW RAID Controller This item allows you to enable/disable the onboard USB controller. Setting options: [AHCI] or [IDE]. 3-11 E-SATA Controller Mode This item allows you... is used to use a USB-interfaced device in the operating system. USB Device Legacy Support Select [Enabled] if you to enable/ disable the E-SATA & HW RAID controller.
... This setting allows you to enable/disable the onboard IEEE1394 controller. Onboard IEEE 1394 Controller This item allows you to configure E-SATA mode. E-SATA/ HW RAID Controller This item allows you to enable/disable the onboard USB controller. Setting options: [AHCI] or [IDE]. 3-11 E-SATA Controller Mode This item allows you... is used to use a USB-interfaced device in the operating system. USB Device Legacy Support Select [Enabled] if you to enable/ disable the E-SATA & HW RAID controller.
User Guide
Page 53
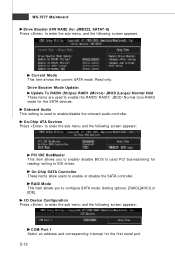
... appears: COM Port 1 Select an address and corresponding interrupt for reading/ writing to used PCI busmastering for the first serial port. 3-12 RAID Mode This item allows you to enable/ disable BIOS to IDE drives. I/O Device Configuration Press to enter the sub-menu and the following ... To RAID0 (Stripe)/ RAID1 (Mirror)/ JBOD (Large)/ Normal Hdd These items are used to enable or disable the SATA controller. Setting options: [RAID],[AHCI] or [IDE]. Current Mode This item shows the current SATA mode. On-Chip SATA Controller These items allow users to enable/disable the onboard...
... appears: COM Port 1 Select an address and corresponding interrupt for reading/ writing to used PCI busmastering for the first serial port. 3-12 RAID Mode This item allows you to enable/ disable BIOS to IDE drives. I/O Device Configuration Press to enter the sub-menu and the following ... To RAID0 (Stripe)/ RAID1 (Mirror)/ JBOD (Large)/ Normal Hdd These items are used to enable or disable the SATA controller. Setting options: [RAID],[AHCI] or [IDE]. Current Mode This item shows the current SATA mode. On-Chip SATA Controller These items allow users to enable/disable the onboard...

User Guide
Page 102
... controller separately, and support RAID function for RAID 0 (Striping), RAID 1 (Mirroring), RAID 10 (Striping & Mirroring) & RAID 5 (striping with parity). It needs at least four drives to form a RAID 1 set. SB750 SATA RAID (SATA1~6) provides support for performance and reliability. RAID 10 is simultaneously written to two drives. RAID 5 defines techniques for RAID Mirroring are RAID 0 arrays. RAID 10 has same fault tolerance...
... controller separately, and support RAID function for RAID 0 (Striping), RAID 1 (Mirroring), RAID 10 (Striping & Mirroring) & RAID 5 (striping with parity). It needs at least four drives to form a RAID 1 set. SB750 SATA RAID (SATA1~6) provides support for performance and reliability. RAID 10 is simultaneously written to two drives. RAID 5 defines techniques for RAID Mirroring are RAID 0 arrays. RAID 10 has same fault tolerance...
User Guide
Page 103
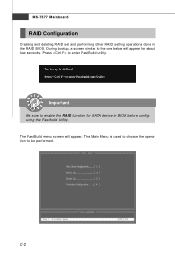
Press to be performed. The FastBuild menu screen will appear for SATA device in the RAID BIOS. C-2 Important Be sure to the one below will appear. The Main Menu is used to choose the operation to enter FastBuild utility. During bootup, a screen similar to enable the RAID function for about few seconds. MS-7577 Mainboard RAID Configuration Creating and deleting RAID set and performing other RAID setting operations done in BIOS before configuring the Fastbuild Utility.
Press to be performed. The FastBuild menu screen will appear for SATA device in the RAID BIOS. C-2 Important Be sure to the one below will appear. The Main Menu is used to choose the operation to enter FastBuild utility. During bootup, a screen similar to enable the RAID function for about few seconds. MS-7577 Mainboard RAID Configuration Creating and deleting RAID set and performing other RAID setting operations done in BIOS before configuring the Fastbuild Utility.

User Guide
Page 104
C-3 SB750 SATA RAID View Drives Assignments This window displays the model number, capacities and assignment of the drives physically attached to the SATA host adapter.
C-3 SB750 SATA RAID View Drives Assignments This window displays the model number, capacities and assignment of the drives physically attached to the SATA host adapter.

User Guide
Page 105
Press the arrow keys to highlight a logical drive number you want to define and press Enter to allow the greatest flexibility, manually. 1. C-4 RAID sets can be based upon factors including performance, data security, and the number of the system and plan the data storage strategy. On the next ...screen, use the space key to choose a RAID mode (RAID 0/ 1/ 10/ 5) and use the arrow key to move to enter the Define LD Menu. 2. Press 2 on the Main Menu screen to the Drives Assignments...
Press the arrow keys to highlight a logical drive number you want to define and press Enter to allow the greatest flexibility, manually. 1. C-4 RAID sets can be based upon factors including performance, data security, and the number of the system and plan the data storage strategy. On the next ...screen, use the space key to choose a RAID mode (RAID 0/ 1/ 10/ 5) and use the arrow key to move to enter the Define LD Menu. 2. Press 2 on the Main Menu screen to the Drives Assignments...

User Guide
Page 106
... replacement drives. • Cache Mode, W riteThru or W riteBack. 4. The default capacity is best for most applications. RAID 0 or 10 only. • Gigabyte Boundary, allows use the space key to change the assignment to allocate the RAID capacity manually. A message will show up on the bottom, press any key to make part of...
... replacement drives. • Cache Mode, W riteThru or W riteBack. 4. The default capacity is best for most applications. RAID 0 or 10 only. • Gigabyte Boundary, allows use the space key to change the assignment to allocate the RAID capacity manually. A message will show up on the bottom, press any key to make part of...
User Guide
Page 108
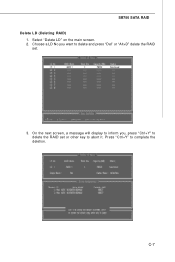
Press "Ctrl+Y" to abort it. C-7 SB750 SATA RAID Delete LD (Deleting RAID) 1. Select "Delete LD" on the main screen. 2. Choose a LD No you , press "Ctrl+Y" to delete the RAID set . 3. On the next screen, a message will display to inform you want to delete and press "Del" or "Alt+D" delete the RAID set or other key to complete the deletion.
Press "Ctrl+Y" to abort it. C-7 SB750 SATA RAID Delete LD (Deleting RAID) 1. Select "Delete LD" on the main screen. 2. Choose a LD No you , press "Ctrl+Y" to delete the RAID set . 3. On the next screen, a message will display to inform you want to delete and press "Del" or "Alt+D" delete the RAID set or other key to complete the deletion.
User Guide
Page 109
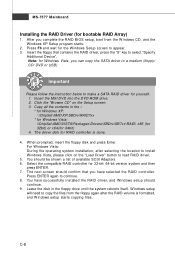
... the floppy again after the RAID volume is done. 4. You should confirm that contains the RAID driver, press the "S" key to make a SATA RAID driver for the W indows Setup screen to continue. 8. MS-7577 Mainboard Installing the RAID Driver (for 64bit) 4. Insert the MSI DVD into the DVD-ROM ...drive. 2. The driver disk for 32-bit/ 64-bit version system and then press ENTER. 7. W indows setup will need to load RAID driver. 5. For W indows Vista: During ...
... the floppy again after the RAID volume is done. 4. You should confirm that contains the RAID driver, press the "S" key to make a SATA RAID driver for the W indows Setup screen to continue. 8. MS-7577 Mainboard Installing the RAID Driver (for 64bit) 4. Insert the MSI DVD into the DVD-ROM ...drive. 2. The driver disk for 32-bit/ 64-bit version system and then press ENTER. 7. W indows setup will need to load RAID driver. 5. For W indows Vista: During ...
User Guide
Page 110
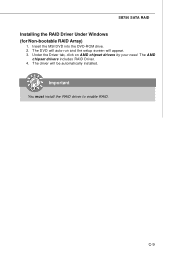
The driver will appear. 3. Important You must install the RAID driver to enable RAID. Under the Driver tab, click on AMD chipset drivers by your need. The AMD chipset drivers includes RAID Driver. 4. Insert the MSI DVD into the DVD-ROM drive. 2. The DVD will auto-run and the setup screen will be automatically installed. SB750 SATA RAID Installing the RAID Driver Under Windows (for Non-bootable RAID Array) 1. C-9
The driver will appear. 3. Important You must install the RAID driver to enable RAID. Under the Driver tab, click on AMD chipset drivers by your need. The AMD chipset drivers includes RAID Driver. 4. Insert the MSI DVD into the DVD-ROM drive. 2. The DVD will auto-run and the setup screen will be automatically installed. SB750 SATA RAID Installing the RAID Driver Under Windows (for Non-bootable RAID Array) 1. C-9
User Guide
Page 111
D-1 Drive Booster Manager Appendix D Drive Booster Manager This appendix will assist users in configuring and enabling JMB322 RAID (SATA7 & SATA8) functionality on platform. The DRIVER BOOSTER MANAGER supports RAID level 0 (striping), RAID level 1 (mirroring) and JBOD (C onc aten ate).
D-1 Drive Booster Manager Appendix D Drive Booster Manager This appendix will assist users in configuring and enabling JMB322 RAID (SATA7 & SATA8) functionality on platform. The DRIVER BOOSTER MANAGER supports RAID level 0 (striping), RAID level 1 (mirroring) and JBOD (C onc aten ate).
User Guide
Page 112
MS-7577 Mainboard Introduction DRIVER BOOSTER MANAGER offers RAID level 0 (Striping), RAID level 1 (Mirroring and Duplexing)and JBOD (Concatenate) for SATA ports (SATA7 & SATA8 ) on this appendix. All the information/ volumes/ pictures listed in your system might differ from the illustrations in this motherboard. Spreading the hard drive I/O load across independent channels greatly improves...
MS-7577 Mainboard Introduction DRIVER BOOSTER MANAGER offers RAID level 0 (Striping), RAID level 1 (Mirroring and Duplexing)and JBOD (Concatenate) for SATA ports (SATA7 & SATA8 ) on this appendix. All the information/ volumes/ pictures listed in your system might differ from the illustrations in this motherboard. Spreading the hard drive I/O load across independent channels greatly improves...

User Guide
Page 113
Click Drive Booster Manager to install the Drive Booster Manager. 1. Drive Booster Manager RAID Configuration The DRIVE BOOSTER MANAGER which helps you have a short cut icon in the system tray D-3 Insert the application DVD into the DVD... on the desktop. Click Utility. 3. Activating DRIVE BOOSTER MANAGER Once you to perform the following tasks of JMicron RAID. • Viewing SATA Drive information • Creating RAID Arrays • Deleting RAID Installing the DRIVE BOOSTER MANAGER Follow the procedures described below to install it will automatically appear. 2. short-cut icon...
Click Drive Booster Manager to install the Drive Booster Manager. 1. Drive Booster Manager RAID Configuration The DRIVE BOOSTER MANAGER which helps you have a short cut icon in the system tray D-3 Insert the application DVD into the DVD... on the desktop. Click Utility. 3. Activating DRIVE BOOSTER MANAGER Once you to perform the following tasks of JMicron RAID. • Viewing SATA Drive information • Creating RAID Arrays • Deleting RAID Installing the DRIVE BOOSTER MANAGER Follow the procedures described below to install it will automatically appear. 2. short-cut icon...

User Guide
Page 115
..." button 2.Click the "Drive Booster Configuration" button, and select a RAID mode you have to the RAID 1 mdoe. c. b. Then click the "Apply" to create. First, you want to apply the RAID creation. The Backup mode corresponds to choose a controller, that supports 2 SATA devices with RAID mode, in the Drive Booster Information screen. "Drive Booster Configuration...
..." button 2.Click the "Drive Booster Configuration" button, and select a RAID mode you have to the RAID 1 mdoe. c. b. Then click the "Apply" to create. First, you want to apply the RAID creation. The Backup mode corresponds to choose a controller, that supports 2 SATA devices with RAID mode, in the Drive Booster Information screen. "Drive Booster Configuration...

User Guide
Page 118
...the one you intend to delete. D-8 First, you have to choose a volume that the data will appear to remind you that you intend to delete RAID mode in the SATA hard drives before performing this task. Click the "Drive Booster Configuration" button, and click the "Normal Mode" button. "Drive ...Booster Conf ig ur at ion" button "Normal Mode" button 3. MS-7577 Mainboard Delete RAID 1. A warning message will be erased. Please ensure to back up all data on the SATA drives when you really want to remove the RAIID mode...
...the one you intend to delete. D-8 First, you have to choose a volume that the data will appear to remind you that you intend to delete RAID mode in the SATA hard drives before performing this task. Click the "Drive Booster Configuration" button, and click the "Normal Mode" button. "Drive ...Booster Conf ig ur at ion" button "Normal Mode" button 3. MS-7577 Mainboard Delete RAID 1. A warning message will be erased. Please ensure to back up all data on the SATA drives when you really want to remove the RAIID mode...
