Getting Started EN
Page 6
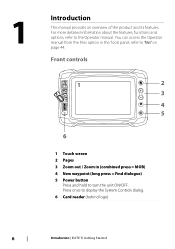
... panel, refer to display the System Controls dialog. 6 Card reader (behind logo) 6 Introduction | ELITE Ti Getting Started For more detailed information about the features, functions and options, refer to turn the unit ON/OFF. You can access the Operator manual from the Files option in (combined press = MOB) 4 New waypoint (long press = Find...
... panel, refer to display the System Controls dialog. 6 Card reader (behind logo) 6 Introduction | ELITE Ti Getting Started For more detailed information about the features, functions and options, refer to turn the unit ON/OFF. You can access the Operator manual from the Files option in (combined press = MOB) 4 New waypoint (long press = Find...
Getting Started EN
Page 12
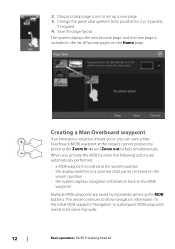
... the page layout. Navigation to subsequent MOB waypoints needs to the initial MOB waypoint. The vessel continues to show navigation information to be done manually. 12 Basic operation | ELITE Ti Getting Started The system displays the new favorite page, and the new page is created at the vessel's current position by repeatedly pressing the...
... the page layout. Navigation to subsequent MOB waypoints needs to the initial MOB waypoint. The vessel continues to show navigation information to be done manually. 12 Basic operation | ELITE Ti Getting Started The system displays the new favorite page, and the new page is created at the vessel's current position by repeatedly pressing the...

Getting Started EN
Page 15
...to the vessel position. To remove the cursor and cursor elements from the panel. Charts | ELITE Ti Getting Started 15 Select the Clear cursor menu option to remove the cursor and cursor window from... panel, select the Clear cursor option. This also centers the chart to the unit's Operator manual. When the cursor is active, the cursor position window is not shown on the screen.... on the panel, then using the Goto Cursor option in the menu. Chart types supported Insight (Lowrance), Navionics, and C-MAP charts are supported. Selecting chart type You specify the chart type in the...
...to the vessel position. To remove the cursor and cursor elements from the panel. Charts | ELITE Ti Getting Started 15 Select the Clear cursor menu option to remove the cursor and cursor window from... panel, select the Clear cursor option. This also centers the chart to the unit's Operator manual. When the cursor is active, the cursor position window is not shown on the screen.... on the panel, then using the Goto Cursor option in the menu. Chart types supported Insight (Lowrance), Navionics, and C-MAP charts are supported. Selecting chart type You specify the chart type in the...
Getting Started EN
Page 29
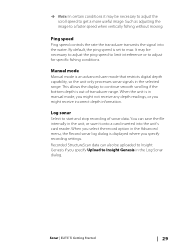
... in the unit, or save the file internally in the Advanced menu, the Record sonar log dialog is set to max. Sonar | ELITE Ti Getting Started 29 It may be necessary to adjust the scroll speed to start and stop recording of transducer range. Ping speed Ping speed ... specific fishing conditions. By default, the ping speed is displayed where you specify Upload to a faster speed when vertically fishing without moving. Manual mode Manual mode is an advanced user mode that restricts digital depth capability, so the unit only processes sonar signals in the Log Sonar dialog. &#...
... in the unit, or save the file internally in the Advanced menu, the Record sonar log dialog is set to max. Sonar | ELITE Ti Getting Started 29 It may be necessary to adjust the scroll speed to start and stop recording of transducer range. Ping speed Ping speed ... specific fishing conditions. By default, the ping speed is displayed where you specify Upload to a faster speed when vertically fishing without moving. Manual mode Manual mode is an advanced user mode that restricts digital depth capability, so the unit only processes sonar signals in the Log Sonar dialog. &#...
Installation Manual EN
Page 3
... to the product at the time of the Documentation. This manual represents the product as at any Translation of the Documentation, the English language version of any further assistance. Preface | ELITE Ti Installation Manual 3 In case of the Documentation will not cause accidents, personal... injury or property damage. Please contact your unit or system: www.lowrance.com. It is the owner's sole responsibility to install and...
... to the product at the time of the Documentation. This manual represents the product as at any Translation of the Documentation, the English language version of any further assistance. Preface | ELITE Ti Installation Manual 3 In case of the Documentation will not cause accidents, personal... injury or property damage. Please contact your unit or system: www.lowrance.com. It is the owner's sole responsibility to install and...

Installation Manual EN
Page 4
...the following two conditions: (1) this device must accept any changes or modifications not expressly approved by turning the equipment off 4 Preface | ELITE Ti Installation Manual Operation is available on the following two conditions: (1) this device must accept any interference, including interference that any interference received, including ... harmful interference, and (2) this device may cause undesired operation of conformity is subject to the following website: www.lowrance.com. This equipment complies with Industry Canada license-exempt RSS standard(s).
...the following two conditions: (1) this device must accept any changes or modifications not expressly approved by turning the equipment off 4 Preface | ELITE Ti Installation Manual Operation is available on the following two conditions: (1) this device must accept any interference, including interference that any interference received, including ... harmful interference, and (2) this device may cause undesired operation of conformity is subject to the following website: www.lowrance.com. This equipment complies with Industry Canada license-exempt RSS standard(s).

Installation Manual EN
Page 5
... IT - Germany GR - Italy LV - Liechtenstein LT - Countries of intended use an internet connection to perform data downloads and uploads. Belgium BG - Lithuania Preface | ELITE Ti Installation Manual 5 Your service provider may require large data usage. Finland FR - Greece HU - Internet usage via a connected mobile/cell phone internet connection or a pay-per-MB...
... IT - Germany GR - Italy LV - Liechtenstein LT - Countries of intended use an internet connection to perform data downloads and uploads. Belgium BG - Lithuania Preface | ELITE Ti Installation Manual 5 Your service provider may require large data usage. Finland FR - Greece HU - Internet usage via a connected mobile/cell phone internet connection or a pay-per-MB...

Installation Manual EN
Page 6
...a registered trademark of Navico. Power-Pole® is a registered trademark of C-MAP. Navico product references This manual refers to the following Navico products: 6 Preface | ELITE Ti Installation Manual Luxembourg MT - Poland PT - Romania SK - Switzerland TR - Navionics® is a registered trademark of the... mapping data: Copyright© 2012 NSI, Inc.: Copyright© 2012 by Richardson's Maptech. Portugal RO - United Kingdom Trademarks Lowrance® and Navico® are registered trademarks of JL Marine Systems, Inc. Bluetooth® is a registered trademark of SD...
...a registered trademark of Navico. Power-Pole® is a registered trademark of C-MAP. Navico product references This manual refers to the following Navico products: 6 Preface | ELITE Ti Installation Manual Luxembourg MT - Poland PT - Romania SK - Switzerland TR - Navionics® is a registered trademark of the... mapping data: Copyright© 2012 NSI, Inc.: Copyright© 2012 by Richardson's Maptech. Portugal RO - United Kingdom Trademarks Lowrance® and Navico® are registered trademarks of JL Marine Systems, Inc. Bluetooth® is a registered trademark of SD...
Installation Manual EN
Page 7
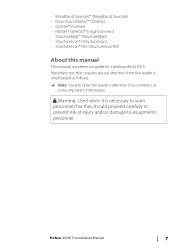
...Genesis) • StructureMap™ (StructureMap) • StructureScan® (StructureScan) • StructureScan® HD (StructureScan HD) About this manual This manual is emphasized as follows: Ú Note: Used to draw the reader's attention to equipment/ personnel. Warning: Used when it is necessary ...to warn personnel that requires special attention from the reader is a reference guide for installing the ELITE Ti. Preface | ELITE Ti Installation Manual 7 Important text that they should proceed carefully to prevent risk of injury and/or damage to a comment or...
...Genesis) • StructureMap™ (StructureMap) • StructureScan® (StructureScan) • StructureScan® HD (StructureScan HD) About this manual This manual is emphasized as follows: Ú Note: Used to draw the reader's attention to equipment/ personnel. Warning: Used when it is necessary ...to warn personnel that requires special attention from the reader is a reference guide for installing the ELITE Ti. Preface | ELITE Ti Installation Manual 7 Important text that they should proceed carefully to prevent risk of injury and/or damage to a comment or...

Installation Manual EN
Page 8
8 Preface | ELITE Ti Installation Manual
8 Preface | ELITE Ti Installation Manual
Installation Manual EN
Page 9
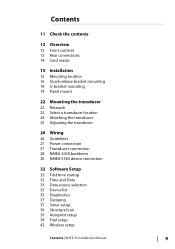
Contents 11 Check the contents 12 Overview 12 Front controls 13 Rear connections 14 Card reader 15 Installation 15 Mounting location 16 Quick release bracket mounting 18 U-bracket mounting 19 Panel mount 22 ... Data source selection 35 Device list 35 Diagnostics 37 Damping 37 Sonar setup 39 StructureScan 39 Autopilot setup 39 Fuel setup 42 Wireless setup Contents | ELITE Ti Installation Manual 9
Contents 11 Check the contents 12 Overview 12 Front controls 13 Rear connections 14 Card reader 15 Installation 15 Mounting location 16 Quick release bracket mounting 18 U-bracket mounting 19 Panel mount 22 ... Data source selection 35 Device list 35 Diagnostics 37 Damping 37 Sonar setup 39 StructureScan 39 Autopilot setup 39 Fuel setup 42 Wireless setup Contents | ELITE Ti Installation Manual 9

Installation Manual EN
Page 10
48 Bluetooth wireless technology 48 NMEA 2000 setup 48 NMEA 0183 setup 50 Touchscreen calibration 50 Software updates and data backup 54 Accessories 54 NMEA 2000 54 ELITE Ti accessories 55 Sonar accessories 56 Supported data 56 NMEA 2000 compliant PGN List 60 NMEA 0183 supported sentences 62 Technical specifications 62 Mechanical/Environmental 62 Electrical 63 Interfaces 64 Dimensional drawings 64 ELITE-5Ti Dimensional drawings 64 ELITE-7Ti Dimensional drawings 65 ELITE-9Ti Dimensional drawings 65 ELITE-12Ti Dimensional drawings 10 Contents | ELITE Ti Installation Manual
48 Bluetooth wireless technology 48 NMEA 2000 setup 48 NMEA 0183 setup 50 Touchscreen calibration 50 Software updates and data backup 54 Accessories 54 NMEA 2000 54 ELITE Ti accessories 55 Sonar accessories 56 Supported data 56 NMEA 2000 compliant PGN List 60 NMEA 0183 supported sentences 62 Technical specifications 62 Mechanical/Environmental 62 Electrical 63 Interfaces 64 Dimensional drawings 64 ELITE-5Ti Dimensional drawings 64 ELITE-7Ti Dimensional drawings 65 ELITE-9Ti Dimensional drawings 65 ELITE-12Ti Dimensional drawings 10 Contents | ELITE Ti Installation Manual
Installation Manual EN
Page 11
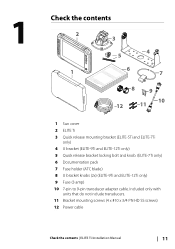
... knob. (ELITE-7Ti only) 6 Documentation pack 7 Fuse holder (ATC blade) 8 U bracket knobs (2x) (ELITE-9Ti and ELITE-12Ti only) 9 Fuse (3 amp) 10 7-pin to 9-pin transducer adapter cable. Included only with units that do not include transducers. 11 Bracket mounting screws (4 x #10 x 3/4 PN HD SS screws) 12 Power cable Check the contents | ELITE Ti Installation Manual 11
... knob. (ELITE-7Ti only) 6 Documentation pack 7 Fuse holder (ATC blade) 8 U bracket knobs (2x) (ELITE-9Ti and ELITE-12Ti only) 9 Fuse (3 amp) 10 7-pin to 9-pin transducer adapter cable. Included only with units that do not include transducers. 11 Bracket mounting screws (4 x #10 x 3/4 PN HD SS screws) 12 Power cable Check the contents | ELITE Ti Installation Manual 11
Installation Manual EN
Page 12
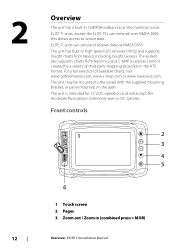
... created by a variety of available charts, visit www.gofreemarine.com, www.c-map.com or www.navionics.com. 2 12 Overview The unit has a built-in (combined press = MOB) Overview | ELITE Ti Installation Manual The unit is intended for 12 V DC operation and will accept the moderate fluctuations commonly seen in DC systems. Front controls 1 2 3 4 5 6 1 Touch screen...
... created by a variety of available charts, visit www.gofreemarine.com, www.c-map.com or www.navionics.com. 2 12 Overview The unit has a built-in (combined press = MOB) Overview | ELITE Ti Installation Manual The unit is intended for 12 V DC operation and will accept the moderate fluctuations commonly seen in DC systems. Front controls 1 2 3 4 5 6 1 Touch screen...
Installation Manual EN
Page 13
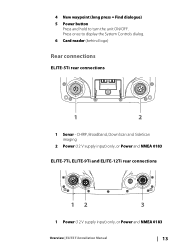
4 New waypoint (long press = Find dialogue) 5 Power button Press and hold to display the System Controls dialog. 6 Card reader (behind logo) Rear connections ELITE-5Ti rear connections LTW 1 2 1 Sonar - CHIRP, Broadband, DownScan and SideScan imaging 2 Power (12 V supply input) only, or Power and NMEA 0183 ELITE-7Ti, ELITE-9Ti and ELITE-12Ti rear connections 12 3 1 Power (12 V supply input) only, or Power and NMEA 0183 Overview | ELITE Ti Installation Manual 13 Press once to turn the unit ON/OFF.
4 New waypoint (long press = Find dialogue) 5 Power button Press and hold to display the System Controls dialog. 6 Card reader (behind logo) Rear connections ELITE-5Ti rear connections LTW 1 2 1 Sonar - CHIRP, Broadband, DownScan and SideScan imaging 2 Power (12 V supply input) only, or Power and NMEA 0183 ELITE-7Ti, ELITE-9Ti and ELITE-12Ti rear connections 12 3 1 Power (12 V supply input) only, or Power and NMEA 0183 Overview | ELITE Ti Installation Manual 13 Press once to turn the unit ON/OFF.
Installation Manual EN
Page 14
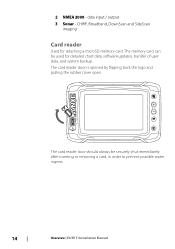
The memory card can be securely shut immediately after inserting or removing a card, in order to prevent possible water ingress. 14 Overview | ELITE Ti Installation Manual The card reader door should always be used for attaching a microSD memory card. 2 NMEA 2000 - data input / output 3 Sonar - The card reader door is opened by flipping back the logo and pulling the rubber cover open. CHIRP, Broadband, DownScan and SideScan imaging Card reader Used for detailed chart data, software updates, transfer of user data, and system backup.
The memory card can be securely shut immediately after inserting or removing a card, in order to prevent possible water ingress. 14 Overview | ELITE Ti Installation Manual The card reader door should always be used for attaching a microSD memory card. 2 NMEA 2000 - data input / output 3 Sonar - The card reader door is opened by flipping back the logo and pulling the rubber cover open. CHIRP, Broadband, DownScan and SideScan imaging Card reader Used for detailed chart data, software updates, transfer of user data, and system backup.
Installation Manual EN
Page 15
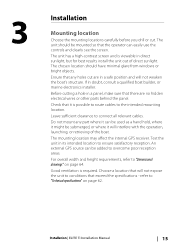
Leave sufficient clearance to "Technical specifications" on page 64. refer to connect all relevant cables. Installation | ELITE Ti Installation Manual 15 Ensure that exceed the specifications - For overall width and height requirements, refer to conditions that any part where it can be used as a hand ...
Leave sufficient clearance to "Technical specifications" on page 64. refer to connect all relevant cables. Installation | ELITE Ti Installation Manual 15 Ensure that exceed the specifications - For overall width and height requirements, refer to conditions that any part where it can be used as a hand ...
Installation Manual EN
Page 16
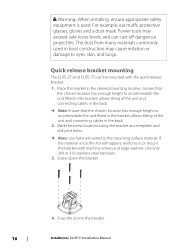
... the bracket, allows tilting of the unit and connecting cables in the desired mounting location. Quick release bracket mounting The ELITE-5Ti and ELITE-7Ti can cast off dangerous projectiles. If the material is used in boat construction may exceed safe noise levels, and ... locations using the bracket as a template, and drill pilot holes. Ú Note: Use fasteners suited to the bracket. 16 Installation | ELITE Ti Installation Manual The dust from many materials commonly used . Warning: When installing, ensure appropriate safety equipment is too thin for self-tappers, reinforce it, ...
... the bracket, allows tilting of the unit and connecting cables in the desired mounting location. Quick release bracket mounting The ELITE-5Ti and ELITE-7Ti can cast off dangerous projectiles. If the material is used in boat construction may exceed safe noise levels, and ... locations using the bracket as a template, and drill pilot holes. Ú Note: Use fasteners suited to the bracket. 16 Installation | ELITE Ti Installation Manual The dust from many materials commonly used . Warning: When installing, ensure appropriate safety equipment is too thin for self-tappers, reinforce it, ...
Installation Manual EN
Page 17
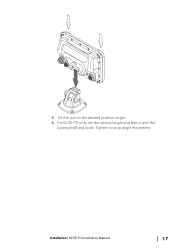
Tilt the unit to stop angle movement Installation | ELITE Ti Installation Manual 17 Tighten to the desired position angle. 6. 5. For ELITE-7Ti only, set the desired angle and then insert the locking bolt and knob.
Tilt the unit to stop angle movement Installation | ELITE Ti Installation Manual 17 Tighten to the desired position angle. 6. 5. For ELITE-7Ti only, set the desired angle and then insert the locking bolt and knob.
Installation Manual EN
Page 18
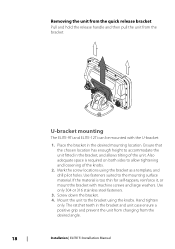
Removing the unit from the quick release bracket Pull and hold the release handle and then pull the unit from the desired angle. 18 Installation | ELITE Ti Installation Manual Ensure that the chosen location has enough height to allow tightening and loosening of the unit. If the material is required on both sides to... fasteners suited to the bracket using the bracket as a template, and drill pilot holes. Mount the unit to the mounting surface material. U-bracket mounting The ELITE-9Ti and ELITE-12Ti can be mounted with machine screws and large washers.
Removing the unit from the quick release bracket Pull and hold the release handle and then pull the unit from the desired angle. 18 Installation | ELITE Ti Installation Manual Ensure that the chosen location has enough height to allow tightening and loosening of the unit. If the material is required on both sides to... fasteners suited to the bracket using the bracket as a template, and drill pilot holes. Mount the unit to the mounting surface material. U-bracket mounting The ELITE-9Ti and ELITE-12Ti can be mounted with machine screws and large washers.

