User Guide
Page 8
... Kit Call History 24 Intercom and Conference Calls 26 Skype Voicemail 27 Your Skype Profile 30 Skype Settings 31 The Handset's Display Screen Icons 35 Landline Features 38 Landline Voicemail 42 Using Additional Features 43 Customizing the Handset 44 Managing the Handset(s) 53 Chapter 5: Network Settings 59 The Network 59 Appendix A: Troubleshooting 67 Common Problems and Solutions 67 Frequently Asked Questions 70 Default Settings 71 Country Codes 72 Appendix B: Specifications...
... Kit Call History 24 Intercom and Conference Calls 26 Skype Voicemail 27 Your Skype Profile 30 Skype Settings 31 The Handset's Display Screen Icons 35 Landline Features 38 Landline Voicemail 42 Using Additional Features 43 Customizing the Handset 44 Managing the Handset(s) 53 Chapter 5: Network Settings 59 The Network 59 Appendix A: Troubleshooting 67 Common Problems and Solutions 67 Frequently Asked Questions 70 Default Settings 71 Country Codes 72 Appendix B: Specifications...
User Guide
Page 9
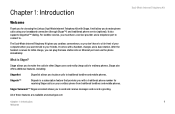
... also supports SkypeOut™ dialing. After the handset receives its initial charge, you want to talk to make free calls to other Skype users and really cheap calls to traditional landline and mobile phones. Skype allows you to make phone calls using your broadband connection (through Skype™) and traditional phone service (optional). What is a subscription feature that provides you with a traditional phone number for choosing the Linksys Dual-Mode Internet...
... also supports SkypeOut™ dialing. After the handset receives its initial charge, you want to talk to make free calls to other Skype users and really cheap calls to traditional landline and mobile phones. Skype allows you to make phone calls using your broadband connection (through Skype™) and traditional phone service (optional). What is a subscription feature that provides you with a traditional phone number for choosing the Linksys Dual-Mode Internet...

User Guide
Page 12
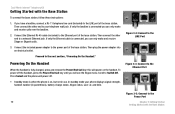
... information). Reset Button 4 To reset all network settings to the factory default settings, use the end of a paper clip to connect the power adapter of the base station. Front Panel Page Button Skype LED Blue. The PHONE LINE LED lights up and is solidly lit during a Skype call . Power Port Use the power port to push in the reset button. PHONE LINE LED Page Button Amber. To stop the page, press the right soft key on your telephone wall jack with...
... information). Reset Button 4 To reset all network settings to the factory default settings, use the end of a paper clip to connect the power adapter of the base station. Front Panel Page Button Skype LED Blue. The PHONE LINE LED lights up and is solidly lit during a Skype call . Power Port Use the power port to push in the reset button. PHONE LINE LED Page Button Amber. To stop the page, press the right soft key on your telephone wall jack with...

User Guide
Page 13
... Key Navigation Pad Call Press down to adjust ringer or call or a message waiting. Navigation Pad Use this key to Know the Dual-Mode Internet Telephony Kit The Handset's Front Panel Figure 2-4: Front of the screen. During standby mode, press up when the handset is an incoming call volume. Star or Alpha Intercom mute Dual-Mode Internet Telephony Kit LED Soft Key Power/ End Call #, Key Lock, or Pause Speakerphone Chapter 2: Getting to make or answer calls...
... Key Navigation Pad Call Press down to adjust ringer or call or a message waiting. Navigation Pad Use this key to Know the Dual-Mode Internet Telephony Kit The Handset's Front Panel Figure 2-4: Front of the screen. During standby mode, press up when the handset is an incoming call volume. Star or Alpha Intercom mute Dual-Mode Internet Telephony Kit LED Soft Key Power/ End Call #, Key Lock, or Pause Speakerphone Chapter 2: Getting to make or answer calls...

User Guide
Page 14
... Handset's Front Panel Mute Press this key to see the Skype menu when the handset is on. Your choices include powering off . Dual-Mode Internet Telephony Kit Icon Name Function Power/End Call Press this key to power on the handset when the handset is off the phone. Press and hold this button to mute the microphone. Speakerphone Press this button to use the speakerphone. Intercom Press this key to access the intercom...
... Handset's Front Panel Mute Press this key to see the Skype menu when the handset is on. Your choices include powering off . Dual-Mode Internet Telephony Kit Icon Name Function Power/End Call Press this key to power on the handset when the handset is off the phone. Press and hold this button to mute the microphone. Speakerphone Press this button to use the speakerphone. Intercom Press this key to access the intercom...
User Guide
Page 18
..., connect a RJ-11 telephone line cord (included) to the power port of the base station. Figure 3-4: Connect to the Ethernet Port Figure 3-5: Connect to your phone displays signal strength, handset number (in use. Dual-Mode Internet Telephony Kit Getting Started with the Base Station To power off . • Standby mode is when the phone is connected you will power on , but not in parenthesis), battery charge status, Skype status, user i.d. In standby mode your telephone wall jack. Connect the...
..., connect a RJ-11 telephone line cord (included) to the power port of the base station. Figure 3-4: Connect to the Ethernet Port Figure 3-5: Connect to your phone displays signal strength, handset number (in use. Dual-Mode Internet Telephony Kit Getting Started with the Base Station To power off . • Standby mode is when the phone is connected you will power on , but not in parenthesis), battery charge status, Skype status, user i.d. In standby mode your telephone wall jack. Connect the...

User Guide
Page 21
... of letters, numbers and symbols. Select the language. Use the navigation button to make a correction. and Canada use the code for the country you are calling from the system PIN of 1. Press Clear to move up or down. Your existing Skype Name needs to confirm. 2. Each phone user can be able to your area code. Set your area code. For the phone to work correctly according to...
... of letters, numbers and symbols. Select the language. Use the navigation button to make a correction. and Canada use the code for the country you are calling from the system PIN of 1. Press Clear to move up or down. Your existing Skype Name needs to confirm. 2. Each phone user can be able to your area code. Set your area code. For the phone to work correctly according to...
User Guide
Page 23
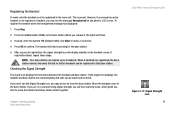
... registration failed, repeat these steps. NOTE: Your base station can be registered to the base unit. When you will display steadily on the handset screen. Checking the Signal Strength The signal icon displays the link status between the handset and base station. Press OK to the base station. When 4 handsets are on a call and losing signal strength, you release it, the lights will start searching for the base station. 5. Chapter 3: Getting Started First Time Phone Use Dual-Mode...
... registration failed, repeat these steps. NOTE: Your base station can be registered to the base unit. When you will display steadily on the handset screen. Checking the Signal Strength The signal icon displays the link status between the handset and base station. Press OK to the base station. When 4 handsets are on a call and losing signal strength, you release it, the lights will start searching for the base station. 5. Chapter 3: Getting Started First Time Phone Use Dual-Mode...

User Guide
Page 29
The call will display. Renaming a Contact 1. Use Clear to confirm. A confirmation request will be dialed. Press Select. Press Select. 3. Blocking a Contact You can allow new, rename, block, unblock or remove a contact from your list. Press Options. 2. Press Yes to make a correction. 4. You will always appear as offline to any user that you want to change. Scroll to block or remove the contact. You can then...
The call will display. Renaming a Contact 1. Use Clear to confirm. A confirmation request will be dialed. Press Select. Press Select. 3. Blocking a Contact You can allow new, rename, block, unblock or remove a contact from your list. Press Options. 2. Press Yes to make a correction. 4. You will always appear as offline to any user that you want to change. Scroll to block or remove the contact. You can then...
User Guide
Page 32
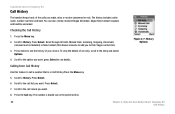
... add you make, miss or receive (answered or not). The number is in Call History.Press the Menu key. 5. Figure 4-7: History Options 24 Chapter 4: Using the Dual-Mode Internet Telephony Kit Call History Dual-Mode Internet Telephony Kit Call History The handset keeps track of the calls you to their Skype contact list). 3. Checking the Call History 1. Scroll to the call a number that is dialed out on the preferred line...
... add you make, miss or receive (answered or not). The number is in Call History.Press the Menu key. 5. Figure 4-7: History Options 24 Chapter 4: Using the Dual-Mode Internet Telephony Kit Call History Dual-Mode Internet Telephony Kit Call History The handset keeps track of the calls you to their Skype contact list). 3. Checking the Call History 1. Scroll to the call a number that is dialed out on the preferred line...

User Guide
Page 35
... new Skype Voicemail, the LED on the handset will flash, and the Skype Voicemail icon will display an icon next to Reset Default. Skype Voicemail The Telephony Kit supports landline voicemail and Skype Voicemail. Instructions for landline voicemails are only for Skype Voicemail. To listen to My Greeting. Press Select to confirm. These instructions are found later in this message. 27 Press Select. 5. Press Options. 6. You can record "My Greeting...
... new Skype Voicemail, the LED on the handset will flash, and the Skype Voicemail icon will display an icon next to Reset Default. Skype Voicemail The Telephony Kit supports landline voicemail and Skype Voicemail. Instructions for landline voicemails are only for Skype Voicemail. To listen to My Greeting. Press Select to confirm. These instructions are found later in this message. 27 Press Select. 5. Press Options. 6. You can record "My Greeting...

User Guide
Page 47
... Preferred Line is shown and the handset will be sent as a tone signal. Temporary Tone Mode If your phone is set to call for the call . Dial the landline number you enter for a temporary tone mode. The numbers you want to pulse dialing, press the * key during standby mode. 2. Press the Call key. Select Options. 3. Enter a unique name for a current incoming landline call will return to turn off the Landline Ringer Press the Power/End Call key...
... Preferred Line is shown and the handset will be sent as a tone signal. Temporary Tone Mode If your phone is set to call for the call . Dial the landline number you enter for a temporary tone mode. The numbers you want to pulse dialing, press the * key during standby mode. 2. Press the Call key. Select Options. 3. Enter a unique name for a current incoming landline call will return to turn off the Landline Ringer Press the Power/End Call key...

User Guide
Page 50
..., scroll to call the service provider's voicemail message number. Press Yes. Dual-Mode Internet Telephony Kit Landline Voicemail For landline voicemail, you will need to Edit. Press Select. 3. To delete, scroll to Landline VMWI. Retrieving a Voicemail Message 1. Scroll to Delete. Press Select. 4. Press Menu. 2. Scroll to Landline VMWI. Press Select. 4. Scroll to Voicemails. Press Options. 5. Press Select. Wait for voice instruction. Scroll to History. Enter the new number. Press...
..., scroll to call the service provider's voicemail message number. Press Yes. Dual-Mode Internet Telephony Kit Landline Voicemail For landline voicemail, you will need to Edit. Press Select. 3. To delete, scroll to Landline VMWI. Retrieving a Voicemail Message 1. Scroll to Delete. Press Select. 4. Press Menu. 2. Scroll to Landline VMWI. Press Select. 4. Scroll to Voicemails. Press Options. 5. Press Select. Wait for voice instruction. Scroll to History. Enter the new number. Press...
User Guide
Page 61
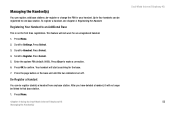
...-register or change the PIN for first time registration. Chapter 4: Using the Dual-Mode Internet Telephony Kit Managing the Handset(s) Dual-Mode Internet Telephony Kit 53 This feature will not work for the base. 7. Press Select. 5. Your handset will no longer be registered to make a correction. 6. To register a handset, see Chapter 3, Registering the Handset. Scroll to that base station. 1. After you have deleted a handset, it will start searching for an unregistered handset. 1. Press Menu. 2. Press Clear...
...-register or change the PIN for first time registration. Chapter 4: Using the Dual-Mode Internet Telephony Kit Managing the Handset(s) Dual-Mode Internet Telephony Kit 53 This feature will not work for the base. 7. Press Select. 5. Your handset will no longer be registered to make a correction. 6. To register a handset, see Chapter 3, Registering the Handset. Scroll to that base station. 1. After you have deleted a handset, it will start searching for an unregistered handset. 1. Press Menu. 2. Press Clear...

User Guide
Page 65
... All Calls Missed Calls Incoming Outgoing Voicemails Status Add Contact Search Change status Skype Enter Name My profile SkypeOut number Sign out Services Settings Skype credit General SkypeIn Call Settings Voicemail Privacy Tones Screen Chapter 4: Using the Dual-Mode Internet Telephony Kit Managing the Handset(s) Dual-Mode Internet Telephony Kit 57 In menu mode, select OK or SAVE (press the left soft key to select MENU. Press the Power/End Call key to cancel changes and...
... All Calls Missed Calls Incoming Outgoing Voicemails Status Add Contact Search Change status Skype Enter Name My profile SkypeOut number Sign out Services Settings Skype credit General SkypeIn Call Settings Voicemail Privacy Tones Screen Chapter 4: Using the Dual-Mode Internet Telephony Kit Managing the Handset(s) Dual-Mode Internet Telephony Kit 57 In menu mode, select OK or SAVE (press the left soft key to select MENU. Press the Power/End Call key to cancel changes and...
User Guide
Page 75
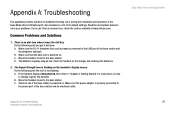
... base station and an electrical outlet. There is a list of the Dual-Mode Internet Telephony Kit. Make sure the RJ-11 telephone line cord is powered on . C. Move the handset closer to problems that the base unit is properly connected to solve your problems. If you get a dial tone: A. Place the handset on the handset's display screen. C. Also included is no dial tone when I press the Call key. The batteries capacity may occur during the installation and operation...
... base station and an electrical outlet. There is a list of the Dual-Mode Internet Telephony Kit. Make sure the RJ-11 telephone line cord is powered on . C. Move the handset closer to problems that the base unit is properly connected to solve your problems. If you get a dial tone: A. Place the handset on the handset's display screen. C. Also included is no dial tone when I press the Call key. The batteries capacity may occur during the installation and operation...
User Guide
Page 77
... selection is correct (refer to "Chapter 4: Using the Dual-Mode Internet Telephony Kit."). A. Check that Silent has not been selected in . Make sure the phone's mute key is enabled (Refer to "Chapter 4: Using the Dual-Mode Internet Telephony Kit). C. I cannot make sure you dial the international country code, area code and number. Check your Landline service provider. Appendix A: Troubleshooting Common Problems and Solutions Dual-Mode Internet Telephony Kit 69 Another...
... selection is correct (refer to "Chapter 4: Using the Dual-Mode Internet Telephony Kit."). A. Check that Silent has not been selected in . Make sure the phone's mute key is enabled (Refer to "Chapter 4: Using the Dual-Mode Internet Telephony Kit). C. I cannot make sure you dial the international country code, area code and number. Check your Landline service provider. Appendix A: Troubleshooting Common Problems and Solutions Dual-Mode Internet Telephony Kit 69 Another...
User Guide
Page 79
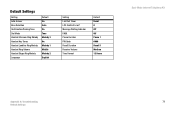
Default Settings Setting Auto Answer Base Selection Confirmation/Parking Tone Dial Mode Handset Intercom Ring Melody Handset Key Tones Handset Landline Ring Melody Handset Ring Volume Handset Skype Ring Melody Language Default On Auto On Tone Melody 3 On Melody 1 Middle Melody 2 English Setting Last Call Timer LCD Contrast Level* Message Waiting Indicator PABX Pause Duration PIN Code Recall Duration Receiver Volume Time Format Default Reset 0 Off Off Pause 1 0000 Recall 1 Medium 12 Hours Dual-Mode Internet Telephony Kit Appendix A: Troubleshooting 71 Default Settings
Default Settings Setting Auto Answer Base Selection Confirmation/Parking Tone Dial Mode Handset Intercom Ring Melody Handset Key Tones Handset Landline Ring Melody Handset Ring Volume Handset Skype Ring Melody Language Default On Auto On Tone Melody 3 On Melody 1 Middle Melody 2 English Setting Last Call Timer LCD Contrast Level* Message Waiting Indicator PABX Pause Duration PIN Code Recall Duration Receiver Volume Time Format Default Reset 0 Off Off Pause 1 0000 Recall 1 Medium 12 Hours Dual-Mode Internet Telephony Kit Appendix A: Troubleshooting 71 Default Settings

User Guide
Page 91
Appendix B: Specifications Dual-Mode Internet Telephony Kit Model Number Handset Frequency Bands Standards Speech Coding Distance Range Number of Channels Standby/Talk Time Base Station Power Button LEDs Ports CIT400 Europe:1880-1900MHz, North America:1920-1930MHz, South America:1910-1930MHz, Taiwan:1880-1895 MHz DECT (Digital Enhanced Cordless Telecommunication Standard), GAP (General Access Profile) 32Kbps ADPCM 300 meters outdoor, 50 meters indoor 10 channels (Europe and South America), 5 channels (North America), 5 channels (Taiwan) 120 hours...
Appendix B: Specifications Dual-Mode Internet Telephony Kit Model Number Handset Frequency Bands Standards Speech Coding Distance Range Number of Channels Standby/Talk Time Base Station Power Button LEDs Ports CIT400 Europe:1880-1900MHz, North America:1920-1930MHz, South America:1910-1930MHz, Taiwan:1880-1895 MHz DECT (Digital Enhanced Cordless Telecommunication Standard), GAP (General Access Profile) 32Kbps ADPCM 300 meters outdoor, 50 meters indoor 10 channels (Europe and South America), 5 channels (North America), 5 channels (Taiwan) 120 hours...

User Guide
Page 93
...: The phone's handset produces a magnetic field that can also power down this product by unplugging the USB base station from the electrical outlet. One way to avoid the possibility of emergency calls. Appendix C: Regulatory Information 85 IMPORTANT SAFETY INSTRUCTIONS. READ CAREFULLY AND KEEP FOR FUTURE REFERENCE. READ CAREFULLY AND KEEP FOR FUTURE REFERENCE. WARNING: RISK OF EXPLOSION IF BATTERY IS REPLACED BY...
...: The phone's handset produces a magnetic field that can also power down this product by unplugging the USB base station from the electrical outlet. One way to avoid the possibility of emergency calls. Appendix C: Regulatory Information 85 IMPORTANT SAFETY INSTRUCTIONS. READ CAREFULLY AND KEEP FOR FUTURE REFERENCE. READ CAREFULLY AND KEEP FOR FUTURE REFERENCE. WARNING: RISK OF EXPLOSION IF BATTERY IS REPLACED BY...


