Getting Started
Page 3
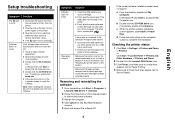
...cartridge and that the print cartridge has been installed properly. or Click Start Æ Control Panel Æ Printers and Other Hardware Æ Printers and Faxes. 2 Double-click the Lexmark 2400 Series icon. 3 Click Printer, and make sure no check mark appears next to Pause Printing. 4 Make sure a check mark does ...the software CD. The USB port is not on hold or paused. Make sure the printer is set as a USB hub or switch box. 2 Directly connect the cable to install the software. In Windows XP, click Start to re-enable your anti-virus software. If necessary, double-click ...
...cartridge and that the print cartridge has been installed properly. or Click Start Æ Control Panel Æ Printers and Other Hardware Æ Printers and Faxes. 2 Double-click the Lexmark 2400 Series icon. 3 Click Printer, and make sure no check mark appears next to Pause Printing. 4 Make sure a check mark does ...the software CD. The USB port is not on hold or paused. Make sure the printer is set as a USB hub or switch box. 2 Directly connect the cable to install the software. In Windows XP, click Start to re-enable your anti-virus software. If necessary, double-click ...
Getting Started
Page 6
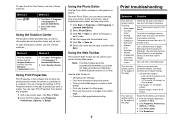
... Solution Center. Using Print Properties Print Properties is the software that controls the printing function when the printer is connected to dry. Use Lexmark Premium Photo Paper if you are using Microsoft Windows Internet Explorer version 5.5 or later. From the Photo Editor, you want to edit. 4 Edit the...the text of a Web page. • Print only the photos or images from almost any program: 1 With a document open the Solution Center, use one of these minimum print margin settings: • Left and right margins: - 6.35 mm (0.25 inches) for all paper except A4 - 3.175 mm ...
... Solution Center. Using Print Properties Print Properties is the software that controls the printing function when the printer is connected to dry. Use Lexmark Premium Photo Paper if you are using Microsoft Windows Internet Explorer version 5.5 or later. From the Photo Editor, you want to edit. 4 Edit the...the text of a Web page. • Print only the photos or images from almost any program: 1 With a document open the Solution Center, use one of these minimum print margin settings: • Left and right margins: - 6.35 mm (0.25 inches) for all paper except A4 - 3.175 mm ...

User's Guide
Page 16
...of the screen. 16 Note: Wait until scanning is Busy Printing. • View the ink level of the printer. For example, while printing, the status of the printer is complete before installing a new print cartridge. • View shopping options for more information, click Help in ...the lower right corner of the Printing Status window. • Turn printing voice notification on or off. • Change network printing...
...of the screen. 16 Note: Wait until scanning is Busy Printing. • View the ink level of the printer. For example, while printing, the status of the printer is complete before installing a new print cartridge. • View shopping options for more information, click Help in ...the lower right corner of the Printing Status window. • Turn printing voice notification on or off. • Change network printing...

User's Guide
Page 19
... with a line tool. • Erase areas. • Paint areas with a paintbrush tool. • Pick up a color using Microsoft Windows Internet Explorer version 5.5 or later. Note: The Lexmark Web Toolbar launches automatically when you create printer-friendly Web pages. Click To • Select Page Setup options. • Select Options to customize the toolbar appearance...
... with a line tool. • Erase areas. • Paint areas with a paintbrush tool. • Pick up a color using Microsoft Windows Internet Explorer version 5.5 or later. Note: The Lexmark Web Toolbar launches automatically when you create printer-friendly Web pages. Click To • Select Page Setup options. • Select Options to customize the toolbar appearance...
User's Guide
Page 40
Note: You can receive faxes only when the fax software is connected to a working phone line. • Both the printer and the computer are turned on. 2 From the desktop, double-click the Imaging Studio icon. 3 Click Fax. 4 Click Receive a fax or view settings/history. Note: ... the fax. Receiving a fax using the software 1 Make sure: • The printer is connected to a computer that is equipped with a fax modem. • The computer is open. 5 Double-click the fax in the status window to view it. 6 Click the printer icon to print faxes as they arrive, select Print Incoming Faxes. 40
Note: You can receive faxes only when the fax software is connected to a working phone line. • Both the printer and the computer are turned on. 2 From the desktop, double-click the Imaging Studio icon. 3 Click Fax. 4 Click Receive a fax or view settings/history. Note: ... the fax. Receiving a fax using the software 1 Make sure: • The printer is connected to a computer that is equipped with a fax modem. • The computer is open. 5 Double-click the fax in the status window to view it. 6 Click the printer icon to print faxes as they arrive, select Print Incoming Faxes. 40
User's Guide
Page 48
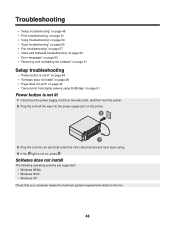
...page 49 • "Cannot print from digital camera using PictBridge" on page 51 Power button is not on the box. 48 Software does not install The following operating systems are supported: • Windows 98/Me • Windows 2000 • Windows XP Check that other electrical devices have been using. 4... If the light is not lit 1 Disconnect the power supply cord from the wall outlet, and then from the printer. 2 Plug the cord all the ...
...page 49 • "Cannot print from digital camera using PictBridge" on page 51 Power button is not on the box. 48 Software does not install The following operating systems are supported: • Windows 98/Me • Windows 2000 • Windows XP Check that other electrical devices have been using. 4... If the light is not lit 1 Disconnect the power supply cord from the wall outlet, and then from the printer. 2 Plug the cord all the ...

User's Guide
Page 49
...USB cable into the back of the computer. The USB port is not lit" on page 60. In Windows XP, click Start to access the My Computer icon. 4 Double-click the CD-ROM drive icon. 5... 6 Follow the instructions on the computer screen to install the software. 1 Visit our Web site at www.lexmark.com to check for the latest software. 2 In all open software applications. 2 Disable any obvious damage. ... end of the USB cable into the wall outlet. 6 Press to the printer. 5 Plug the power cord into the USB port of the printer. 1 Shut down and then restart your operating system. 7 Select the file...
...USB cable into the back of the computer. The USB port is not lit" on page 60. In Windows XP, click Start to access the My Computer icon. 4 Double-click the CD-ROM drive icon. 5... 6 Follow the instructions on the computer screen to install the software. 1 Visit our Web site at www.lexmark.com to check for the latest software. 2 In all open software applications. 2 Disable any obvious damage. ... end of the USB cable into the wall outlet. 6 Press to the printer. 5 Plug the power cord into the USB port of the printer. 1 Shut down and then restart your operating system. 7 Select the file...
User's Guide
Page 50
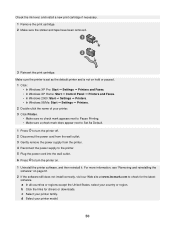
...8226; In Windows XP Pro: Start Œ Settings Œ Printers and Faxes. • In Windows XP Home: Start Œ Control Panel Œ Printers and Faxes. • In Windows 2000: Start Œ Settings Œ Printers. • In Windows 98/Me: Start Œ Settings Œ Printers. 2 Double-click the name of your printer model. 50 ... power supply from the printer. 4 Reconnect the power supply to the printer. 5 Plug the power cord into the wall outlet. 6 Press to turn the printer on page 61. 2 If the software still does not install correctly, visit our Web site at www.lexmark.com to check for...
...8226; In Windows XP Pro: Start Œ Settings Œ Printers and Faxes. • In Windows XP Home: Start Œ Control Panel Œ Printers and Faxes. • In Windows 2000: Start Œ Settings Œ Printers. • In Windows 98/Me: Start Œ Settings Œ Printers. 2 Double-click the name of your printer model. 50 ... power supply from the printer. 4 Reconnect the power supply to the printer. 5 Plug the power cord into the wall outlet. 6 Press to turn the printer on page 61. 2 If the software still does not install correctly, visit our Web site at www.lexmark.com to check for...

User's Guide
Page 55
... not on hold or paused. 1 Click: • In Windows XP Pro: Start Œ Settings Œ Printers and Faxes. • In Windows XP Home: Start Œ Control Panel Œ Printers and Faxes. • In Windows 2000: Start Œ Settings Œ Printers. • In Windows 98/Me: Start Œ Settings Œ Printers. 2 Double-click the name of the document or...
... not on hold or paused. 1 Click: • In Windows XP Pro: Start Œ Settings Œ Printers and Faxes. • In Windows XP Home: Start Œ Control Panel Œ Printers and Faxes. • In Windows 2000: Start Œ Settings Œ Printers. • In Windows 98/Me: Start Œ Settings Œ Printers. 2 Double-click the name of the document or...

User's Guide
Page 60
...; Settings Œ Printers and Faxes. • For Windows XP Home: Start Œ Control Panel Œ Printers and Faxes. • For Windows 2000: Start Œ Settings Œ Printers. • For Windows 98/Me: Start Œ Settings Œ Printers. 2 Double-click the name of specialty media at a time. Try loading one page, envelope, or sheet of your printer. 3 Click Printer. • Make...
...; Settings Œ Printers and Faxes. • For Windows XP Home: Start Œ Control Panel Œ Printers and Faxes. • For Windows 2000: Start Œ Settings Œ Printers. • For Windows 98/Me: Start Œ Settings Œ Printers. 2 Double-click the name of specialty media at a time. Try loading one page, envelope, or sheet of your printer. 3 Click Printer. • Make...


