
Getting Started
Page 5
...Photos • Scan & Edit Text (OCR) • Scan • Copy • Fax To open the Imaging Studio, use the buttons on the scanner glass. Scanning Scanning an item 1 Make sure the printer is connected to a computer, and both the printer and the computer are on. 2 ... All programs Æ Lexmark 2400 Series. 2 Select Imaging Studio. Copying 4 x 6 photos 1 Place the 4 x 6 photo facedown on the camera to select and print your photos. Using a PictBridge-enabled camera to print photos You can connect a PictBridge-enabled camera to the printer and use one of the preview image to...
...Photos • Scan & Edit Text (OCR) • Scan • Copy • Fax To open the Imaging Studio, use the buttons on the scanner glass. Scanning Scanning an item 1 Make sure the printer is connected to a computer, and both the printer and the computer are on. 2 ... All programs Æ Lexmark 2400 Series. 2 Select Imaging Studio. Copying 4 x 6 photos 1 Place the 4 x 6 photo facedown on the camera to select and print your photos. Using a PictBridge-enabled camera to print photos You can connect a PictBridge-enabled camera to the printer and use one of the preview image to...

User's Guide
Page 12
... desktop, double-click the Imaging Studio icon. 1 Click StartŒPrograms or All ProgramsŒLexmark 2400 Series. 2 Select Imaging Studio. Learning about the software Using the printer software Use this software To The Imaging Studio Open the software component necessary for you with the ... stored on your computer • Scanning and editing text using OCR • Scanning, copying, or faxing • Finding our Web site • Finding tips on using the software • Finding maintenance and troubleshooting information To open the Imaging Studio, use one of Web pages.
... desktop, double-click the Imaging Studio icon. 1 Click StartŒPrograms or All ProgramsŒLexmark 2400 Series. 2 Select Imaging Studio. Learning about the software Using the printer software Use this software To The Imaging Studio Open the software component necessary for you with the ... stored on your computer • Scanning and editing text using OCR • Scanning, copying, or faxing • Finding our Web site • Finding tips on using the software • Finding maintenance and troubleshooting information To open the Imaging Studio, use one of Web pages.
User's Guide
Page 13
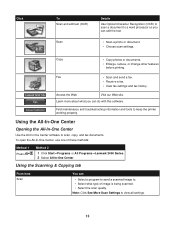
... what you can edit the text. • Scan a photo or document. • Choose scan settings. To open the All-In-One Center, use one of image is being scanned. • Select the scan quality. Fax • Scan and send a fax. • Receive a ...printer working properly. Click To Scan and edit text (OCR) Scan Details Use Optical Character Recognition (OCR) to scan a document to a word processor so you can • Select a program to send a scanned image to. • Select what type of these methods: Method 1 Press Method 2 . 1 Click StartŒPrograms or All ProgramsŒLexmark...
... what you can edit the text. • Scan a photo or document. • Choose scan settings. To open the All-In-One Center, use one of image is being scanned. • Select the scan quality. Fax • Scan and send a fax. • Receive a ...printer working properly. Click To Scan and edit text (OCR) Scan Details Use Optical Character Recognition (OCR) to scan a document to a word processor so you can • Select a program to send a scanned image to. • Select what type of these methods: Method 1 Press Method 2 . 1 Click StartŒPrograms or All ProgramsŒLexmark...

User's Guide
Page 14
... Modify an image with images that are saved on the computer. Note: For more information about the Scanning & Copying tab, click Help in a scanned document (OCR). - From here Preview Open With Photo Prints You can • Select the quantity and color of copies. • Select a quality setting for copies. &#... copy. • View an image of the original document. • Lighten or darken copies. • Enlarge or reduce copies. Save an image on one page. - Using the Saved Images tab Use the Saved Images tab to perform tasks with a photo editor. • Select a region of the previewed...
... Modify an image with images that are saved on the computer. Note: For more information about the Scanning & Copying tab, click Help in a scanned document (OCR). - From here Preview Open With Photo Prints You can • Select the quantity and color of copies. • Select a quality setting for copies. &#... copy. • View an image of the original document. • Lighten or darken copies. • Enlarge or reduce copies. Save an image on one page. - Using the Saved Images tab Use the Saved Images tab to perform tasks with a photo editor. • Select a region of the previewed...

User's Guide
Page 15
... Center. 1 Click StartŒPrograms or All ProgramsŒLexmark 2400 Series. 2 Select All-In-One Center. 3 Click Maintain/Troubleshoot. 4 Select from these methods...: Method 1 Method 2 From the desktop, double-click the Imaging Studio icon, and then click the Maintain/Troubleshoot button. 1 Click StartŒPrograms or All ProgramsŒLexmark...using your computer modem. • Edit - Note: For more information about the printer status and ink level. Modify an image with various photo sizes. - Enlarge or...
... Center. 1 Click StartŒPrograms or All ProgramsŒLexmark 2400 Series. 2 Select All-In-One Center. 3 Click Maintain/Troubleshoot. 4 Select from these methods...: Method 1 Method 2 From the desktop, double-click the Imaging Studio icon, and then click the Maintain/Troubleshoot button. 1 Click StartŒPrograms or All ProgramsŒLexmark...using your computer modem. • Edit - Note: For more information about the printer status and ink level. Modify an image with various photo sizes. - Enlarge or...
User's Guide
Page 37
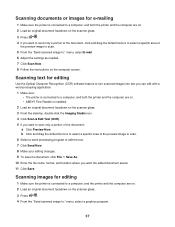
...connected to a computer, and both the printer and the computer are on. • ABBYY Fine Reader is installed. 2 Load an original document facedown on the scanner glass. 3 From the desktop, double-click the Imaging Studio icon. 4 Click Scan & Edit Text (OCR). 5 If you want the edited .... Scanning text for editing Use the Optical Character Recognition (OCR) software feature to turn scanned images into text you can edit with a word-processing application. 1 Make sure: • The printer is connected to a computer, and both the printer and the computer are on. 2 Load an original document...
...connected to a computer, and both the printer and the computer are on. • ABBYY Fine Reader is installed. 2 Load an original document facedown on the scanner glass. 3 From the desktop, double-click the Imaging Studio icon. 4 Click Scan & Edit Text (OCR). 5 If you want the edited .... Scanning text for editing Use the Optical Character Recognition (OCR) software feature to turn scanned images into text you can edit with a word-processing application. 1 Make sure: • The printer is connected to a computer, and both the printer and the computer are on. 2 Load an original document...

User's Guide
Page 68
... Advanced tab 16 album page, creating 31 aligning print cartridge using the computer 44 All-In-One Center Maintain/Troubleshoot link 15 opening 13 Saved Images tab 14 Scanning & Copying tab 13 B... print photos 12 Copy 13 Fax 13 Maintain/Troubleshoot 13 Scan 13 Scan and edit text (OCR) 13 Share photos 12 Tips 13 using 12 Web site 13 Imaging Studio, using 12 improving...printing 28 information, finding 7 ink level, checking 15 inserting PictBridge-enabled digital camera 31 installing print cartridge 42 printer software 61 software and sharing printer on network 41 iron-on transfers, loading 22 J jams...
... Advanced tab 16 album page, creating 31 aligning print cartridge using the computer 44 All-In-One Center Maintain/Troubleshoot link 15 opening 13 Saved Images tab 14 Scanning & Copying tab 13 B... print photos 12 Copy 13 Fax 13 Maintain/Troubleshoot 13 Scan 13 Scan and edit text (OCR) 13 Share photos 12 Tips 13 using 12 Web site 13 Imaging Studio, using 12 improving...printing 28 information, finding 7 ink level, checking 15 inserting PictBridge-enabled digital camera 31 installing print cartridge 42 printer software 61 software and sharing printer on network 41 iron-on transfers, loading 22 J jams...

User's Guide
Page 69
...64, 65 O OCR, editing document ...printer does not print or respond 53 printer software reinstalling 61 removing 61 using 12 Printer Status dialog 16 printing cards 28 changing paper type 26 collated copies 29 document 26 envelopes 28 greeting cards 28 index cards 28 last page first 29 photos from PictBridge...-enabled digital camera 31 postcards 28 reverse page order 29 transparencies 28 Web page 26 Web page, photos only 27 printing photos from the computer 30 publications, finding 7 Q Quality/Copies tab 18 R received fax is blank 58 receiving a fax using the software 40 recycling Lexmark...
...64, 65 O OCR, editing document ...printer does not print or respond 53 printer software reinstalling 61 removing 61 using 12 Printer Status dialog 16 printing cards 28 changing paper type 26 collated copies 29 document 26 envelopes 28 greeting cards 28 index cards 28 last page first 29 photos from PictBridge...-enabled digital camera 31 postcards 28 reverse page order 29 transparencies 28 Web page 26 Web page, photos only 27 printing photos from the computer 30 publications, finding 7 Q Quality/Copies tab 18 R received fax is blank 58 receiving a fax using the software 40 recycling Lexmark...
User's Guide
Page 70
...37 from magazines or newspapers 38 saving scanned image 36 text for editing (OCR) 37 using the control panel 35 Scanning & Copying tab Copy section ...scrapbook page, creating 31 setup troubleshooting cannot print from digital camera using PictBridge 51 page does not print 49 power button is not lit 48 ...-to-peer method 41 point-and-print method 41 software All-In-One Center 13 Imaging Studio 12 Photo Editor 18 Print Properties 17 removing...Contact Information tab 16 How To tab 16 Maintenance tab 16 opening 15 Printer Status dialog 16 Troubleshooting tab 16 using 15 supplies, ordering 46 T text...
...37 from magazines or newspapers 38 saving scanned image 36 text for editing (OCR) 37 using the control panel 35 Scanning & Copying tab Copy section ...scrapbook page, creating 31 setup troubleshooting cannot print from digital camera using PictBridge 51 page does not print 49 power button is not lit 48 ...-to-peer method 41 point-and-print method 41 software All-In-One Center 13 Imaging Studio 12 Photo Editor 18 Print Properties 17 removing...Contact Information tab 16 How To tab 16 Maintenance tab 16 opening 15 Printer Status dialog 16 Troubleshooting tab 16 using 15 supplies, ordering 46 T text...

