User's Guide
Page 1
Z700 Series Color Jetprinter™ P700 Series Photo Jetprinter™ User's Guide for Windows • Setup troubleshooting A checklist to find solutions to common setup problems. • Printer overview Learn about the printer parts and the printer software. • Printing ideas How to print several projects on various types of paper. • Maintenance Caring for your cartridges and ordering supplies. • General troubleshooting Error messages, print quality problems, paper jams, and much more. January 2003 www.lexmark.com
Z700 Series Color Jetprinter™ P700 Series Photo Jetprinter™ User's Guide for Windows • Setup troubleshooting A checklist to find solutions to common setup problems. • Printer overview Learn about the printer parts and the printer software. • Printing ideas How to print several projects on various types of paper. • Maintenance Caring for your cartridges and ordering supplies. • General troubleshooting Error messages, print quality problems, paper jams, and much more. January 2003 www.lexmark.com
User's Guide
Page 3
Contents Chapter 1: Printer overview 5 Understanding the printer parts 5 Using memory cards (Lexmark P700 Series only 7 Using the printer software 8 Using the paper type sensor 12 Chapter 2: Printing ideas 13 Printing on plain paper 13 Printing photos 14 Printing on premium or coated paper ...
Contents Chapter 1: Printer overview 5 Understanding the printer parts 5 Using memory cards (Lexmark P700 Series only 7 Using the printer software 8 Using the paper type sensor 12 Chapter 2: Printing ideas 13 Printing on plain paper 13 Printing photos 14 Printing on premium or coated paper ...
User's Guide
Page 4
Preserving the print cartridges 49 Ordering supplies 50 Chapter 4: Setup troubleshooting 51 Troubleshooting checklist 51 Solving printer software installation problems 52 Chapter 5: General troubleshooting 55 Solving network printing problems 55 Understanding error messages and flashing lights 55 Resolving unsuccessful or slow printing 57 Clearing paper misfeeds or jams 59 Solving print quality problems 60 Solving specialty media problems 63 Notices 64 Glossary 66 Index 70 Contents 4
Preserving the print cartridges 49 Ordering supplies 50 Chapter 4: Setup troubleshooting 51 Troubleshooting checklist 51 Solving printer software installation problems 52 Chapter 5: General troubleshooting 55 Solving network printing problems 55 Understanding error messages and flashing lights 55 Resolving unsuccessful or slow printing 57 Clearing paper misfeeds or jams 59 Solving print quality problems 60 Solving specialty media problems 63 Notices 64 Glossary 66 Index 70 Contents 4
User's Guide
Page 5
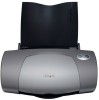
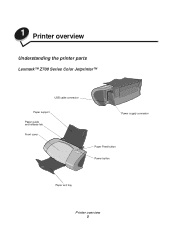
1 Printer overview Understanding the printer parts Lexmark™ Z700 Series Color Jetprinter™ USB cable connector Paper support Paper guide and release tab Front cover Power supply connector Paper Feed button Power button Paper exit tray Printer overview 5
1 Printer overview Understanding the printer parts Lexmark™ Z700 Series Color Jetprinter™ USB cable connector Paper support Paper guide and release tab Front cover Power supply connector Paper Feed button Power button Paper exit tray Printer overview 5
User's Guide
Page 6
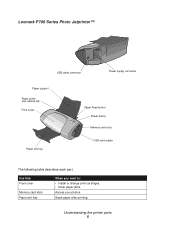
Lexmark P700 Series Photo Jetprinter™ USB cable connector Power supply connector Paper support Paper guide and release tab Front cover Paper exit tray Paper Feed button Power button Memory card slots USB card reader The following table describes each part. Stack paper after printing. Understanding the printer parts 6 Use this: Front cover Memory card slots Paper exit tray When you want to: • Install or change print cartridges. • Clear paper jams. Access your photos.
Lexmark P700 Series Photo Jetprinter™ USB cable connector Power supply connector Paper support Paper guide and release tab Front cover Paper exit tray Paper Feed button Power button Memory card slots USB card reader The following table describes each part. Stack paper after printing. Understanding the printer parts 6 Use this: Front cover Memory card slots Paper exit tray When you want to: • Install or change print cartridges. • Clear paper jams. Access your photos.
User's Guide
Page 7
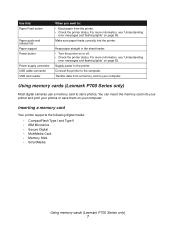
... on page 55. Supply power to store photos. Using memory cards (Lexmark P700 Series only) Most digital cameras use a memory card to the printer. Keep paper straight in the sheet feeder. • Turn the printer on your photos or save them on or off. • Check ...can insert the memory card into the printer. Inserting a memory card Your printer supports the following digital media: • CompactFlash Type I and Type II • IBM Microdrive • Secure Digital • MultiMedia Card • Memory Stick • SmartMedia Using memory cards (Lexmark P700 Series only) 7 For more ...
... on page 55. Supply power to store photos. Using memory cards (Lexmark P700 Series only) Most digital cameras use a memory card to the printer. Keep paper straight in the sheet feeder. • Turn the printer on your photos or save them on or off. • Check ...can insert the memory card into the printer. Inserting a memory card Your printer supports the following digital media: • CompactFlash Type I and Type II • IBM Microdrive • Secure Digital • MultiMedia Card • Memory Stick • SmartMedia Using memory cards (Lexmark P700 Series only) 7 For more ...
User's Guide
Page 8
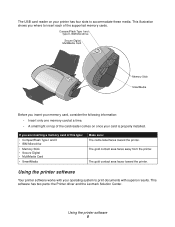
... a memory card of the card reader comes on your printer has four slots to accommodate these media. Using the printer software Your printer software works with superior results. The gold contact area faces away from the printer. This software has two parts: the Printer driver and the Lexmark Solution Center. The USB card reader on once...
... a memory card of the card reader comes on your printer has four slots to accommodate these media. Using the printer software Your printer software works with superior results. The gold contact area faces away from the printer. This software has two parts: the Printer driver and the Lexmark Solution Center. The USB card reader on once...

User's Guide
Page 9
... of print jobs, see "Printing ideas" on plain paper, you install the printer software, the Print Properties are set to change your printer settings in the printer driver. When you do not need to these default settings: • Paper Type: Use Printer Sensor • Quality/Speed: Automatic • Paper Size: A4 or Letter •...
... of print jobs, see "Printing ideas" on plain paper, you install the printer software, the Print Properties are set to change your printer settings in the printer driver. When you do not need to these default settings: • Paper Type: Use Printer Sensor • Quality/Speed: Automatic • Paper Size: A4 or Letter •...
User's Guide
Page 10
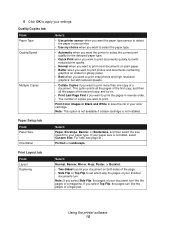
... Top Flip, the pages turn like the pages of a legal pad. Quality/Copies tab From: Paper Type Quality/Speed Multiple Copies Select: • Use printer sensor when you want the paper type sensor to detect the paper in your finished documents turn. For help, see page 41. Print Layout tab... high resolution graphics, but with reduced speeds. • Collate Copies if you want to your document turn like the pages of a document. Using the printer software 10 Print Color Images in Black and White to apply your settings. 6 Click OK to save the ink in your paper size is not...
... Top Flip, the pages turn like the pages of a legal pad. Quality/Copies tab From: Paper Type Quality/Speed Multiple Copies Select: • Use printer sensor when you want the paper type sensor to detect the paper in your finished documents turn. For help, see page 41. Print Layout tab... high resolution graphics, but with reduced speeds. • Collate Copies if you want to your document turn like the pages of a document. Using the printer software 10 Print Color Images in Black and White to apply your settings. 6 Click OK to save the ink in your paper size is not...
User's Guide
Page 11
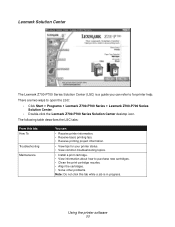
... Series Solution Center. • Double-click the Lexmark Z700-P700 Series Solution Center desktop icon. Lexmark Solution Center The Lexmark Z700-P700 Series Solution Center (LSC) is in progress. The following table describes the LSC tabs: From this tab: How To Troubleshooting Maintenance You can: • Receive printer information. • Receive basic printing tips...
... Series Solution Center. • Double-click the Lexmark Z700-P700 Series Solution Center desktop icon. Lexmark Solution Center The Lexmark Z700-P700 Series Solution Center (LSC) is in progress. The following table describes the LSC tabs: From this tab: How To Troubleshooting Maintenance You can: • Receive printer information. • Receive basic printing tips...
User's Guide
Page 12
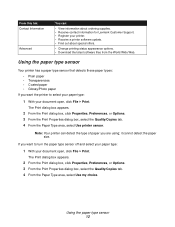
...Properties, Preferences, or Options. 3 From the Print Properties dialog box, select the Quality/Copies tab. 4 From the Paper Type area, select Use printer sensor. The Print dialog box appears. 2 From the Print dialog box, click Properties, Preferences, or Options. 3 From the Print Properties dialog ... From this tab: Contact Information Advanced You can detect the type of paper you are using; Note: Your printer can : • View information about ordering supplies. • Receive contact information for Lexmark Customer Support. • Register your document open , click File Print.
...Properties, Preferences, or Options. 3 From the Print Properties dialog box, select the Quality/Copies tab. 4 From the Paper Type area, select Use printer sensor. The Print dialog box appears. 2 From the Print dialog box, click Properties, Preferences, or Options. 3 From the Print Properties dialog ... From this tab: Contact Information Advanced You can detect the type of paper you are using; Note: Your printer can : • View information about ordering supplies. • Receive contact information for Lexmark Customer Support. • Register your document open , click File Print.
User's Guide
Page 13
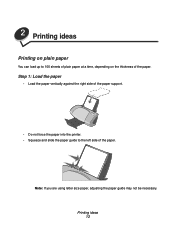
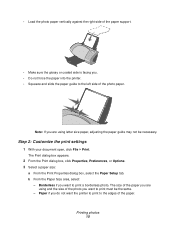
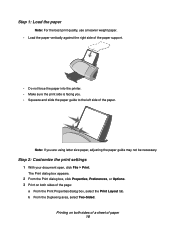
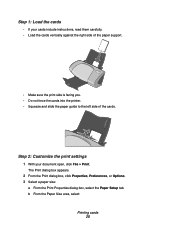
Note: If you are using letter size paper, adjusting the paper guide may not be necessary. Printing ideas 13 Step 1: Load the paper • Load the paper vertically against the right side of the paper support. • Do not force the paper into the printer. • Squeeze and slide the paper guide to 100 sheets of plain paper at a time, depending on the thickness of the paper. 2 Printing ideas Printing on plain paper You can load up to the left side of the paper.
Note: If you are using letter size paper, adjusting the paper guide may not be necessary. Printing ideas 13 Step 1: Load the paper • Load the paper vertically against the right side of the paper support. • Do not force the paper into the printer. • Squeeze and slide the paper guide to 100 sheets of plain paper at a time, depending on the thickness of the paper. 2 Printing ideas Printing on plain paper You can load up to the left side of the paper.
User's Guide
Page 14
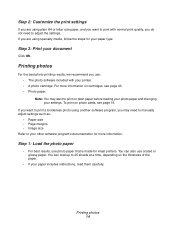
... cartridges, see page 19. Step 3: Print your other software program's documentation for more information on plain paper before loading your photo paper and changing your printer. • A photo cartridge. Printing photos 14 If you want to your document Click OK. Step 1: Load the photo paper • For best results, use coated... adjust the settings. If you may want to print a borderless photo using another software program, you are using specialty media, follow the steps for inkjet printers.
... cartridges, see page 19. Step 3: Print your other software program's documentation for more information on plain paper before loading your photo paper and changing your printer. • A photo cartridge. Printing photos 14 If you want to your document Click OK. Step 1: Load the photo paper • For best results, use coated... adjust the settings. If you may want to print a borderless photo using another software program, you are using specialty media, follow the steps for inkjet printers.
User's Guide
Page 15
... must be necessary. Note: If you are using letter size paper, adjusting the paper guide may not be the same. - Borderless if you want the printer to print to the edges of the photo paper. Step 2: Customize the print settings 1 With your document open, click File Print. The Print dialog box... right side of the paper support. • Make sure the glossy or coated side is facing you. • Do not force the paper into the printer. • Squeeze and slide the paper guide to the left side of the paper.
... must be necessary. Note: If you are using letter size paper, adjusting the paper guide may not be the same. - Borderless if you want the printer to print to the edges of the photo paper. Step 2: Customize the print settings 1 With your document open, click File Print. The Print dialog box... right side of the paper support. • Make sure the glossy or coated side is facing you. • Do not force the paper into the printer. • Squeeze and slide the paper guide to the left side of the paper.
User's Guide
Page 16
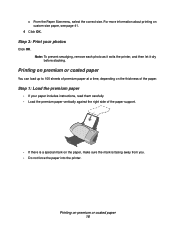
... vertically against the right side of the paper support. • If there is facing away from you. • Do not force the paper into the printer. For more information about printing on the thickness of premium paper at a time, depending on custom size paper, see page 41. 4 Click OK. Note: To... prevent smudging, remove each photo as it exits the printer, and then let it dry before stacking. Printing on premium or coated paper You can load up to 100 sheets of the paper. Step 1: Load...
... vertically against the right side of the paper support. • If there is facing away from you. • Do not force the paper into the printer. For more information about printing on the thickness of premium paper at a time, depending on custom size paper, see page 41. 4 Click OK. Note: To... prevent smudging, remove each photo as it exits the printer, and then let it dry before stacking. Printing on premium or coated paper You can load up to 100 sheets of the paper. Step 1: Load...
User's Guide
Page 18
..., use a heavier weight paper. • Load the paper vertically against the right side of the paper support. • Do not force the paper into the printer. • Make sure the print side is facing you are using letter size paper, adjusting the paper guide may not be necessary.
..., use a heavier weight paper. • Load the paper vertically against the right side of the paper support. • Do not force the paper into the printer. • Make sure the print side is facing you are using letter size paper, adjusting the paper guide may not be necessary.
User's Guide
Page 19
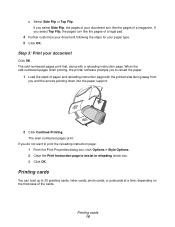
... Flip, the pages turn like the pages of paper and reloading instruction page with a reloading instruction page. When the odd-numbered pages finish printing, the printer software prompts you and the arrows pointing down into the paper support. 2 Click Continue Printing. Printing cards You can load up to 25 greeting cards...
... Flip, the pages turn like the pages of paper and reloading instruction page with a reloading instruction page. When the odd-numbered pages finish printing, the printer software prompts you and the arrows pointing down into the paper support. 2 Click Continue Printing. Printing cards You can load up to 25 greeting cards...
User's Guide
Page 20
... against the right side of the paper support. • Make sure the print side is facing you. • Do not force the cards into the printer. • Squeeze and slide the paper guide to the left side of the cards. b From the Paper Size area, select: Printing cards 20 Step 1: Load...
... against the right side of the paper support. • Make sure the print side is facing you. • Do not force the cards into the printer. • Squeeze and slide the paper guide to the left side of the cards. b From the Paper Size area, select: Printing cards 20 Step 1: Load...

User's Guide
Page 21
Paper if you want the printer to print to print a borderless photo. Printing envelopes You can load up to print must be the same. - Printing envelopes 21 c From the Paper Size ... Click OK. Borderless if you . • Make sure the stamp location is in the upper left corner. • Do not force the envelopes into the printer. - For more information about printing on the thickness of the paper. Step 1: Load the envelopes Note: Do not use envelopes with holes, windows, deep embossing...
Paper if you want the printer to print to print a borderless photo. Printing envelopes You can load up to print must be the same. - Printing envelopes 21 c From the Paper Size ... Click OK. Borderless if you . • Make sure the stamp location is in the upper left corner. • Do not force the envelopes into the printer. - For more information about printing on the thickness of the paper. Step 1: Load the envelopes Note: Do not use envelopes with holes, windows, deep embossing...
User's Guide
Page 23
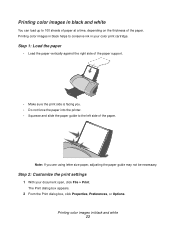
... paper guide may not be necessary. Printing color images in black and white 23 Note: If you . • Do not force the paper into the printer. • Squeeze and slide the paper guide to conserve ink in your document open, click File Print. Step 2: Customize the print settings 1 With your color...
... paper guide may not be necessary. Printing color images in black and white 23 Note: If you . • Do not force the paper into the printer. • Squeeze and slide the paper guide to conserve ink in your document open, click File Print. Step 2: Customize the print settings 1 With your color...


