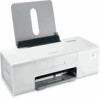

Getting Started
Page 2
... INSTRUCTIONS. CAUTION: Do not set up this product or the manufacturer's authorized replacement power supply and power supply cord. Lexmark is near the product and easily accessible. The safety features of specific Lexmark components. Operating system notice All features and functions are operating system-dependent. Connect the power supply cord to a properly... use of some parts may not always be obvious. Important safety information Use only the power supply and power supply cord provided with the printer software.
... INSTRUCTIONS. CAUTION: Do not set up this product or the manufacturer's authorized replacement power supply and power supply cord. Lexmark is near the product and easily accessible. The safety features of specific Lexmark components. Operating system notice All features and functions are operating system-dependent. Connect the power supply cord to a properly... use of some parts may not always be obvious. Important safety information Use only the power supply and power supply cord provided with the printer software.
Getting Started
Page 3
...networking...17 Networking overview...17 Learning about the printer 22 Understanding the parts of the printer 22 Learning about the software 24 Using the printer software...24 Using the Imaging Studio...24 Using the Solution Center...25 Using Print Properties...26 Opening Print Properties ...26 ... I Want To menu...27 Using the Options menu ...27 Using the Print Properties tabs...27 Using the Toolbar...28 Resetting printer software settings to defaults 29 Maintaining the printer 30 Changing print cartridges...30 Removing a used print cartridge...30 Installing print cartridges...31 Ordering...
...networking...17 Networking overview...17 Learning about the printer 22 Understanding the parts of the printer 22 Learning about the software 24 Using the printer software...24 Using the Imaging Studio...24 Using the Solution Center...25 Using Print Properties...26 Opening Print Properties ...26 ... I Want To menu...27 Using the Options menu ...27 Using the Print Properties tabs...27 Using the Toolbar...28 Resetting printer software settings to defaults 29 Maintaining the printer 30 Changing print cartridges...30 Removing a used print cartridge...30 Installing print cartridges...31 Ordering...
Getting Started
Page 4
... Changing wireless settings after installation 49 Finding your MAC address...50 Resetting an internal wireless print server to factory default 50 Uninstalling and reinstalling the software 50 Advanced wireless setup 52 Adding a printer to an existing ad hoc wireless network 52 Creating an ad hoc wireless network 53 Notices...56 Edition...
... Changing wireless settings after installation 49 Finding your MAC address...50 Resetting an internal wireless print server to factory default 50 Uninstalling and reinstalling the software 50 Advanced wireless setup 52 Adding a printer to an existing ad hoc wireless network 52 Creating an ad hoc wireless network 53 Notices...56 Edition...
Getting Started
Page 5
... Windows operating systems) and some basic instructions for setting up hardware and software. Note: If your printer supports Macintosh operating systems, see the User's Guide instead. 5 Finding information about the printer Quick Setup sheet Description The Quick ... The Setup Solutions booklet tells you instructions for using the printer. You can find this document in the printer box or on the Lexmark Web site at www.lexmark.com. Getting Started or Setup Solutions booklet Description Where to solve printer setup problems. Note: These documents do not ship with all ...
... Windows operating systems) and some basic instructions for setting up hardware and software. Note: If your printer supports Macintosh operating systems, see the User's Guide instead. 5 Finding information about the printer Quick Setup sheet Description The Quick ... The Setup Solutions booklet tells you instructions for using the printer. You can find this document in the printer box or on the Lexmark Web site at www.lexmark.com. Getting Started or Setup Solutions booklet Description Where to solve printer setup problems. Note: These documents do not ship with all ...
Getting Started
Page 6
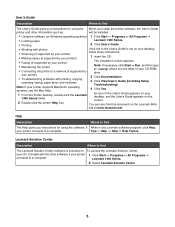
... to find The Help gives you instructions for using the When you instructions for using the software, if While in any Lexmark software program, click Help, your printer connects to a computer. Lexmark 1400 Series. 2 Select Lexmark Solution Center. 6 An icon of your CD-ROM • Connecting the printer to a...operating systems, see the Mac Help: 4 Click Yes. 1 From the Finder desktop, double-click the Lexmark 1400 Series folder. You can also find The Lexmark Solution Center software is the letter of the User's Guide appears on your desktop, and the User's Guide appears on Windows...
... to find The Help gives you instructions for using the When you instructions for using the software, if While in any Lexmark software program, click Help, your printer connects to a computer. Lexmark 1400 Series. 2 Select Lexmark Solution Center. 6 An icon of your CD-ROM • Connecting the printer to a...operating systems, see the Mac Help: 4 Click Yes. 1 From the Finder desktop, double-click the Lexmark 1400 Series folder. You can also find The Lexmark Solution Center software is the letter of the User's Guide appears on your desktop, and the User's Guide appears on Windows...
Getting Started
Page 10
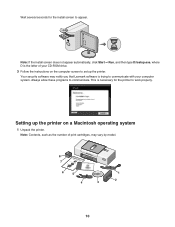
... screen does not appear automatically, click Start ΠRun, and then type D:\setup.exe, where D is the letter of print cartridges, may notify you that Lexmark software is necessary for the install screen to appear. Wait several seconds for the printer to work properly. Setting up the printer. Always allow these programs...
... screen does not appear automatically, click Start ΠRun, and then type D:\setup.exe, where D is the letter of print cartridges, may notify you that Lexmark software is necessary for the install screen to appear. Wait several seconds for the printer to work properly. Setting up the printer. Always allow these programs...

Getting Started
Page 19
.... 2 Type ipconfig. 3 Press Enter. How to the Internet. The IP address appears as four sets of numbers separated by your operating system or wireless network software. 19 Scenario 5: Laptop connected wirelessly to printer without Internet • A laptop is directly connected wirelessly to a printer without going through a wireless router. • The network... even other devices such as 192.168.0.100. The IP address appears as four sets of numbers separated by your operating system or wireless network software. This is that transmit and receive radio signals.
.... 2 Type ipconfig. 3 Press Enter. How to the Internet. The IP address appears as four sets of numbers separated by your operating system or wireless network software. 19 Scenario 5: Laptop connected wirelessly to printer without Internet • A laptop is directly connected wirelessly to a printer without going through a wireless router. • The network... even other devices such as 192.168.0.100. The IP address appears as four sets of numbers separated by your operating system or wireless network software. This is that transmit and receive radio signals.
Getting Started
Page 24
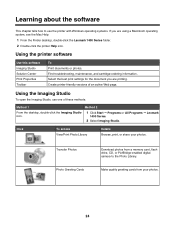
... this software Imaging Studio Solution Center Print Properties Toolbar To Print documents or photos. Create printer-friendly versions of these methods: Method 1 Method 2 From the desktop, double-click the Imaging Studio icon. 1 Click Start ΠPrograms or All Programs ΠLexmark 1400 Series. 2 Select ... use one of an active Web page. Select the best print settings for the document you are printing. Learning about the software This chapter tells how to the Photo Library. Find troubleshooting, maintenance, and cartridge-ordering information. Using the Imaging Studio To open...
... this software Imaging Studio Solution Center Print Properties Toolbar To Print documents or photos. Create printer-friendly versions of these methods: Method 1 Method 2 From the desktop, double-click the Imaging Studio icon. 1 Click Start ΠPrograms or All Programs ΠLexmark 1400 Series. 2 Select ... use one of an active Web page. Select the best print settings for the document you are printing. Learning about the software This chapter tells how to the Photo Library. Find troubleshooting, maintenance, and cartridge-ordering information. Using the Imaging Studio To open...
Getting Started
Page 26
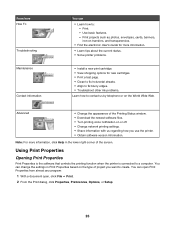
... other ink problems. Learn how to a computer. Advanced • Change the appearance of the Printing Status window. • Download the newest software files. • Turn printing voice notification on or off. • Change network printing settings. • Share information with us by telephone or... on the type of the screen. Using Print Properties Opening Print Properties Print Properties is the software that controls the printing function when the printer is connected to contact us regarding how you want to : - From here How...
... other ink problems. Learn how to a computer. Advanced • Change the appearance of the Printing Status window. • Download the newest software files. • Turn printing voice notification on or off. • Change network printing settings. • Share information with us by telephone or... on the type of the screen. Using Print Properties Opening Print Properties Print Properties is the software that controls the printing function when the printer is connected to contact us regarding how you want to : - From here How...
Getting Started
Page 27
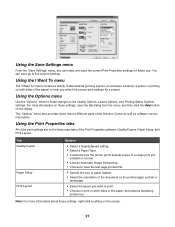
... the printed page: portrait or landscape. • Select the layout you want to print. • Choose to print on both sides of the Print Properties software: Quality/Copies, Paper Setup, and Print Layout. For more information about these settings, open the tab dialog from the menu, and then click the Help... "Save Settings" menu, you select the correct print settings for future use. Using the Print Properties tabs All of the Solution Center as well as software version information.
... the printed page: portrait or landscape. • Select the layout you want to print. • Choose to print on both sides of the Print Properties software: Quality/Copies, Paper Setup, and Print Layout. For more information about these settings, open the tab dialog from the menu, and then click the Help... "Save Settings" menu, you select the correct print settings for future use. Using the Print Properties tabs All of the Solution Center as well as software version information.
Getting Started
Page 29
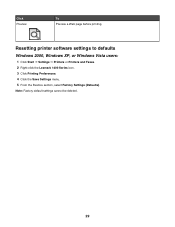
Resetting printer software settings to defaults Windows 2000, Windows XP, or Windows Vista users: 1 Click Start ΠSettings ΠPrinters or Printers and Faxes. 2 Right-click the Lexmark 1400 Series icon. 3 Click Printing Preferences. 4 Click the Save Settings menu. 5 From the Restore section, select Factory Settings (Defaults). Note: Factory default settings cannot be deleted. 29 Click Preview To Preview a Web page before printing.
Resetting printer software settings to defaults Windows 2000, Windows XP, or Windows Vista users: 1 Click Start ΠSettings ΠPrinters or Printers and Faxes. 2 Right-click the Lexmark 1400 Series icon. 3 Click Printing Preferences. 4 Click the Save Settings menu. 5 From the Restore section, select Factory Settings (Defaults). Note: Factory default settings cannot be deleted. 29 Click Preview To Preview a Web page before printing.
Getting Started
Page 34
Software does not install These are possible solutions. Disconnect and reconnect the power cord 1 Disconnect the power cord from the wall outlet, and then from the ...
Software does not install These are possible solutions. Disconnect and reconnect the power cord 1 Disconnect the power cord from the wall outlet, and then from the ...
Getting Started
Page 35
... 3 Firmly plug the rectangular end of the USB cable into the wall outlet. 6 Press to turn the printer on page 34. Uninstall and reinstall software Uninstall the printer software, and then reinstall it. Check power If the light is not on, see "Power button is not lit" on . Check ink Check the... message is marked with the USB symbol. Page does not print These are possible solutions. The USB port is displayed, see "Uninstalling and reinstalling the software" on the CD.
... 3 Firmly plug the rectangular end of the USB cable into the wall outlet. 6 Press to turn the printer on page 34. Uninstall and reinstall software Uninstall the printer software, and then reinstall it. Check power If the light is not on, see "Power button is not lit" on . Check ink Check the... message is marked with the USB symbol. Page does not print These are possible solutions. The USB port is displayed, see "Uninstalling and reinstalling the software" on the CD.
Getting Started
Page 36
... installed. The network setup page lists the configuration settings of the following: Check power If the light is not on, see "Uninstalling and reinstalling the software" on page 34. For more information, see "Power button is not lit" on page 50. Try one or more information, see the "Setting up the... printer" chapter. 36 For more of the internal wireless print server. Uninstall and reinstall software Uninstall the printer software, and then reinstall it. Reinstall the internal wireless print server.
... installed. The network setup page lists the configuration settings of the following: Check power If the light is not on, see "Uninstalling and reinstalling the software" on page 34. For more information, see "Power button is not lit" on page 50. Try one or more information, see the "Setting up the... printer" chapter. 36 For more of the internal wireless print server. Uninstall and reinstall software Uninstall the printer software, and then reinstall it. Reinstall the internal wireless print server.
Getting Started
Page 37
... in a safe place for future reference. c Write down exactly, including any capital letters. 2 Click Start ΠPrograms or All Programs ΠLexmark 1400 Series. 3 Click Wireless Setup. If you do not know the SSID of the network, use the following steps to the computer again using the...printer must match the SSID of AirPort and obtain the SSID before rerunning the Wireless Setup Utility. b Enter your operating system or wireless network software. c Click OK. Note: Make sure you do not know the SSID of the network the computer is connected to obtain it before rerunning...
... in a safe place for future reference. c Write down exactly, including any capital letters. 2 Click Start ΠPrograms or All Programs ΠLexmark 1400 Series. 3 Click Wireless Setup. If you do not know the SSID of the network, use the following steps to the computer again using the...printer must match the SSID of AirPort and obtain the SSID before rerunning the Wireless Setup Utility. b Enter your operating system or wireless network software. c Click OK. Note: Make sure you do not know the SSID of the network the computer is connected to obtain it before rerunning...
Getting Started
Page 38
... Firmly plug the rectangular end of the USB cable into the USB port on the back of the printer. 4 Cancel the software installation. 5 Click Start Œ Programs or All Programs Œ Lexmark 1400 Series. 6 Click Wireless Setup. 7 Follow the prompts on the computer screen to 64 hexadecimal characters. ASCII characters are ... more of the computer. The USB port is not lit" on page 34. WPA-PSK or WPA2-PSK key • Up to reinstall the software. 38 Wireless Setup Utility cannot communicate with the USB symbol . 3 Firmly plug the square end of the USB cable into the USB port of...
... Firmly plug the rectangular end of the USB cable into the USB port on the back of the printer. 4 Cancel the software installation. 5 Click Start Œ Programs or All Programs Œ Lexmark 1400 Series. 6 Click Wireless Setup. 7 Follow the prompts on the computer screen to 64 hexadecimal characters. ASCII characters are ... more of the computer. The USB port is not lit" on page 34. WPA-PSK or WPA2-PSK key • Up to reinstall the software. 38 Wireless Setup Utility cannot communicate with the USB symbol . 3 Firmly plug the square end of the USB cable into the USB port of...
Getting Started
Page 40
... antennas Generally, antennas work best if they are correct. c Press Enter. • The "Default Gateway" entry is determined by your operating system or wireless network software. 2 Ping the wireless access point (wireless router). Although the possible distance between devices in 802.11b or 802.11g networks is not positioned too closely...
... antennas Generally, antennas work best if they are correct. c Press Enter. • The "Default Gateway" entry is determined by your operating system or wireless network software. 2 Ping the wireless access point (wireless router). Although the possible distance between devices in 802.11b or 802.11g networks is not positioned too closely...

Getting Started
Page 41
... is active but is active (turned on) and connected. d Select AirPort in the network address field. This ensures that your operating system or wireless network software. 2 Ping the wireless access point (wireless router). Try the following: a Click: • In Windows XP: Start Œ Settings or Control Panel Œ Network Connection •...
... is active but is active (turned on) and connected. d Select AirPort in the network address field. This ensures that your operating system or wireless network software. 2 Ping the wireless access point (wireless router). Try the following: a Click: • In Windows XP: Start Œ Settings or Control Panel Œ Network Connection •...
Getting Started
Page 44
... are possible solutions. Make sure your printer. For information on how to the wireless access point (wireless router). Move your printer. Reinstall software Uninstall and then reinstall the printer software. You can find , however, that reception improves if you experiment with the MAC address that XXXX Series is the default printer, where...
... are possible solutions. Make sure your printer. For information on how to the wireless access point (wireless router). Move your printer. Reinstall software Uninstall and then reinstall the printer software. You can find , however, that reception improves if you experiment with the MAC address that XXXX Series is the default printer, where...
Getting Started
Page 45
...the wireless access point (wireless router) responds, you are not using a unique network name, consult the documentation for your operating system or wireless network software. 2 Ping the wireless access point (wireless router). Ping the wireless access point (wireless router) to the same network name. • To reset ...might also start with your computer. • To reset the printer name: 1 Click Start Œ Programs or All Programs Œ Lexmark 1400 Series. 2 Click Wireless Setup Utility. 3 Follow the instructions on the computer screen, and enter the new network name when prompted.
...the wireless access point (wireless router) responds, you are not using a unique network name, consult the documentation for your operating system or wireless network software. 2 Ping the wireless access point (wireless router). Ping the wireless access point (wireless router) to the same network name. • To reset ...might also start with your computer. • To reset the printer name: 1 Click Start Œ Programs or All Programs Œ Lexmark 1400 Series. 2 Click Wireless Setup Utility. 3 Follow the instructions on the computer screen, and enter the new network name when prompted.


