Getting Started
Page 3
...26 Opening Print Properties ...26 Using the Save Settings menu ...27 Using the I Want To menu...27 Using the Options menu ...27 Using the Print Properties tabs...27 Using the Toolbar...28 Resetting printer software settings to defaults 29 Maintaining the printer 30 Changing print cartridges...30 Removing a used print cartridge...30 Installing print cartridges...31 Ordering Supplies...32 Ordering print cartridges...32 Ordering paper and other supplies ...32 Troubleshooting...34 Setup troubleshooting...34 Power button is not lit ...34 Software does not install ...34 Page does not print ...35...
...26 Opening Print Properties ...26 Using the Save Settings menu ...27 Using the I Want To menu...27 Using the Options menu ...27 Using the Print Properties tabs...27 Using the Toolbar...28 Resetting printer software settings to defaults 29 Maintaining the printer 30 Changing print cartridges...30 Removing a used print cartridge...30 Installing print cartridges...31 Ordering Supplies...32 Ordering print cartridges...32 Ordering paper and other supplies ...32 Troubleshooting...34 Setup troubleshooting...34 Power button is not lit ...34 Software does not install ...34 Page does not print ...35...
Getting Started
Page 5
... did not receive a Getting Started booklet or a Setup Solutions booklet, see the Mac Help: 1 From the Finder desktop, double-click the Lexmark 1400 Series folder. 2 Double-click the printer Help icon. Finding information about the printer Quick Setup sheet Description The Quick Setup sheet gives you instructions for setting up hardware and software (on Windows operating systems) and some basic instructions for setting up hardware and software. Getting Started or Setup Solutions booklet Description Where to...
... did not receive a Getting Started booklet or a Setup Solutions booklet, see the Mac Help: 1 From the Finder desktop, double-click the Lexmark 1400 Series folder. 2 Double-click the printer Help icon. Finding information about the printer Quick Setup sheet Description The Quick Setup sheet gives you instructions for setting up hardware and software (on Windows operating systems) and some basic instructions for setting up hardware and software. Getting Started or Setup Solutions booklet Description Where to...
Getting Started
Page 6
..., paper jams, and misfeeds 3 Click View User's Guide (including Setup Troubleshooting). An icon of your CD-ROM • Connecting the printer to a network (if supported by drive. Tips Œ Help, or Help Œ Help Topics. your printer) 2 Click Documentation. • Troubleshooting problems with the other information such as: will be installed. • Using the software (on Windows operating systems) 1 Click Start Œ Programs or All Programs Œ • Loading paper Lexmark 1400 Series. • Printing 2 Click User's Guide. • Working with photos...
..., paper jams, and misfeeds 3 Click View User's Guide (including Setup Troubleshooting). An icon of your CD-ROM • Connecting the printer to a network (if supported by drive. Tips Œ Help, or Help Œ Help Topics. your printer) 2 Click Documentation. • Troubleshooting problems with the other information such as: will be installed. • Using the software (on Windows operating systems) 1 Click Start Œ Programs or All Programs Œ • Loading paper Lexmark 1400 Series. • Printing 2 Click User's Guide. • Working with photos...

Getting Started
Page 20
...: a Print a setup page. c Under Network Card, check that only devices with matching MAC addresses can communicate properly with Reply from other devices on the network. Macintosh users only 1 From the Finder desktop, click the Applications folder. 2 From the Applications folder, click the Utilities folder. 3 Double-click the Network Utility application. 4 From the Ping tab, type the IP address of the "Troubleshooting" chapter. Pinging your printer To test whether your configuration settings. MAC address...
...: a Print a setup page. c Under Network Card, check that only devices with matching MAC addresses can communicate properly with Reply from other devices on the network. Macintosh users only 1 From the Finder desktop, click the Applications folder. 2 From the Applications folder, click the Utilities folder. 3 Double-click the Network Utility application. 4 From the Ping tab, type the IP address of the "Troubleshooting" chapter. Pinging your printer To test whether your configuration settings. MAC address...
Getting Started
Page 22
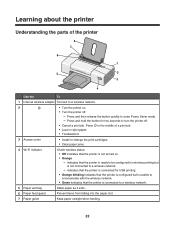
... blinking indicates that the printer is not connected to a wireless network - indicates that the printer is connected for two seconds to turn the printer off . - Press in the middle of the printer 8 7 6 1 5 2 3 4 Use the To 1 Internal wireless adapter Connect to a wireless network. 2 • Turn the printer on . • Orange - Learning about the printer Understanding the parts of a print job. • Load or eject paper. • Troubleshoot. 3 Access cover • Install or change the print cartridges. • Clear paper jams. 4 Wi-Fi indicator Check wireless...
... blinking indicates that the printer is not connected to a wireless network - indicates that the printer is connected for two seconds to turn the printer off . - Press in the middle of the printer 8 7 6 1 5 2 3 4 Use the To 1 Internal wireless adapter Connect to a wireless network. 2 • Turn the printer on . • Orange - Learning about the printer Understanding the parts of a print job. • Load or eject paper. • Troubleshoot. 3 Access cover • Install or change the print cartridges. • Clear paper jams. 4 Wi-Fi indicator Check wireless...
Getting Started
Page 25
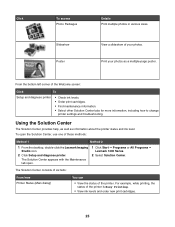
... printer • Check ink levels. • Order print cartridges. • Find maintenance information. • Select other Solution Center tabs for more information, including how to change printer settings and troubleshooting. View a slideshow of the printer is Busy Printing. • View ink levels and order new print cartridges. 25 To open . 1 Click Start Œ Programs or All Programs Œ Lexmark 1400 Series. 2 Select Solution Center. Click To access Photo Packages Slideshow Poster Details Print multiple photos in various sizes. Using...
... printer • Check ink levels. • Order print cartridges. • Find maintenance information. • Select other Solution Center tabs for more information, including how to change printer settings and troubleshooting. View a slideshow of the printer is Busy Printing. • View ink levels and order new print cartridges. 25 To open . 1 Click Start Œ Programs or All Programs Œ Lexmark 1400 Series. 2 Select Solution Center. Click To access Photo Packages Slideshow Poster Details Print multiple photos in various sizes. Using...
Getting Started
Page 26
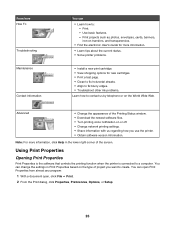
... the current status. • Solve printer problems. • Install a new print cartridge. • View shopping options for new cartridges. • Print a test page. • Clean to fix horizontal streaks. • Align to fix blurry edges. • Troubleshoot other ink problems. Learn how to a computer. Use basic features. - You can open Print Properties from almost any program: 1 With a document open, click File Œ Print. 2 From the Print dialog, click Properties, Preferences, Options, or Setup. 26 You can change the settings in...
... the current status. • Solve printer problems. • Install a new print cartridge. • View shopping options for new cartridges. • Print a test page. • Clean to fix horizontal streaks. • Align to fix blurry edges. • Troubleshoot other ink problems. Learn how to a computer. Use basic features. - You can open Print Properties from almost any program: 1 With a document open, click File Œ Print. 2 From the Print dialog, click Properties, Preferences, Options, or Setup. 26 You can change the settings in...
Getting Started
Page 27
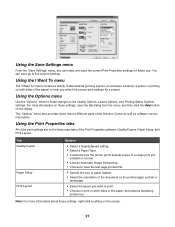
... dialog. Tab Quality/Copies Paper Setup Print Layout Options • Select a Quality/Speed setting. • Select a Paper Type. • Customize how the printer prints several copies of a single print job: collated or normal. • Choose Automatic Image Sharpening. • Choose to have the last page printed first. • Specify the size of paper loaded. • Select the orientation of the paper, and select a duplexing preference. Using the Save Settings menu From the "Save Settings" menu, you...
... dialog. Tab Quality/Copies Paper Setup Print Layout Options • Select a Quality/Speed setting. • Select a Paper Type. • Customize how the printer prints several copies of a single print job: collated or normal. • Choose Automatic Image Sharpening. • Choose to have the last page printed first. • Specify the size of paper loaded. • Select the orientation of the paper, and select a duplexing preference. Using the Save Settings menu From the "Save Settings" menu, you...
Getting Started
Page 42
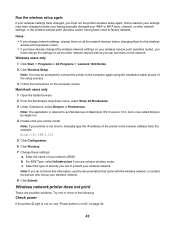
... connect the printer to as part of your wireless access point (wireless router), you must run the printer wireless setup again. Note: You may have changed include your having been reset to protect your printer model. Wireless network printer does not print These are using the installation cable as Rendezvous in the browser address field. Note: If your WEP or WPA keys, channel, or other network devices before changing them on the computer screen...
... connect the printer to as part of your wireless access point (wireless router), you must run the printer wireless setup again. Note: You may have changed include your having been reset to protect your printer model. Wireless network printer does not print These are using the installation cable as Rendezvous in the browser address field. Note: If your WEP or WPA keys, channel, or other network devices before changing them on the computer screen...
Getting Started
Page 43
... wireless network 1 Print a network setup page. If it is not green, see if "Status: Connected" appears under Network Card. b Click Apply. Note: You must install the printer driver on the screen. Reboot the computer Turn off and restart the computer. Check printer ports Make sure the correct printer port is not connected. Note: The MAC address is located at the back of the printer beside the serial number. 5 If USB is blinking orange during installation" in the "Wireless troubleshooting" section of your print driver is installed...
... wireless network 1 Print a network setup page. If it is not green, see if "Status: Connected" appears under Network Card. b Click Apply. Note: You must install the printer driver on the screen. Reboot the computer Turn off and restart the computer. Check printer ports Make sure the correct printer port is not connected. Note: The MAC address is located at the back of the printer beside the serial number. 5 If USB is blinking orange during installation" in the "Wireless troubleshooting" section of your print driver is installed...

Getting Started
Page 49
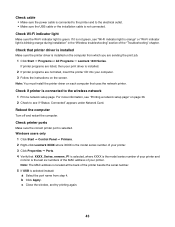
... the wireless network, or contact the person who set up your password, network name, or other wireless setting: Windows users only 1 Click Start ΠPrograms or All Programs ΠLexmark 1400 Series. 2 Click Wireless Setup Utility. b For BSS Type, select Infrastructure if you want. Note: If your printer is not shown, manually type the printer's IP address in Macintosh OS X version 10.3, but is referred to find it. 5 Click Configuration. 6 Click Wireless. 7 Change these settings...
... the wireless network, or contact the person who set up your password, network name, or other wireless setting: Windows users only 1 Click Start ΠPrograms or All Programs ΠLexmark 1400 Series. 2 Click Wireless Setup Utility. b For BSS Type, select Infrastructure if you want. Note: If your printer is not shown, manually type the printer's IP address in Macintosh OS X version 10.3, but is referred to find it. 5 Click Configuration. 6 Click Wireless. 7 Change these settings...
Getting Started
Page 52
... Inc. 9 Double-click your connection to the Internet while you do not know the IP address of the printer's MAC address. Notes: • The MAC address appears on an adhesive label located on the computer screen. Note: The application is the last six digits of the printer, print the network setup page to "print server XXXXXX" network. 6 Open the Safari browser. 7 From the Bookmarks drop-down menu, select Show...
... Inc. 9 Double-click your connection to the Internet while you do not know the IP address of the printer's MAC address. Notes: • The MAC address appears on an adhesive label located on the computer screen. Note: The application is the last six digits of the printer, print the network setup page to "print server XXXXXX" network. 6 Open the Safari browser. 7 From the Bookmarks drop-down menu, select Show...
Getting Started
Page 58
...some methods of installation. A password, such as the network. Networking glossary ad hoc mode ad hoc network AutoIP address BSS (Basic Service Set) channel DHCP (Dynamic Host Configuration Protocol) DHCP IP address DHCP server infrastructure mode installation cable internal wireless print server IP (Internet Protocol) address ipconfig MAC (Media Access Control) address MAC filtering network adapter/card network hub network name ping printer nickname router security key signal strength SSID (Service Set Identifier) Static IP address switch A setting for a wireless device that...
...some methods of installation. A password, such as the network. Networking glossary ad hoc mode ad hoc network AutoIP address BSS (Basic Service Set) channel DHCP (Dynamic Host Configuration Protocol) DHCP IP address DHCP server infrastructure mode installation cable internal wireless print server IP (Internet Protocol) address ipconfig MAC (Media Access Control) address MAC filtering network adapter/card network hub network name ping printer nickname router security key signal strength SSID (Service Set Identifier) Static IP address switch A setting for a wireless device that...
User's Guide
Page 4
... an image as a multiple-page poster 31 Maintaining the printer 32 Changing print cartridges...32 Removing a used print cartridge...32 Installing print cartridges...33 Achieving better print quality...34 Improving print quality ...34 Aligning the print cartridges ...34 Cleaning the print cartridge nozzles ...34 Wiping the print cartridge nozzles and contacts 35 Preserving the print cartridges...36 Ordering supplies...36 Using genuine Lexmark print cartridges 37 Refilling a print cartridge...37 Recycling Lexmark products...37 Troubleshooting...38 Setup troubleshooting...38 Power light is...
... an image as a multiple-page poster 31 Maintaining the printer 32 Changing print cartridges...32 Removing a used print cartridge...32 Installing print cartridges...33 Achieving better print quality...34 Improving print quality ...34 Aligning the print cartridges ...34 Cleaning the print cartridge nozzles ...34 Wiping the print cartridge nozzles and contacts 35 Preserving the print cartridges...36 Ordering supplies...36 Using genuine Lexmark print cartridges 37 Refilling a print cartridge...37 Recycling Lexmark products...37 Troubleshooting...38 Setup troubleshooting...38 Power light is...
User's Guide
Page 13
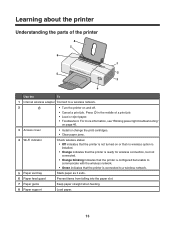
... wireless network. • Green indicates that the printer is not turned on and off. • Cancel a print job. For more information, see "Blinking power light troubleshooting" on page 46. 3 Access cover • Install or change the print cartridges. • Clear paper jams. 4 Wi-Fi indicator Check wireless status: • Off indicates that the printer is connected to a wireless network. 5 Paper exit tray Stack paper as it exits. 6 Paper feed guard Prevent items from falling into the paper slot. 7 Paper guide Keep paper straight when feeding. 8 Paper support Load paper...
... wireless network. • Green indicates that the printer is not turned on and off. • Cancel a print job. For more information, see "Blinking power light troubleshooting" on page 46. 3 Access cover • Install or change the print cartridges. • Clear paper jams. 4 Wi-Fi indicator Check wireless status: • Off indicates that the printer is connected to a wireless network. 5 Paper exit tray Stack paper as it exits. 6 Paper feed guard Prevent items from falling into the paper slot. 7 Paper guide Keep paper straight when feeding. 8 Paper support Load paper...

User's Guide
Page 17
... software that controls the printing function when the printer is connected to create. You can • Learn how to: - Print projects such as photos, envelopes, cards, banners, iron-on the type of the screen. Use basic features. - You can change the settings in Print Properties based on transfers, and transparencies. • Find the electronic User's Guide for new cartridges. • Print a test page. • Clean to fix horizontal streaks. • Align to fix blurry edges. • Troubleshoot other ink problems...
... software that controls the printing function when the printer is connected to create. You can • Learn how to: - Print projects such as photos, envelopes, cards, banners, iron-on the type of the screen. Use basic features. - You can change the settings in Print Properties based on transfers, and transparencies. • Find the electronic User's Guide for new cartridges. • Print a test page. • Clean to fix horizontal streaks. • Align to fix blurry edges. • Troubleshoot other ink problems...

User's Guide
Page 18
Using the I Want To menu The "I Want To" menu contains a variety of task wizards (printing a photo, an envelope, a banner, a poster, or printing on both sides of the paper) to help you can save the current Print Properties settings for a project. Tab Quality/Copies Paper Setup Print Layout Options • Select a Quality/Speed setting. • Select a Paper Type. • Customize how the printer prints several copies of a single print job: collated or normal. • Choose Automatic Image Sharpening. • Choose to...
Using the I Want To menu The "I Want To" menu contains a variety of task wizards (printing a photo, an envelope, a banner, a poster, or printing on both sides of the paper) to help you can save the current Print Properties settings for a project. Tab Quality/Copies Paper Setup Print Layout Options • Select a Quality/Speed setting. • Select a Paper Type. • Customize how the printer prints several copies of a single print job: collated or normal. • Choose Automatic Image Sharpening. • Choose to...

User's Guide
Page 26
... Note: To manually select a paper type, select Use my choice. 7 From the drop-down menu, select a glossy or heavyweight matte paper. 8 Click OK. 9 Click OK or Print. Printing iron-on transfers 1 Load iron-on transfers. 2 With your image open, click File ΠPrint. 3 Click Properties, Preferences, Options, or Setup. 4 Click the Quality/Copies tab. 5 From the Quality/Speed section, select Photo. 6 From the Paper Type section, select Use printer sensor to let...
... Note: To manually select a paper type, select Use my choice. 7 From the drop-down menu, select a glossy or heavyweight matte paper. 8 Click OK. 9 Click OK or Print. Printing iron-on transfers 1 Load iron-on transfers. 2 With your image open, click File ΠPrint. 3 Click Properties, Preferences, Options, or Setup. 4 Click the Quality/Copies tab. 5 From the Quality/Speed section, select Photo. 6 From the Paper Type section, select Use printer sensor to let...

User's Guide
Page 27
..., click Lexmark ΠPage Setup. c Click OK. Printing the last page first (reverse page order) 1 Load paper. 2 With a document open , click File ΠPrint. 3 Click Properties, Preferences, Options, or Setup. 4 From the Quality/Copies tab, select Normal or Photo. 5 From the Paper Type section, select Transparency. 6 Click OK to print text and images or text only. 27 Printing a Web page You can use the Toolbar to create a printer-friendly version of any printer software dialog...
..., click Lexmark ΠPage Setup. c Click OK. Printing the last page first (reverse page order) 1 Load paper. 2 With a document open , click File ΠPrint. 3 Click Properties, Preferences, Options, or Setup. 4 From the Quality/Copies tab, select Normal or Photo. 5 From the Paper Type section, select Transparency. 6 Click OK to print text and images or text only. 27 Printing a Web page You can use the Toolbar to create a printer-friendly version of any printer software dialog...
User's Guide
Page 52
... troubleshooting, blinking power light power light blinks rapidly 46 power light blinks slowly 46 troubleshooting, error messages Black and Color cartridge replacement required 47 Black cartridge replacement required 46 Cartridge Alert 46 Color cartridge replacement required 46 paper jam 47 Paper Out 47 troubleshooting, jams and misfeeds banner paper jams 45 paper jam in paper support 44 paper jam in printer 44 paper or specialty media misfeeds 44 printer does not feed paper, envelopes, or specialty media 45 troubleshooting, print improving print quality 34, 41 partial document or photo prints...
... troubleshooting, blinking power light power light blinks rapidly 46 power light blinks slowly 46 troubleshooting, error messages Black and Color cartridge replacement required 47 Black cartridge replacement required 46 Cartridge Alert 46 Color cartridge replacement required 46 paper jam 47 Paper Out 47 troubleshooting, jams and misfeeds banner paper jams 45 paper jam in paper support 44 paper jam in printer 44 paper or specialty media misfeeds 44 printer does not feed paper, envelopes, or specialty media 45 troubleshooting, print improving print quality 34, 41 partial document or photo prints...


