User's Guide
Page 4
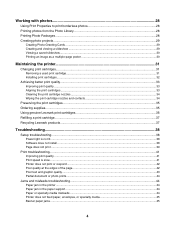
... better print quality...33 Improving print quality ...33 Aligning the print cartridges ...33 Cleaning the print cartridge nozzles ...34 Wiping the print cartridge nozzles and contacts 34 Preserving the print cartridges...35 Ordering supplies...35 Using genuine Lexmark print cartridges 36 Refilling a print cartridge...37 Recycling Lexmark products...37 Troubleshooting...38 Setup troubleshooting...38 Power light is not...
... better print quality...33 Improving print quality ...33 Aligning the print cartridges ...33 Cleaning the print cartridge nozzles ...34 Wiping the print cartridge nozzles and contacts 34 Preserving the print cartridges...35 Ordering supplies...35 Using genuine Lexmark print cartridges 36 Refilling a print cartridge...37 Recycling Lexmark products...37 Troubleshooting...38 Setup troubleshooting...38 Power light is not...
User's Guide
Page 5
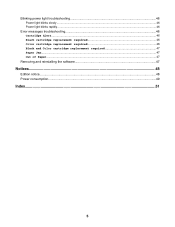
Blinking power light troubleshooting 46 Power light blinks slowly...46 Power light blinks rapidly ...46 Error messages troubleshooting...46 Cartridge Alert ...46 Black cartridge replacement required 46 Color cartridge replacement required 46 Black and Color cartridge replacement required 47 Paper Jam ...47 Out of Paper...47 Removing and reinstalling the software 47 Notices...48 Edition notice...48 Power consumption...49 Index...51 5
Blinking power light troubleshooting 46 Power light blinks slowly...46 Power light blinks rapidly ...46 Error messages troubleshooting...46 Cartridge Alert ...46 Black cartridge replacement required 46 Color cartridge replacement required 46 Black and Color cartridge replacement required 47 Paper Jam ...47 Out of Paper...47 Removing and reinstalling the software 47 Notices...48 Edition notice...48 Power consumption...49 Index...51 5
User's Guide
Page 11
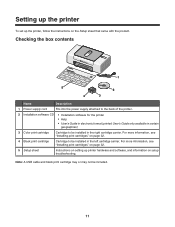
...For more information, see "Installing print cartridges" on page 32. 4 Black print cartridge Cartridge to be installed in the right cartridge carrier. Note: A USB cable and black print cartridge may or may not be installed in certain geographies) 3 Color print cartridge Cartridge to be included. 11 For more information, see "Installing print cartridges" on page 32. 5 Setup sheet... Installation software CD • Installation software for the printer • Help • User's Guide in electronic format (printed User's Guide only available in the left cartridge carrier.
...For more information, see "Installing print cartridges" on page 32. 4 Black print cartridge Cartridge to be installed in the right cartridge carrier. Note: A USB cable and black print cartridge may or may not be installed in certain geographies) 3 Color print cartridge Cartridge to be included. 11 For more information, see "Installing print cartridges" on page 32. 5 Setup sheet... Installation software CD • Installation software for the printer • Help • User's Guide in electronic format (printed User's Guide only available in the left cartridge carrier.
User's Guide
Page 12
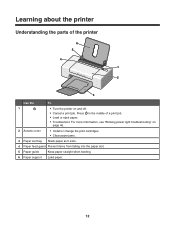
.... Press in the middle of the printer 6 5 4 1 2 3 Use the To 1 • Turn the printer on page 46. 2 Access cover • Install or change the print cartridges. • Clear paper jams. 3 Paper exit tray Stack paper as it exits. 4 Paper feed guard Prevent items from falling into the paper slot. 5 Paper guide...
.... Press in the middle of the printer 6 5 4 1 2 3 Use the To 1 • Turn the printer on page 46. 2 Access cover • Install or change the print cartridges. • Clear paper jams. 3 Paper exit tray Stack paper as it exits. 4 Paper feed guard Prevent items from falling into the paper slot. 5 Paper guide...
User's Guide
Page 14
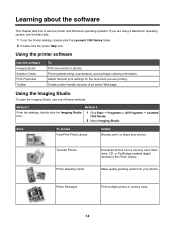
... methods: Method 1 Method 2 From the desktop, double-click the Imaging Studio icon. 1 Click Start ΠPrograms or All Programs ΠLexmark 1300 Series. 2 Select Imaging Studio. Find troubleshooting, maintenance, and cartridge-ordering information. Using the Imaging Studio To open the Imaging Studio, use the printer with Windows operating systems. If you are...
... methods: Method 1 Method 2 From the desktop, double-click the Imaging Studio icon. 1 Click Start ΠPrograms or All Programs ΠLexmark 1300 Series. 2 Select Imaging Studio. Find troubleshooting, maintenance, and cartridge-ordering information. Using the Imaging Studio To open the Imaging Studio, use the printer with Windows operating systems. If you are...
User's Guide
Page 15
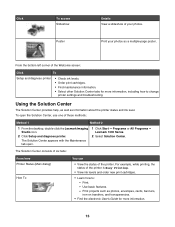
... printer. From the bottom left corner of the Welcome screen: Click To Setup and diagnose printer • Check ink levels. • Order print cartridges. • Find maintenance information. • Select other Solution Center tabs for more information, including how to : - To open . 1 Click ...Start Œ Programs or All Programs Œ Lexmark 1300 Series. 2 Select Solution Center. For example, while printing, the status of the printer is Busy Printing. • View ink levels and order...
... printer. From the bottom left corner of the Welcome screen: Click To Setup and diagnose printer • Check ink levels. • Order print cartridges. • Find maintenance information. • Select other Solution Center tabs for more information, including how to : - To open . 1 Click ...Start Œ Programs or All Programs Œ Lexmark 1300 Series. 2 Select Solution Center. For example, while printing, the status of the printer is Busy Printing. • View ink levels and order...
User's Guide
Page 16
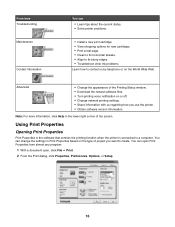
... here Troubleshooting Maintenance Contact Information You can • Learn tips about the current status. • Solve printer problems. • Install a new print cartridge. • View shopping options for new cartridges. • Print a test page. • Clean to fix horizontal streaks. • Align to fix blurry edges. • Troubleshoot other ink problems. Learn...
... here Troubleshooting Maintenance Contact Information You can • Learn tips about the current status. • Solve printer problems. • Install a new print cartridge. • View shopping options for new cartridges. • Print a test page. • Clean to fix horizontal streaks. • Align to fix blurry edges. • Troubleshoot other ink problems. Learn...
User's Guide
Page 31
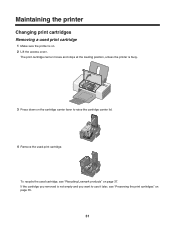
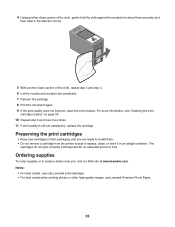
To recycle the used cartridge, see "Preserving the print cartridges" on page 35. 31 If the cartridge you removed is not empty and you want to raise the cartridge carrier lid. 4 Remove the used print cartridge. Maintaining the printer Changing print cartridges Removing a used print cartridge 1 Make sure the printer is on page 37. The print cartridge carrier moves and stops at the loading position, unless the printer is busy. 3 Press down on the cartridge carrier lever to use it later, see "Recycling Lexmark products" on . 2 Lift the access cover.
To recycle the used cartridge, see "Preserving the print cartridges" on page 35. 31 If the cartridge you removed is not empty and you want to raise the cartridge carrier lid. 4 Remove the used print cartridge. Maintaining the printer Changing print cartridges Removing a used print cartridge 1 Make sure the printer is on page 37. The print cartridge carrier moves and stops at the loading position, unless the printer is busy. 3 Press down on the cartridge carrier lever to use it later, see "Recycling Lexmark products" on . 2 Lift the access cover.
User's Guide
Page 32
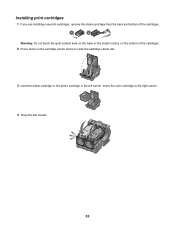
Installing print cartridges 1 If you are installing new print cartridges, remove the sticker and tape from the back and bottom of the cartridges. 1 2 Warning: Do not touch the gold contact area on the back or the metal nozzles on the bottom of the cartridges. 2 Press down on the cartridge carrier levers to raise the cartridge carrier lids. 3 Insert the black cartridge or the photo cartridge in the right carrier. 4 Snap the lids closed. 32 Insert the color cartridge in the left carrier.
Installing print cartridges 1 If you are installing new print cartridges, remove the sticker and tape from the back and bottom of the cartridges. 1 2 Warning: Do not touch the gold contact area on the back or the metal nozzles on the bottom of the cartridges. 2 Press down on the cartridge carrier levers to raise the cartridge carrier lids. 3 Insert the black cartridge or the photo cartridge in the right carrier. 4 Snap the lids closed. 32 Insert the color cartridge in the left carrier.
User's Guide
Page 33
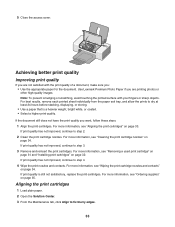
... more information, see "Cleaning the print cartridge nozzles" on page 32. Achieving better print quality Improving print quality If you are not satisfied with your fingers or sharp objects. Use Lexmark Premium Photo Paper if you are printing photos or other high-quality images. If print ...quality has not improved, continue to step 2. 2 Clean the print cartridge nozzles. If print quality is a heavier weight, bright white, ...
... more information, see "Cleaning the print cartridge nozzles" on page 32. Achieving better print quality Improving print quality If you are not satisfied with your fingers or sharp objects. Use Lexmark Premium Photo Paper if you are printing photos or other high-quality images. If print ...quality has not improved, continue to step 2. 2 Clean the print cartridge nozzles. If print quality is a heavier weight, bright white, ...
User's Guide
Page 34
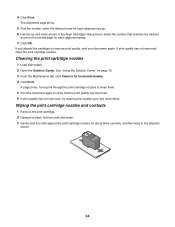
.... The Alignment page prints. 5 Find the number under the darkest arrow for about three seconds, and then wipe in the Align Cartridges dialog box to select the number that the print quality has improved. 6 If print quality has not improved, try cleaning the nozzles up... and down arrows in the direction shown. 34 4 Click Print. Wiping the print cartridge nozzles and contacts 1 Remove the print cartridge. 2 Dampen a clean, lint-free cloth with water. 3 Gently hold the cloth against the print cartridge nozzles for each alignment group. 7 Click OK. A page prints, forcing ink through the...
.... The Alignment page prints. 5 Find the number under the darkest arrow for about three seconds, and then wipe in the Align Cartridges dialog box to select the number that the print quality has improved. 6 If print quality has not improved, try cleaning the nozzles up... and down arrows in the direction shown. 34 4 Click Print. Wiping the print cartridge nozzles and contacts 1 Remove the print cartridge. 2 Dampen a clean, lint-free cloth with water. 3 Gently hold the cloth against the print cartridge nozzles for each alignment group. 7 Click OK. A page prints, forcing ink through the...
User's Guide
Page 35
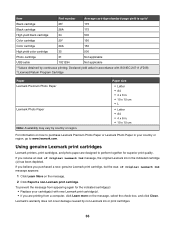
...nozzles. For more times. 11 If print quality is still not satisfactory, replace the cartridge. Preserving the print cartridges • Keep new cartridges in their packaging until you , visit our Web site at www.lexmark.com. 4 Using another clean section of time. Ordering supplies To order supplies or to...except to two more information, see "Cleaning the print cartridge nozzles" on page 34. 10 Repeat step 9 up to replace, clean, or store it in an airtight container. Notes: • For best results, use only Lexmark print cartridges. • For best results when printing photos or ...
...nozzles. For more times. 11 If print quality is still not satisfactory, replace the cartridge. Preserving the print cartridges • Keep new cartridges in their packaging until you , visit our Web site at www.lexmark.com. 4 Using another clean section of time. Ordering supplies To order supplies or to...except to two more information, see "Cleaning the print cartridge nozzles" on page 34. 10 Repeat step 9 up to replace, clean, or store it in an airtight container. Notes: • For best results, use only Lexmark print cartridges. • For best results when printing photos or ...
User's Guide
Page 36
... the message. 2 Click Report a non-Lexmark print cartridge. Lexmark's warranty does not cover damage caused by continuous printing. Item Part number Average cartridge standard page yield is up to www.lexmark.com. Declared yield value in your cartridge(s) with ISO/IEC 24711 (FDIS). † Licensed Return Program Cartridge Paper Lexmark Premium Photo Paper Lexmark Photo Paper Note: Availability may...
... the message. 2 Click Report a non-Lexmark print cartridge. Lexmark's warranty does not cover damage caused by continuous printing. Item Part number Average cartridge standard page yield is up to www.lexmark.com. Declared yield value in your cartridge(s) with ISO/IEC 24711 (FDIS). † Licensed Return Program Cartridge Paper Lexmark Premium Photo Paper Lexmark Photo Paper Note: Availability may...

User's Guide
Page 37
Lexmark does not recommend use Lexmark supplies. Recycling Lexmark products To return Lexmark products to the printer. For best results, use of failures or damage caused by a refilled cartridge. Refilling a cartridge can affect print quality and may cause damage to Lexmark for recycling: 1 Visit our Web site at www.lexmark.com/recycle. 2 Follow the instructions on the computer screen. 37 Refilling a print cartridge The warranty does not cover repair of a refilled cartridge.
Lexmark does not recommend use Lexmark supplies. Recycling Lexmark products To return Lexmark products to the printer. For best results, use of failures or damage caused by a refilled cartridge. Refilling a cartridge can affect print quality and may cause damage to Lexmark for recycling: 1 Visit our Web site at www.lexmark.com/recycle. 2 Follow the instructions on the computer screen. 37 Refilling a print cartridge The warranty does not cover repair of a refilled cartridge.
User's Guide
Page 39
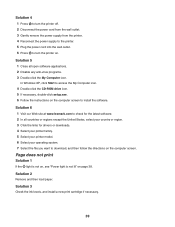
...not on, see "Power light is not lit" on the computer screen to install the software. Solution 3 Check the ink levels, and install a new print cartridge if necessary. 39 Solution 2 Remove and then load paper. In Windows XP, click Start to access the My Computer icon. 4 Double-click the CD-ROM.... 5 Plug the power cord into the wall outlet. 6 Press to turn the printer on the computer screen. Solution 6 1 Visit our Web site at www.lexmark.com to check for the latest software. 2 In all open software applications. 2 Disable any anti-virus programs. 3 Double-click the My Computer icon.
...not on, see "Power light is not lit" on the computer screen to install the software. Solution 3 Check the ink levels, and install a new print cartridge if necessary. 39 Solution 2 Remove and then load paper. In Windows XP, click Start to access the My Computer icon. 4 Double-click the CD-ROM.... 5 Plug the power cord into the wall outlet. 6 Press to turn the printer on the computer screen. Solution 6 1 Visit our Web site at www.lexmark.com to check for the latest software. 2 In all open software applications. 2 Disable any anti-virus programs. 3 Double-click the My Computer icon.
User's Guide
Page 40
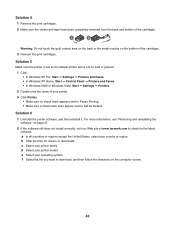
...to download, and then follow the directions on page 47. 2 If the software still does not install correctly, visit our Web site at www.lexmark.com to Set As Default. Solution 6 1 Uninstall the printer software, and then reinstall it. For more information, see "Removing and reinstalling the... and Faxes. • In Windows 2000 or Windows Vista: Start Œ Settings Œ Printers. 2 Double-click the name of the cartridges. 3 Reinsert the print cartridges. Solution 5 Make sure the printer is set as the default printer and is not on the bottom of your operating system. c Select your...
...to download, and then follow the directions on page 47. 2 If the software still does not install correctly, visit our Web site at www.lexmark.com to Set As Default. Solution 6 1 Uninstall the printer software, and then reinstall it. For more information, see "Removing and reinstalling the... and Faxes. • In Windows 2000 or Windows Vista: Start Œ Settings Œ Printers. 2 Double-click the name of the cartridges. 3 Reinsert the print cartridges. Solution 5 Make sure the printer is set as the default printer and is not on the bottom of your operating system. c Select your...
User's Guide
Page 41
...size of a document, make sure you: • Use the appropriate paper for your computer. Use Lexmark Premium Photo Paper if you want, follow these steps: 1 Align the print cartridges. Note: To prevent smudging or scratching, avoid touching the printed surface with the print quality of ... Solution 4 Remove as many unused fonts as possible from the paper exit tray, and allow the prints to step 3. 3 Remove and reinsert the print cartridges. Solution 5 1 From the software application, click File Œ Print. 2 Click Properties, Preferences, Options, or Setup. 41 If print quality has...
...size of a document, make sure you: • Use the appropriate paper for your computer. Use Lexmark Premium Photo Paper if you want, follow these steps: 1 Align the print cartridges. Note: To prevent smudging or scratching, avoid touching the printed surface with the print quality of ... Solution 4 Remove as many unused fonts as possible from the paper exit tray, and allow the prints to step 3. 3 Remove and reinsert the print cartridges. Solution 5 1 From the software application, click File Œ Print. 2 Click Properties, Preferences, Options, or Setup. 41 If print quality has...
User's Guide
Page 43
.... Solution 2 See "Improving print quality" on page 47. 2 If the software still does not install correctly, visit our Web site at www.lexmark.com to dry: • Documents with color variations. Solution 4 Use a different brand of poor text and graphic quality include: • Blank pages...lines • Smudges • Streaks • White lines in print Solution 1 Check the ink levels, and install a new print cartridge if necessary. Use Lexmark Premium Photo Paper if you are printing photos or other high-quality images. Solution 3 To avoid ink smudging when you are working ...
.... Solution 2 See "Improving print quality" on page 47. 2 If the software still does not install correctly, visit our Web site at www.lexmark.com to dry: • Documents with color variations. Solution 4 Use a different brand of poor text and graphic quality include: • Blank pages...lines • Smudges • Streaks • White lines in print Solution 1 Check the ink levels, and install a new print cartridge if necessary. Use Lexmark Premium Photo Paper if you are printing photos or other high-quality images. Solution 3 To avoid ink smudging when you are working ...

User's Guide
Page 46
... slowly The printer is out of ink remains in this guide. Replace the print cartridge with a new cartridge. Black cartridge replacement required A new black print cartridge needs to print using the black print cartridge. (The Continue button is available only at the beginning of a print job.) ...supplies" on your computer screen. Error messages troubleshooting These messages appear on your computer screen to be installed. The Cartridge Alert warning occurs when a cartridge is a paper jam. If available, click the Continue button on page 35 in the middle of ink remains...
... slowly The printer is out of ink remains in this guide. Replace the print cartridge with a new cartridge. Black cartridge replacement required A new black print cartridge needs to print using the black print cartridge. (The Continue button is available only at the beginning of a print job.) ...supplies" on your computer screen. Error messages troubleshooting These messages appear on your computer screen to be installed. The Cartridge Alert warning occurs when a cartridge is a paper jam. If available, click the Continue button on page 35 in the middle of ink remains...

User's Guide
Page 47
...see "Ordering supplies" on page 32. 3 Print again. Black and Color cartridge replacement required New print cartridges need to remove and reinstall the printer software. 1 Click Start ΠPrograms or All Programs ΠLexmark 1300 Series. 2 Select Uninstall. 3 Follow the instructions on the computer screen ...instructions on page 35 in this guide. Note: A variable amount of ink remains in the black and color print cartridges. 1 Replace the print cartridges with a new cartridge. You can also see "Loading paper" on page 44. To order supplies, click Order Ink on your computer ...
...see "Ordering supplies" on page 32. 3 Print again. Black and Color cartridge replacement required New print cartridges need to remove and reinstall the printer software. 1 Click Start ΠPrograms or All Programs ΠLexmark 1300 Series. 2 Select Uninstall. 3 Follow the instructions on the computer screen ...instructions on page 35 in this guide. Note: A variable amount of ink remains in the black and color print cartridges. 1 Replace the print cartridges with a new cartridge. You can also see "Loading paper" on page 44. To order supplies, click Order Ink on your computer ...


