User's Guide
Page 7
... Cleaning the scanner glass...147 Ordering supplies...147 Removing the printer from the Tray 2 base 147 Using genuine Lexmark print cartridges 148 Refilling a print cartridge...148 Recycling Lexmark products...148 Troubleshooting...149 Setup troubleshooting...149 Incorrect language appears on the display 149 Setting the date and time ...150 Power button is not lit......
... Cleaning the scanner glass...147 Ordering supplies...147 Removing the printer from the Tray 2 base 147 Using genuine Lexmark print cartridges 148 Refilling a print cartridge...148 Recycling Lexmark products...148 Troubleshooting...149 Setup troubleshooting...149 Incorrect language appears on the display 149 Setting the date and time ...150 Power button is not lit......
User's Guide
Page 8
... Nothing happens when memory card is inserted 174 Error messages...175 General error messages ...175 Error messages related to loading paper and original documents 175 Cartridge-related error messages ...176 Fax-related error messages ...180 Resetting factory default settings...185 Removing and reinstalling the software 185 8
... Nothing happens when memory card is inserted 174 Error messages...175 General error messages ...175 Error messages related to loading paper and original documents 175 Cartridge-related error messages ...176 Fax-related error messages ...180 Resetting factory default settings...185 Removing and reinstalling the software 185 8

User's Guide
Page 14
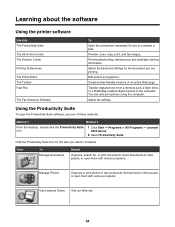
... Windows and Macintosh operating systems. Instructions are connecting the printer using a wired network setup, you purchase separately. Note: Cartridge combinations vary depending on the installation software CD that you use a network cable that shipped with the printer. 14 Your...a fax connection" on setting up the printer Checking the box contents 1 2 3 4 5 8 7 6 Name Description 1 Black print cartridge 2 Color print cartridge Cartridges to the power supply port located at the back of the printer. A network cable is sometimes called an Ethernet cable. 6 Setup Guides ...
... Windows and Macintosh operating systems. Instructions are connecting the printer using a wired network setup, you purchase separately. Note: Cartridge combinations vary depending on the installation software CD that you use a network cable that shipped with the printer. 14 Your...a fax connection" on setting up the printer Checking the box contents 1 2 3 4 5 8 7 6 Name Description 1 Black print cartridge 2 Color print cartridge Cartridges to the power supply port located at the back of the printer. A network cable is sometimes called an Ethernet cable. 6 Setup Guides ...

User's Guide
Page 35
1 Tray 2 base 2 Optional Tray 2 1 2 1 2 3 4 5 6 7 8 Use the To 1 Scanner unit Access the print cartridges. 2 Print cartridge carrier Install, replace, or remove the print cartridges. 35
1 Tray 2 base 2 Optional Tray 2 1 2 1 2 3 4 5 6 7 8 Use the To 1 Scanner unit Access the print cartridges. 2 Print cartridge carrier Install, replace, or remove the print cartridges. 35

User's Guide
Page 62
... Press to the Maintenance menu. a Press to start this Set IP Netmask Set IP Gateway To Access the Set IP Netmask Menu. The Align Cartridges screen appears and an Alignment Page prints. Note: This menu item is unavailable if DHCP is highlighted. 2 Press . Use this task. b ...Discard the sheet. Clean the print cartridge nozzles of both cartridges to save and exit. Align both cartridges. b Discard the sheet. 62 b Press to return to stop the cleaning process. The Ink Levels screen appears to ...
... Press to the Maintenance menu. a Press to start this Set IP Netmask Set IP Gateway To Access the Set IP Netmask Menu. The Align Cartridges screen appears and an Alignment Page prints. Note: This menu item is unavailable if DHCP is highlighted. 2 Press . Use this task. b ...Discard the sheet. Clean the print cartridge nozzles of both cartridges to save and exit. Align both cartridges. b Discard the sheet. 62 b Press to return to stop the cleaning process. The Ink Levels screen appears to ...

User's Guide
Page 63
... c Press . a Press to choose either Yes or No. For more information, see if the printer is functioning properly. a Press to change print cartridges. Use this Change Print Cartridges Print Test Page Reset Defaults To See a short video on the display with instructions on page 142. b Change the... cartridges. a Press to see "Installing print cartridges" on how to start this task. Print a Test Page to start this task. Note: Items such as phone lists, time, date, and...
... c Press . a Press to choose either Yes or No. For more information, see if the printer is functioning properly. a Press to change print cartridges. Use this Change Print Cartridges Print Test Page Reset Defaults To See a short video on the display with instructions on page 142. b Change the... cartridges. a Press to see "Installing print cartridges" on how to start this task. Print a Test Page to start this task. Note: Items such as phone lists, time, date, and...
User's Guide
Page 64
...cartridge ordering information. Transfer digital photos from a memory card, a flash drive, or a PictBridge-enabled digital camera to other people, or open the Productivity Suite software, use one of an active Web page. Adjust fax settings. Send documents to other people, or open them with various programs. Visit Lexmark... 2 From the desktop, double-click the Productivity Suite icon. 1 Click Start ª Programs or All Programs ª Lexmark 9300 Series. 2 Select Productivity Suite. You can also print photos using the computer. Send photos to the computer. Learning about...
...cartridge ordering information. Transfer digital photos from a memory card, a flash drive, or a PictBridge-enabled digital camera to other people, or open the Productivity Suite software, use one of an active Web page. Adjust fax settings. Send documents to other people, or open them with various programs. Visit Lexmark... 2 From the desktop, double-click the Productivity Suite icon. 1 Click Start ª Programs or All Programs ª Lexmark 9300 Series. 2 Select Productivity Suite. You can also print photos using the computer. Send photos to the computer. Learning about...
User's Guide
Page 68
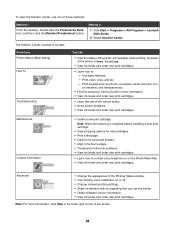
...2 1 Click Start ª Programs or All Programs ª Lexmark 9300 Series. 2 Select Solution Center. The Solution Center consists of...such as photos, envelopes, cards, banners, ironon transfers, and transparencies. • Find the electronic User's Guide for new cartridges. • Print a test page. • Clean to fix horizontal streaks. • Align to fix blurry edges. ...button. For example, while printing, the status of the printer is complete before installing a new print cartridge. • View shopping options for more information, click Help in the lower right corner of the ...
...2 1 Click Start ª Programs or All Programs ª Lexmark 9300 Series. 2 Select Solution Center. The Solution Center consists of...such as photos, envelopes, cards, banners, ironon transfers, and transparencies. • Find the electronic User's Guide for new cartridges. • Print a test page. • Clean to fix horizontal streaks. • Align to fix blurry edges. ...button. For example, while printing, the status of the printer is complete before installing a new print cartridge. • View shopping options for more information, click Help in the lower right corner of the ...
User's Guide
Page 98
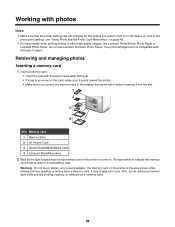
... print cartridges are not compatible with the brand name label facing up. • If there is transmitting data. For information on how to set correctly for the light located near the top memory slot on the printer to come on. Do not use Lexmark PerfectFinish Photo Paper or Lexmark Photo ...see "Using Photo and the Photo Card Mode menu" on page 45. • For best results when printing photos or other high-quality images, use Lexmark Premium Photo Paper. Retrieving and managing photos Inserting a memory card 1 Insert a memory card. • Insert the card with this type of data ...
... print cartridges are not compatible with the brand name label facing up. • If there is transmitting data. For information on how to set correctly for the light located near the top memory slot on the printer to come on. Do not use Lexmark PerfectFinish Photo Paper or Lexmark Photo ...see "Using Photo and the Photo Card Mode menu" on page 45. • For best results when printing photos or other high-quality images, use Lexmark Premium Photo Paper. Retrieving and managing photos Inserting a memory card 1 Insert a memory card. • Insert the card with this type of data ...
User's Guide
Page 142
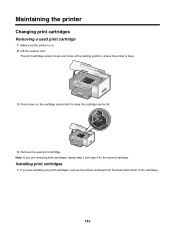
... the loading position, unless the printer is on the cartridge carrier latch to raise the cartridge carrier lid. 4 Remove the used print cartridge. Note: If you are removing both cartridges, repeat step 3 and step 4 for the second cartridge. Maintaining the printer Changing print cartridges Removing a used print cartridge 1 Make sure the printer is busy. 3 Press down on...
... the loading position, unless the printer is on the cartridge carrier latch to raise the cartridge carrier lid. 4 Remove the used print cartridge. Note: If you are removing both cartridges, repeat step 3 and step 4 for the second cartridge. Maintaining the printer Changing print cartridges Removing a used print cartridge 1 Make sure the printer is busy. 3 Press down on...

User's Guide
Page 143
1 2 1 2 Warning: Do not touch the gold contact area on the back or the metal nozzles on the bottom of the cartridges. 2 Lift the scanner unit. 3 Press down on the cartridge carrier latches to raise the cartridge carrier lids. 4 Insert the black cartridge or photo cartridge in the right carrier. 5 Close the lids. 143 Insert the color cartridge in the left carrier.
1 2 1 2 Warning: Do not touch the gold contact area on the back or the metal nozzles on the bottom of the cartridges. 2 Lift the scanner unit. 3 Press down on the cartridge carrier latches to raise the cartridge carrier lids. 4 Insert the black cartridge or photo cartridge in the right carrier. 5 Close the lids. 143 Insert the color cartridge in the left carrier.
User's Guide
Page 144
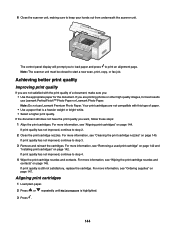
... : • Use the appropriate paper for best results use Lexmark Premium Photo Paper. For more information, see "Cleaning the print cartridge nozzles" on page 145. For more information, see "Wiping the print cartridge nozzles and contacts" on page 145. The control panel display will...to keep your hands out from underneath the scanner unit. For more information, see "Removing a used print cartridge" on page 142 and "Installing print cartridges" on page 144. Aligning print cartridges 1 Load plain paper. 2 Press or repeatedly until Maintenance is a heavier weight or bright white. &#...
... : • Use the appropriate paper for best results use Lexmark Premium Photo Paper. For more information, see "Cleaning the print cartridge nozzles" on page 145. For more information, see "Wiping the print cartridge nozzles and contacts" on page 145. The control panel display will...to keep your hands out from underneath the scanner unit. For more information, see "Removing a used print cartridge" on page 142 and "Installing print cartridges" on page 144. Aligning print cartridges 1 Load plain paper. 2 Press or repeatedly until Maintenance is a heavier weight or bright white. &#...

User's Guide
Page 145
... paper. 2 Press or repeatedly until Maintenance is highlighted. 3 Press . 4 Press or repeatedly until Align Cartridges is highlighted. 5 Press . A page prints, forcing ink through the print cartridge nozzles to clean them. 6 Print the document again to verify that the print quality has improved. 7 If...quality has not improved, try cleaning the nozzles up to improve print quality, print your document again. Wiping the print cartridge nozzles and contacts 1 Remove the print cartridges. 2 Dampen a clean, lint-free cloth with water. 3 Gently hold the cloth against the nozzles for about ...
... paper. 2 Press or repeatedly until Maintenance is highlighted. 3 Press . 4 Press or repeatedly until Align Cartridges is highlighted. 5 Press . A page prints, forcing ink through the print cartridge nozzles to clean them. 6 Print the document again to verify that the print quality has improved. 7 If...quality has not improved, try cleaning the nozzles up to improve print quality, print your document again. Wiping the print cartridge nozzles and contacts 1 Remove the print cartridges. 2 Dampen a clean, lint-free cloth with water. 3 Gently hold the cloth against the nozzles for about ...
User's Guide
Page 146
...and then wipe in the direction shown. 5 With another clean section of time. • Keep the photo cartridge in its packaging until you are ready to install it. • Do not remove a cartridge from the printer except to two more times. 11 If print quality is still not satisfactory, replace the... print cartridges. For more information, see "Cleaning the print cartridge nozzles" on page 145. 10 Repeat step 9 up to replace, clean, or store it in use. 146 4 Using another clean section of the ...
...and then wipe in the direction shown. 5 With another clean section of time. • Keep the photo cartridge in its packaging until you are ready to install it. • Do not remove a cartridge from the printer except to two more times. 11 If print quality is still not satisfactory, replace the... print cartridges. For more information, see "Cleaning the print cartridge nozzles" on page 145. 10 Repeat step 9 up to replace, clean, or store it in use. 146 4 Using another clean section of the ...
User's Guide
Page 147
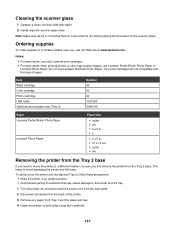
...; For best results when printing photos or other high-quality images, use Lexmark Premium Photo Paper. Item Black cartridge Color cartridge Photo cartridge USB cable Optional second paper tray (Tray 2) Number 44 43 40 1021294 30B0199 Paper Lexmark PerfectFinish Photo Paper Lexmark Photo Paper Paper size • Letter • A4 • 4 x 6.... 3 Remove any paper from Tray 1 and the paper exit tray. 4 Grasp the printer on the scanner glass. Your print cartridges are not compatible with water. 2 Gently wipe the scanner glass clean. Note: Make sure all cables from the wall outlet. 2...
...; For best results when printing photos or other high-quality images, use Lexmark Premium Photo Paper. Item Black cartridge Color cartridge Photo cartridge USB cable Optional second paper tray (Tray 2) Number 44 43 40 1021294 30B0199 Paper Lexmark PerfectFinish Photo Paper Lexmark Photo Paper Paper size • Letter • A4 • 4 x 6.... 3 Remove any paper from Tray 1 and the paper exit tray. 4 Grasp the printer on the scanner glass. Your print cartridges are not compatible with water. 2 Gently wipe the scanner glass clean. Note: Make sure all cables from the wall outlet. 2...
User's Guide
Page 148
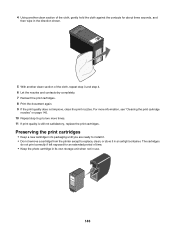
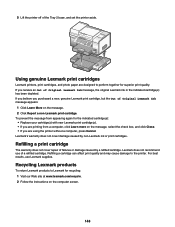
... message, select the check box, and click Close. • If you receive an Out of a refilled cartridge. Refilling a print cartridge The warranty does not cover repair of failures or damage caused by non-Lexmark ink or print cartridges. Using genuine Lexmark print cartridges Lexmark printers, print cartridges, and photo paper are using the printer without a computer, press Cancel.
... message, select the check box, and click Close. • If you receive an Out of a refilled cartridge. Refilling a print cartridge The warranty does not cover repair of failures or damage caused by non-Lexmark ink or print cartridges. Using genuine Lexmark print cartridges Lexmark printers, print cartridges, and photo paper are using the printer without a computer, press Cancel.
User's Guide
Page 152
...Close all countries or regions except the United States, select your country or region. In Windows XP, click Start to check for drivers or downloads. Cartridges may have been removed. For more information, see "Power button is not on page 185. 2 If the software still does not install correctly,... visit our Web site at www.lexmark.com to access the My Computer icon. 4 Double-click the CD-ROM drive icon. 5 If necessary, double-click setup.exe. 6 Follow the ...
...Close all countries or regions except the United States, select your country or region. In Windows XP, click Start to check for drivers or downloads. Cartridges may have been removed. For more information, see "Power button is not on page 185. 2 If the software still does not install correctly,... visit our Web site at www.lexmark.com to access the My Computer icon. 4 Double-click the CD-ROM drive icon. 5 If necessary, double-click setup.exe. 6 Follow the ...
User's Guide
Page 154
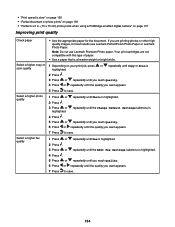
Your print cartridges are printing photos or other high quality images, for the document... or 1 Depending on page 157 Improving print quality Check paper • Use the appropriate paper for best results use Lexmark Premium Photo paper. Select a higher photo quality 1 Press or 2 Press . repeatedly until Fax is highlighted. 3... reach Quality. 6 Press or repeatedly until Photo is highlighted. 3 Press or highlighted. Note: Do not use Lexmark PerfectFinish Photo Paper or Lexmark Photo Paper. If you are not compatible with this type of paper. • Use a paper that is ...
Your print cartridges are printing photos or other high quality images, for the document... or 1 Depending on page 157 Improving print quality Check paper • Use the appropriate paper for best results use Lexmark Premium Photo paper. Select a higher photo quality 1 Press or 2 Press . repeatedly until Fax is highlighted. 3... reach Quality. 6 Press or repeatedly until Photo is highlighted. 3 Press or highlighted. Note: Do not use Lexmark PerfectFinish Photo Paper or Lexmark Photo Paper. If you are not compatible with this type of paper. • Use a paper that is ...

User's Guide
Page 155
...print quality has not improved, continue to step 3. 3 Remove and reinsert the print cartridges. If print quality is still not satisfactory, replace the print cartridges. Note: Do not use Lexmark PerfectFinish Photo Paper or Lexmark Photo Paper. If print quality has not improved, continue to step 2. 2 Clean...page 144. are printing photos or other high-quality images, for best results use Lexmark Premium Photo Paper. paper If you want, follow these steps: 1 Align the print cartridges. Check print cartridges If the document still does not have the print quality you are printed •...
...print quality has not improved, continue to step 3. 3 Remove and reinsert the print cartridges. If print quality is still not satisfactory, replace the print cartridges. Note: Do not use Lexmark PerfectFinish Photo Paper or Lexmark Photo Paper. If print quality has not improved, continue to step 2. 2 Clean...page 144. are printing photos or other high-quality images, for best results use Lexmark Premium Photo Paper. paper If you want, follow these steps: 1 Align the print cartridges. Check print cartridges If the document still does not have the print quality you are printed •...

User's Guide
Page 159
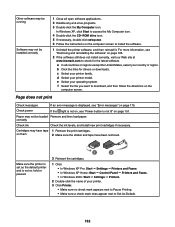
... scanner glass. For more information, see "Software may not be installed correctly" on page 153. Check ink Check the ink levels, and install a new print cartridge if necessary.
... scanner glass. For more information, see "Software may not be installed correctly" on page 153. Check ink Check the ink levels, and install a new print cartridge if necessary.


