
User's Guide
Page 9
... product is not responsible for signs of some parts may not always be obvious. Inspect the power cord regularly for the use of specific Lexmark components. SAVE THESE INSTRUCTIONS. Safety information Use only the power supply and power supply cord provided with the use of other than those described in the user documentation, to a professional service...
... product is not responsible for signs of some parts may not always be obvious. Inspect the power cord regularly for the use of specific Lexmark components. SAVE THESE INSTRUCTIONS. Safety information Use only the power supply and power supply cord provided with the use of other than those described in the user documentation, to a professional service...
User's Guide
Page 13
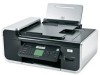
Setting up the printer Granting access to the software during setup. Note: If you do so. 9 8 1 2 3 WI F I PRINTING 1 7 6 5 4 2 3 1 Power cord 2 Telephone cord 3 Printer software CD 4 USB cable or installation cable Note: Your printer model may alert you must grant access to work properly, you about the printer ...
Setting up the printer Granting access to the software during setup. Note: If you do so. 9 8 1 2 3 WI F I PRINTING 1 7 6 5 4 2 3 1 Power cord 2 Telephone cord 3 Printer software CD 4 USB cable or installation cable Note: Your printer model may alert you must grant access to work properly, you about the printer ...
User's Guide
Page 15
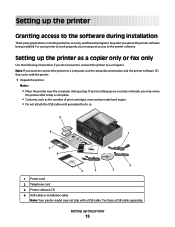
WI F I PRINTING 7 Extend the paper guides. 8 Load paper. 1 2 9 Extend the paper exit tray. 10 Connect the power cord. 2 WI F I PRINTING 1 1 2 Note: Do not attach the USB cable yet. 6 Close the printer. CAUTION-POTENTIAL INJURY: Read the safety information included with this product before connecting power or making any cabling connections. Setting up the printer 15
WI F I PRINTING 7 Extend the paper guides. 8 Load paper. 1 2 9 Extend the paper exit tray. 10 Connect the power cord. 2 WI F I PRINTING 1 1 2 Note: Do not attach the USB cable yet. 6 Close the printer. CAUTION-POTENTIAL INJURY: Read the safety information included with this product before connecting power or making any cabling connections. Setting up the printer 15

User's Guide
Page 30
... to select a Power Saver timeout, and then press OK. Changing the Power Saver timeout You can disable the settings timeout feature if you do not want to turn the printer back on power usage, then select the minimum Power Saver timeout from Power Saver mode as the power supply cord or telephone, during... a lightning storm. The Power Saver timeout is the time it takes for the printer to switch to...
... to select a Power Saver timeout, and then press OK. Changing the Power Saver timeout You can disable the settings timeout feature if you do not want to turn the printer back on power usage, then select the minimum Power Saver timeout from Power Saver mode as the power supply cord or telephone, during... a lightning storm. The Power Saver timeout is the time it takes for the printer to switch to...

User's Guide
Page 112
... of numbers (broadcast fax): a Press OK. Notes: • Do not load postcards, photos, small items, transparencies, photo paper, or thin media (such as the power supply cord or telephone, during a lightning storm. Faxing 112 It is useful when you must navigate an automated answering system or enter a calling card number before sending...
... of numbers (broadcast fax): a Press OK. Notes: • Do not load postcards, photos, small items, transparencies, photo paper, or thin media (such as the power supply cord or telephone, during a lightning storm. Faxing 112 It is useful when you must navigate an automated answering system or enter a calling card number before sending...
User's Guide
Page 127
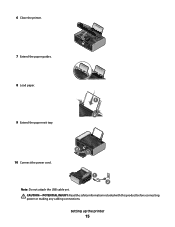
...; Keep new cartridges in an airtight container. The cartridges do not print correctly if left exposed for an extended period of electric shock, unplug the power cord from the wall outlet and disconnect all ink or corrective fluid on the scanner glass. Cleaning the scanner glass 1 Dampen a clean, lint-free cloth with...
...; Keep new cartridges in an airtight container. The cartridges do not print correctly if left exposed for an extended period of electric shock, unplug the power cord from the wall outlet and disconnect all ink or corrective fluid on the scanner glass. Cleaning the scanner glass 1 Dampen a clean, lint-free cloth with...

User's Guide
Page 131
.... 3 Firmly plug the rectangular end of the USB cable into the power supply on , press . DISCONNECT AND RECONNECT THE POWER CORD 1 Disconnect the power cord from the wall outlet, and then from the printer. 2 Plug the cord all the way into the USB port of the following: MAKE SURE ...YOUR OPERATING SYSTEM IS SUPPORTED The following : PRESS POWER BUTTON Make sure the printer is damaged,...
.... 3 Firmly plug the rectangular end of the USB cable into the power supply on , press . DISCONNECT AND RECONNECT THE POWER CORD 1 Disconnect the power cord from the wall outlet, and then from the printer. 2 Plug the cord all the way into the USB port of the following: MAKE SURE ...YOUR OPERATING SYSTEM IS SUPPORTED The following : PRESS POWER BUTTON Make sure the printer is damaged,...
User's Guide
Page 132
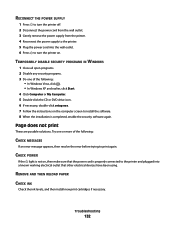
... the following : CHECK MESSAGES If an error message appears, then resolve the error before trying to the printer. 5 Plug the power cord into a known working electrical outlet that the power cord is completed, enable the security software again. Page does not print These are possible solutions. REMOVE AND THEN RELOAD PAPER CHECK INK... software. 8 When the installation is properly connected to the printer and plugged into the wall outlet. 6 Press to turn the printer off. 2 Disconnect the power cord from the wall outlet. 3 Gently remove the power supply from the printer. 4 Reconnect the...
... the following : CHECK MESSAGES If an error message appears, then resolve the error before trying to the printer. 5 Plug the power cord into a known working electrical outlet that the power cord is completed, enable the security software again. Page does not print These are possible solutions. REMOVE AND THEN RELOAD PAPER CHECK INK... software. 8 When the installation is properly connected to the printer and plugged into the wall outlet. 6 Press to turn the printer off. 2 Disconnect the power cord from the wall outlet. 3 Gently remove the power supply from the printer. 4 Reconnect the...
User's Guide
Page 134
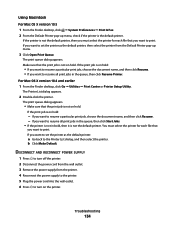
...default printer. If you want to set the printer as the default printer, then select the printer from the printer. 4 Reconnect the power supply to the printer. 5 Plug the power cord into the wall outlet. 6 Press to resume a particular print job, choose the document name, and then click Resume. - Using...job, choose the document name, and then click Resume. • If you want to turn off the printer. 2 Disconnect the power cord from the wall outlet. 3 Remove the power supply from the Default Printer pop-up menu, check if the printer is not on hold : - If the print job is ...
...default printer. If you want to set the printer as the default printer, then select the printer from the printer. 4 Reconnect the power supply to the printer. 5 Plug the power cord into the wall outlet. 6 Press to resume a particular print job, choose the document name, and then click Resume. - Using...job, choose the document name, and then click Resume. • If you want to turn off the printer. 2 Disconnect the power cord from the wall outlet. 3 Remove the power supply from the Default Printer pop-up menu, check if the printer is not on hold : - If the print job is ...
User's Guide
Page 135
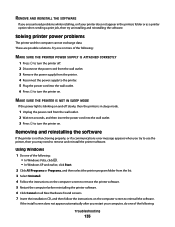
...and reinstalling the software If the printer is blinking on and off . 2 Disconnect the power cord from the wall outlet. 3 Remove the power supply from the wall outlet. 2 Wait ten seconds, and then insert the power cord into the wall outlet. 6 Press to turn the printer on the computer screen to reinstall...follow the instructions on . REMOVE AND REINSTALL THE SOFTWARE If you restart your printer does not appear in sleep mode. 1 Unplug the power cord from the printer. 4 Reconnect the power supply to the printer. 5 Plug the power cord into the wall outlet. 3 Press to turn the printer on.
...and reinstalling the software If the printer is blinking on and off . 2 Disconnect the power cord from the wall outlet. 3 Remove the power supply from the wall outlet. 2 Wait ten seconds, and then insert the power cord into the wall outlet. 6 Press to turn the printer on the computer screen to reinstall...follow the instructions on . REMOVE AND REINSTALL THE SOFTWARE If you restart your printer does not appear in sleep mode. 1 Unplug the power cord from the printer. 4 Reconnect the power supply to the printer. 5 Plug the power cord into the wall outlet. 3 Press to turn the printer on.
User's Guide
Page 137
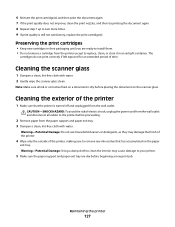
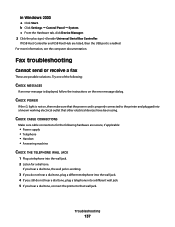
... the light is not on, then make sure that the power cord is properly connected to the printer and plugged into a known working . 3 If you do not hear a dial tone, plug a different telephone into the wall jack. 4 ... Hardware tab, click Device Manager. 2 Click the plus sign (+) beside Universal Serial Bus Controller. Try one of the following hardware are secure, if applicable: • Power supply • Telephone • Handset • Answering machine CHECK THE TELEPHONE WALL JACK 1 Plug a telephone into a different wall jack. 5 If you hear a dial tone, connect...
... the light is not on, then make sure that the power cord is properly connected to the printer and plugged into a known working . 3 If you do not hear a dial tone, plug a different telephone into the wall jack. 4 ... Hardware tab, click Device Manager. 2 Click the plus sign (+) beside Universal Serial Bus Controller. Try one of the following hardware are secure, if applicable: • Power supply • Telephone • Handset • Answering machine CHECK THE TELEPHONE WALL JACK 1 Plug a telephone into a different wall jack. 5 If you hear a dial tone, connect...

User's Guide
Page 172
... to the EPA Sleep Mode. Since power consumption claims are subject to completely stop product power consumption, disconnect the power supply cord from hard-copy original 17 documents. Instantaneous power draws may be multiplied by lowering power consumption during extended periods of each mode in power units of power, then to change. LEXMARK LICENSE AGREEMENTS PLEASE READ CAREFULLY: BY...
... to the EPA Sleep Mode. Since power consumption claims are subject to completely stop product power consumption, disconnect the power supply cord from hard-copy original 17 documents. Instantaneous power draws may be multiplied by lowering power consumption during extended periods of each mode in power units of power, then to change. LEXMARK LICENSE AGREEMENTS PLEASE READ CAREFULLY: BY...
Fax Guide
Page 11
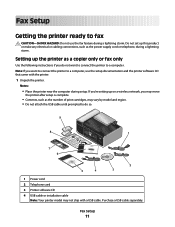
...the printer to a computer, use the fax feature during a lightning storm. Note: If you do so. 9 8 1 2 3 WI F I PRINTING 1 7 6 5 4 2 3 1 Power cord 2 Telephone cord 3 Printer software CD 4 USB cable or installation cable Note: Your printer model may move the printer after setup is complete. • Contents, such as a copier.... Fax Setup 11 If you're setting up this product or make any electrical or cabling connections, such as the power supply cord or telephone, during setup. Do not set up on a wireless network, you may not ship with the printer. 1 Unpack the printer....
...the printer to a computer, use the fax feature during a lightning storm. Note: If you do so. 9 8 1 2 3 WI F I PRINTING 1 7 6 5 4 2 3 1 Power cord 2 Telephone cord 3 Printer software CD 4 USB cable or installation cable Note: Your printer model may move the printer after setup is complete. • Contents, such as a copier.... Fax Setup 11 If you're setting up this product or make any electrical or cabling connections, such as the power supply cord or telephone, during setup. Do not set up on a wireless network, you may not ship with the printer. 1 Unpack the printer....

Fax Guide
Page 13
WI F I PRINTING 7 Extend the paper guides. 8 Load paper. 1 2 9 Extend the paper exit tray. 10 Connect the power cord. 2 WI F I PRINTING 1 1 2 Note: Do not attach the USB cable yet. Fax Setup 13 CAUTION-POTENTIAL INJURY: Read the safety information included with this product before connecting power or making any cabling connections. 6 Close the printer.
WI F I PRINTING 7 Extend the paper guides. 8 Load paper. 1 2 9 Extend the paper exit tray. 10 Connect the power cord. 2 WI F I PRINTING 1 1 2 Note: Do not attach the USB cable yet. Fax Setup 13 CAUTION-POTENTIAL INJURY: Read the safety information included with this product before connecting power or making any cabling connections. 6 Close the printer.

Fax Guide
Page 30
... scanner glass for : F I Use the ADF for single pages, small items (such as postcards or photos), transparencies, photo paper, or thin media (such as the power supply cord or telephone, during a lightning storm.
... scanner glass for : F I Use the ADF for single pages, small items (such as postcards or photos), transparencies, photo paper, or thin media (such as the power supply cord or telephone, during a lightning storm.

Fax Guide
Page 44
...is not lit These are supported: Windows Vista, Windows XP, Windows 2000 with the USB symbol. Troubleshooting 44 Power button is marked with Service Pack 3 or later, and Mac OS X versions 10.5, 10.4 and 10.3. ...light is not on the printer. 1 2 3 Plug the cord into the USB port of the following: MAKE SURE YOUR OPERATING SYSTEM IS SUPPORTED The following : PRESS POWER BUTTON Make sure the printer is damaged, use a new one... systems are possible solutions. DISCONNECT AND RECONNECT THE POWER CORD 1 Disconnect the power cord from the wall outlet, and then from the printer. 2 Plug the...
...is not lit These are supported: Windows Vista, Windows XP, Windows 2000 with the USB symbol. Troubleshooting 44 Power button is marked with Service Pack 3 or later, and Mac OS X versions 10.5, 10.4 and 10.3. ...light is not on the printer. 1 2 3 Plug the cord into the USB port of the following: MAKE SURE YOUR OPERATING SYSTEM IS SUPPORTED The following : PRESS POWER BUTTON Make sure the printer is damaged, use a new one... systems are possible solutions. DISCONNECT AND RECONNECT THE POWER CORD 1 Disconnect the power cord from the wall outlet, and then from the printer. 2 Plug the...

Fax Guide
Page 45
... If the install screen does not appear automatically after you may need to turn the printer off. 2 Disconnect the power cord from the wall outlet. 3 Gently remove the power supply from the list. 3 Select Uninstall. 4 Follow the instructions on the computer screen to remove the printer software.... click Start. 2 Click All Programs or Programs, and then select the printer program folder from the printer. 4 Reconnect the power supply to the printer. 5 Plug the power cord into the wall outlet. 6 Press to remove and reinstall the printer software. Using Windows 1 Do one of the following :...
... If the install screen does not appear automatically after you may need to turn the printer off. 2 Disconnect the power cord from the wall outlet. 3 Gently remove the power supply from the list. 3 Select Uninstall. 4 Follow the instructions on the computer screen to remove the printer software.... click Start. 2 Click All Programs or Programs, and then select the printer program folder from the printer. 4 Reconnect the power supply to the printer. 5 Plug the power cord into the wall outlet. 6 Press to remove and reinstall the printer software. Using Windows 1 Do one of the following :...
Fax Guide
Page 46
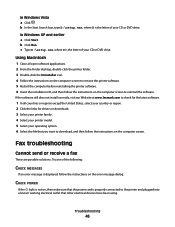
... is not on, then make sure that the power cord is properly connected to the printer and plugged into a known working electrical outlet that you want to reinstall the software. If the software still does not install correctly, visit our Web site at www.lexmark.com to check for the latest software. 1 In...
... is not on, then make sure that the power cord is properly connected to the printer and plugged into a known working electrical outlet that you want to reinstall the software. If the software still does not install correctly, visit our Web site at www.lexmark.com to check for the latest software. 1 In...


