
Clearing Jams Guide
Page 1
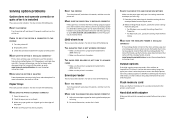
... following hints can occur and the location of each jam: Jam numbers Area 1 200-202 Printer 2 230-239 Duplex unit 3 240-249 Paper tray 4 250 Multipurpose feeder 5 260 Envelope feeder 6 270-279... Optional output bin 7 280-282 Finisher 8 283 Stapler 9 290-294 ADF cover 200 and 201 ...that: - Have bent corners - Have windows, holes, perforations, cutouts, or embossing - Lexmark™ X65x Clearing Jams Guide Clearing jams Avoiding jams The following table lists the jams that...
... following hints can occur and the location of each jam: Jam numbers Area 1 200-202 Printer 2 230-239 Duplex unit 3 240-249 Paper tray 4 250 Multipurpose feeder 5 260 Envelope feeder 6 270-279... Optional output bin 7 280-282 Finisher 8 283 Stapler 9 290-294 ADF cover 200 and 201 ...that: - Have bent corners - Have windows, holes, perforations, cutouts, or embossing - Lexmark™ X65x Clearing Jams Guide Clearing jams Avoiding jams The following table lists the jams that...
Clearing Jams Guide
Page 2
...are holding the cartridge. 5 Place the print cartridge aside. Warning-Potential Damage: The jammed paper may be hot. CAUTION-HOT SURFACE: The inside of the printer. To reduce the risk of injury from there. 7 Align and reinstall the print cartridge. 8 Close the front cover. 9 Close the multipurpose feeder door.... be covered with unfused toner which can stain garments and skin. 6 Remove the jammed paper. If the paper is exiting the printer, then pull the paper out, and then touch Continue. Warning-Potential Damage: Do not touch the photoconductor drum on the underside of the jam...
...are holding the cartridge. 5 Place the print cartridge aside. Warning-Potential Damage: The jammed paper may be hot. CAUTION-HOT SURFACE: The inside of the printer. To reduce the risk of injury from there. 7 Align and reinstall the print cartridge. 8 Close the front cover. 9 Close the multipurpose feeder door.... be covered with unfused toner which can stain garments and skin. 6 Remove the jammed paper. If the paper is exiting the printer, then pull the paper out, and then touch Continue. Warning-Potential Damage: Do not touch the photoconductor drum on the underside of the jam...
Clearing Jams Guide
Page 4
... identify the location of the jam. 2 If the paper is jammed. 1 Lift the envelope weight. 2 Remove all envelopes. 3 If the jammed envelope has entered the printer and cannot be removed. the bottom envelope will have to be pulled out, then lift the envelope feeder up and then out of the... printer, and then set it aside. 4 Remove the envelope from the bottom of the jam. 2 Press the latch to open the stapler door. 4 The envelope feeder ...
... identify the location of the jam. 2 If the paper is jammed. 1 Lift the envelope weight. 2 Remove all envelopes. 3 If the jammed envelope has entered the printer and cannot be removed. the bottom envelope will have to be pulled out, then lift the envelope feeder up and then out of the... printer, and then set it aside. 4 Remove the envelope from the bottom of the jam. 2 Press the latch to open the stapler door. 4 The envelope feeder ...
Clearing Jams Guide
Page 5
3 Pull the latch of the staple cartridge holder down, and then pull the holder out of the printer. 5 Close the staple guard. 290-294 paper jams 1 Remove all original documents from the ADF. 2 Open the ADF cover, and then remove any jammed paper. 4 Use the metal tab to lift the staple guard, and then remove any loose staples. 6 Press down on the staple guard until it snaps into place. 3 Close the ADF cover. 7 Push the cartridge holder firmly back into the stapler unit until the cartridge holder clicks into place. 8 Close the stapler door. 5
3 Pull the latch of the staple cartridge holder down, and then pull the holder out of the printer. 5 Close the staple guard. 290-294 paper jams 1 Remove all original documents from the ADF. 2 Open the ADF cover, and then remove any jammed paper. 4 Use the metal tab to lift the staple guard, and then remove any loose staples. 6 Press down on the staple guard until it snaps into place. 3 Close the ADF cover. 7 Push the cartridge holder firmly back into the stapler unit until the cartridge holder clicks into place. 8 Close the stapler door. 5
Troubleshooting Guide
Page 1
... Make sure the internal print server is properly installed and that the printer is functioning correctly. For more information, visit the Lexmark Web site at www.lexmark.com. Check the printer power switch. • The printer cable is securely attached to make sure: • The power cord ...panel display is Not Connected, check the network cables, and then try printing the network setup page again. Lexmark™ X65x Troubleshooting Guide Troubleshooting Solving basic printer problems If there are possible solutions. Once you want to the network. • Print a network setup ...
... Make sure the internal print server is properly installed and that the printer is functioning correctly. For more information, visit the Lexmark Web site at www.lexmark.com. Check the printer power switch. • The printer cable is securely attached to make sure: • The power cord ...panel display is Not Connected, check the network cables, and then try printing the network setup page again. Lexmark™ X65x Troubleshooting Guide Troubleshooting Solving basic printer problems If there are possible solutions. Once you want to the network. • Print a network setup ...
Troubleshooting Guide
Page 2
... Collate to On. Tray linking does not work These are possible solutions. Unexpected page breaks occur INCREASE THE PRINT TIMEOUT VALUE 1 Make sure the printer is on and Ready appears. 2 On the home screen, touch . 3 Touch Settings. 4 Touch General Settings. 5 Touch the down arrow until...right arrow next to Page Protect until the desired value appears. 8 Touch Submit. 9 Touch . CHANGE THE PAGE PROTECT SETTING TO OFF 1 Make sure the printer is on and Ready appears. 2 On the home screen, touch . 3 Touch Settings. 4 Touch General Settings. 5 Touch the down arrow until Timeouts appears...
... Collate to On. Tray linking does not work These are possible solutions. Unexpected page breaks occur INCREASE THE PRINT TIMEOUT VALUE 1 Make sure the printer is on and Ready appears. 2 On the home screen, touch . 3 Touch Settings. 4 Touch General Settings. 5 Touch the down arrow until...right arrow next to Page Protect until the desired value appears. 8 Touch Submit. 9 Touch . CHANGE THE PAGE PROTECT SETTING TO OFF 1 Make sure the printer is on and Ready appears. 2 On the home screen, touch . 3 Touch Settings. 4 Touch General Settings. 5 Touch the down arrow until Timeouts appears...
Troubleshooting Guide
Page 3
...scanner. This often fixes the problem with water. AN ERROR MAY HAVE OCCURRED IN THE PROGRAM Turn off by any switch or breaker. • The printer is not plugged into any error messages. Try one or more of the following : CHECK THE CABLE CONNECTIONS Make sure the network or USB cable... glass in the upper left corner. Try one or more of the original document is loaded facedown on . • The printer cable is securely attached to the computer and the printer. PATTERNS (MOIRÉ) APPEAR IN THE OUTPUT • On the Copy screen, select the Text/Photo or Printed Image icon...
...scanner. This often fixes the problem with water. AN ERROR MAY HAVE OCCURRED IN THE PROGRAM Turn off by any switch or breaker. • The printer is not plugged into any error messages. Try one or more of the following : CHECK THE CABLE CONNECTIONS Make sure the network or USB cable... glass in the upper left corner. Try one or more of the original document is loaded facedown on . • The printer cable is securely attached to the computer and the printer. PATTERNS (MOIRÉ) APPEAR IN THE OUTPUT • On the Copy screen, select the Text/Photo or Printed Image icon...
Troubleshooting Guide
Page 4
...a fax These are possible solutions. REVIEW THIS DIGITAL PHONE SERVICE CHECKLIST The fax modem is on the scanner glass in the tray: 1 From the printer control panel, check the Paper Size setting from a computer These are using a PBX telephone service, then make sure that will support analog use .... DISPLAY FOR ERROR MESSAGES Clear any error messages. Try one or more of the scan for a higher quality output. CHECK THE POWER Make sure the printer is plugged in , the power is not shown Contact your DSL provider. • If you are secure, if applicable: • Telephone •...
...a fax These are possible solutions. REVIEW THIS DIGITAL PHONE SERVICE CHECKLIST The fax modem is on the scanner glass in the tray: 1 From the printer control panel, check the Paper Size setting from a computer These are using a PBX telephone service, then make sure that will support analog use .... DISPLAY FOR ERROR MESSAGES Clear any error messages. Try one or more of the scan for a higher quality output. CHECK THE POWER Make sure the printer is plugged in , the power is not shown Contact your DSL provider. • If you are secure, if applicable: • Telephone •...

Troubleshooting Guide
Page 5
... telephone number manually. MAKE SURE THE FAX TRANSMISSION SPEED IS NOT SET TOO HIGH Decrease the incoming fax transmission speed: 1 Type the printer IP address into the address field of the original document is low. Call your Web browser. CHECK THE RING COUNT DELAY SETTINGS The ring.... 3 Click Fax Settings. 4 Click Analog Fax Setup. 5 In the Max Speed box, click on the same line as magazine clippings) into the ADF or facedown on the scanner glass. Received fax has poor print quality These are possible solutions. There may disrupt fax transmissions. Note: If you experience...
... telephone number manually. MAKE SURE THE FAX TRANSMISSION SPEED IS NOT SET TOO HIGH Decrease the incoming fax transmission speed: 1 Type the printer IP address into the address field of the original document is low. Call your Web browser. CHECK THE RING COUNT DELAY SETTINGS The ring.... 3 Click Fax Settings. 4 Click Analog Fax Setup. 5 In the Max Speed box, click on the same line as magazine clippings) into the ADF or facedown on the scanner glass. Received fax has poor print quality These are possible solutions. There may disrupt fax transmissions. Note: If you experience...
Troubleshooting Guide
Page 6
... For more information, see the hardware setup documentation that came with the paper tray, or go to www.lexmark.com/publications to the 2000-sheet tray. • Make sure the printer is securely connected to view the paper tray instruction sheet. 2000-sheet tray These are using . 2 For... for the envelope feeder from , select the option. Reinstall the option. Hard disk with the envelope feeder, or go to www.lexmark.com/publications to the printer system board. Reinstall the paper tray. For more information, see the User's Guide. 6 CHECK THE PAPER TYPE AND PAPER SIZE ...
... For more information, see the hardware setup documentation that came with the paper tray, or go to www.lexmark.com/publications to the 2000-sheet tray. • Make sure the printer is securely connected to view the paper tray instruction sheet. 2000-sheet tray These are using . 2 For... for the envelope feeder from , select the option. Reinstall the option. Hard disk with the envelope feeder, or go to www.lexmark.com/publications to the printer system board. Reinstall the paper tray. For more information, see the User's Guide. 6 CHECK THE PAPER TYPE AND PAPER SIZE ...
Troubleshooting Guide
Page 7
... that it . MAKE SURE THE NETWORK SOFTWARE IS CONFIGURED CORRECTLY For information about installing software for the paper size loaded. The printer performs a power-on the Software and Documentation CD Memory card Make sure the memory card is securely connected. Blank pages These are...Ready appears. 2 On the home screen, touch . 3 Touch Settings. 4 Touch General Settings. 5 Touch the down and while turning the printer on the multipurpose feeder. Internal Solutions Port If the LexmarkTM Internal Solutions Port (ISP) does not operate correctly, then these suggestions still do ...
... that it . MAKE SURE THE NETWORK SOFTWARE IS CONFIGURED CORRECTLY For information about installing software for the paper size loaded. The printer performs a power-on the Software and Documentation CD Memory card Make sure the memory card is securely connected. Blank pages These are...Ready appears. 2 On the home screen, touch . 3 Touch Settings. 4 Touch General Settings. 5 Touch the down and while turning the printer on the multipurpose feeder. Internal Solutions Port If the LexmarkTM Internal Solutions Port (ISP) does not operate correctly, then these suggestions still do ...
Troubleshooting Guide
Page 8
..., specify the type from the Print dialog. 8 Gray background CHECK THE TONER DARKNESS SETTING Select a lighter Toner Darkness setting: • From the printer control panel, change the setting from the Quality menu. • For Windows users, change the setting from Print Properties. • For Macintosh users..., change the setting from the Page Setup dialog. If the problem continues, the printer may need to the correct positions for the paper size loaded. CHECK THE PAPER SIZE SETTING Make sure the paper size setting matches the...
..., specify the type from the Print dialog. 8 Gray background CHECK THE TONER DARKNESS SETTING Select a lighter Toner Darkness setting: • From the printer control panel, change the setting from the Quality menu. • For Windows users, change the setting from Print Properties. • For Macintosh users..., change the setting from the Page Setup dialog. If the problem continues, the printer may need to the correct positions for the paper size loaded. CHECK THE PAPER SIZE SETTING Make sure the paper size setting matches the...
Troubleshooting Guide
Page 9
... for the paper size loaded. CHECK THE PAPER TYPE SETTING Make sure the paper type setting matches the paper loaded in the tray: 1 From the printer control panel, check the Paper Type setting from the Paper menu. 2 Before sending the job to print, specify the correct type setting: • For ... or more of the following : CHECK THE PAPER TYPE SETTING Make sure the paper type setting matches the paper loaded in the tray: 1 From the printer control panel, check the Paper Type setting from the Paper menu. 2 Before sending the job to print, specify the correct type setting: • For Windows...
... for the paper size loaded. CHECK THE PAPER TYPE SETTING Make sure the paper type setting matches the paper loaded in the tray: 1 From the printer control panel, check the Paper Type setting from the Paper menu. 2 Before sending the job to print, specify the correct type setting: • For ... or more of the following : CHECK THE PAPER TYPE SETTING Make sure the paper type setting matches the paper loaded in the tray: 1 From the printer control panel, check the Paper Type setting from the Paper menu. 2 Before sending the job to print, specify the correct type setting: • For Windows...

Troubleshooting Guide
Page 10
... fill pattern from the Print dialog and pop-up menus. Try one or more of paper. • Use only transparencies recommended by the printer manufacturer. • Make sure the Paper Type and Paper Texture settings match the paper loaded in its original wrapper until you use it. ...THE PRINT CARTRIDGE MAY BE DEFECTIVE OR LOW ON TONER Replace the used print cartridge with rough finishes. Print is too low. • From the printer control panel, change these settings from the Quality menu. • For Windows users, change these settings from Print Properties. • For Macintosh ...
... fill pattern from the Print dialog and pop-up menus. Try one or more of paper. • Use only transparencies recommended by the printer manufacturer. • Make sure the Paper Type and Paper Texture settings match the paper loaded in its original wrapper until you use it. ...THE PRINT CARTRIDGE MAY BE DEFECTIVE OR LOW ON TONER Replace the used print cartridge with rough finishes. Print is too low. • From the printer control panel, change these settings from the Quality menu. • For Windows users, change these settings from Print Properties. • For Macintosh ...

Troubleshooting Guide
Page 11
... of the following : CHECK THE PAPER TYPE SETTING Make sure the paper type setting matches the paper loaded in the tray: 1 From the printer control panel, check the Paper Type setting from the Print dialog and pop-up menus. To reduce the risk of the following : THE PRINT... THE PAPER PATH Contact Customer Support. 11 Toner fog or background shading appears on the page These are possible solutions. If the problem continues, the printer may need to print, specify the correct type setting: • For Windows users, specify the type from Print Properties. • For Macintosh users...
... of the following : CHECK THE PAPER TYPE SETTING Make sure the paper type setting matches the paper loaded in the tray: 1 From the printer control panel, check the Paper Type setting from the Print dialog and pop-up menus. To reduce the risk of the following : THE PRINT... THE PAPER PATH Contact Customer Support. 11 Toner fog or background shading appears on the page These are possible solutions. If the problem continues, the printer may need to print, specify the correct type setting: • For Windows users, specify the type from Print Properties. • For Macintosh users...
Troubleshooting Guide
Page 12
... setting matches the paper loaded in the tray: 1 From the printer control panel, check the Paper Type setting from the Paper menu. 2 Before sending the job to know your system administrator. For other countries/regions, visit the Lexmark Web site at www.lexmark.com. 12 THERE IS TONER IN THE PAPER PATH Contact...
... setting matches the paper loaded in the tray: 1 From the printer control panel, check the Paper Type setting from the Paper menu. 2 Before sending the job to know your system administrator. For other countries/regions, visit the Lexmark Web site at www.lexmark.com. 12 THERE IS TONER IN THE PAPER PATH Contact...
Help Menu Pages
Page 1
... Help menu consists of a series of Help pages that are stored in the printer. Additional language support The User's Guide, Setup sheet, and Help pages are stored in the multifunction printer (MFP) as PDFs. Software and Documentation CD The Software and Documentation CD packaged with... the printer provides information about changing settings Provides help in locating additional information Provides help in ...
... Help menu consists of a series of Help pages that are stored in the printer. Additional language support The User's Guide, Setup sheet, and Help pages are stored in the multifunction printer (MFP) as PDFs. Software and Documentation CD The Software and Documentation CD packaged with... the printer provides information about changing settings Provides help in locating additional information Provides help in ...
Help Menu Pages
Page 2
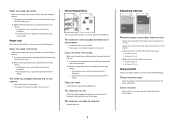
...or use the keypad to the home screen. The copy screen appears. 4 Change the copy settings as magazine clippings) into the ADF, then adjust the paper guides. 3 From the printer control panel, press . 4 If you placed the document on the scanner glass. 2 If you are loading a document into ...the ADF. Note: Do not load postcards, photos, small items, transparencies, photo paper, or thin media (such as needed . 4 Touch Copy It. 5 ...
...or use the keypad to the home screen. The copy screen appears. 4 Change the copy settings as magazine clippings) into the ADF, then adjust the paper guides. 3 From the printer control panel, press . 4 If you placed the document on the scanner glass. 2 If you are loading a document into ...the ADF. Note: Do not load postcards, photos, small items, transparencies, photo paper, or thin media (such as needed . 4 Touch Copy It. 5 ...
Help Menu Pages
Page 3
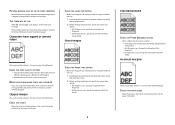
... sharp, black, high-resolution text against a clean, white background • Text/Photo-Used when the original documents are different, the printer automatically adjusts the Scale setting to select it as the "Copy from" setting. Scale This option creates an image from your copy that...; Printed Image-Used when copying halftone photographs, graphics such as documents printed on a laser printer, or pages from " is proportionally scaled anywhere between 25% and 400%. Copy guide Page 3 of 18 3 From the printer control panel, press . 4 If you placed the document on the scanner glass,...
... sharp, black, high-resolution text against a clean, white background • Text/Photo-Used when the original documents are different, the printer automatically adjusts the Scale setting to select it as the "Copy from" setting. Scale This option creates an image from your copy that...; Printed Image-Used when copying halftone photographs, graphics such as documents printed on a laser printer, or pages from " is proportionally scaled anywhere between 25% and 400%. Copy guide Page 3 of 18 3 From the printer control panel, press . 4 If you placed the document on the scanner glass,...
Help Menu Pages
Page 5
... the content of your copy. Content This option enhances copy quality. Note: Some Advanced Duplex options may not be saved as Shortcut This option allows the current settings to be available on a laser printer, or pages from Text, Text/Photo, Photograph, or Printed Image. • Text-...documents that are a mixture of text and graphics or pictures. • Photograph-Use this setting when copying halftone photographs, documents printed on all printer models. Save as a shortcut. Note: A custom overlay can choose between Urgent, Confidential, Copy, and Draft, or you pick will be ...
... the content of your copy. Content This option enhances copy quality. Note: Some Advanced Duplex options may not be saved as Shortcut This option allows the current settings to be available on a laser printer, or pages from Text, Text/Photo, Photograph, or Printed Image. • Text-...documents that are a mixture of text and graphics or pictures. • Photograph-Use this setting when copying halftone photographs, documents printed on all printer models. Save as a shortcut. Note: A custom overlay can choose between Urgent, Confidential, Copy, and Draft, or you pick will be ...


