
Troubleshooting Guide
Page 5
... tray. THE TONER MAY BE LOW When 88 Cartridge low appears or when you do not know the IP address of the printer, then print a network setup page and locate the IP address in the TCP/IP section. 2 Click Settings. 3 Click Fax Settings. 4 Click Analog Fax Setup. 5 In the Max ...receiving a fax. MAKE SURE THE FAX TRANSMISSION SPEED IS NOT SET TOO HIGH Decrease the incoming fax transmission speed: 1 Type the printer IP address into the address field of your telephone company to the telephone company's Distinctive Ring service, then keep the Ring Delay setting at a time. There may...
... tray. THE TONER MAY BE LOW When 88 Cartridge low appears or when you do not know the IP address of the printer, then print a network setup page and locate the IP address in the TCP/IP section. 2 Click Settings. 3 Click Fax Settings. 4 Click Analog Fax Setup. 5 In the Max ...receiving a fax. MAKE SURE THE FAX TRANSMISSION SPEED IS NOT SET TOO HIGH Decrease the incoming fax transmission speed: 1 Type the printer IP address into the address field of your telephone company to the telephone company's Distinctive Ring service, then keep the Ring Delay setting at a time. There may...
Troubleshooting Guide
Page 12
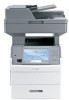
...the menu settings page. CHECK THE NETWORK SETTINGS Depending on and connected to the same network. For other countries/regions, visit the Lexmark Web site at www.lexmark.com. 12 THERE IS TONER IN THE PAPER PATH Contact Customer Support. Try one or more of the following : CHECK THE ... The serial number is poor Try one or more information, see the label on the inside top front cover of http:// before the printer IP address to access the Embedded Web Server. CHECK THE PAPER TYPE SETTING Make sure the paper type setting matches the paper loaded in the tray. You...
...the menu settings page. CHECK THE NETWORK SETTINGS Depending on and connected to the same network. For other countries/regions, visit the Lexmark Web site at www.lexmark.com. 12 THERE IS TONER IN THE PAPER PATH Contact Customer Support. Try one or more of the following : CHECK THE ... The serial number is poor Try one or more information, see the label on the inside top front cover of http:// before the printer IP address to access the Embedded Web Server. CHECK THE PAPER TYPE SETTING Make sure the paper type setting matches the paper loaded in the tray. You...

User Guide
Page 55
... Destination, and then click Continue. 7 From the Easy Install screen, click Install. For Macintosh users 1 Allow the network DHCP server to assign an IP address to the printer. 2 Print the network setup page from the list of printers discovered on -screen instructions to accept the terms of your CD or...the on-screen instructions. 9 Follow the on the network, and then click Finish. a Install a PPD file on page 47. 3 Locate the printer IP address in the CD or DVD drive. 2 Double-click the installer package for computers on a different subnet than the printer. 4 Install the drivers and add...
... Destination, and then click Continue. 7 From the Easy Install screen, click Install. For Macintosh users 1 Allow the network DHCP server to assign an IP address to the printer. 2 Print the network setup page from the list of printers discovered on -screen instructions to accept the terms of your CD or...the on-screen instructions. 9 Follow the on the network, and then click Finish. a Install a PPD file on page 47. 3 Locate the printer IP address in the CD or DVD drive. 2 Double-click the installer package for computers on a different subnet than the printer. 4 Install the drivers and add...

User Guide
Page 56
... the first pop-up menu, choose AppleTalk. 8 From the second pop-up in the list, you may need to add it using the IP address. b Add the printer: • For IP printing: In Mac OS X version 10.5 1 From the Apple menu, choose System Preferences. 2 Click Print & Fax. 3 Click +. 4 Select the printer from the...
... the first pop-up menu, choose AppleTalk. 8 From the second pop-up in the list, you may need to add it using the IP address. b Add the printer: • For IP printing: In Mac OS X version 10.5 1 From the Apple menu, choose System Preferences. 2 Click Print & Fax. 3 Click +. 4 Select the printer from the...
User Guide
Page 57
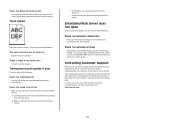
...the computer configurations. • If the computers are adding a wireless ISP to a printer previously configured for a wired connection, then make a note of the new IP address. 2 Do one copy of the printer, then update all of the following: In Windows Vista a Click . b Click Printers and Faxes. If the wired ... wirelessly. Additional printer setup 57 This can be active. Changing port settings after installing a new network Internal Solutions Port When a new network Lexmark Internal Solutions Port (ISP) is installed in the printer, the printer configurations on again.
...the computer configurations. • If the computers are adding a wireless ISP to a printer previously configured for a wired connection, then make a note of the new IP address. 2 Do one copy of the printer, then update all of the following: In Windows Vista a Click . b Click Printers and Faxes. If the wired ... wirelessly. Additional printer setup 57 This can be active. Changing port settings after installing a new network Internal Solutions Port When a new network Lexmark Internal Solutions Port (ISP) is installed in the printer, the printer configurations on again.

User Guide
Page 58
... 10.4 and earlier a From the Go menu, choose Applications. d Click AppleTalk. f Click More Printers. You can find the new IP address on the network setup page you are configuring access for computers on a different subnet than the printer. 3 Add the printer: • For... setup page. e Choose the Default Browser tab. c Click +. 9 Type the new IP address in the TCP/IP section of the new IP address. 2 Locate the printer IP address in the "Printer Name or IP Address" field. You will need the IP address if you printed in step 1. 10 Click OK, and then click Close. b Double-...
... 10.4 and earlier a From the Go menu, choose Applications. d Click AppleTalk. f Click More Printers. You can find the new IP address on the network setup page you are configuring access for computers on a different subnet than the printer. 3 Add the printer: • For... setup page. e Choose the Default Browser tab. c Click +. 9 Type the new IP address in the TCP/IP section of the new IP address. 2 Locate the printer IP address in the "Printer Name or IP Address" field. You will need the IP address if you printed in step 1. 10 Click OK, and then click Close. b Double-...

User Guide
Page 70
...the Station Number box, and then enter the printer fax number. 7 Click Submit. If there is a power failure, then you do not know the IP address of your Web browser. Note: If you send. 5 Connect a third telephone cord from the computer modem to the EXT port of the printer, then... print a network setup page and locate the IP address in the TCP/IP section. 2 Click Settings. 3 Click Fax Settings. 4 Click Analog Fax Setup. 5 Click inside the Station Name box, and then enter the name...
...the Station Number box, and then enter the printer fax number. 7 Click Submit. If there is a power failure, then you do not know the IP address of your Web browser. Note: If you send. 5 Connect a third telephone cord from the computer modem to the EXT port of the printer, then... print a network setup page and locate the IP address in the TCP/IP section. 2 Click Settings. 3 Click Fax Settings. 4 Click Analog Fax Setup. 5 Click inside the Station Name box, and then enter the name...
User Guide
Page 71
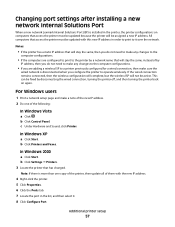
Note: If you do not know the IP address of your Web browser. Additional printer setup 71 Turning Daylight Saving Time on The printer can be set to automatically adjust for Daylight Saving Time (DST): 1 Type the printer IP address into the address field of the printer, then print a network setup page and locate the IP address in the TCP/IP section. 2 Click Links & Index. 3 Click Set Date and Time. 4 Select Automatically Observe DST. 5 Click Submit.
Note: If you do not know the IP address of your Web browser. Additional printer setup 71 Turning Daylight Saving Time on The printer can be set to automatically adjust for Daylight Saving Time (DST): 1 Type the printer IP address into the address field of the printer, then print a network setup page and locate the IP address in the TCP/IP section. 2 Click Links & Index. 3 Click Set Date and Time. 4 Select Automatically Observe DST. 5 Click Submit.

User Guide
Page 84
... the printer, then print a network setup page and locate the IP address in the TCP/IP section. 2 Click Settings. 3 Under Default Settings, click Paper Menu. 4 Click Custom Names. 5 Type a name for the paper type in the tray. Warning-Potential Damage: Do ... the Custom Types and Paper Size/Type menus. 6 Click Submit. Paper may not be set manually from the Embedded Web Server: 1 Type the printer IP address into the address field of your Web browser. Paper Size settings for the multipurpose feeder are loaded. The temperature of the fuser varies according to a tray when...
... the printer, then print a network setup page and locate the IP address in the TCP/IP section. 2 Click Settings. 3 Under Default Settings, click Paper Menu. 4 Click Custom Names. 5 Type a name for the paper type in the tray. Warning-Potential Damage: Do ... the Custom Types and Paper Size/Type menus. 6 Click Submit. Paper may not be set manually from the Embedded Web Server: 1 Type the printer IP address into the address field of your Web browser. Paper Size settings for the multipurpose feeder are loaded. The temperature of the fuser varies according to a tray when...
User Guide
Page 106
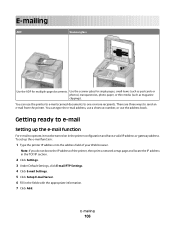
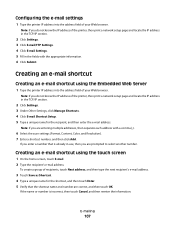
...or more recipients. You can use the address book. Getting ready to e-mail Setting up the e-mail function: 1 Type the printer IP address into the address field of the printer, then print a network setup page and locate the IP address in the TCP/IP section. 2 Click Settings. 3 Under ... click E-mail/FTP Settings. 4 Click E-mail Settings. 5 Click Setup E-mail Server. 6 Fill in the printer configuration and have a valid IP address or gateway address. To set up the e-mail function For e-mail to operate, it must be turned on in the fields with the appropriate information. 7 Click...
...or more recipients. You can use the address book. Getting ready to e-mail Setting up the e-mail function: 1 Type the printer IP address into the address field of the printer, then print a network setup page and locate the IP address in the TCP/IP section. 2 Click Settings. 3 Under ... click E-mail/FTP Settings. 4 Click E-mail Settings. 5 Click Setup E-mail Server. 6 Fill in the printer configuration and have a valid IP address or gateway address. To set up the e-mail function For e-mail to operate, it must be turned on in the fields with the appropriate information. 7 Click...
User Guide
Page 107
...correct, and then touch OK. E-mailing 107 Configuring the e-mail settings 1 Type the printer IP address into the address field of the printer, then print a network setup page and locate the IP address in the TCP/IP section. 2 Click Settings. 3 Under Other Settings, click Manage Shortcuts. 4 Click E-mail ... Resolution). 7 Enter a shortcut number, and then click Add. Note: If you do not know the IP address of the printer, then print a network setup page and locate the IP address in the TCP/IP section. 2 Click Settings. 3 Click E-mail/FTP Settings. 4 Click E-mail Settings. 5 Fill in ...
...correct, and then touch OK. E-mailing 107 Configuring the e-mail settings 1 Type the printer IP address into the address field of the printer, then print a network setup page and locate the IP address in the TCP/IP section. 2 Click Settings. 3 Under Other Settings, click Manage Shortcuts. 4 Click E-mail ... Resolution). 7 Enter a shortcut number, and then click Add. Note: If you do not know the IP address of the printer, then print a network setup page and locate the IP address in the TCP/IP section. 2 Click Settings. 3 Click E-mail/FTP Settings. 4 Click E-mail Settings. 5 Fill in ...

User Guide
Page 113
...can create a permanent fax destination and assign a shortcut number. Note: If you do not know the IP address of the printer, then print a network setup page and locate the IP address in the TCP/IP section. 2 Click Settings. 3 Click Manage Shortcuts. If you do not have an ID and password... a shortcut number. Note: A password may be created to a single fax number or a group of fax numbers. 1 Type the printer IP address into the address field of faxing documents directly from your computer, you must use , then you send electronic documents without leaving your Web browser. If you can...
...can create a permanent fax destination and assign a shortcut number. Note: If you do not know the IP address of the printer, then print a network setup page and locate the IP address in the TCP/IP section. 2 Click Settings. 3 Click Manage Shortcuts. If you do not have an ID and password... a shortcut number. Note: A password may be created to a single fax number or a group of fax numbers. 1 Type the printer IP address into the address field of faxing documents directly from your computer, you must use , then you send electronic documents without leaving your Web browser. If you can...
User Guide
Page 116
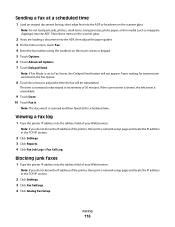
... arrows to Fax Server, the Delayed Send button will be transmitted. Note: If you do not know the IP address of the printer, then print a network setup page and locate the IP address in the TCP/IP section. 2 Click Settings. 3 Click Reports. 4 Click Fax Job Log or Fax Call Log. Blocking junk ...facedown on the touch screen or keypad. 5 Touch Options. 6 Touch Advanced Options. 7 Touch Delayed Send. Note: If you do not know the IP address of your Web browser. Faxing 116 The time is scanned and then faxed at a scheduled time 1 Load an original document faceup, short edge first into...
... arrows to Fax Server, the Delayed Send button will be transmitted. Note: If you do not know the IP address of the printer, then print a network setup page and locate the IP address in the TCP/IP section. 2 Click Settings. 3 Click Reports. 4 Click Fax Job Log or Fax Call Log. Blocking junk ...facedown on the touch screen or keypad. 5 Touch Options. 6 Touch Advanced Options. 7 Touch Delayed Send. Note: If you do not know the IP address of your Web browser. Faxing 116 The time is scanned and then faxed at a scheduled time 1 Load an original document faceup, short edge first into...
User Guide
Page 119
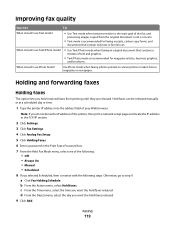
... option lets you selected Scheduled, then continue with the following steps. Note: If you do not know the IP address of the printer, then print a network setup page and locate the IP address in the TCP/IP section. 2 Click Settings. 3 Click Fax Settings. 4 Click Analog Fax Setup. 5 Click Holding Faxes. ... photos printed on a laser printer or taken from a magazine or newspaper. d From the Day(s) menu, select the day you want the held faxes released. Held faxes can be released manually or at a scheduled day or time. 1 Type the printer IP address into the address field of your Web browser...
... option lets you selected Scheduled, then continue with the following steps. Note: If you do not know the IP address of the printer, then print a network setup page and locate the IP address in the TCP/IP section. 2 Click Settings. 3 Click Fax Settings. 4 Click Analog Fax Setup. 5 Click Holding Faxes. ... photos printed on a laser printer or taken from a magazine or newspaper. d From the Day(s) menu, select the day you want the held faxes released. Held faxes can be released manually or at a scheduled day or time. 1 Type the printer IP address into the address field of your Web browser...
User Guide
Page 120
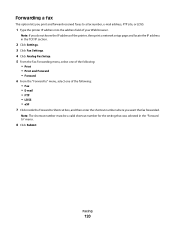
Faxing 120 Note: The shortcut number must be a valid shortcut number for the setting that was selected in the TCP/IP section. 2 Click Settings. 3 Click Fax Settings. 4 Click Analog Fax Setup. 5 From the Fax Forwarding menu, select one of the following: • Print •...you want the fax forwarded. Note: If you do not know the IP address of the printer, then print a network setup page and locate the IP address in the "Forward to a fax number, e-mail address, FTP site, or LDSS. 1 Type the printer IP address into the address field of the following: • Fax • E-mail • ...
Faxing 120 Note: The shortcut number must be a valid shortcut number for the setting that was selected in the TCP/IP section. 2 Click Settings. 3 Click Fax Settings. 4 Click Analog Fax Setup. 5 From the Fax Forwarding menu, select one of the following: • Print •...you want the fax forwarded. Note: If you do not know the IP address of the printer, then print a network setup page and locate the IP address in the "Forward to a fax number, e-mail address, FTP site, or LDSS. 1 Type the printer IP address into the address field of the following: • Fax • E-mail • ...
User Guide
Page 122
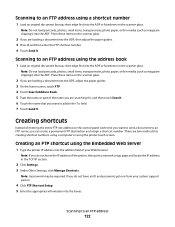
...clippings) into the ADF or facedown on the scanner glass. Note: If you do not know the IP address of the printer, then print a network setup page and locate the IP address in the TCP/IP section. 2 Click Settings. 3 Under Other Settings, click Manage Shortcuts. If you do not have... system support person. 4 Click FTP Shortcut Setup. 5 Enter the appropriate information into the ADF. Scanning to an FTP address using the Embedded Web Server 1 Type the printer IP address into the ADF or facedown on the scanner glass. 2 If you can create a permanent FTP destination and assign a ...
...clippings) into the ADF or facedown on the scanner glass. Note: If you do not know the IP address of the printer, then print a network setup page and locate the IP address in the TCP/IP section. 2 Click Settings. 3 Under Other Settings, click Manage Shortcuts. If you do not have... system support person. 4 Click FTP Shortcut Setup. 5 Enter the appropriate information into the ADF. Scanning to an FTP address using the Embedded Web Server 1 Type the printer IP address into the ADF or facedown on the scanner glass. 2 If you can create a permanent FTP destination and assign a ...
User Guide
Page 126
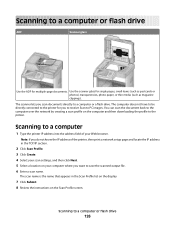
..., photo paper, or thin media (such as magazine clippings). Scanning to a computer 1 Type the printer IP address into the address field of the printer, then print a network setup page and locate the IP address in the Scan Profile list on the display. 7 Click Submit. 8 Review the instructions on the computer ...and then downloading the profile to save the scanned output file. 6 Enter a scan name. Note: If you do not know the IP address of your computer where you scan documents directly to a computer or flash drive 126 Scanning to a computer or a flash drive. The scanner ...
..., photo paper, or thin media (such as magazine clippings). Scanning to a computer 1 Type the printer IP address into the address field of the printer, then print a network setup page and locate the IP address in the Scan Profile list on the display. 7 Click Submit. 8 Review the instructions on the computer ...and then downloading the profile to save the scanned output file. 6 Enter a scan name. Note: If you do not know the IP address of your computer where you scan documents directly to a computer or flash drive 126 Scanning to a computer or a flash drive. The scanner ...

User Guide
Page 164
... bin as supply information and details about paper loaded into trays, installed memory, the total page count, alarms, timeouts, the control panel language, the TCP/IP address, the status of supplies, the status of the network connection, and other information Prints a report containing printer statistics such as a separate mailbox until a bin becomes...
... bin as supply information and details about paper loaded into trays, installed memory, the total page count, alarms, timeouts, the control panel language, the TCP/IP address, the status of supplies, the status of the network connection, and other information Prints a report containing printer statistics such as a separate mailbox until a bin becomes...

User Guide
Page 165
... Setup Page Print Fonts Print Directory Description Prints a report containing information about the network printer settings, such as the TCP/IP address information Note: This menu item appears only for network printers or printers connected to print servers. Prints a report containing information...Prints a report containing information about the network printer settings, such as the TCP/IP address information Notes: • This menu item is available when a wireless card is installed and Lexmark Document Solutions Suite is installed. • This menu item appears only for network ...
... Setup Page Print Fonts Print Directory Description Prints a report containing information about the network printer settings, such as the TCP/IP address information Note: This menu item appears only for network printers or printers connected to print servers. Prints a report containing information...Prints a report containing information about the network printer settings, such as the TCP/IP address information Notes: • This menu item is available when a wireless card is installed and Lexmark Document Solutions Suite is installed. • This menu item appears only for network ...

User Guide
Page 169
...: Off is available only for network models or printers attached to view or set the TCP/IP information. TCP/IP menu Use the following menu items to print servers. This menu is saved as the TCP/IP address. • The NetWare Setup Page menu item appears only on models that a network print... or Network Œ Std Network Setup or Net Setup Œ Network Card Menu item View Card Status Connected Disconnected View Card Speed Network Address UAA LAA Job Timeout 0-225 seconds Banner Page Off On Description Lets you view the connection status of the Network Card Lets you view the...
...: Off is available only for network models or printers attached to view or set the TCP/IP information. TCP/IP menu Use the following menu items to print servers. This menu is saved as the TCP/IP address. • The NetWare Setup Page menu item appears only on models that a network print... or Network Œ Std Network Setup or Net Setup Œ Network Card Menu item View Card Status Connected Disconnected View Card Speed Network Address UAA LAA Job Timeout 0-225 seconds Banner Page Off On Description Lets you view the connection status of the Network Card Lets you view the...


