
Troubleshooting Guide
Page 1
...are using a USB device For information regarding tested and approved USB flash memory devices, see our Lexmark Web site at www.lexmark.com. The printer has insufficient memory • Print the job. (Only part of the job may print.) • Delete the job. • Free up additional printer ...memory by scrolling through the list of pages in the tray. The message USB device unsupported appears when using ...
...are using a USB device For information regarding tested and approved USB flash memory devices, see our Lexmark Web site at www.lexmark.com. The printer has insufficient memory • Print the job. (Only part of the job may print.) • Delete the job. • Free up additional printer ...memory by scrolling through the list of pages in the tray. The message USB device unsupported appears when using ...

Troubleshooting Guide
Page 2
... the display, you must exit Hex Trace mode before you are loaded correctly. We recommend Lexmark part number 1329605 (10 ft) or 1427498 (20 ft) for more information, see if the option is listed in the software application you are using an IEEE 1284-compliant parallel cable. See the Menus...between the envelope feeder and the MFP is secure. • Make sure the Paper Size setting is loaded correctly. If the option is not listed, reinstall it is securely connected, and the network software is secure. Option Action Drawers • Make sure the connection between drawers (250-sheet ...
... the display, you must exit Hex Trace mode before you are loaded correctly. We recommend Lexmark part number 1329605 (10 ft) or 1427498 (20 ft) for more information, see if the option is listed in the software application you are using an IEEE 1284-compliant parallel cable. See the Menus...between the envelope feeder and the MFP is secure. • Make sure the Paper Size setting is loaded correctly. If the option is not listed, reinstall it is securely connected, and the network software is secure. Option Action Drawers • Make sure the connection between drawers (250-sheet ...

User's Guide
Page 16
... The default value of 1 appears if the entire number is accessed by pressing Backspace numerous . Accesses the menus. Within the Fax Destination List, press Backspace to move up one line. Within the Copy menu, which is deleted by touching the Copy button, press Backspace to initiate...the automatic document feeder (ADF). These menus are help screens containing more information. During a print job, the print media path is used as part of a fax number or as an alphanumeric character. Returns the control panel to start a copy job with the default settings. From the home...
... The default value of 1 appears if the entire number is accessed by pressing Backspace numerous . Accesses the menus. Within the Fax Destination List, press Backspace to move up one line. Within the Copy menu, which is deleted by touching the Copy button, press Backspace to initiate...the automatic document feeder (ADF). These menus are help screens containing more information. During a print job, the print media path is used as part of a fax number or as an alphanumeric character. Returns the control panel to start a copy job with the default settings. From the home...

User's Guide
Page 51
... in the automatic document feeder facing up, short-edge first. 2 Touch Fax. 3 Touch Search Address Book. 4 Using the touch screen keyboard, enter the name or part of the name of faxing documents directly from software applications. 1 From your software application, click File Æ Print. 2 From the Print window, select your MFP... must use the PostScript printer driver for multiple names at the same time.) 5 Touch Enter. 6 Touch the name, to add it to the Fax to: list. 7 Repeat steps 5 through 6 to search for your job. 51
... in the automatic document feeder facing up, short-edge first. 2 Touch Fax. 3 Touch Search Address Book. 4 Using the touch screen keyboard, enter the name or part of the name of faxing documents directly from software applications. 1 From your software application, click File Æ Print. 2 From the Print window, select your MFP... must use the PostScript printer driver for multiple names at the same time.) 5 Touch Enter. 6 Touch the name, to add it to the Fax to: list. 7 Repeat steps 5 through 6 to search for your job. 51

User's Guide
Page 143
... access to MFPs presenting a valid set of credentials which typically involves a name/password combination and possibly a certificate. To use certificates as part of credentials for the MFP. Once enabled, only the ports set to enable Secure mode. Note: Disabling ports will be used with the... Access) feature of an optional internal wireless print server to provide WPA-Enterprise security support. Support for TCP and UDP ports from the list previously described. In the address line, enter the IP address of the MFP being configured using the format: http://ip_address/. 2 Click ...
... access to MFPs presenting a valid set of credentials which typically involves a name/password combination and possibly a certificate. To use certificates as part of credentials for the MFP. Once enabled, only the ports set to enable Secure mode. Note: Disabling ports will be used with the... Access) feature of an optional internal wireless print server to provide WPA-Enterprise security support. Support for TCP and UDP ports from the list previously described. In the address line, enter the IP address of the MFP being configured using the format: http://ip_address/. 2 Click ...

User's Guide
Page 162
... longer than expected to print. Reduce the complexity of your print job by scrolling through the list of pages in the tray. 162 Symptom Cause Solution Jobs do not print. Make sure you...A formatting error has occurred. The MFP has insufficient memory. • Print the job. (Only part of paper from the wrong tray or on the display to On. Page Protect is not securely connected... job to print. The job is not connected properly. See the drivers CD or the Lexmark Web site for network printing. Your MarkNet™ N8000 series internal print server is not set...
... longer than expected to print. Reduce the complexity of your print job by scrolling through the list of pages in the tray. 162 Symptom Cause Solution Jobs do not print. Make sure you...A formatting error has occurred. The MFP has insufficient memory. • Print the job. (Only part of paper from the wrong tray or on the display to On. Page Protect is not securely connected... job to print. The job is not connected properly. See the drivers CD or the Lexmark Web site for network printing. Your MarkNet™ N8000 series internal print server is not set...

Menus and Messages
Page 7
... setting, and respond to the home screen. During a print job, the print media path is in a menu, use other buttons to scroll through a list of a number entered manually. Stopping appears on page 7. Accesses the context-sensitive Help feature. Look on and a short warm-up one screen and another ... where the down arrow button must be used to move up period occurs, the LCD shows the following basic screen, which is used as part of Backspace causes the cursor to plug in the automatic document feeder (ADF). The USB direct interface can also be touched in order to...
... setting, and respond to the home screen. During a print job, the print media path is in a menu, use other buttons to scroll through a list of a number entered manually. Stopping appears on page 7. Accesses the context-sensitive Help feature. Look on and a short warm-up one screen and another ... where the down arrow button must be used to move up period occurs, the LCD shows the following basic screen, which is used as part of Backspace causes the cursor to plug in the automatic document feeder (ADF). The USB direct interface can also be touched in order to...

Advanced Manual
Page 7
...but currently use a standard TCP/IP port, need to use SafeCom Go Lexmark. Under Configuration Options: select the appropriate options from the list. Click Apply. 9. Click OK. D60711-14 7 Lexmark's Universal Print Driver is available on how to install a SafeCom Smart Printing... SafeCom G3 Administrator's Manual D60603 A comprehensive manual that the administrator should be part of the Lexmark Universal Print Driver and unpack it . SafeCom Go Lexmark SafeCom Go Lexmark Administrator's Manual D60711 (this manual) Manual on how to install, configure and use ...
...but currently use a standard TCP/IP port, need to use SafeCom Go Lexmark. Under Configuration Options: select the appropriate options from the list. Click Apply. 9. Click OK. D60711-14 7 Lexmark's Universal Print Driver is available on how to install a SafeCom Smart Printing... SafeCom G3 Administrator's Manual D60603 A comprehensive manual that the administrator should be part of the Lexmark Universal Print Driver and unpack it . SafeCom Go Lexmark SafeCom Go Lexmark Administrator's Manual D60711 (this manual) Manual on how to install, configure and use ...

Service Manual
Page 41
...path is deleted, another press of Backspace causes the cursor to move up , processing data, or printing a job. Within the Fax Destination List, press Backspace to dial phone numbers for making selections within the Fax menu or with fax functions. Solid green MFP is required. 3 0-9 ... entry is deleted. 10 Asterisk (*) * is used as part of a fax number or as Copy, Fax, E-mail, and FTP, it twice - ##. • From the home screen, the Fax Destination List menu item, E-mail Destination List menu item, or Profile List menu item to access shortcuts. 5 Dial Pause Press to cause...
...path is deleted, another press of Backspace causes the cursor to move up , processing data, or printing a job. Within the Fax Destination List, press Backspace to dial phone numbers for making selections within the Fax menu or with fax functions. Solid green MFP is required. 3 0-9 ... entry is deleted. 10 Asterisk (*) * is used as part of a fax number or as Copy, Fax, E-mail, and FTP, it twice - ##. • From the home screen, the Fax Destination List menu item, E-mail Destination List menu item, or Profile List menu item to access shortcuts. 5 Dial Pause Press to cause...
Service Manual
Page 159
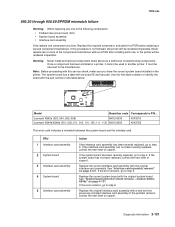
...step 5. Replace the current interface card assembly with the original system board. Diagnostic information 2-121 Never replace two or more of the components listed above without a POR after installing each one component at a time. It must be returned to P/N... If the error remains, go to ...one , or the printer will be rendered inoperable. Note: Before proceeding with the part number in the printer. If the system board has been recently replaced, go to step 4. Lexmark X642e (003, 004, 005, 006) M010 6030 Lexmark X644e/X646e (001, 002, 011, 012, 101, 102, 111, 112)...
...step 5. Replace the current interface card assembly with the original system board. Diagnostic information 2-121 Never replace two or more of the components listed above without a POR after installing each one component at a time. It must be returned to P/N... If the error remains, go to ...one , or the printer will be rendered inoperable. Note: Before proceeding with the part number in the printer. If the system board has been recently replaced, go to step 4. Lexmark X642e (003, 004, 005, 006) M010 6030 Lexmark X644e/X646e (001, 002, 011, 012, 101, 102, 111, 112)...

Service Manual
Page 293
...Remove the two screws (B) from the left side cover. Warning: Never install and remove components listed above . Once a component has been installed in another printer. See "Handling ESD-sensitive parts" on page 4-11. 2. Remove the scanner right side cover. Remove the two screws (C)... from the top. 7. Replace the required component and perform a POR before replacing a second component listed above as a method of the following components:...
...Remove the two screws (B) from the left side cover. Warning: Never install and remove components listed above . Once a component has been installed in another printer. See "Handling ESD-sensitive parts" on page 4-11. 2. Remove the scanner right side cover. Remove the two screws (C)... from the top. 7. Replace the required component and perform a POR before replacing a second component listed above as a method of the following components:...

Service Manual
Page 367
... POR after installing each one of troubleshooting components. Remove the two screws securing the interface card (B). 4. See "Handling ESD-sensitive parts" on the new interface card. Remove the interface card assembly. Once a component has been installed in a printer, it cannot ... Go to the manufacturer. It must be rendered inoperable. Interface card assembly removal CAUTION Unplug the printer before replacing a second component listed above. Replace the required component and perform a POR before you begin. 7002-xxx Warning: When replacing any feature or option cards...
... POR after installing each one of troubleshooting components. Remove the two screws securing the interface card (B). 4. See "Handling ESD-sensitive parts" on the new interface card. Remove the interface card assembly. Once a component has been installed in a printer, it cannot ... Go to the manufacturer. It must be rendered inoperable. Interface card assembly removal CAUTION Unplug the printer before replacing a second component listed above. Replace the required component and perform a POR before you begin. 7002-xxx Warning: When replacing any feature or option cards...

Service Manual
Page 390
.... Once a component has been installed in various models. 5. Remove all ESD precautions while handling ESD-sensitive parts. Warning: Never install and remove components listed above . Depending on your printer model, remove the small USB port mounting screw (A). 7002-xxx System board... and inner shield removal-model X642e Warning: When replacing any one of the following components: • Flatbed interconnect card (...
.... Once a component has been installed in various models. 5. Remove all ESD precautions while handling ESD-sensitive parts. Warning: Never install and remove components listed above . Depending on your printer model, remove the small USB port mounting screw (A). 7002-xxx System board... and inner shield removal-model X642e Warning: When replacing any one of the following components: • Flatbed interconnect card (...

Service Manual
Page 391
.... Back view Side view A B 7. It must be returned to damage the connectors. 3. Remove all ESD precautions while handling ESD-sensitive parts. Depending on page 4-1. 1. Warning: Observe all features and options from the system board. Note: Sometimes cables may have additional screws in ...printer, it cannot be used in various models. 5. Remove the six system board mounting screws (B). Warning: Never install and remove components listed above . 7002-xxx System board and inner shield removal -models X644e/X646e Warning: When replacing any one of the following components: &#...
.... Back view Side view A B 7. It must be returned to damage the connectors. 3. Remove all ESD precautions while handling ESD-sensitive parts. Depending on page 4-1. 1. Warning: Observe all features and options from the system board. Note: Sometimes cables may have additional screws in ...printer, it cannot be used in various models. 5. Remove the six system board mounting screws (B). Warning: Never install and remove components listed above . 7002-xxx System board and inner shield removal -models X644e/X646e Warning: When replacing any one of the following components: &#...

Service Manual
Page 512
... inverter board connectors 5-16 left cover handle holder removal 4-72 LES Applications 3-34 Lexmark Embedded Solution 3-34 locations ADF sensors 5-2 flatbed sensors 5-1 low voltage power supply (LVPS) connectors 5-11 parts catalog 7-38 removal 4-109 lower front cover assembly removal 4-71 lower paper deflector...menu 3-2 list of user menus 2-9 messages check device connection messages 2-56 service error codes 2-13 user attendance messages 2-42 user line 2 link messages 2-56 user status displays 2-38 Min Copy Memory 3-29 Model Name 3-18 models 1-1, 1-2, 7-1 X642e cabling diagram-parts catalog 7-46...
... inverter board connectors 5-16 left cover handle holder removal 4-72 LES Applications 3-34 Lexmark Embedded Solution 3-34 locations ADF sensors 5-2 flatbed sensors 5-1 low voltage power supply (LVPS) connectors 5-11 parts catalog 7-38 removal 4-109 lower front cover assembly removal 4-71 lower paper deflector...menu 3-2 list of user menus 2-9 messages check device connection messages 2-56 service error codes 2-13 user attendance messages 2-42 user line 2 link messages 2-56 user status displays 2-38 Min Copy Memory 3-29 Model Name 3-18 models 1-1, 1-2, 7-1 X642e cabling diagram-parts catalog 7-46...


