Wireless Setup Guide
Page 28
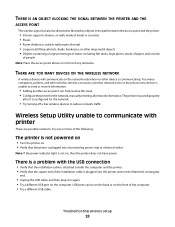
..., rectangular end. • Unplug the USB cable, and then plug it is communicating. Too many computers, printers, and other device is configured for the network, manually entering all network information.
..., rectangular end. • Unplug the USB cable, and then plug it is communicating. Too many computers, printers, and other device is configured for the network, manually entering all network information.
Wireless Setup Guide
Page 35
The BSS type can be assigned manually by you are using an access point or router. This setting may be assigned by specifying which MAC addresses may communicate on the network. A device ...
The BSS type can be assigned manually by you are using an access point or router. This setting may be assigned by specifying which MAC addresses may communicate on the network. A device ...
Wireless Setup Guide
Page 36
... glossary 36 When you . A device similar to a network hub that helps prevent unauthorized access to a wireless network. WPA is being received. An IP address assigned manually by the manufacturer. A security setting that can connect different networks together An address assigned to a network printer or print server by you connect a printer to...
... glossary 36 When you . A device similar to a network hub that helps prevent unauthorized access to a wireless network. WPA is being received. An IP address assigned manually by the manufacturer. A security setting that can connect different networks together An address assigned to a network printer or print server by you connect a printer to...
User's Guide
Page 3
Recycling...47 Recycling Lexmark products...47 Recycling Lexmark packaging...47 Returning Lexmark cartridges for reuse or recycling...47 Loading paper and specialty media 48 Linking and unlinking trays...48 Linking trays...48 Unlinking trays...48 Assigning a Custom...the standard 250-sheet tray and optional 550-sheet tray 50 Loading the 650-sheet duo drawer...53 Using the multipurpose feeder...54 Using the manual feeder...56 Paper and specialty media guide 58 Paper guidelines...58 Paper characteristics...58 Unacceptable paper ...59 Selecting paper...59 Selecting preprinted forms and letterhead...
Recycling...47 Recycling Lexmark products...47 Recycling Lexmark packaging...47 Returning Lexmark cartridges for reuse or recycling...47 Loading paper and specialty media 48 Linking and unlinking trays...48 Linking trays...48 Unlinking trays...48 Assigning a Custom...the standard 250-sheet tray and optional 550-sheet tray 50 Loading the 650-sheet duo drawer...53 Using the multipurpose feeder...54 Using the manual feeder...56 Paper and specialty media guide 58 Paper guidelines...58 Paper characteristics...58 Unacceptable paper ...59 Selecting paper...59 Selecting preprinted forms and letterhead...
User's Guide
Page 16
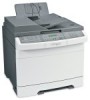
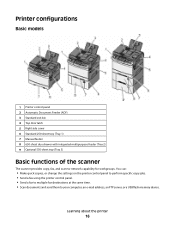
... Printer configurations Basic models 1 Printer control panel 2 Automatic Document Feeder (ADF) 3 Standard exit bin 4 Top door latch 5 Right side cover 6 Standard 250-sheet tray (Tray 1) 7 Manual feeder 8 650-sheet duo drawer with integrated multipurpose feeder (Tray 2) 9 Optional 550-sheet tray (Tray 3) Basic functions of the scanner The scanner provides copy, fax...
... Printer configurations Basic models 1 Printer control panel 2 Automatic Document Feeder (ADF) 3 Standard exit bin 4 Top door latch 5 Right side cover 6 Standard 250-sheet tray (Tray 1) 7 Manual feeder 8 650-sheet duo drawer with integrated multipurpose feeder (Tray 2) 9 Optional 550-sheet tray (Tray 3) Basic functions of the scanner The scanner provides copy, fax...

User's Guide
Page 32
... make them available for print jobs. Additional printer setup 32 Note: Once the printer software and any options are installed, it may be necessary to manually add the options in the printer driver" on . For more information, see "Initial fax setup" on page 88. • Make sure the software is installed...
... make them available for print jobs. Additional printer setup 32 Note: Once the printer software and any options are installed, it may be necessary to manually add the options in the printer driver" on . For more information, see "Initial fax setup" on page 88. • Make sure the software is installed...

User's Guide
Page 35
...click the Install icon. 5 Follow the instructions on a wireless network Note: Do not connect the installation or network cables until prompted to the Lexmark Web site at www.lexmark.com. 2 From the Drivers & Downloads menu, click Driver Finder. 3 Select your printer, and then select your operating system. 4 Download ...do so by the setup software. Note: If the printer has a fax option, select Fax and then add it may be necessary to manually add the options in the printer driver Once the printer software and any installed hardware options. Updating available options in the printer driver to ...
...click the Install icon. 5 Follow the instructions on a wireless network Note: Do not connect the installation or network cables until prompted to the Lexmark Web site at www.lexmark.com. 2 From the Drivers & Downloads menu, click Driver Finder. 3 Select your printer, and then select your operating system. 4 Download ...do so by the setup software. Note: If the printer has a fax option, select Fax and then add it may be necessary to manually add the options in the printer driver Once the printer software and any installed hardware options. Updating available options in the printer driver to ...

User's Guide
Page 48
... example: Plain Paper, Letterhead, Custom Type ) Paper Type names describe the paper characteristics. The temperature of any other tray. Paper may not be set manually from the Paper Type menu. The Paper Size menu appears. 6 Press the arrow buttons until Size/Type appears, and then press . 5 Press the arrow... printer is used by linked trays, assign a different Paper Type name to change the following tray settings so that they must be set manually from the Paper Size menu. The Paper Size setting for all trays must be properly processed if an inaccurate Paper Type is useful for ...
... example: Plain Paper, Letterhead, Custom Type ) Paper Type names describe the paper characteristics. The temperature of any other tray. Paper may not be set manually from the Paper Type menu. The Paper Size menu appears. 6 Press the arrow buttons until Size/Type appears, and then press . 5 Press the arrow... printer is used by linked trays, assign a different Paper Type name to change the following tray settings so that they must be set manually from the Paper Size menu. The Paper Size setting for all trays must be properly processed if an inaccurate Paper Type is useful for ...

User's Guide
Page 50
... the tray out. Note: Do not remove trays while a job prints or while Busy appears on one standard 250-sheet tray (Tray 1) with an attached manual feeder. Specify the paper height and width Defining a specific height and width measurement for the Universal paper size (in the same way. Doing so may...
... the tray out. Note: Do not remove trays while a job prints or while Busy appears on one standard 250-sheet tray (Tray 1) with an attached manual feeder. Specify the paper height and width Defining a specific height and width measurement for the Universal paper size (in the same way. Doing so may...

User's Guide
Page 56
... that it will go with appears, load the print media facedown into the multipurpose feeder as far into the manual feeder. e From the Paper size menu, select the appropriate media size . c Click OK or Print. 2 When Load Single Sheet Feeder with very gentle pushing. Paper ...should lie flat in the multipurpose feeder and is flush with the flap side up menu, choose Manual Paper. f Click OK. Note: Align the long edge of the manual feeder. 7 Make sure the paper is as it is not bent or wrinkled. 8 From the printer control panel, set the...
... that it will go with appears, load the print media facedown into the multipurpose feeder as far into the manual feeder. e From the Paper size menu, select the appropriate media size . c Click OK or Print. 2 When Load Single Sheet Feeder with very gentle pushing. Paper ...should lie flat in the multipurpose feeder and is flush with the flap side up menu, choose Manual Paper. f Click OK. Note: Align the long edge of the manual feeder. 7 Make sure the paper is as it is not bent or wrinkled. 8 From the printer control panel, set the...

User's Guide
Page 60
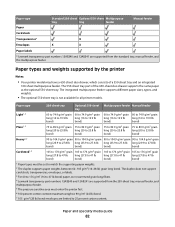
... and an integrated 100-sheet multipurpose feeder. Paper and specialty media guide 60 Paper size Dimensions 250-sheet tray Optional Multipurpose 550-sheet tray feeder Manual feeder A4 210 x 297 mm (8.3 x 11.7 in.) A5 148 x 210 mm (5.83 x 8.3 in.) JIS B5 182 x 257 mm (7.2 x 10.1 in.) A6 105 x 148 mm X X (4.1 x 5.8 in...
... and an integrated 100-sheet multipurpose feeder. Paper and specialty media guide 60 Paper size Dimensions 250-sheet tray Optional Multipurpose 550-sheet tray feeder Manual feeder A4 210 x 297 mm (8.3 x 11.7 in.) A5 148 x 210 mm (5.83 x 8.3 in.) JIS B5 182 x 257 mm (7.2 x 10.1 in.) A6 105 x 148 mm X X (4.1 x 5.8 in...

User's Guide
Page 61
... paper as the optional 550-sheet tray. Paper and specialty media guide 61 Paper size Dimensions 250-sheet tray Optional Multipurpose 550-sheet tray feeder Manual feeder Legal 216 x 356 mm (8.5 x 14 in.) Executive 184 x 267 mm (7.3 x 10.5 in.) Universal* 148 x 210 mm (5.8 x 8.3 in.) up to 216 x 356 mm (8.5 x 14 in...
... paper as the optional 550-sheet tray. Paper and specialty media guide 61 Paper size Dimensions 250-sheet tray Optional Multipurpose 550-sheet tray feeder Manual feeder Legal 216 x 356 mm (8.5 x 14 in.) Executive 184 x 267 mm (7.3 x 10.5 in.) Universal* 148 x 210 mm (5.8 x 8.3 in.) up to 216 x 356 mm (8.5 x 14 in...
User's Guide
Page 62
... 176 g/m2 (16 to 47 lb bond) paper, we recommend grain long fibers. 4 Lexmark transparency part numbers 12A8240 and 12A8241 are supported from the standard tray, manual feeder, and the multipurpose feeder. Paper type Standard 250-sheet Optional 550-sheet Multipurpose tray tray... feeder Manual feeder Paper Card stock Transparencies* X Envelopes X X Paper labels * Lexmark transparency part numbers 12A8240 and 12A8241 are supported from the 250-sheet tray, manual feeder, and multipurpose feeder. 5 The pressure sensitive area...
... 176 g/m2 (16 to 47 lb bond) paper, we recommend grain long fibers. 4 Lexmark transparency part numbers 12A8240 and 12A8241 are supported from the standard tray, manual feeder, and the multipurpose feeder. Paper type Standard 250-sheet Optional 550-sheet Multipurpose tray tray... feeder Manual feeder Paper Card stock Transparencies* X Envelopes X X Paper labels * Lexmark transparency part numbers 12A8240 and 12A8241 are supported from the 250-sheet tray, manual feeder, and multipurpose feeder. 5 The pressure sensitive area...

User's Guide
Page 63
... content maximum weight is 90 g/m2 (24 lb) bond. 7 105 g/m2 (28 lb) bond envelopes are supported from the 250-sheet tray, manual feeder, and multipurpose feeder. 5 The pressure sensitive area must be set to 25 percent cotton content. Index Bristol- Paper and specialty media guide 63 Index... stock, transparencies, envelopes, or labels. 3 For 60 to 176 g/m2 (16 to 47 lb bond) paper, we recommend grain long fibers. 4 Lexmark transparency part numbers 12A8240 and 12A8241 are limited to match the supporting paper weights. 2 The duplex supports paper weights between 60-105 g/m2 (16-28...
... content maximum weight is 90 g/m2 (24 lb) bond. 7 105 g/m2 (28 lb) bond envelopes are supported from the 250-sheet tray, manual feeder, and multipurpose feeder. 5 The pressure sensitive area must be set to 25 percent cotton content. Index Bristol- Paper and specialty media guide 63 Index... stock, transparencies, envelopes, or labels. 3 For 60 to 176 g/m2 (16 to 47 lb bond) paper, we recommend grain long fibers. 4 Lexmark transparency part numbers 12A8240 and 12A8241 are limited to match the supporting paper weights. 2 The duplex supports paper weights between 60-105 g/m2 (16-28...

User's Guide
Page 67
...: • Feed transparencies from sticking together. • We recommend Lexmark part number 12A8240 for letter-size transparencies and Lexmark part number 12A8241 for A4-size transparencies. Printing 67 Manual feeder (duplex printing) Multipurpose feeder Preprinted letterhead design is placed facedown.... print quality problems, avoid getting fingerprints on the transparencies being considered for laser printers. Source or process Manual feeder (simplex printing) Multipurpose feeder Print side and paper orientation Preprinted letterhead design is placed faceup. Check with the ...
...: • Feed transparencies from sticking together. • We recommend Lexmark part number 12A8240 for letter-size transparencies and Lexmark part number 12A8241 for A4-size transparencies. Printing 67 Manual feeder (duplex printing) Multipurpose feeder Preprinted letterhead design is placed facedown.... print quality problems, avoid getting fingerprints on the transparencies being considered for laser printers. Source or process Manual feeder (simplex printing) Multipurpose feeder Print side and paper orientation Preprinted letterhead design is placed faceup. Check with the ...

User's Guide
Page 68
... up to 200°C (392°F) without sealing, wrinkling, curling excessively, or releasing hazardous emissions. • For the best performance, use envelopes made from the manual feeder or optional multipurpose feeder. • Set the Paper Type to verify that : - Have rough, cockle, or laid finishes • Adjust the width guides to...
... up to 200°C (392°F) without sealing, wrinkling, curling excessively, or releasing hazardous emissions. • For the best performance, use envelopes made from the manual feeder or optional multipurpose feeder. • Set the Paper Type to verify that : - Have rough, cockle, or laid finishes • Adjust the width guides to...

User's Guide
Page 85
...If there are loading a document into the ADF, then adjust the paper guides. 3 From the printer control panel, press the Scan/Email button. Search or Manual Entry appears. d Press 1 to enter another address or press 2 to send a color copy. b Press 1 to search for that corresponds with a blinking ...cursor appears on the printer control panel, press the arrow buttons until Manual appears, and then press or enter an e-mail address. e Press to send a black only copy or to end the search. Note: Do not ...
...If there are loading a document into the ADF, then adjust the paper guides. 3 From the printer control panel, press the Scan/Email button. Search or Manual Entry appears. d Press 1 to enter another address or press 2 to send a color copy. b Press 1 to search for that corresponds with a blinking ...cursor appears on the printer control panel, press the arrow buttons until Manual appears, and then press or enter an e-mail address. e Press to send a black only copy or to end the search. Note: Do not ...

User's Guide
Page 86
... book 1 Load an original document faceup, short edge first into the ADF. Search appears. E-mailing 86 The printer clears all pages in the address book, Manual Entry appears. 5 Press to search the address book. 6 Press the arrow buttons until the address you press 2, Press Start To Begin appears. 7 Press to send...
... book 1 Load an original document faceup, short edge first into the ADF. Search appears. E-mailing 86 The printer clears all pages in the address book, Manual Entry appears. 5 Press to search the address book. 6 Press the arrow buttons until the address you press 2, Press Start To Begin appears. 7 Press to send...

User's Guide
Page 99
3 Remove the protective plug from the telephone to the bottom EXT port of the printer. 4 Connect a second telephone cord from the bottom EXT port of the printer. Faxing 99 Note: Refer to the manual that came with your computer for the telephone connections. 5 Connect a third telephone cord from the computer modem to the computer modem.
3 Remove the protective plug from the telephone to the bottom EXT port of the printer. 4 Connect a second telephone cord from the bottom EXT port of the printer. Faxing 99 Note: Refer to the manual that came with your computer for the telephone connections. 5 Connect a third telephone cord from the computer modem to the computer modem.
User's Guide
Page 113
... press Scan/Email. A dialog box appears with your scan profile information and the status of the Embedded Web Server to create Scan to manually search for an IP address or hostname. Your output file is sent in the ADF or on the screens to define the type of ...buttons until Profiles appears, and then press . b Select the printer you specified. Using the ScanBack utility Using the ScanBack Utility You can use the Lexmark ScanBackTM Utility instead of the received images. 2 Scan your original documents. If no printers are listed, then see your scan profile name appears, and...
... press Scan/Email. A dialog box appears with your scan profile information and the status of the Embedded Web Server to create Scan to manually search for an IP address or hostname. Your output file is sent in the ADF or on the screens to define the type of ...buttons until Profiles appears, and then press . b Select the printer you specified. Using the ScanBack utility Using the ScanBack Utility You can use the Lexmark ScanBackTM Utility instead of the received images. 2 Scan your original documents. If no printers are listed, then see your scan profile name appears, and...


