User's Guide
Page 7
... 176 Checking the status of supplies from a network computer 176 Ordering supplies...177 Ordering toner cartridges...177 Ordering imaging kits ...178 Ordering a waste toner bottle...178 Replacing supplies...179 Replacing the waste toner bottle ...179 Replacing a black imaging kit ...182 Replacing a black and color imaging kit ...188 Replacing a toner cartridge...193 Replacing a developer unit ...195 Cleaning the exterior of the printer...201...
... 176 Checking the status of supplies from a network computer 176 Ordering supplies...177 Ordering toner cartridges...177 Ordering imaging kits ...178 Ordering a waste toner bottle...178 Replacing supplies...179 Replacing the waste toner bottle ...179 Replacing a black imaging kit ...182 Replacing a black and color imaging kit ...188 Replacing a toner cartridge...193 Replacing a developer unit ...195 Cleaning the exterior of the printer...201...

User's Guide
Page 122
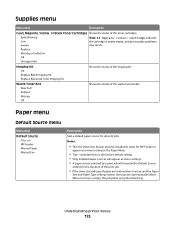
... with an * indicates it easy for you to make it is the current default setting. Supplies Menu Cyan Cartridge Magenta Cartridge Yellow Cartridge Black Cartridge Imaging Kit Waste Toner Bottle Paper Menu Default Source Size/Type Paper Texture Paper Weight Paper Loading Custom Type Custom Scan Sizes Universal Setup Reports Menu Settings Page Device...
... with an * indicates it easy for you to make it is the current default setting. Supplies Menu Cyan Cartridge Magenta Cartridge Yellow Cartridge Black Cartridge Imaging Kit Waste Toner Bottle Paper Menu Default Source Size/Type Paper Texture Paper Weight Paper Loading Custom Type Custom Scan Sizes Universal Setup Reports Menu Settings Page Device...
User's Guide
Page 123
... Invalid may result. Replace Missing or Defective OK Unsupported Imaging Kit OK Replace Black Imaging Kit Replace Black and Color Imaging Kit Shows the status of the imaging kit Waste Toner Box Near Full Replace Missing OK Shows the status of the waste toner bottle Paper menu Default Source menu Menu item Default Source... override the Default Source setting for the duration of the print job. • If the same size and type of the toner cartridges Early Warning Low Note: 88 Replace Cartridge indicates the cartridge is empty, the job prints using the linked tray. Understanding ...
... Invalid may result. Replace Missing or Defective OK Unsupported Imaging Kit OK Replace Black Imaging Kit Replace Black and Color Imaging Kit Shows the status of the imaging kit Waste Toner Box Near Full Replace Missing OK Shows the status of the waste toner bottle Paper menu Default Source menu Menu item Default Source... override the Default Source setting for the duration of the print job. • If the same size and type of the toner cartridges Early Warning Low Note: 88 Replace Cartridge indicates the cartridge is empty, the job prints using the linked tray. Understanding ...
User's Guide
Page 178
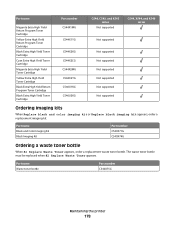
... X543 series Not supported C544, X544, and X546 series Not supported Not supported Not supported Not supported Not supported Not supported Not supported Ordering imaging kits When Replace black and color imaging kit or Replace black imaging kit appears, order a replacement imaging kit. Part name Waste toner bottle Part number C540X75G Maintaining the printer 178 Part name Black and Color Imaging Kit Black Imaging Kit...
... X543 series Not supported C544, X544, and X546 series Not supported Not supported Not supported Not supported Not supported Not supported Not supported Ordering imaging kits When Replace black and color imaging kit or Replace black imaging kit appears, order a replacement imaging kit. Part name Waste toner bottle Part number C540X75G Maintaining the printer 178 Part name Black and Color Imaging Kit Black Imaging Kit...
User's Guide
Page 183
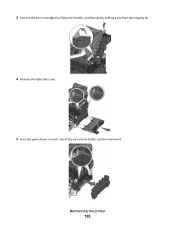
Maintaining the printer 183 3 Remove the toner cartridges by lifting the handles, and then gently pulling away from the imaging kit. 4 Remove the right side cover. 5 Press the green levers on each side of the waste toner bottle, and then remove it.
Maintaining the printer 183 3 Remove the toner cartridges by lifting the handles, and then gently pulling away from the imaging kit. 4 Remove the right side cover. 5 Press the green levers on each side of the waste toner bottle, and then remove it.

User's Guide
Page 186
15 Align and insert the imaging kit. 16 Rotate the blue levers down until the imaging kit drops into place. 17 Replace the waste toner bottle. Maintaining the printer 186
15 Align and insert the imaging kit. 16 Rotate the blue levers down until the imaging kit drops into place. 17 Replace the waste toner bottle. Maintaining the printer 186

User's Guide
Page 189
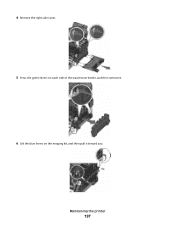
3 Remove the toner cartridges by lifting the handles, and then gently pulling away from the imaging kit. 4 Remove the right side cover. 5 Press the green levers on each side of the waste toner bottle, and remove it. Maintaining the printer 189
3 Remove the toner cartridges by lifting the handles, and then gently pulling away from the imaging kit. 4 Remove the right side cover. 5 Press the green levers on each side of the waste toner bottle, and remove it. Maintaining the printer 189
User's Guide
Page 197
Maintaining the printer 197 4 Remove the right side cover. 5 Press the green levers on each side of the waste toner bottle, and then remove it. 6 Lift the blue levers on the imaging kit, and then pull it toward you.
Maintaining the printer 197 4 Remove the right side cover. 5 Press the green levers on each side of the waste toner bottle, and then remove it. 6 Lift the blue levers on the imaging kit, and then pull it toward you.
User's Guide
Page 252
...293.02 Flatbed Cover Open 173 294 ADF Jam 174 30.yy cartridge missing 168 31 Defective Imaging Kit 168 34 Short paper 169 35 Insufficient memory to support Resource Save feature 169 37 Insufficient ...171 59 Incompatible tray 171 650-sheet duo drawer installing 30 loading 53 82 Replace waste toner box 171 82.yy Waste toner box missing 171 840.01 Scanner Disabled 174 840.02 Scanner Auto Disabled 174 88... not respond 209 partial document or photo copies 211 poor copy quality 210 poor scanned image quality 212 scanner unit does not close 209 copying adjusting quality 80 canceling a copy job 82...
...293.02 Flatbed Cover Open 173 294 ADF Jam 174 30.yy cartridge missing 168 31 Defective Imaging Kit 168 34 Short paper 169 35 Insufficient memory to support Resource Save feature 169 37 Insufficient ...171 59 Incompatible tray 171 650-sheet duo drawer installing 30 loading 53 82 Replace waste toner box 171 82.yy Waste toner box missing 171 840.01 Scanner Disabled 174 840.02 Scanner Auto Disabled 174 88... not respond 209 partial document or photo copies 211 poor copy quality 210 poor scanned image quality 212 scanner unit does not close 209 copying adjusting quality 80 canceling a copy job 82...
User's Guide
Page 255
...control panel 73 canceling from Windows 73 print quality cleaning the scanner glass 202 replacing developer unit 195 replacing imaging kits 182, 188 replacing the waste toner bottle 179 print quality test pages, printing 72 print quality troubleshooting blank pages 220 characters have jagged edges 220... clipped images 221 color misregistration 229 dark lines 221 gray background 221 light colored line, white line, or incorrectly ...
...control panel 73 canceling from Windows 73 print quality cleaning the scanner glass 202 replacing developer unit 195 replacing imaging kits 182, 188 replacing the waste toner bottle 179 print quality test pages, printing 72 print quality troubleshooting blank pages 220 characters have jagged edges 220... clipped images 221 color misregistration 229 dark lines 221 gray background 221 light colored line, white line, or incorrectly ...
User's Guide
Page 256
82 Replace waste toner bottle 179 82 Replace waste toner box 171 82.yy Waste toner box missing... from standard output bin 166 Replace cartridge 167 Replace Black Imaging Kit 182 Replace Color Imaging Kit 188 Replace PC Kit 167 Replace Unsupported Cartridge 169 Scan Document Too Long 167 ...Lexmark products 47 toner cartridges 47 WEEE statement 236 reducing a copy 79 reducing noise 46 Reload printed pages in Tray 166 Remote Management Active 166 Remove originals from the scanner ADF 166 Remove packaging material 166 Remove paper from standard output bin 166 Replace cartridge 167 Replace PC Kit...
82 Replace waste toner bottle 179 82 Replace waste toner box 171 82.yy Waste toner box missing... from standard output bin 166 Replace cartridge 167 Replace Black Imaging Kit 182 Replace Color Imaging Kit 188 Replace PC Kit 167 Replace Unsupported Cartridge 169 Scan Document Too Long 167 ...Lexmark products 47 toner cartridges 47 WEEE statement 236 reducing a copy 79 reducing noise 46 Reload printed pages in Tray 166 Remote Management Active 166 Remove originals from the scanner ADF 166 Remove packaging material 166 Remove paper from standard output bin 166 Replace cartridge 167 Replace PC Kit...
User's Guide
Page 257
...supplies 176 supplies conserving 44 status of 176 storing 176 Supplies menu 123 supplies, ordering imaging kits 178 toner cartridges 177 waste toner bottle 178 T telecommunication notices 239, 240, 241, 242 toner cartridges ordering 177 recycling 47 replacing 193 transparencies copying to 76 loading 54 tips on using...problems 206 troubleshooting, copy copier does not respond 209 partial document or photo copies 211 poor copy quality 210 poor scanned image quality 212 scanner unit does not close 209 troubleshooting, display display is blank 206 display shows only diamonds 206 troubleshooting, fax...
...supplies 176 supplies conserving 44 status of 176 storing 176 Supplies menu 123 supplies, ordering imaging kits 178 toner cartridges 177 waste toner bottle 178 T telecommunication notices 239, 240, 241, 242 toner cartridges ordering 177 recycling 47 replacing 193 transparencies copying to 76 loading 54 tips on using...problems 206 troubleshooting, copy copier does not respond 209 partial document or photo copies 211 poor copy quality 210 poor scanned image quality 212 scanner unit does not close 209 troubleshooting, display display is blank 206 display shows only diamonds 206 troubleshooting, fax...


