Fax Guide
Page 35
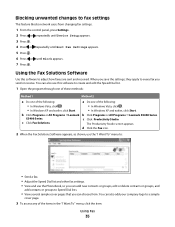
...Lexmark b Click Programs or All Programs ŒLexmark X5400 Series. X5400 Series. c Click Productivity Studio. Using the Fax Solutions Software Use this software to create and edit the Speed Dial list. 1 Open the program through one of these methods: Method 1 Method 2 a Do one of the following: a Do one... your company logo to a sample cover page. 3 To access any of the following: • In Windows Vista, click . • In Windows Vista, click . • In Windows XP and earlier, click Start. • In Windows XP and earlier, click Start. The Productivity Studio screen appears.
...Lexmark b Click Programs or All Programs ŒLexmark X5400 Series. X5400 Series. c Click Productivity Studio. Using the Fax Solutions Software Use this software to create and edit the Speed Dial list. 1 Open the program through one of these methods: Method 1 Method 2 a Do one of the following: a Do one... your company logo to a sample cover page. 3 To access any of the following: • In Windows Vista, click . • In Windows Vista, click . • In Windows XP and earlier, click Start. • In Windows XP and earlier, click Start. The Productivity Studio screen appears.

Fax Guide
Page 41
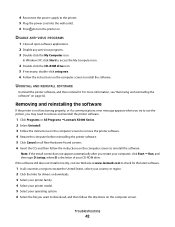
...one or more of the following: CHECK YOUR OPERATING SYSTEM The following operating systems are possible solutions. RECONNECT POWER SUPPLY 1 Press to reinstall the software. Troubleshooting 41 CHECK YOUR SYSTEM REQUIREMENTS Check that your computer. 2 Click Cancel on all the way into the power supply on the printer... instructions on the computer screen to turn the printer off and then restart your computer meets the minimum system requirements listed on , press . Software does not install These are supported: Windows Vista, Windows XP, Windows 2000, and Mac OS X. CHECK USB CONNECTION...
...one or more of the following: CHECK YOUR OPERATING SYSTEM The following operating systems are possible solutions. RECONNECT POWER SUPPLY 1 Press to reinstall the software. Troubleshooting 41 CHECK YOUR SYSTEM REQUIREMENTS Check that your computer. 2 Click Cancel on all the way into the power supply on the printer... instructions on the computer screen to turn the printer off and then restart your computer meets the minimum system requirements listed on , press . Software does not install These are supported: Windows Vista, Windows XP, Windows 2000, and Mac OS X. CHECK USB CONNECTION...
Fax Guide
Page 42
...still does not install correctly, visit our Web site at www.lexmark.com to check for drivers or downloads. 3 Select your printer family. 4 Select your printer model. 5 Select your CD-ROM drive. Removing and reinstalling the software If the printer is the letter of your operating system. 6 Select the ...file you want to download, and then follow the instructions on the computer screen. In Windows XP, click Start to access the My Computer icon. 4 Double-...
...still does not install correctly, visit our Web site at www.lexmark.com to check for drivers or downloads. 3 Select your printer family. 4 Select your printer model. 5 Select your CD-ROM drive. Removing and reinstalling the software If the printer is the letter of your operating system. 6 Select the ...file you want to download, and then follow the instructions on the computer screen. In Windows XP, click Start to access the My Computer icon. 4 Double-...

User's Guide
Page 3
... Understanding the control panel...25 Using the control panel ...25 Saving settings...27 Installing the printer software...28 Installing the optional XPS driver (Windows Vista users only 28 Understanding the printer software...29 Turning printing voice notification on or off...31 Security Information...32 General networking 33 What is a network?...33 What you...
... Understanding the control panel...25 Using the control panel ...25 Saving settings...27 Installing the printer software...28 Installing the optional XPS driver (Windows Vista users only 28 Understanding the printer software...29 Turning printing voice notification on or off...31 Security Information...32 General networking 33 What is a network?...33 What you...
User's Guide
Page 11
Where to find You can find this document in the printer box or on Windows operating systems) and some basic instructions for setting up hardware and software (on the Lexmark Web site at www.lexmark.com. Introduction 11 Note: If your printer supports Macintosh operating systems, see the Mac Help: 1 From the Finder desktop, double-click...
Where to find You can find this document in the printer box or on Windows operating systems) and some basic instructions for setting up hardware and software (on the Lexmark Web site at www.lexmark.com. Introduction 11 Note: If your printer supports Macintosh operating systems, see the Mac Help: 1 From the Finder desktop, double-click...
User's Guide
Page 12
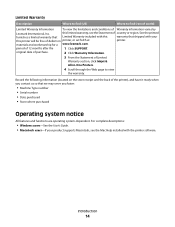
... (including Setup X5400 Series folder. Troubleshooting). 2 Double-click the printer Help icon. 4 Click Yes. To access the Lexmark Solution Center: 1 Do one of the following : • Using the software (on your CD. such as: 1 Do one of the following : • In Windows Vista, click . • In Windows XP and earlier, click Start. 2 Click Programs or All...
... (including Setup X5400 Series folder. Troubleshooting). 2 Double-click the printer Help icon. 4 Click Yes. To access the Lexmark Solution Center: 1 Do one of the following : • Using the software (on your CD. such as: 1 Do one of the following : • In Windows Vista, click . • In Windows XP and earlier, click Start. 2 Click Programs or All...
User's Guide
Page 14
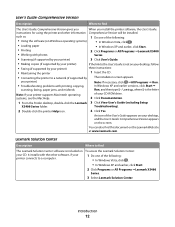
... by Lexmark International, Inc. For complete descriptions: • Windows users-See the User's Guide. • Macintosh users-If your product supports Macintosh, see the Statement of defects in printer, or set forth at printer. Record the following information (located on the store receipt and the back of Limited Warranty section, click Inkjet & All-In-One Printers...
... by Lexmark International, Inc. For complete descriptions: • Windows users-See the User's Guide. • Macintosh users-If your product supports Macintosh, see the Statement of defects in printer, or set forth at printer. Record the following information (located on the store receipt and the back of Limited Warranty section, click Inkjet & All-In-One Printers...
User's Guide
Page 28
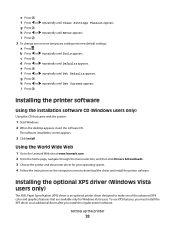
...Click Install. Using the World Wide Web 1 Go to the Lexmark Web site at www.lexmark.com. 2 From the home page, navigate through the menu selection, and then click Drivers & Downloads. 3 Choose the printer and the printer driver for your operating system. 4 Follow the instructions on the...install the XPS driver as an additional driver after you install the regular printer software. e Press . Installing the printer software Using the installation software CD (Windows users only) Using the CD that are available only for Windows Vista users. f Press or repeatedly until Tools appears. g Press ....
...Click Install. Using the World Wide Web 1 Go to the Lexmark Web site at www.lexmark.com. 2 From the home page, navigate through the menu selection, and then click Drivers & Downloads. 3 Choose the printer and the printer driver for your operating system. 4 Follow the instructions on the...install the XPS driver as an additional driver after you install the regular printer software. e Press . Installing the printer software Using the installation software CD (Windows users only) Using the CD that are available only for Windows Vista users. f Press or repeatedly until Tools appears. g Press ....
User's Guide
Page 31
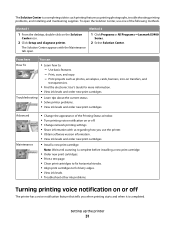
...-click on or off The printer has a voice notification feature that tells you use one of the Printing Status window. • Turn printing voice notification on the Solution Center icon. 2 Click Setup and diagnose printer. 1 Click Programs or All Programs ŒLexmark X5400 Series. 2 Select Solution...-on or off . • Change network printing settings. • Share information with the Maintenance tab open the Solution Center, use the printer. • Obtain software version information. • View ink levels and order new print cartridges. • Install a new print cartridge. ...
...-click on or off The printer has a voice notification feature that tells you use one of the Printing Status window. • Turn printing voice notification on the Solution Center icon. 2 Click Setup and diagnose printer. 1 Click Programs or All Programs ŒLexmark X5400 Series. 2 Select Solution...-on or off . • Change network printing settings. • Share information with the Maintenance tab open the Solution Center, use the printer. • Obtain software version information. • View ink levels and order new print cartridges. • Install a new print cartridge. ...

User's Guide
Page 32
... being installed. To turn the voice notification on your printer to work properly, allow the printer software to run on or off: 1 Do one of the following: • In Windows Vista, click . • In Windows XP and earlier, click Start. 2 Click Programs or All Programs ŒLexmark X5400 Series. 3 Click Solution Center. 4 Click Advanced. 5 Click Printing...
... being installed. To turn the voice notification on your printer to work properly, allow the printer software to run on or off: 1 Do one of the following: • In Windows Vista, click . • In Windows XP and earlier, click Start. 2 Click Programs or All Programs ŒLexmark X5400 Series. 3 Click Solution Center. 4 Click Advanced. 5 Click Printing...

User's Guide
Page 33
... an Ethernet network Before you install the printer on a wired network, it must have a wired adapter attached or installed that lets it communicate over cables. If the Welcome screen does not appear after a minute, do one of the following : • An external print server (purchased separately) • ... The gateway for the print server to use radio waves instead of the network where the printer will be able to your network information before you will need the following : In Windows Vista a Click . You will need an Ethernet cable to connect the print server to avoid...
... an Ethernet network Before you install the printer on a wired network, it must have a wired adapter attached or installed that lets it communicate over cables. If the Welcome screen does not appear after a minute, do one of the following : • An external print server (purchased separately) • ... The gateway for the print server to use radio waves instead of the network where the printer will be able to your network information before you will need the following : In Windows Vista a Click . You will need an Ethernet cable to connect the print server to avoid...
User's Guide
Page 34
... the adapter connections are located on . • Make sure you must manually enter an IP address during printer software installation. Checking the port setting Windows Vista users only 1 Click Œ Control Panel Œ Printers. 2 Right-click the Lexmark X5400 Series icon. 3 From the sidebar menu, select Properties. 4 Click the Ports tab. 5 Make sure: •...
... the adapter connections are located on . • Make sure you must manually enter an IP address during printer software installation. Checking the port setting Windows Vista users only 1 Click Œ Control Panel Œ Printers. 2 Right-click the Lexmark X5400 Series icon. 3 From the sidebar menu, select Properties. 4 Click the Ports tab. 5 Make sure: •...

User's Guide
Page 35
... more information. Damage to find and configure newly added printers. 5 Make sure: • The port is set as the port. General networking 35 Configure network printers Configure To configure a network printer, select a printer from the list in the window, and then click Configure to manually assign an IP ...address to a power source and is not set to a USB port. • File is turned on. Contact your system support person for any obvious damage. • Firmly plug one ...
... more information. Damage to find and configure newly added printers. 5 Make sure: • The port is set as the port. General networking 35 Configure network printers Configure To configure a network printer, select a printer from the list in the window, and then click Configure to manually assign an IP ...address to a power source and is not set to a USB port. • File is turned on. Contact your system support person for any obvious damage. • Firmly plug one ...
User's Guide
Page 44
..., Preferences, Options, or Setup. 4 Adjust the settings. 5 Click OK. 6 Click OK or Print. Printing a Web page You can use the Toolbar to create a printer-friendly version of any Web page. 1 Load paper. 2 Open a Web page using Microsoft Internet Explorer 5.5 or later. 3 If you want to print text and images... or text only. c Click: • Print in the Print Preview window, then click Print in or out, or select whether to check or change your print settings: a From the toolbar area, click Lexmark Œ Page Setup. c Click OK. 4 If you want to the next step. 5...
..., Preferences, Options, or Setup. 4 Adjust the settings. 5 Click OK. 6 Click OK or Print. Printing a Web page You can use the Toolbar to create a printer-friendly version of any Web page. 1 Load paper. 2 Open a Web page using Microsoft Internet Explorer 5.5 or later. 3 If you want to print text and images... or text only. c Click: • Print in the Print Preview window, then click Print in or out, or select whether to check or change your print settings: a From the toolbar area, click Lexmark Œ Page Setup. c Click OK. 4 If you want to the next step. 5...
User's Guide
Page 47
..., click Start ΠSettings ΠPrinters and Faxes. 2 Right-click the Lexmark X5400 Series icon. 3 Select Pause. In Windows XP, click Start ΠSettings ΠPrinters and Faxes. 2 Right-click the Lexmark X5400 Series icon. 3 Select Open. 4 Right-click the document name. 5 Select Cancel. Printing multiple pages on one sheet (N-Up) 1 With a document open , click File...
..., click Start ΠSettings ΠPrinters and Faxes. 2 Right-click the Lexmark X5400 Series icon. 3 Select Pause. In Windows XP, click Start ΠSettings ΠPrinters and Faxes. 2 Right-click the Lexmark X5400 Series icon. 3 Select Open. 4 Right-click the document name. 5 Select Cancel. Printing multiple pages on one sheet (N-Up) 1 With a document open , click File...
User's Guide
Page 52
... your current settings. 6 Click a radio button next to the number of the settings in the selected box. In Windows 2000 and Windows XP, click Start ΠSettings ΠPrinters or Printers and Faxes. 2 Right-click the Lexmark X5400 Series icon. 3 Click Printing Preferences. 4 Click the Save Settings menu. 5 From the Restore section, select Factory Settings...
... your current settings. 6 Click a radio button next to the number of the settings in the selected box. In Windows 2000 and Windows XP, click Start ΠSettings ΠPrinters or Printers and Faxes. 2 Right-click the Lexmark X5400 Series icon. 3 Click Printing Preferences. 4 Click the Save Settings menu. 5 From the Restore section, select Factory Settings...
User's Guide
Page 54
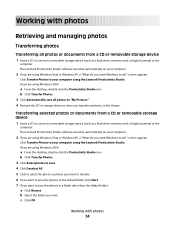
...computer. 2 If you are using Windows Vista or Windows XP, a "What do you want to save the photos to the default folder, click Next. 7 If you want Windows to do ?" If you are using the Lexmark Productivity Studio. The Lexmark Productivity Studio software launches automatically on your... computer. 2 If you are using the Lexmark Productivity Studio. screen appears. screen appears. b Select the...
...computer. 2 If you are using Windows Vista or Windows XP, a "What do you want to save the photos to the default folder, click Next. 7 If you want Windows to do ?" If you are using the Lexmark Productivity Studio. The Lexmark Productivity Studio software launches automatically on your... computer. 2 If you are using the Lexmark Productivity Studio. screen appears. screen appears. b Select the...
User's Guide
Page 57
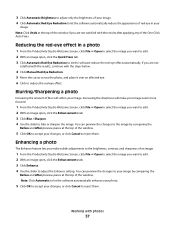
... slider to adjust the Enhance setting. Working with the results after applying any of the One-Click Auto Fixes. You can preview the changes to accept your image. Note: Click Undo at the top of the window. Note: Click Automatic to let the software automatically enhance your photo. 5 Click OK... to your image by comparing the Before and After preview panes at the top of the window if you are not satisfied with photos 57 Increasing the sharpness will soften your changes, or click Cancel to reduce the red-eye effect. ...
... slider to adjust the Enhance setting. Working with the results after applying any of the One-Click Auto Fixes. You can preview the changes to accept your image. Note: Click Undo at the top of the window. Note: Click Automatic to let the software automatically enhance your photo. 5 Click OK... to your image by comparing the Before and After preview panes at the top of the window if you are not satisfied with photos 57 Increasing the sharpness will soften your changes, or click Cancel to reduce the red-eye effect. ...
User's Guide
Page 58
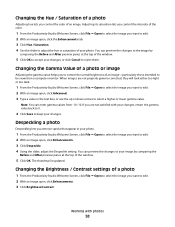
... text box, or use the up or down arrows to your image by comparing the Before and After preview panes at the top of the window. 5 Click OK. You can enter gamma values from -10-10. Changing the Gamma Value of a photo or image Adjusting the gamma value helps you want... to reject them. Note: You can preview the changes to the image by comparing the Before and After preview panes at the top of the window. 5 Click OK to accept your changes, or click Cancel to edit. 2 With an image open , click Enhancements. 3 Click Brightness/Contrast. The thumbnail is updated...
... text box, or use the up or down arrows to your image by comparing the Before and After preview panes at the top of the window. 5 Click OK. You can enter gamma values from -10-10. Changing the Gamma Value of a photo or image Adjusting the gamma value helps you want... to reject them. Note: You can preview the changes to the image by comparing the Before and After preview panes at the top of the window. 5 Click OK to accept your changes, or click Cancel to edit. 2 With an image open , click Enhancements. 3 Click Brightness/Contrast. The thumbnail is updated...
User's Guide
Page 59
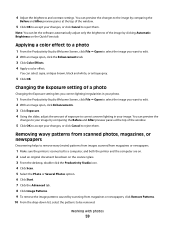
... open , click the Enhancements tab. 3 Click Color Effects. 4 Apply a color effect. You can let the software automatically adjust only the brightness of the window. 5 Click OK to accept your changes, or click Cancel to edit. 2 With an image open , click Enhancements. 3 Click Exposure. 4 Using the slider...photos, magazines, or newspapers Descreening helps to remove wavy (moire) patterns from images scanned from magazines or newspapers. 1 Make sure the printer is connected to be removed. Note: You can preview the changes to your image by comparing the Before and After preview panes at ...
... open , click the Enhancements tab. 3 Click Color Effects. 4 Apply a color effect. You can let the software automatically adjust only the brightness of the window. 5 Click OK to accept your changes, or click Cancel to edit. 2 With an image open , click Enhancements. 3 Click Exposure. 4 Using the slider...photos, magazines, or newspapers Descreening helps to remove wavy (moire) patterns from images scanned from magazines or newspapers. 1 Make sure the printer is connected to be removed. Note: You can preview the changes to your image by comparing the Before and After preview panes at ...


