
Setup Sheet
Page 1
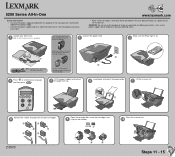
.... Unpack your language and then press . www.lexmark.com • Refer service or repairs, other than those described in the user documentation, to your All-In-One. 1 Note: Contents may include a photo cartridge instead of a black print cartridge. Your All-In-One may vary based on .... 3 Before you continue, remove the photo cartridge from the print cartridges. 8 Open the cartridge lids, insert the cartridges, and 9 snap the lids closed. Close the scanner ...
.... Unpack your language and then press . www.lexmark.com • Refer service or repairs, other than those described in the user documentation, to your All-In-One. 1 Note: Contents may include a photo cartridge instead of a black print cartridge. Your All-In-One may vary based on .... 3 Before you continue, remove the photo cartridge from the print cartridges. 8 Open the cartridge lids, insert the cartridges, and 9 snap the lids closed. Close the scanner ...
Setup Sheet
Page 2
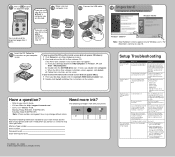
...8226; Refer to your printer. • 31 • 32 • 34 • 33 • 35 P/N 21D0070 E.C. 21D005 © 2004 Lexmark International, Inc. Setup Troubleshooting Symptom: The Power light is not lit" symptom at 1-800-332-4120. Disconnect the power cord from the wall outlet,... purchased The following information (located on your User's Guide. Follow the 15 instructions on your store receipt and the back of each print cartridge? c When the All-In-One software installation screen appears, click Install. See "Error messages troubleshooting" in the wrong language Diagnosis...
...8226; Refer to your printer. • 31 • 32 • 34 • 33 • 35 P/N 21D0070 E.C. 21D005 © 2004 Lexmark International, Inc. Setup Troubleshooting Symptom: The Power light is not lit" symptom at 1-800-332-4120. Disconnect the power cord from the wall outlet,... purchased The following information (located on your User's Guide. Follow the 15 instructions on your store receipt and the back of each print cartridge? c When the All-In-One software installation screen appears, click Install. See "Error messages troubleshooting" in the wrong language Diagnosis...

Setup Guide
Page 5
English English Contents checklist Verify that these items are in the storage unit. 5 Keep unused cartridges in the box with your All-In-One: Note: A USB cable may or may not be included. 1 Power supply cord 2 USB cable 3 Setup sheet 4 Color print cartridge 5 Black or photo print cartridge 6 User's Guide 7 Software CD Note: If your All-In-One comes with a photo print cartridge, remove it from the print cartridge storage unit before installing it.
English English Contents checklist Verify that these items are in the storage unit. 5 Keep unused cartridges in the box with your All-In-One: Note: A USB cable may or may not be included. 1 Power supply cord 2 USB cable 3 Setup sheet 4 Color print cartridge 5 Black or photo print cartridge 6 User's Guide 7 Software CD Note: If your All-In-One comes with a photo print cartridge, remove it from the print cartridge storage unit before installing it.

Setup Guide
Page 8
...carrier and the color cartridge should be secure in your list of each print cartridge. The All-In-One is connected to use your desktop? Reconnect the power cord by pushing it to see "Removing and reinstalling the software" on page 9. For Mac OS X Is there a Lexmark 5200 Series folder ...on your All-In-One Check to an outlet that you create a paper jam by connecting it all the way into the connector on the control panel display. Make sure the print cartridges are installed correctly. Power light is pushed all...
...carrier and the color cartridge should be secure in your list of each print cartridge. The All-In-One is connected to use your desktop? Reconnect the power cord by pushing it to see "Removing and reinstalling the software" on page 9. For Mac OS X Is there a Lexmark 5200 Series folder ...on your All-In-One Check to an outlet that you create a paper jam by connecting it all the way into the connector on the control panel display. Make sure the print cartridges are installed correctly. Power light is pushed all...


