Setup Sheet
Page 1
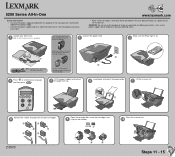
...Load paper and adjust the paper guide. 6 Lift the scanner unit. 7 Remove the sticker and tape from the print cartridge storage unit. www.lexmark.com • Refer service or repairs, other than those described in the user documentation, to your All-In-One. 1 Note: Contents may .... Lift the paper support and extend 5 the paper exit tray. Close the scanner unit. 10 21D0070 Steps 11 - 15 Connect the power cord. 2 Make sure the Power light is near the product and easily accessible. Note: You may include a photo cartridge instead of a black print cartridge. CAUTION: Do...
...Load paper and adjust the paper guide. 6 Lift the scanner unit. 7 Remove the sticker and tape from the print cartridge storage unit. www.lexmark.com • Refer service or repairs, other than those described in the user documentation, to your All-In-One. 1 Note: Contents may .... Lift the paper support and extend 5 the paper exit tray. Close the scanner unit. 10 21D0070 Steps 11 - 15 Connect the power cord. 2 Make sure the Power light is near the product and easily accessible. Note: You may include a photo cartridge instead of a black print cartridge. CAUTION: Do...
Setup Sheet
Page 2
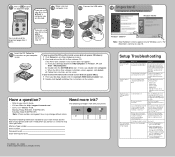
...the CD and the install screen did not appear (Windows): 1 Click Cancel on ? Is your User's Guide. • Visit our Web site: http://support.lexmark.com/. • Call us so that language. Is your printer. • 31 • 32 • 34 • 33 • 35 P/N 21D0070 ...software installation screen appears, click Install. Record the following cartridges work with your All-In-One connected to a working electrical outlet? Disconnect the power cord from the wall outlet, and then from the bottom of this table. If you are using . Windows 98/Me You may change without ...
...the CD and the install screen did not appear (Windows): 1 Click Cancel on ? Is your User's Guide. • Visit our Web site: http://support.lexmark.com/. • Call us so that language. Is your printer. • 31 • 32 • 34 • 33 • 35 P/N 21D0070 ...software installation screen appears, click Install. Record the following cartridges work with your All-In-One connected to a working electrical outlet? Disconnect the power cord from the wall outlet, and then from the bottom of this table. If you are using . Windows 98/Me You may change without ...

Setup Guide
Page 5
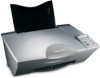
English English Contents checklist Verify that these items are in the storage unit. 5 Keep unused cartridges in the box with your All-In-One: Note: A USB cable may or may not be included. 1 Power supply cord 2 USB cable 3 Setup sheet 4 Color print cartridge 5 Black or photo print cartridge 6 User's Guide 7 Software CD Note: If your All-In-One comes with a photo print cartridge, remove it from the print cartridge storage unit before installing it.
English English Contents checklist Verify that these items are in the storage unit. 5 Keep unused cartridges in the box with your All-In-One: Note: A USB cable may or may not be included. 1 Power supply cord 2 USB cable 3 Setup sheet 4 Color print cartridge 5 Black or photo print cartridge 6 User's Guide 7 Software CD Note: If your All-In-One comes with a photo print cartridge, remove it from the print cartridge storage unit before installing it.

Setup Guide
Page 6
... All-In-One to your computer. 6 All-In-One is not communicating with the computer Make sure your computer through another device, such as the power cord, during a lightning storm. Symptom: The All-In-One's control panel is compatible with the All-In-One, which supports these operating systems: •... or cabling connections, such as a USB hub or switch box? CAUTION: Do not set up this product or the manufacturer's authorized replacement power supply. • Connect the power cord to a setup problem. Language text then appears on the All-In-One. 2 Press and hold both the...
... All-In-One to your computer. 6 All-In-One is not communicating with the computer Make sure your computer through another device, such as the power cord, during a lightning storm. Symptom: The All-In-One's control panel is compatible with the All-In-One, which supports these operating systems: •... or cabling connections, such as a USB hub or switch box? CAUTION: Do not set up this product or the manufacturer's authorized replacement power supply. • Connect the power cord to a setup problem. Language text then appears on the All-In-One. 2 Press and hold both the...

Setup Guide
Page 8
... you try to use your All-In-One Check to a working electrical outlet by forcing the paper into the All-In-One. • Disconnect the power cord from the wall outlet, and then from the bottom of programs, see "Removing and reinstalling the software" on page 9. The...-In-One is connected to see if the software was installed correctly: For Windows From your desktop, click Start Æ Programs or All Programs. If Lexmark 5200 Series does not appear in the right carrier. If not, see "Removing and reinstalling the software" on page 9. Make sure the print cartridges are...
... you try to use your All-In-One Check to a working electrical outlet by forcing the paper into the All-In-One. • Disconnect the power cord from the wall outlet, and then from the bottom of programs, see "Removing and reinstalling the software" on page 9. The...-In-One is connected to see if the software was installed correctly: For Windows From your desktop, click Start Æ Programs or All Programs. If Lexmark 5200 Series does not appear in the right carrier. If not, see "Removing and reinstalling the software" on page 9. Make sure the print cartridges are...


