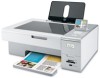

User's Guide
Page 3
... panel menus ...27 Saving settings...28 Installing the printer software...29 What do the Wi-Fi indicator lights mean 29 Turning printing voice notification on or off 29 Security Information...30 Networking...31 General networking...31 Networking overview ...31 Common home network configurations ...information do I need and where do I find it 33 Finding the MAC address ...33 Printing a network setup page ...34 Sharing a printer in a Windows environment 34 Finding a printer/print server located on remote subnets 35 Wireless networking...35 Finding IP addresses...35 Assigning an IP address...
... panel menus ...27 Saving settings...28 Installing the printer software...29 What do the Wi-Fi indicator lights mean 29 Turning printing voice notification on or off 29 Security Information...30 Networking...31 General networking...31 Networking overview ...31 Common home network configurations ...information do I need and where do I find it 33 Finding the MAC address ...33 Printing a network setup page ...34 Sharing a printer in a Windows environment 34 Finding a printer/print server located on remote subnets 35 Wireless networking...35 Finding IP addresses...35 Assigning an IP address...
User's Guide
Page 4
... Choosing compatible specialty paper types 50 Printing envelopes ...50 Printing greeting cards, index cards, photo cards, and postcards 50 Printing a document as a poster...51 Printing an image as a poster...51 Printing a booklet...52 Assembling a booklet ...52 Printing on custom-size paper ...52 Printing iron-on transfers ...53 Printing transparencies...53 Printing a banner ...53 Printing on both sides of the paper...
... Choosing compatible specialty paper types 50 Printing envelopes ...50 Printing greeting cards, index cards, photo cards, and postcards 50 Printing a document as a poster...51 Printing an image as a poster...51 Printing a booklet...52 Assembling a booklet ...52 Printing on custom-size paper ...52 Printing iron-on transfers ...53 Printing transparencies...53 Printing a banner ...53 Printing on both sides of the paper...
User's Guide
Page 5
... settings 57 Working with photos 58 Using recommended paper...58 Retrieving and managing photos...58 Understanding the Photo Card Mode menu 58 Printing photos from a PictBridge-enabled digital camera 59 Inserting a flash drive ...60 Inserting a memory card...60 Understanding the PictBridge Default... Print Settings menu 62 Transferring photos from a memory device to the computer using the control panel 62 Transferring all photos from a memory card ...
... settings 57 Working with photos 58 Using recommended paper...58 Retrieving and managing photos...58 Understanding the Photo Card Mode menu 58 Printing photos from a PictBridge-enabled digital camera 59 Inserting a flash drive ...60 Inserting a memory card...60 Understanding the PictBridge Default... Print Settings menu 62 Transferring photos from a memory device to the computer using the control panel 62 Transferring all photos from a memory card ...

User's Guide
Page 6
Creating Photo Greeting Cards ...72 Viewing a slideshow of photos on the control panel display 73 Printing a photo or selected photos ...73 Printing all photos from a memory device 74 Printing photos stored on a memory device using the proof sheet 74 Printing photos from a digital camera using DPOF 75 Creating and viewing a slideshow...75 Copying...77 Making...
Creating Photo Greeting Cards ...72 Viewing a slideshow of photos on the control panel display 73 Printing a photo or selected photos ...73 Printing all photos from a memory device 74 Printing photos stored on a memory device using the proof sheet 74 Printing photos from a digital camera using DPOF 75 Creating and viewing a slideshow...75 Copying...77 Making...
User's Guide
Page 7
... a fax using the software...93 Maintaining the printer 94 Installing print cartridges...94 Removing a used print cartridge...96 Refilling print cartridges...96 Using genuine Lexmark print cartridges 96 Aligning print cartridges...97 Cleaning the print cartridge nozzles 97 Wiping the print cartridge nozzles and contacts 97 Preserving the print cartridges...98 Cleaning the scanner glass...99 Cleaning the exterior...
... a fax using the software...93 Maintaining the printer 94 Installing print cartridges...94 Removing a used print cartridge...96 Refilling print cartridges...96 Using genuine Lexmark print cartridges 96 Aligning print cartridges...97 Cleaning the print cartridge nozzles 97 Wiping the print cartridge nozzles and contacts 97 Preserving the print cartridges...98 Cleaning the scanner glass...99 Cleaning the exterior...
User's Guide
Page 8
...or differ from colors on the screen 123 Glossy photo paper or transparencies stick together 124 Page prints with different fonts ...124 Print is too dark or smudged...124 Printed characters are improperly formed or are not aligned correctly 125 Printouts have alternating bands of light and......127 Checking the Spool Settings for banner printing 128 Resolving font problems ...128 Printer is busy printing another job ...129 Ready or Busy Printing is listed as the status 129 Printing a test page...129 Test page does not print...130 External print server is not working ...130 Duplex unit...
...or differ from colors on the screen 123 Glossy photo paper or transparencies stick together 124 Page prints with different fonts ...124 Print is too dark or smudged...124 Printed characters are improperly formed or are not aligned correctly 125 Printouts have alternating bands of light and......127 Checking the Spool Settings for banner printing 128 Resolving font problems ...128 Printer is busy printing another job ...129 Ready or Busy Printing is listed as the status 129 Printing a test page...129 Test page does not print...130 External print server is not working ...130 Duplex unit...
User's Guide
Page 9
... from a memory card or flash drive 132 Cannot print from digital camera using PictBridge 133 Printer cannot communicate with computers over peer-to-peer network 133 Printer is not able to communicate with the ...
... from a memory card or flash drive 132 Cannot print from digital camera using PictBridge 133 Printer cannot communicate with computers over peer-to-peer network 133 Printer is not able to communicate with the ...
User's Guide
Page 10
... host 152 Problems reading the memory card ...152 Two-sided paper type error ...153 Two-sided printing is not supported on the current paper size 153 Two-sided printing is not supported on the current paper type 153 Error messages on the computer screen 153 Clearing error...Left/Right Cartridge Missing ...154 Communication not available ...154 General Printing Problem ...154 Ink Low ...154 Out of Memory...154 Out of Paper ...155 Fixing a printing failure ...155 Paper Jam ...155 Multiple All-In-Ones found ...155 Print File Error ...155 Notices...156 Product information...156 Edition notice......
... host 152 Problems reading the memory card ...152 Two-sided paper type error ...153 Two-sided printing is not supported on the current paper size 153 Two-sided printing is not supported on the current paper type 153 Error messages on the computer screen 153 Clearing error...Left/Right Cartridge Missing ...154 Communication not available ...154 General Printing Problem ...154 Ink Low ...154 Out of Memory...154 Out of Paper ...155 Fixing a printing failure ...155 Paper Jam ...155 Multiple All-In-Ones found ...155 Print File Error ...155 Notices...156 Product information...156 Edition notice......
User's Guide
Page 12
...8226; In Windows Vista, click . • Loading paper • In Windows XP and earlier, click Start. • Printing 2 Click Programs or All Programs Œ Lexmark 4800 • Working with photos Series. • Scanning (if supported by your printer) 3 Click User's Guide. •...: 2 Click Documentation. 1 From the Finder desktop, double-click the Lexmark 3 Click View User's Guide (including Setup 4800 Series folder. Troubleshooting). 2 Double-click the printer Help icon. 4 Click Yes. It installs with printing, copying, Run. your printer) Note: If necessary, click Œ...
...8226; In Windows Vista, click . • Loading paper • In Windows XP and earlier, click Start. • Printing 2 Click Programs or All Programs Œ Lexmark 4800 • Working with photos Series. • Scanning (if supported by your printer) 3 Click User's Guide. •...: 2 Click Documentation. 1 From the Finder desktop, double-click the Lexmark 3 Click View User's Guide (including Setup 4800 Series folder. Troubleshooting). 2 Double-click the printer Help icon. 4 Click Yes. It installs with printing, copying, Run. your printer) Note: If necessary, click Œ...

User's Guide
Page 13
... shipped with your printer. 6 Complete the form, and then click Submit Request. E-mail support varies by Lexmark International, Inc. Mail Support. Note: For additional information about contacting Lexmark, see the printed warranty that shipped with your printer. See the printed furnishes a limited warranty that this Limited Warranty included with this limited warranty, see the...
... shipped with your printer. 6 Complete the form, and then click Submit Request. E-mail support varies by Lexmark International, Inc. Mail Support. Note: For additional information about contacting Lexmark, see the printed warranty that shipped with your printer. See the printed furnishes a limited warranty that this Limited Warranty included with this limited warranty, see the...

User's Guide
Page 14
...: • Machine Type number • Serial number • Date purchased • Store where purchased Wireless network compatibility Your printer contains an IEEE 802.11g wireless print server. Your printer is compatible with IEEE 802.11 b/g/n routers that are having issues with an N router, verify with your router manufacturer that the current...
...: • Machine Type number • Serial number • Date purchased • Store where purchased Wireless network compatibility Your printer contains an IEEE 802.11g wireless print server. Your printer is compatible with IEEE 802.11 b/g/n routers that are having issues with an N router, verify with your router manufacturer that the current...

User's Guide
Page 15
... supply port located at the back of installation. 15 Setting up the printer Checking the box contents 7 1 2 3 6 5 4 Name 1 Black print cartridge 2 Color print cartridge 3 Power cord 4 Installation software CD for the printer • Windows Help • User's Guide in electronic format • Mac Help... Printed booklet that serves as a guide. Note: Cartridge combinations vary depending on the installation software CDs. Note: Your power cord may look...
... supply port located at the back of installation. 15 Setting up the printer Checking the box contents 7 1 2 3 6 5 4 Name 1 Black print cartridge 2 Color print cartridge 3 Power cord 4 Installation software CD for the printer • Windows Help • User's Guide in electronic format • Mac Help... Printed booklet that serves as a guide. Note: Cartridge combinations vary depending on the installation software CDs. Note: Your power cord may look...
User's Guide
Page 16
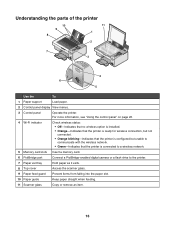
Understanding the parts of the printer 10 9 8 11 1 2 7 WI F I PRINTING 3 WI F I PRINTING 4 6 5 Use the To 1 Paper support Load paper. 2 Control panel display View menus. 3 Control panel Operate the printer. For more information, see "Using the control panel" ...
Understanding the parts of the printer 10 9 8 11 1 2 7 WI F I PRINTING 3 WI F I PRINTING 4 6 5 Use the To 1 Paper support Load paper. 2 Control panel display View menus. 3 Control panel Operate the printer. For more information, see "Using the control panel" ...

User's Guide
Page 17
... the To 1 Scanner unit Access the print cartridges. 2 Print cartridge carrier Install, replace, or remove a print cartridge. 3 Lexmark N2050 (internal wireless print Connect the printer to a computer using a USB cable. server) 4 USB port Connect the printer to a wireless network. Warning: Do not touch the USB port except ...
... the To 1 Scanner unit Access the print cartridges. 2 Print cartridge carrier Install, replace, or remove a print cartridge. 3 Lexmark N2050 (internal wireless print Connect the printer to a computer using a USB cable. server) 4 USB port Connect the printer to a wireless network. Warning: Do not touch the USB port except ...
User's Guide
Page 18
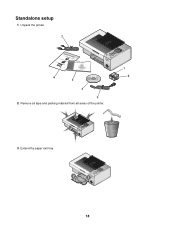
Standalone setup 1 Unpack the printer. 7 1 2 3 WI F I PRINTING 6 5 4 3 2 Remove all tape and packing material from all areas of the printer. 1 2 WI F I PRINTING 3 Extend the paper exit tray. 2 1 WI F I PRINTING 18
Standalone setup 1 Unpack the printer. 7 1 2 3 WI F I PRINTING 6 5 4 3 2 Remove all tape and packing material from all areas of the printer. 1 2 WI F I PRINTING 3 Extend the paper exit tray. 2 1 WI F I PRINTING 18
User's Guide
Page 19
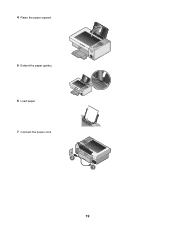
4 Raise the paper support. 5 Extend the paper guides. 6 Load paper. WI F I PRINTING WI F I PRINTING 7 Connect the power cord. 2 1 19
4 Raise the paper support. 5 Extend the paper guides. 6 Load paper. WI F I PRINTING WI F I PRINTING 7 Connect the power cord. 2 1 19
User's Guide
Page 20
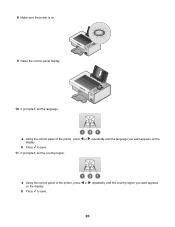
b Press to save . 20 WI F I PRINTING 9 Raise the control panel display. WI F I PRINTING 10 If prompted, set the country/region. 121 a Using the control panel of the printer, press or repeatedly until the country/region you want appears on the display. b Press to save . 11 If prompted, set the language. 121 a Using the control panel of the printer, press or repeatedly until the language you want appears on . 8 Make sure the power is on the display.
b Press to save . 20 WI F I PRINTING 9 Raise the control panel display. WI F I PRINTING 10 If prompted, set the country/region. 121 a Using the control panel of the printer, press or repeatedly until the country/region you want appears on the display. b Press to save . 11 If prompted, set the language. 121 a Using the control panel of the printer, press or repeatedly until the language you want appears on . 8 Make sure the power is on the display.
User's Guide
Page 21
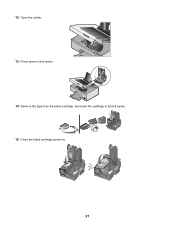
WI F I PRINTING 14 Remove the tape from the black cartridge, and insert the cartridge in the left carrier. 15 Close the black cartridge carrier lid. 21 12 Open the printer. 13 Press down on the levers.
WI F I PRINTING 14 Remove the tape from the black cartridge, and insert the cartridge in the left carrier. 15 Close the black cartridge carrier lid. 21 12 Open the printer. 13 Press down on the levers.
User's Guide
Page 22
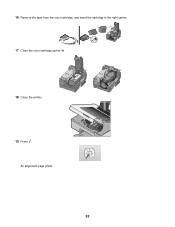
An alignment page prints. 22 16 Remove the tape from the color cartridge, and insert the cartridge in the right carrier. 17 Close the color cartridge carrier lid. 18 Close the printer. 19 Press .
An alignment page prints. 22 16 Remove the tape from the color cartridge, and insert the cartridge in the right carrier. 17 Close the color cartridge carrier lid. 18 Close the printer. 19 Press .
User's Guide
Page 24
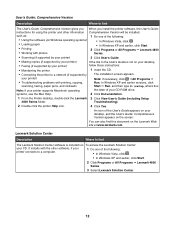
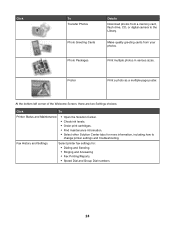
...Settings choices: Click To Printer Status and Maintenance • Open the Solution Center. • Check ink levels. • Order print cartridges. • Find maintenance information. • Select other Solution Center tabs for : • Dialing and Sending • Ringing and Answering ...• Fax Printing/Reports • Speed Dial and Group Dial numbers 24 Photo Packages Print multiple photos in various sizes. Fax History and Settings Select printer fax settings for more information, including ...
...Settings choices: Click To Printer Status and Maintenance • Open the Solution Center. • Check ink levels. • Order print cartridges. • Find maintenance information. • Select other Solution Center tabs for : • Dialing and Sending • Ringing and Answering ...• Fax Printing/Reports • Speed Dial and Group Dial numbers 24 Photo Packages Print multiple photos in various sizes. Fax History and Settings Select printer fax settings for more information, including ...


