User's Guide
Page 12
80 Routine maintenance needed ...265 84 Replace PC Kit...265 84 PC Kit life warning...265 88 Cartridge low...265 88.yy Cartridge nearly low...266 88.yy Replace cartridge ...266 200-282.yy paper jam...266 290-...
80 Routine maintenance needed ...265 84 Replace PC Kit...265 84 PC Kit life warning...265 88 Cartridge low...265 88.yy Cartridge nearly low...266 88.yy Replace cartridge ...266 200-282.yy paper jam...266 290-...
User's Guide
Page 265
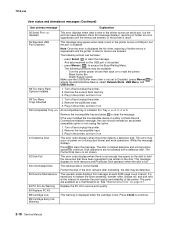
...or more of the following : • Touch Continue to clear the message and continue printing. Install a new photoconductor kit. 84 PC Kit life warning The photoconductor kit is low. If the error message remains, the hard disk may be defective and require replacing. 80 Routine maintenance ...pick rollers, the charge roll, the transfer roller, and the fuser. 84 Replace PC Kit The photoconductor kit is exhausted. Troubleshooting 265 Try one or more of the following : • Replace the photoconductor kit. • Touch Continue to clear the message and continue printing. 88 Cartridge ...
...or more of the following : • Touch Continue to clear the message and continue printing. Install a new photoconductor kit. 84 PC Kit life warning The photoconductor kit is low. If the error message remains, the hard disk may be defective and require replacing. 80 Routine maintenance ...pick rollers, the charge roll, the transfer roller, and the fuser. 84 Replace PC Kit The photoconductor kit is exhausted. Troubleshooting 265 Try one or more of the following : • Replace the photoconductor kit. • Touch Continue to clear the message and continue printing. 88 Cartridge ...
User's Guide
Page 312
... 59 Incompatible tray 265 61 Remove defective disk 265 62 Disk full 265 63 Unformatted disk 265 80 Routine maintenance needed 265 84 PC Kit life warning 265 84 Replace PC Kit 265 840.01 Scanner Disabled 267 841-846 Scanner Service Error 267 88 Cartridge low 265 88.yy Cartridge nearly low 266...
... 59 Incompatible tray 265 61 Remove defective disk 265 62 Disk full 265 63 Unformatted disk 265 80 Routine maintenance needed 265 84 PC Kit life warning 265 84 Replace PC Kit 265 840.01 Scanner Disabled 267 841-846 Scanner Service Error 267 88 Cartridge low 265 88.yy Cartridge nearly low 266...
User's Guide
Page 316
...93 Paper Weight menu 161 Parallel menu 175 pausing the current print job to make copies 110 PCL Emul menu 225 PDF menu 224 photoconductor kit ordering 235 photos copying 105 port settings configuring 65 PostScript menu 224 Power Saver adjusting 71 print job canceling from Macintosh 102 canceling from ...59 Incompatible tray 265 61 Remove defective disk 265 62 Disk full 265 63 Unformatted disk 265 80 Routine maintenance needed 265 84 PC Kit life warning 265 84 Replace PC Kit 265 840.01 Scanner Disabled 267 841-846 Scanner Service Error 267 88 Cartridge low 265 88.yy Cartridge nearly low 266...
...93 Paper Weight menu 161 Parallel menu 175 pausing the current print job to make copies 110 PCL Emul menu 225 PDF menu 224 photoconductor kit ordering 235 photos copying 105 port settings configuring 65 PostScript menu 224 Power Saver adjusting 71 print job canceling from Macintosh 102 canceling from ...59 Incompatible tray 265 61 Remove defective disk 265 62 Disk full 265 63 Unformatted disk 265 80 Routine maintenance needed 265 84 PC Kit life warning 265 84 Replace PC Kit 265 840.01 Scanner Disabled 267 841-846 Scanner Service Error 267 88 Cartridge low 265 88.yy Cartridge nearly low 266...
Service Manual
Page 56
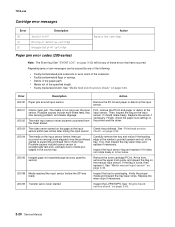
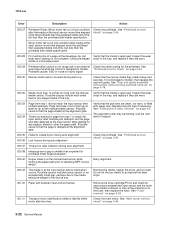
...sent to the printer across an serial port, but the port is disabled. Format the disk. Any data received on page 6-1. 84 PC Kit Life Warning Replace the PC kit to clear the message. Remove the additional trays. 3. Once this message at each 300K page count interval. Remove the incompatible trays.... 3. Press to ensure print quality. 84 Replace PC Kit 88 Cartridge Low This warning is displayed when the cartridge is low. The disk is reset or menus are entered, or the printer is ...
...sent to the printer across an serial port, but the port is disabled. Format the disk. Any data received on page 6-1. 84 PC Kit Life Warning Replace the PC kit to clear the message. Remove the additional trays. 3. Once this message at each 300K page count interval. Remove the incompatible trays.... 3. Press to ensure print quality. 84 Replace PC Kit 88 Cartridge Low This warning is displayed when the cartridge is low. The disk is reset or menus are entered, or the printer is ...
Service Manual
Page 58
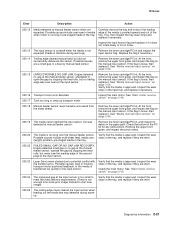
.... 200.06 Imaged page not expected page (bouncy passthru sensor) Remove the toner cartridge/PC kit. Carefully remove the tray and notice if the leading edge of the media is pointed...flag on page 2-54. 200.04 The media at the input Check the printhead. First, remove the PC kit and paper or debric at the input sensor. 200.01 200.02 Classic input jam. See "Printhead ... the page at the input sensor before the EP was ready Inspect the tray for prestaging. Remove the PC kit and paper or debris at the input sensor. The main input sensor never became uncovered from the sheet...
.... 200.06 Imaged page not expected page (bouncy passthru sensor) Remove the toner cartridge/PC kit. Carefully remove the tray and notice if the leading edge of the media is pointed...flag on page 2-54. 200.04 The media at the input Check the printhead. First, remove the PC kit and paper or debric at the input sensor. 200.01 200.02 Classic input jam. See "Printhead ... the page at the input sensor before the EP was ready Inspect the tray for prestaging. Remove the PC kit and paper or debris at the input sensor. The main input sensor never became uncovered from the sheet...
Service Manual
Page 59
... SMALL GAP OR NO GAP JAM RECOVERY. See "Main motor service check" on the manual input sensor. Remove the toner cartridge/PC kit. Check the bottom of the PC kit for debris in the tray. Engine detected small gap or no trailing edge was ever seen at the input sensor. Carefully remove ...media is approved. Verify that was detected at the input sensor. 200.23 Laser Servo never started due to ramp up ) Remove the toner cartridge/PC kit and inspect the input sensor flag. See "Main motor service check" on the manual input sensor. Inspect the wear strips in the tray. Diagnostics...
... SMALL GAP OR NO GAP JAM RECOVERY. See "Main motor service check" on the manual input sensor. Remove the toner cartridge/PC kit. Check the bottom of the PC kit for debris in the tray. Engine detected small gap or no trailing edge was ever seen at the input sensor. Carefully remove ...media is approved. Verify that was detected at the input sensor. 200.23 Laser Servo never started due to ramp up ) Remove the toner cartridge/PC kit and inspect the input sensor flag. See "Main motor service check" on the manual input sensor. Inspect the wear strips in the tray. Diagnostics...
Service Manual
Page 60
..." on page 2-54. 200.37 Timeout on hsync signal. 200.30 Narrow media sensor covered during auto alignment Check the printhead. Remove the toner cartridge/PC kit and check for the printhead. Likely pre staged strips in the tray. See event beyond the wear strips. If it out of the tray at...
..." on page 2-54. 200.37 Timeout on hsync signal. 200.30 Narrow media sensor covered during auto alignment Check the printhead. Remove the toner cartridge/PC kit and check for the printhead. Likely pre staged strips in the tray. See event beyond the wear strips. If it out of the tray at...
Service Manual
Page 61
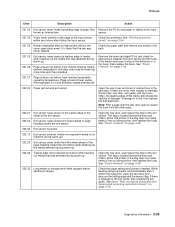
...at the exit sensor. 202.02 Exit sensor never broke from the other parts. Page arrived at fuser earlier than intended Remove the toner cartridge/PC kit and check for obstructions in the path way. See "Fuser removal" on the page at the input sensor within two inches after it was ... Often, the leading edge of the media will indicate the vacinity of the page heading toward the exit sensor. Diagnostics information 2-23 Also Remove the PC kit and paper or debris at the fuser, rear door, exit guide, and top cover. If there are none, then inspect for damage at the ...
...at the exit sensor. 202.02 Exit sensor never broke from the other parts. Page arrived at fuser earlier than intended Remove the toner cartridge/PC kit and check for obstructions in the path way. See "Fuser removal" on the page at the input sensor within two inches after it was ... Often, the leading edge of the media will indicate the vacinity of the page heading toward the exit sensor. Diagnostics information 2-23 Also Remove the PC kit and paper or debris at the fuser, rear door, exit guide, and top cover. If there are none, then inspect for damage at the ...
Service Manual
Page 85
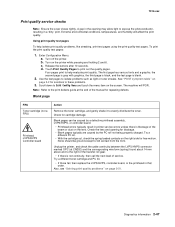
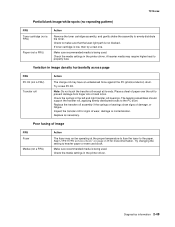
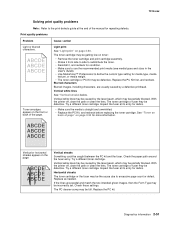
...to help isolate print quality problems, like streaking, print test pages using the print quality test pages. Try a different toner cartridge and PC kit. • If those fail, then replace the LVPS/HVPS, controller board, or the printhead in printer service errors unless there is blank...caused by a defective printhead assembly, LVPS/HVPS, or controller board. • Printhead errors typically result in that order. Try a different PC kit. • With the cartridge out, check the spring loaded contacts on the screen. Turn off the printer. Use the test pages to these ...
...to help isolate print quality problems, like streaking, print test pages using the print quality test pages. Try a different toner cartridge and PC kit. • If those fail, then replace the LVPS/HVPS, controller board, or the printhead in printer service errors unless there is blank...caused by a defective printhead assembly, LVPS/HVPS, or controller board. • Printhead errors typically result in that order. Try a different PC kit. • With the cartridge out, check the spring loaded contacts on the screen. Turn off the printer. Use the test pages to these ...
Service Manual
Page 86
... time in the driver. Make sure the toner cartridge and PC Kit are correctly installed and the high voltage contacts are installed correctly, then try a new PC Kit first and then toner cartridge. If the toner cartridge and PC Kit are clean. 7014-xxx Black page Note: Incorrect laser exposure ...correct and the toner electrodes are incorrect, then check ground paths. • Check continuity in the cable. FRU Toner cartridge (not a FRU) PC Kit (not a FRU) LVPS/HVPS Engine board Action Check the toner darkness setting in the order shown: • LVPS/HVPS board (See ...
... time in the driver. Make sure the toner cartridge and PC Kit are correctly installed and the high voltage contacts are installed correctly, then try a new PC Kit first and then toner cartridge. If the toner cartridge and PC Kit are clean. 7014-xxx Black page Note: Incorrect laser exposure ...correct and the toner electrodes are incorrect, then check ground paths. • Check continuity in the cable. FRU Toner cartridge (not a FRU) PC Kit (not a FRU) LVPS/HVPS Engine board Action Check the toner darkness setting in the order shown: • LVPS/HVPS board (See ...
Service Manual
Page 87
... media is not blocked. Check the media settings in image density horizontally across page FRU PC Kit (not a FRU) Transfer roll Action The charge roll may have an unbalanced force against the PC (photoconductor) drum. Variation in the printer driver. The bearing assemblies should support the transfer...contamination. Replace as necessary. Try changing the setting to evenly distribute the toner. If toner cartridge is being used . Try a new PC Kit. Note: Do not touch the transfer roll except at the proper temperature to fuse the toner to properly fuse. Inspect the transfer roll...
... media is not blocked. Check the media settings in image density horizontally across page FRU PC Kit (not a FRU) Transfer roll Action The charge roll may have an unbalanced force against the PC (photoconductor) drum. Variation in the printer driver. The bearing assemblies should support the transfer...contamination. Replace as necessary. Try changing the setting to evenly distribute the toner. If toner cartridge is being used . Try a new PC Kit. Note: Do not touch the transfer roll except at the proper temperature to fuse the toner to properly fuse. Inspect the transfer roll...

Service Manual
Page 88
... a FRU) Transfer roll LVPS/HVPS card Action Make sure the toner cartridge and PC Kit are installed correctly and that the laser beam is not blocked. Recheck condition before replacing PC Kit, if necessary. Banding is primarily due to contaminate the transfer roller. Inspect the toner cartridge and...the high voltage cable is not low on the wiring diagram. Replace the fuser as necessary. 2-50 Service Manual None of page FRU Photoconductor kit (not a FRU) Fuser Transfer roll HVPS or engine board Action Print a menu page from the Menu Settings Page in the Reports menu...
... a FRU) Transfer roll LVPS/HVPS card Action Make sure the toner cartridge and PC Kit are installed correctly and that the laser beam is not blocked. Recheck condition before replacing PC Kit, if necessary. Banding is primarily due to contaminate the transfer roller. Inspect the toner cartridge and...the high voltage cable is not low on the wiring diagram. Replace the fuser as necessary. 2-50 Service Manual None of page FRU Photoconductor kit (not a FRU) Fuser Transfer roll HVPS or engine board Action Print a menu page from the Menu Settings Page in the Reports menu...
Service Manual
Page 89
... the end of the page. Toner smudges appear on the front or back of the manual for debris. Try a different toner cartridge. Replace the PC kit. Inspect the fuser at its entry for condition. • Make sure to use the recommended print media (see media types and sizes in the...be defective. The toner cartridge may be getting low on page 2-50 for media type, media texture, or media weight. • The toner cartridge or PC Kit may be defective. See "Toner on back of page" on toner: • Remove the toner cartridge and print cartridge assembly. • Shake it ...
... the end of the page. Toner smudges appear on the front or back of the manual for debris. Try a different toner cartridge. Replace the PC kit. Inspect the fuser at its entry for condition. • Make sure to use the recommended print media (see media types and sizes in the...be defective. The toner cartridge may be getting low on page 2-50 for media type, media texture, or media weight. • The toner cartridge or PC Kit may be defective. See "Toner on back of page" on toner: • Remove the toner cartridge and print cartridge assembly. • Shake it ...

Service Manual
Page 110
... Diagnostics menu. However, the event log printed from the Configuration Menu. Off disables the users' access to menus. 7014-xxx Reset Photoconductor Maintenance Counter (Reset PC Cnt) This setting resets the photoconductor kit page counter and clears any warnings or photoconductor exhausted messages.
... Diagnostics menu. However, the event log printed from the Configuration Menu. Off disables the users' access to menus. 7014-xxx Reset Photoconductor Maintenance Counter (Reset PC Cnt) This setting resets the photoconductor kit page counter and clears any warnings or photoconductor exhausted messages.


