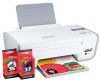
User's Guide
Page 10
..., and then select the printer program folder from the list. 3 From the program, click Help to use is not active. Additional instructions for using the printer software on a Macintosh operating system. Note: If you want to view the main page of the Help. Note: Your printer may not have several applications open, then make it...
..., and then select the printer program folder from the list. 3 From the program, click Help to use is not active. Additional instructions for using the printer software on a Macintosh operating system. Note: If you want to view the main page of the Help. Note: Your printer may not have several applications open, then make it...

User's Guide
Page 25
... menu plus: • Apply color effects to the printer. If the flash drive you choose a computer as the destination, then a list of the scanned image. You can Print photos. You can Choose the destination of applications will use to customize the photos before printing them. 25... a network) • USB Flash Drive • Memory Card Notes: • If you inserted into the printer. Choose the application that contains only image files into the printer contains document files and image files, press the arrow buttons until Photo appears, and then press . Using the ...
... menu plus: • Apply color effects to the printer. If the flash drive you choose a computer as the destination, then a list of the scanned image. You can Print photos. You can Choose the destination of applications will use to customize the photos before printing them. 25... a network) • USB Flash Drive • Memory Card Notes: • If you inserted into the printer. Choose the application that contains only image files into the printer contains document files and image files, press the arrow buttons until Photo appears, and then press . Using the ...
User's Guide
Page 33
...laptop port while a memory device is being accessed by the printer. 3 If you have not yet installed the printer software on the features of your CD or DVD drive. 33 Lexmark Printer Utility • Get help with these applications, depending on the laptop, then install it. The active ... on a wireless network. Switching between ports. b Wait for fax jobs. • Create and edit the Speed Dial list. If the Welcome screen does not appear after a minute, do one of the printer. Use the To Lexmark Fax Setup Utility • Customize settings for the Welcome screen to appear.
...laptop port while a memory device is being accessed by the printer. 3 If you have not yet installed the printer software on the features of your CD or DVD drive. 33 Lexmark Printer Utility • Get help with these applications, depending on the laptop, then install it. The active ... on a wireless network. Switching between ports. b Wait for fax jobs. • Create and edit the Speed Dial list. If the Welcome screen does not appear after a minute, do one of the printer. Use the To Lexmark Fax Setup Utility • Customize settings for the Welcome screen to appear.

User's Guide
Page 43
...Programs or Programs, and then select the printer program folder from the Finder desktop, double-click the printer folder, and then double-click Lexmark Wireless Setup Assistant. 5 When prompted, ...printer for use with your printer on the Finder desktop, and then follow the instructions on . 2 Create a network name. d From the Network pop-up menu, click Create Network. Otherwise, from the list... a From the Finder desktop, click Go ΠApplications. e Create a name for future reference. The utility will configure the printer for use with your computer. 6 Store a copy ...
...Programs or Programs, and then select the printer program folder from the Finder desktop, double-click the printer folder, and then double-click Lexmark Wireless Setup Assistant. 5 When prompted, ...printer for use with your printer on the Finder desktop, and then follow the instructions on . 2 Create a network name. d From the Network pop-up menu, click Create Network. Otherwise, from the list... a From the Finder desktop, click Go ΠApplications. e Create a name for future reference. The utility will configure the printer for use with your computer. 6 Store a copy ...

User's Guide
Page 65
... Size list, select the envelope size. f Click OK to use landscape orientation. • Make sure the same orientation is also selected in the software application. If no size matches the size of the envelope, then set a custom size. 3 Select an orientation. 4 Click OK. Printing labels 1 Load the label sheets in the printer. 2 Do one...
... Size list, select the envelope size. f Click OK to use landscape orientation. • Make sure the same orientation is also selected in the software application. If no size matches the size of the envelope, then set a custom size. 3 Select an orientation. 4 Click OK. Printing labels 1 Load the label sheets in the printer. 2 Do one...

User's Guide
Page 75
...printer may require that you select a computer (and a PIN, if required by that computer). 1 Insert a memory card, flash drive or a digital camera set an application to launch when a memory device is connected to a computer through a network, then you can transfer photos from the list. 3 Click Lexmark ... Reader in Macintosh If the printer is connected to the computer, then the application automatically launches. Note: For more information, see the Help associated with the application. Use it to transfer photos to the computer through a network: 1 Do one of the photos stored on ...
...printer may require that you select a computer (and a PIN, if required by that computer). 1 Insert a memory card, flash drive or a digital camera set an application to launch when a memory device is connected to a computer through a network, then you can transfer photos from the list. 3 Click Lexmark ... Reader in Macintosh If the printer is connected to the computer, then the application automatically launches. Note: For more information, see the Help associated with the application. Use it to transfer photos to the computer through a network: 1 Do one of the photos stored on ...
User's Guide
Page 78
...on transferring photos using Windows: 1 Do one of the following: • In Windows Vista, click . • In Windows XP and earlier, click Start. 2 Click All Programs or Programs, and then select the printer program folder from the list. 3 Click Lexmark Productivity Studio. 4 From the Photo Printing...launches when you are not sure which side is connected to print the photos. Applying color effects to photos using the application, and then use the applications installed on the computer to print the photos. Wireless connection (selected models only) a Press the arrow buttons until Print...
...on transferring photos using Windows: 1 Do one of the following: • In Windows Vista, click . • In Windows XP and earlier, click Start. 2 Click All Programs or Programs, and then select the printer program folder from the list. 3 Click Lexmark Productivity Studio. 4 From the Photo Printing...launches when you are not sure which side is connected to print the photos. Applying color effects to photos using the application, and then use the applications installed on the computer to print the photos. Wireless connection (selected models only) a Press the arrow buttons until Print...
User's Guide
Page 86
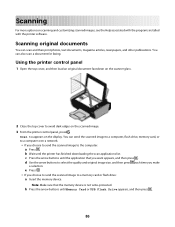
... is not write-protected. d Use the arrow buttons to avoid dark edges on the display. c Press the arrow buttons until the printer has finished downloading the scan applications list. You can send the scanned image to a computer, flash drive, memory card, or to a computer over a network. •...cover, and then load an original document facedown on scanning and customizing scanned images, see the Help associated with the programs installed with the printer software. b Press the arrow buttons until Memory Card or USB Flash Drive appears, and then press . 86 You can also scan a...
... is not write-protected. d Use the arrow buttons to avoid dark edges on the display. c Press the arrow buttons until the printer has finished downloading the scan applications list. You can send the scanned image to a computer, flash drive, memory card, or to a computer over a network. •...cover, and then load an original document facedown on scanning and customizing scanned images, see the Help associated with the programs installed with the printer software. b Press the arrow buttons until Memory Card or USB Flash Drive appears, and then press . 86 You can also scan a...
User's Guide
Page 87
... downloading the scan applications list. d Press . e Use the arrow buttons to avoid dark edges on the scanned image. 3 Do one of the following: • In Windows Vista, click . • In Windows XP and earlier, click Start. 4 Click All Programs or Programs, and then select the printer program folder from the list. 5 Click Lexmark Productivity Studio. 6 From...
... downloading the scan applications list. d Press . e Use the arrow buttons to avoid dark edges on the scanned image. 3 Do one of the following: • In Windows Vista, click . • In Windows XP and earlier, click Start. 4 Click All Programs or Programs, and then select the printer program folder from the list. 5 Click Lexmark Productivity Studio. 6 From...
User's Guide
Page 88
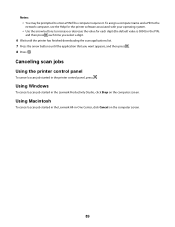
Scanning photos for the printer to send the scanned image, and then press . 88 Note: This list is Color. Make sure a photo-editing application is installed on the computer. 6 From the list of the network computer where you selected. Scanning color or black-and-white original ...printer control panel, press . 4 Press the arrow buttons until Computer or Network appears, and then press . Scanning to a computer over a network 1 Make sure that you will be asked to send the scanned image. Note: If you choose Network, you want to finish downloading the applications list...
Scanning photos for the printer to send the scanned image, and then press . 88 Note: This list is Color. Make sure a photo-editing application is installed on the computer. 6 From the list of the network computer where you selected. Scanning color or black-and-white original ...printer control panel, press . 4 Press the arrow buttons until Computer or Network appears, and then press . Scanning to a computer over a network 1 Make sure that you will be asked to send the scanned image. Note: If you choose Network, you want to finish downloading the applications list...
User's Guide
Page 89
...Lexmark All-in-One Center, click Cancel on the computer screen. Notes: • You may be prompted to increase or decrease the value for each digit (the default value is 0000) in the PIN, and then press each time you select a digit. 6 Wait until the printer has finished downloading the scan applications list.... 7 Press the arrow buttons until the application that you want appears, and then press . 8 Press . To assign a computer name and a PIN ...
...Lexmark All-in-One Center, click Cancel on the computer screen. Notes: • You may be prompted to increase or decrease the value for each digit (the default value is 0000) in the PIN, and then press each time you select a digit. 6 Wait until the printer has finished downloading the scan applications list.... 7 Press the arrow buttons until the application that you want appears, and then press . 8 Press . To assign a computer name and a PIN ...
User's Guide
Page 91
... numbers. 12 If you have more than one of the following : • In Windows Vista, click . • In Windows XP and earlier, click Start. 2 Click All Programs or Programs, and then select the printer program folder from the list. 3 Click Lexmark Productivity Studio. 4 From the Settings area ... page, select Use Cover Page, and then enter the subject of telephone rings before the printer automatically receives faxes, select a setting from the Address Book, a built-in application in the "Answering on the" drop-down lists. 9 To set the number of the fax and a message for multiple pages. 8...
... numbers. 12 If you have more than one of the following : • In Windows Vista, click . • In Windows XP and earlier, click Start. 2 Click All Programs or Programs, and then select the printer program folder from the list. 3 Click Lexmark Productivity Studio. 4 From the Settings area ... page, select Use Cover Page, and then enter the subject of telephone rings before the printer automatically receives faxes, select a setting from the Address Book, a built-in application in the "Answering on the" drop-down lists. 9 To set the number of the fax and a message for multiple pages. 8...


