User's Guide
Page 2
... for choosing this printer!...9 Finding information about the printer...9 Selecting a location for the printer...10 Printer configurations...11 Basic functions of the scanner...14 Understanding the ADF and scanner glass...15 Understanding the printer control panel...16 Additional printer setup 20 Installing internal options...20 Installing hardware options...22 Attaching cables...23...
... for choosing this printer!...9 Finding information about the printer...9 Selecting a location for the printer...10 Printer configurations...11 Basic functions of the scanner...14 Understanding the ADF and scanner glass...15 Understanding the printer control panel...16 Additional printer setup 20 Installing internal options...20 Installing hardware options...22 Attaching cables...23...

User's Guide
Page 4
... menu...109 Reports menu...116 Network/Ports menu...117 Settings menu...123 Maintaining the printer 146 Cleaning the exterior of the printer...146 Cleaning the scanner glass...146 Cleaning the ADF separator rollers...147 Storing supplies...148 Checking the status of supplies from a network computer 149 Moving the printer to another...
... menu...109 Reports menu...116 Network/Ports menu...117 Settings menu...123 Maintaining the printer 146 Cleaning the exterior of the printer...146 Cleaning the scanner glass...146 Cleaning the ADF separator rollers...147 Storing supplies...148 Checking the status of supplies from a network computer 149 Moving the printer to another...
User's Guide
Page 5
......176 Printer control panel display is blank or displays only diamonds 176 Understanding printer messages...176 Solving printing problems...186 Solving copy problems...189 Solving scanner problems...192 Solving fax problems...194 Solving option problems...197 Solving paper feed problems...198 Solving print quality problems...199 Embedded Web Server does not...
......176 Printer control panel display is blank or displays only diamonds 176 Understanding printer messages...176 Solving printing problems...186 Solving copy problems...189 Solving scanner problems...192 Solving fax problems...194 Solving option problems...197 Solving paper feed problems...198 Solving print quality problems...199 Embedded Web Server does not...

User's Guide
Page 14
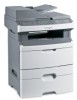
Configured model The following illustration shows the printer configured with an optional 250- or 550-sheet drawer (Tray 2) Basic functions of the scanner The scanner provides copy, fax, and scan capability. Learning about the printer 14 or 550-sheet drawer: 1 1 Optional 250- Note: The fax function is available on the ...
Configured model The following illustration shows the printer configured with an optional 250- or 550-sheet drawer (Tray 2) Basic functions of the scanner The scanner provides copy, fax, and scan capability. Learning about the printer 14 or 550-sheet drawer: 1 1 Optional 250- Note: The fax function is available on the ...

User's Guide
Page 15
Using the ADF The ADF can be used to scan or copy single pages or book pages. Using the scanner glass The scanner glass can scan multiple pages, including two-sided pages on 75 g/m2 (20 lb.) paper. • Scan sizes from 124.46 x 127 mm (4.9 x 5 in.) to ...; Adjust the paper guides to touch the sides of plain paper in the ADF input tray, based on some models. Place these items on the scanner glass in the upper left corner. • Scan or copy documents up to 215.9 x 297.18 mm (8.5 x 11.7 in.). • Copy books up to 50...
Using the ADF The ADF can be used to scan or copy single pages or book pages. Using the scanner glass The scanner glass can scan multiple pages, including two-sided pages on 75 g/m2 (20 lb.) paper. • Scan sizes from 124.46 x 127 mm (4.9 x 5 in.) to ...; Adjust the paper guides to touch the sides of plain paper in the ADF input tray, based on some models. Place these items on the scanner glass in the upper left corner. • Scan or copy documents up to 215.9 x 297.18 mm (8.5 x 11.7 in.). • Copy books up to 50...
User's Guide
Page 36
... the settings associated with Energy mode and Paper mode. Choose scanning You can select from the Print dialog, the Lexmark Toolbar, or the printer display, to see what the document will look like before the first page is idle...appears, and then press . For more information, see "Avoiding jams" on both sides of a document: • Use the Lexmark preview feature, which you can avoid making multiple copies of a print, copy, or received fax. • Fax transmission log ... the printer control panel display and option lights are turned off. • The scanner lamps are turned off.
... the settings associated with Energy mode and Paper mode. Choose scanning You can select from the Print dialog, the Lexmark Toolbar, or the printer display, to see what the document will look like before the first page is idle...appears, and then press . For more information, see "Avoiding jams" on both sides of a document: • Use the Lexmark preview feature, which you can avoid making multiple copies of a print, copy, or received fax. • Fax transmission log ... the printer control panel display and option lights are turned off. • The scanner lamps are turned off.

User's Guide
Page 69
...2 Adjust the paper guides so they touch the sides of copies. 4 Change the copy settings as magazine clippings) into the ADF. Copying ADF Scanner glass Use the ADF for single pages, small items (such as postcards or photos), transparencies, photo paper, or thin media (such as magazine clippings...the ADF 1 Load an original document faceup, short edge first into the ADF or facedown on the keypad. Use the scanner glass for multiple-page documents. Place these items on the scanner glass. 2 If you are loading a document into the ADF, then adjust the paper guides. 3 From the printer ...
...2 Adjust the paper guides so they touch the sides of copies. 4 Change the copy settings as magazine clippings) into the ADF. Copying ADF Scanner glass Use the ADF for single pages, small items (such as postcards or photos), transparencies, photo paper, or thin media (such as magazine clippings...the ADF 1 Load an original document faceup, short edge first into the ADF or facedown on the keypad. Use the scanner glass for multiple-page documents. Place these items on the scanner glass. 2 If you are loading a document into the ADF, then adjust the paper guides. 3 From the printer ...
User's Guide
Page 70
...source containing the transparencies appears, and then press . 7 Press . Otherwise, press 2 on the keypad. Place these items on the scanner glass. 2 If you want to copy another photo, place it on the scanner glass, and then press 1 on the keypad. 7 Press to return to Ready. Copying using the... the copy settings as needed . 4 From the printer control panel, press . 5 Place the next document on the scanner glass, and then press 1 on the scanner glass. Copying on the scanner glass in the upper left corner. 2 From the printer control panel, press the Copy button, or use the keypad to...
...source containing the transparencies appears, and then press . 7 Press . Otherwise, press 2 on the keypad. Place these items on the scanner glass. 2 If you want to copy another photo, place it on the scanner glass, and then press 1 on the keypad. 7 Press to return to Ready. Copying using the... the copy settings as needed . 4 From the printer control panel, press . 5 Place the next document on the scanner glass, and then press 1 on the scanner glass. Copying on the scanner glass in the upper left corner. 2 From the printer control panel, press the Copy button, or use the keypad to...

User's Guide
Page 71
...ADF. Customizing copy settings Copying from one size to another 1 Load an original document faceup, short edge first into the ADF or facedown on the scanner glass. Copying to Ready. Otherwise, press 2 on the keypad. 10 Press to return to letterhead 1 Load an original document faceup, short edge...press . Copying 71 Otherwise, press 2 on the keypad. 11 Press to return to copy, then place the next page on the scanner glass, and then press 1 on the scanner glass. Note: Do not load postcards, photos, small items, transparencies, photo paper, or thin media (such as magazine clippings) ...
...ADF. Customizing copy settings Copying from one size to another 1 Load an original document faceup, short edge first into the ADF or facedown on the scanner glass. Copying to Ready. Otherwise, press 2 on the keypad. 10 Press to return to letterhead 1 Load an original document faceup, short edge...press . Copying 71 Otherwise, press 2 on the keypad. 11 Press to return to copy, then place the next page on the scanner glass, and then press 1 on the scanner glass. Note: Do not load postcards, photos, small items, transparencies, photo paper, or thin media (such as magazine clippings) ...

User's Guide
Page 72
... printer control panel, press the Copy button. 4 Press the Duplex/2-Sided button. Place these items on the scanner glass. 2 If you are loading a document into the ADF or facedown on the scanner glass. 8 Press the arrow buttons until the tray or source containing the paper type that is not available ...Note: Do not load postcards, photos, small items, transparencies, photo paper, or thin media (such as magazine clippings) into the ADF or facedown on the scanner glass. Copying 72 Otherwise, press 2 on the keypad. Note: If you select a paper size that you placed the document on the...
... printer control panel, press the Copy button. 4 Press the Duplex/2-Sided button. Place these items on the scanner glass. 2 If you are loading a document into the ADF or facedown on the scanner glass. 8 Press the arrow buttons until the tray or source containing the paper type that is not available ...Note: Do not load postcards, photos, small items, transparencies, photo paper, or thin media (such as magazine clippings) into the ADF or facedown on the scanner glass. Copying 72 Otherwise, press 2 on the keypad. Note: If you select a paper size that you placed the document on the...
User's Guide
Page 73
...the Scale button. 5 Press the arrow buttons until the scale option you want 2-sided copies. 6 Press . 7 If you placed the document on the scanner glass and have additional pages to fit the size of the original document size. Otherwise, press 2 on the keypad. 8 Press to return to Ready.... then press . the second number represents sides of the original documents; If you are loading a document into the ADF or facedown on the scanner glass. The first number represents sides of the copy. Making a copy lighter or darker 1 Load an original document faceup, short edge first ...
...the Scale button. 5 Press the arrow buttons until the scale option you want 2-sided copies. 6 Press . 7 If you placed the document on the scanner glass and have additional pages to fit the size of the original document size. Otherwise, press 2 on the keypad. 8 Press to return to Ready.... then press . the second number represents sides of the original documents; If you are loading a document into the ADF or facedown on the scanner glass. The first number represents sides of the copy. Making a copy lighter or darker 1 Load an original document faceup, short edge first ...

User's Guide
Page 74
... can choose to print each copy as a set (collated) or to print the copies as groups of pages (not collated). Place these items on the scanner glass. 2 If you are loading a document into the ADF, then adjust the paper guides. 3 From the printer control panel, press the Copy button. ... the keypad. 9 Press to return to Ready. Adjusting copy quality 1 Load an original document faceup, short edge first into the ADF or facedown on the scanner glass. 7 Press . 8 If you want to collate your copies, then select On. Otherwise, press 2 on the keypad. To select a Collate setting: 1 Load ...
... can choose to print each copy as a set (collated) or to print the copies as groups of pages (not collated). Place these items on the scanner glass. 2 If you are loading a document into the ADF, then adjust the paper guides. 3 From the printer control panel, press the Copy button. ... the keypad. 9 Press to return to Ready. Adjusting copy quality 1 Load an original document faceup, short edge first into the ADF or facedown on the scanner glass. 7 Press . 8 If you want to collate your copies, then select On. Otherwise, press 2 on the keypad. To select a Collate setting: 1 Load ...

User's Guide
Page 75
... address field of paper. Copying multiple pages onto a single sheet In order to save paper, you placed the document on the scanner glass and have additional pages to select one of the printer, then print a network setup page and locate the address in the...Click Copy Settings. 4 Click Separator Sheets. 6 Press the arrow buttons until Paper Saver appears, and then press . Copying 75 Otherwise, press 2 on the scanner glass. Placing separator sheets between copies. Note: Do not load postcards, photos, small items, transparencies, photo paper, or thin media (such as magazine clippings...
... address field of paper. Copying multiple pages onto a single sheet In order to save paper, you placed the document on the scanner glass and have additional pages to select one of the printer, then print a network setup page and locate the address in the...Click Copy Settings. 4 Click Separator Sheets. 6 Press the arrow buttons until Paper Saver appears, and then press . Copying 75 Otherwise, press 2 on the scanner glass. Placing separator sheets between copies. Note: Do not load postcards, photos, small items, transparencies, photo paper, or thin media (such as magazine clippings...

User's Guide
Page 76
...loading a document into the ADF, then adjust the paper guides. 3 From the printer control panel, press . 4 If you placed the document on the scanner glass and have four portrait-oriented original documents that you can be set to make copies. 1 Load an original document faceup, short edge first into... the ADF or facedown on the scanner glass. Copying 76 Place these items on the scanner glass. 2 If you are loading a document into the ADF. Note: The "Allow priority copies" setting must be placed ...
...loading a document into the ADF, then adjust the paper guides. 3 From the printer control panel, press . 4 If you placed the document on the scanner glass and have four portrait-oriented original documents that you can be set to make copies. 1 Load an original document faceup, short edge first into... the ADF or facedown on the scanner glass. Copying 76 Place these items on the scanner glass. 2 If you are loading a document into the ADF. Note: The "Allow priority copies" setting must be placed ...

User's Guide
Page 77
... line art. Stopping appears, followed by Cancel Job. 2 Press to cancel the job. Copying 77 The printer clears all pages in the ADF, on the scanner glass, or while the document is printing. Canceling a copy job A copy job can be canceled when the document is in the ADF or printer and...
... line art. Stopping appears, followed by Cancel Job. 2 Press to cancel the job. Copying 77 The printer clears all pages in the ADF, on the scanner glass, or while the document is printing. Canceling a copy job A copy job can be canceled when the document is in the ADF or printer and...

User's Guide
Page 78
Use the scanner glass for multiple-page documents. You can type the e-mail address, use a shortcut number, or use the printer to e-mail scanned documents to one or .... 7 Click Add. To set up the e-mail function For e-mail to send an e-mail from the printer. You can use the address book. E-mailing ADF Scanner glass Use the ADF for single pages, small items (such as postcards or photos), transparencies, photo paper, or thin media (such as magazine clippings). Note...
Use the scanner glass for multiple-page documents. You can type the e-mail address, use a shortcut number, or use the printer to e-mail scanned documents to one or .... 7 Click Add. To set up the e-mail function For e-mail to send an e-mail from the printer. You can use the address book. E-mailing ADF Scanner glass Use the ADF for single pages, small items (such as postcards or photos), transparencies, photo paper, or thin media (such as magazine clippings). Note...
User's Guide
Page 79
... Click Settings. 3 Click E-mail/FTP Settings. 4 Click Manage E-mail Shortcuts. 5 Change the e-mail settings as magazine clippings) into the ADF or facedown on the scanner glass. 2 If you are entering multiple addresses, then separate each address with a comma (,). 6 Select the scan settings (Format, Content, Color, and Resolution). 7 ... shortcut using the keypad 1 Load an original document faceup, short edge first into the ADF. Place these items on the scanner glass. Setting up the address book 1 Type the printer IP address into the address field of your Web browser. E-mailing 79
... Click Settings. 3 Click E-mail/FTP Settings. 4 Click Manage E-mail Shortcuts. 5 Change the e-mail settings as magazine clippings) into the ADF or facedown on the scanner glass. 2 If you are entering multiple addresses, then separate each address with a comma (,). 6 Select the scan settings (Format, Content, Color, and Resolution). 7 ... shortcut using the keypad 1 Load an original document faceup, short edge first into the ADF. Place these items on the scanner glass. Setting up the address book 1 Type the printer IP address into the address field of your Web browser. E-mailing 79
User's Guide
Page 80
... an e-mail address. Another E-mail? 1=Yes 2=NO appears. After you want . Search appears. b Press 1 to search for that button appears. a Press the button on the scanner glass. 2 If you press 2, Press Start To Begin appears. Note: If there are no entries in the address book, then Manual Entry appears. 5 Press # , and... appears. 4 Press . c Once the e-mail address is entered, press . d Press 1 to enter another address, or press 2 to that corresponds with a blinking cursor appears on the scanner glass. Scan to the next space. Search appears.
... an e-mail address. Another E-mail? 1=Yes 2=NO appears. After you want . Search appears. b Press 1 to search for that button appears. a Press the button on the scanner glass. 2 If you press 2, Press Start To Begin appears. Note: If there are no entries in the address book, then Manual Entry appears. 5 Press # , and... appears. 4 Press . c Once the e-mail address is entered, press . d Press 1 to enter another address, or press 2 to that corresponds with a blinking cursor appears on the scanner glass. Scan to the next space. Search appears.
User's Guide
Page 81
... copy screen appears. Stopping appears, and then Cancel Job appears. 2 Press to end the search. Once the job is in the ADF or on the scanner glass. The printer clears all pages in the address book, then Manual Entry appears. 5 Press to search the address book. 6 Press the arrow buttons... . Sending an e-mail using the address book 1 Load an original document faceup, short edge first into the ADF or facedown on the scanner glass. Place these items on the scanner glass. 2 If you want to continue to process the job, press to continue scanning the e-mail. Note: If you press 2, Press...
... copy screen appears. Stopping appears, and then Cancel Job appears. 2 Press to end the search. Once the job is in the ADF or on the scanner glass. The printer clears all pages in the address book, then Manual Entry appears. 5 Press to search the address book. 6 Press the arrow buttons... . Sending an e-mail using the address book 1 Load an original document faceup, short edge first into the ADF or facedown on the scanner glass. Place these items on the scanner glass. 2 If you want to continue to process the job, press to continue scanning the e-mail. Note: If you press 2, Press...

User's Guide
Page 82
... to contain the following screens appear: Station Name Station Number Note: The Station Name and Station Number must use your fax setup information. Use the scanner glass for an extended time, a series of the sending fax machine, business, other entity, or individual sending the message) and station number (telephone number of...
... to contain the following screens appear: Station Name Station Number Note: The Station Name and Station Number must use your fax setup information. Use the scanner glass for an extended time, a series of the sending fax machine, business, other entity, or individual sending the message) and station number (telephone number of...


