Sending a fax using the computer
Page 1
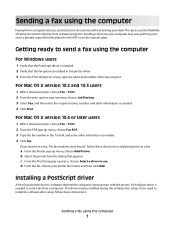
... a fax from the dialog that lets the computer communicate with the printer. b Select the printer from a computer. If you the flexibility of the fax recipient. A PostScript driver is installed in the printer driver. 3 From the Print dialog Fax screen, type the name and number... you receive an error, "No fax modems were found", follow these directions to use. Installing a PostScript driver A PostScript printer driver is software that appears. If you send electronic documents without leaving your printer fax model, and then click Add. d From the list, choose your desk.
... a fax from the dialog that lets the computer communicate with the printer. b Select the printer from a computer. If you the flexibility of the fax recipient. A PostScript driver is installed in the printer driver. 3 From the Print dialog Fax screen, type the name and number... you receive an error, "No fax modems were found", follow these directions to use. Installing a PostScript driver A PostScript printer driver is software that appears. If you send electronic documents without leaving your printer fax model, and then click Add. d From the list, choose your desk.
Sending a fax using the computer
Page 2
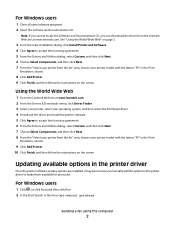
...and Documentation CD, you can download the driver from the Lexmark Web site at www.lexmark.com. 2 From the Drivers & Downloads menu, click Driver Finder. 3 Select your printer, select your operating system, and then select the PostScript driver. 4 Download the driver and install the printer software. 5 Click Agree to accept the...the World Wide Web" on the screen. Updating available options in the printer driver Once the printer software and any options are installed, it may be necessary to the Lexmark Web site at www.lexmark.com. Using the World Wide Web 1 Go to manually add the options...
...and Documentation CD, you can download the driver from the Lexmark Web site at www.lexmark.com. 2 From the Drivers & Downloads menu, click Driver Finder. 3 Select your printer, select your operating system, and then select the PostScript driver. 4 Download the driver and install the printer software. 5 Click Agree to accept the...the World Wide Web" on the screen. Updating available options in the printer driver Once the printer software and any options are installed, it may be necessary to the Lexmark Web site at www.lexmark.com. Using the World Wide Web 1 Go to manually add the options...
Sending a fax using the computer
Page 3
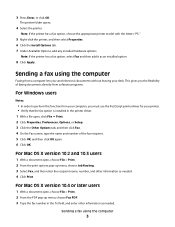
Sending a fax using the computer Faxing from your computer, you send electronic documents without leaving your printer. • Verify that the fax option is installed in the printer driver. 1 With a file open , choose File > Print. 2 From the PDF pop-up menu, choose Job Routing. 3 Select Fax,...8226; In order to perform this function from a computer lets you must use the PostScript printer driver for your desk. 3 Press Enter, or click OK. The printer folder opens. 4 Select the printer. Note: If the printer has a fax option, select Fax and then add it as an installed option. 8...
Sending a fax using the computer Faxing from your computer, you send electronic documents without leaving your printer. • Verify that the fax option is installed in the printer driver. 1 With a file open , choose File > Print. 2 From the PDF pop-up menu, choose Job Routing. 3 Select Fax,...8226; In order to perform this function from a computer lets you must use the PostScript printer driver for your desk. 3 Press Enter, or click OK. The printer folder opens. 4 Select the printer. Note: If the printer has a fax option, select Fax and then add it as an installed option. 8...

Sending a fax using the computer
Page 4
c From the Print Using pop-up menu, choose Add Printer. 4 Click Fax. d From the list, choose your printer as a fax: a From the Printer pop-up menu, choose Select a driver to add your printer fax model, and then click Add. b Select the printer from the dialog that appears. Sending a fax using the computer 4 If you receive an error, "No fax modems were found", follow these directions to use.
c From the Print Using pop-up menu, choose Add Printer. 4 Click Fax. d From the list, choose your printer as a fax: a From the Printer pop-up menu, choose Select a driver to add your printer fax model, and then click Add. b Select the printer from the dialog that appears. Sending a fax using the computer 4 If you receive an error, "No fax modems were found", follow these directions to use.

Troubleshooting Guide
Page 2
...next to Pause Printing. 4 Make sure a check mark appears next to the Ready prompt. For more information, see "Removing and reinstalling the drivers software" on page 1. • If you are using the MFP. • Restart the computer. • Make sure the MFP is ... or respond • Remove and reinstall the software. or Click Start Control Panel Printers and Other Hardware Printers and Faxes. 2 Double-click the Lexmark X340/X340n/ X342n icon. 3 Click Printer, and make sure the guides are scanning a document, wait until Toner Dark appears. 5 Press . ...
...next to Pause Printing. 4 Make sure a check mark appears next to the Ready prompt. For more information, see "Removing and reinstalling the drivers software" on page 1. • If you are using the MFP. • Restart the computer. • Make sure the MFP is ... or respond • Remove and reinstall the software. or Click Start Control Panel Printers and Other Hardware Printers and Faxes. 2 Double-click the Lexmark X340/X340n/ X342n icon. 3 Click Printer, and make sure the guides are scanning a document, wait until Toner Dark appears. 5 Press . ...

Troubleshooting Guide
Page 4
... the software. Disable this feature before sending the scan job. or Click Start Control Panel Printers and Other Hardware Printers and Faxes. 2 Double-click the Lexmark X340/X340n/ X342n icon. 3 Click Printer, and make sure that the paper size settings match the paper in use . 3 Click Edit. 4 Under ... a document, wait until FAX DEFAULTS appears. Black pages • Replace the toner cartridge. For more information, see "Removing and reinstalling the drivers software" on hold or paused. 1 Click Start Settings Printers and Faxes or...
... the software. Disable this feature before sending the scan job. or Click Start Control Panel Printers and Other Hardware Printers and Faxes. 2 Double-click the Lexmark X340/X340n/ X342n icon. 3 Click Printer, and make sure that the paper size settings match the paper in use . 3 Click Edit. 4 Under ... a document, wait until FAX DEFAULTS appears. Black pages • Replace the toner cartridge. For more information, see "Removing and reinstalling the drivers software" on hold or paused. 1 Click Start Settings Printers and Faxes or...
User's Guide
Page 7
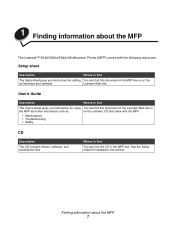
... The Setup sheet gives you instructions for installation instructions. Finding information about the MFP The Lexmark™ X340/X340n/X342n Multifunction Printer (MFP) comes with the MFP. • Maintenance • Troubleshooting • Safety CD Description The CD contains drivers, software, and publications files. See the Setup sheet for using You can find this document...
... The Setup sheet gives you instructions for installation instructions. Finding information about the MFP The Lexmark™ X340/X340n/X342n Multifunction Printer (MFP) comes with the MFP. • Maintenance • Troubleshooting • Safety CD Description The CD contains drivers, software, and publications files. See the Setup sheet for using You can find this document...
User's Guide
Page 12
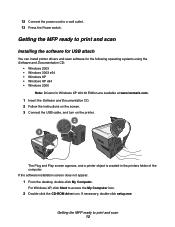
... outlet. 13 Press the Power switch. 12 Connect the power cord to print and scan Installing the software for USB attach You can install printer drivers and scan software for the following operating systems using the Software and Documentation CD: • Windows 2003 • Windows 2003 x64 •... Windows XP • Windows XP x64 • Windows 2000 Note: Drivers for Windows XP x64 bit Edition are available at www.lexmark.com. 1 Insert the Software and Documentation CD. 2 Follow the instructions on the screen. 3 Connect the USB cable, and...
... outlet. 13 Press the Power switch. 12 Connect the power cord to print and scan Installing the software for USB attach You can install printer drivers and scan software for the following operating systems using the Software and Documentation CD: • Windows 2003 • Windows 2003 x64 •... Windows XP • Windows XP x64 • Windows 2000 Note: Drivers for Windows XP x64 bit Edition are available at www.lexmark.com. 1 Insert the Software and Documentation CD. 2 Follow the instructions on the screen. 3 Connect the USB cable, and...
User's Guide
Page 13
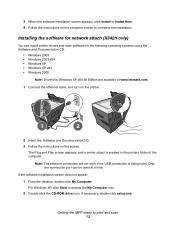
... Now. 4 Follow the instructions on the screen. The Plug and Play screen appears, and a printer object is being used at www.lexmark.com. 1 Connect the ethernet cable, and turn on the printer. 1 2 2 Insert the Software and Documentation CD. 3 Follow the instructions on the computer screen...the installation. Note: The ethernet connection will not work if the USB connection is created in the printers folder of the computer. Only one connection port can install printer drivers and scan software for the following operating systems using the Software and Documentation CD: • Windows ...
... Now. 4 Follow the instructions on the screen. The Plug and Play screen appears, and a printer object is being used at www.lexmark.com. 1 Connect the ethernet cable, and turn on the printer. 1 2 2 Insert the Software and Documentation CD. 3 Follow the instructions on the computer screen...the installation. Note: The ethernet connection will not work if the USB connection is created in the printers folder of the computer. Only one connection port can install printer drivers and scan software for the following operating systems using the Software and Documentation CD: • Windows ...

User's Guide
Page 88
... dialog on page 54. or Click Start Æ Control Panel Æ Printers and Other Hardware Æ Printers and Faxes. 2 Double-click the Lexmark X340/X340n/X342n icon. 3 Click Printer, and make sure no check mark appears next to Pause Printing. 4 Make...Printers. For more information, see Setting the paper type and size on page 74. Scan troubleshooting Problem Scanner does not respond Scans very slowly Scan was unsuccessful. If you are printing a document, wait until printing is done before sending the scan job. For more information, see Removing and reinstalling the drivers...
... dialog on page 54. or Click Start Æ Control Panel Æ Printers and Other Hardware Æ Printers and Faxes. 2 Double-click the Lexmark X340/X340n/X342n icon. 3 Click Printer, and make sure no check mark appears next to Pause Printing. 4 Make...Printers. For more information, see Setting the paper type and size on page 74. Scan troubleshooting Problem Scanner does not respond Scans very slowly Scan was unsuccessful. If you are printing a document, wait until printing is done before sending the scan job. For more information, see Removing and reinstalling the drivers...


