Troubleshooting Guide
Page 3
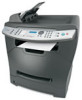
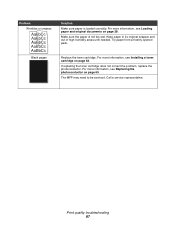
... may be able to temporarily extend the toner cartridge life by shaking the toner cartridge. Vertical lines AaBbCc AaBbCc AaBbCc AaBbCc AaBbCc • Replace the photoconductor. For more information, see the User's Guide. Clean the inside of the paper. For more information, see the User's Guide.
... may be able to temporarily extend the toner cartridge life by shaking the toner cartridge. Vertical lines AaBbCc AaBbCc AaBbCc AaBbCc AaBbCc • Replace the photoconductor. For more information, see the User's Guide. Clean the inside of the paper. For more information, see the User's Guide.

Troubleshooting Guide
Page 4
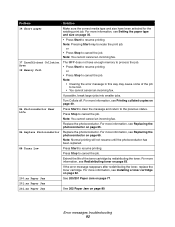
... to the telephone line. Call a service representative. or Click Start Control Panel Printers and Other Hardware Printers and Faxes. 2 Double-click the Lexmark X340/X340n/ X342n icon. 3 Click Printer, and make sure that the paper size settings match the paper in use . 3 Click Edit. 4 Under Resolution, select a lower ... Make sure the document is an error message, see the User's Guide. • If replacing the toner cartridge does not correct the problem, replace the photoconductor. Fax troubleshooting Cannot send or receive a fax • Check the display.
... to the telephone line. Call a service representative. or Click Start Control Panel Printers and Other Hardware Printers and Faxes. 2 Double-click the Lexmark X340/X340n/ X342n icon. 3 Click Printer, and make sure that the paper size settings match the paper in use . 3 Click Edit. 4 Under Resolution, select a lower ... Make sure the document is an error message, see the User's Guide. • If replacing the toner cartridge does not correct the problem, replace the photoconductor. Fax troubleshooting Cannot send or receive a fax • Check the display.

User's Guide
Page 5
... options 59 Chapter 9: Maintaining the MFP 61 Removing a toner cartridge 61 Installing a toner cartridge 62 Redistributing toner ...63 Replacing the photoconductor 65 Cleaning the MFP ...67 Cleaning the scanner glass 67 Cleaning the outside of the MFP 67 Cleaning the inside of the MFP ...68 Ordering supplies ...70 Recycling Lexmark products 70 Chapter 10: Troubleshooting 71 Setup troubleshooting ...72 Removing and reinstalling the drivers software 74 Jams and misfeeds troubleshooting 75 Clearing...
... options 59 Chapter 9: Maintaining the MFP 61 Removing a toner cartridge 61 Installing a toner cartridge 62 Redistributing toner ...63 Replacing the photoconductor 65 Cleaning the MFP ...67 Cleaning the scanner glass 67 Cleaning the outside of the MFP 67 Cleaning the inside of the MFP ...68 Ordering supplies ...70 Recycling Lexmark products 70 Chapter 10: Troubleshooting 71 Setup troubleshooting ...72 Removing and reinstalling the drivers software 74 Jams and misfeeds troubleshooting 75 Clearing...

User's Guide
Page 65
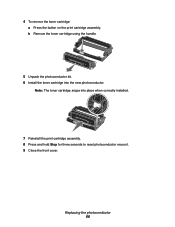
Replacing the photoconductor 65 Replacing the photoconductor 1 Press the access button on the left side of the MFP, and open the front cover. 1 2 2 Pull on the handle to remove the print cartridge assembly. 3 Place the print cartridge assembly on a flat, clean surface.
Replacing the photoconductor 65 Replacing the photoconductor 1 Press the access button on the left side of the MFP, and open the front cover. 1 2 2 Pull on the handle to remove the print cartridge assembly. 3 Place the print cartridge assembly on a flat, clean surface.
User's Guide
Page 66
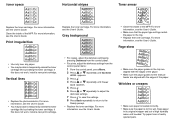
Note: The toner cartridge snaps into the new photoconductor. b Remove the toner cartridge using the handle. 5 Unpack the photoconductor kit. 6 Install the toner cartridge into place when correctly installed. 7 Reinstall the print cartridge assembly. 8 Press and hold Stop for three seconds to reset photoconductor recount. 9 Close the front cover. 4 To remove the toner cartridge: a Press the button on the print cartridge assembly. Replacing the photoconductor 66
Note: The toner cartridge snaps into the new photoconductor. b Remove the toner cartridge using the handle. 5 Unpack the photoconductor kit. 6 Install the toner cartridge into place when correctly installed. 7 Reinstall the print cartridge assembly. 8 Press and hold Stop for three seconds to reset photoconductor recount. 9 Close the front cover. 4 To remove the toner cartridge: a Press the button on the print cartridge assembly. Replacing the photoconductor 66
User's Guide
Page 68
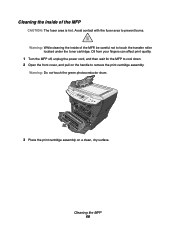
Avoid contact with the fuser area to remove the print cartridge assembly. Warning: Do not touch the green photoconductor drum. 3 Place the print cartridge assembly on the handle to prevent burns. Warning: While cleaning the inside of the MFP, be careful not to touch ...
Avoid contact with the fuser area to remove the print cartridge assembly. Warning: Do not touch the green photoconductor drum. 3 Place the print cartridge assembly on the handle to prevent burns. Warning: While cleaning the inside of the MFP, be careful not to touch ...
User's Guide
Page 70
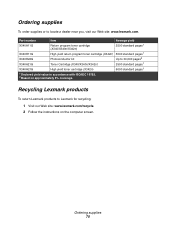
... order supplies or to Lexmark for recycling: 1 Visit our Web site: www.lexmark.com/recycle. 2 Follow the instructions on approximately 5% coverage. Part number Item Average yield X340A11G Return program toner cartridge (X340/X340n/X342n) 2500 standard pages1 X340H11G High yield return program toner cartridge (X342n) 6000 standard pages1 X340H22G Photoconductor kit Up to 30...
... order supplies or to Lexmark for recycling: 1 Visit our Web site: www.lexmark.com/recycle. 2 Follow the instructions on approximately 5% coverage. Part number Item Average yield X340A11G Return program toner cartridge (X340/X340n/X342n) 2500 standard pages1 X340H11G High yield return program toner cartridge (X342n) 6000 standard pages1 X340H22G Photoconductor kit Up to 30...

User's Guide
Page 85
Replace the toner cartridge. Use only new, dry paper. For more information, see Installing a toner cartridge on page 62. Replace the photoconductor. if this does not work , install a new toner cartridge. Clean the inside of the MFP. if this does not work , install...toner cartridge life by redistributing the toner. For prints, adjust the darkness settings from the control panel. For more information, see Replacing the photoconductor on page 68. Print quality troubleshooting 85 Install a new toner cartridge. For more information, see Cleaning the inside of the MFP on...
Replace the toner cartridge. Use only new, dry paper. For more information, see Installing a toner cartridge on page 62. Replace the photoconductor. if this does not work , install a new toner cartridge. Clean the inside of the MFP. if this does not work , install...toner cartridge life by redistributing the toner. For prints, adjust the darkness settings from the control panel. For more information, see Replacing the photoconductor on page 68. Print quality troubleshooting 85 Install a new toner cartridge. For more information, see Cleaning the inside of the MFP on...
User's Guide
Page 87
... out of high humidity areas until needed. Problem Wrinkles or creases Solution Make sure paper is not too wet. For more information, see Replacing the photoconductor on page 62. Try paper from a freshly opened pack. If replacing the toner cartridge does not correct the problem, replace the...
... out of high humidity areas until needed. Problem Wrinkles or creases Solution Make sure paper is not too wet. For more information, see Replacing the photoconductor on page 62. Try paper from a freshly opened pack. If replacing the toner cartridge does not correct the problem, replace the...
User's Guide
Page 92
... job. For more information, see Replacing the photoconductor on page 65. For more information, see Replacing the photoconductor on page 65. 84 Replace Photoconductor Replace the photoconductor. Note: Normal printing will not resume until the photoconductor has been replaced. 88 Toner Low Press Start... to cancel the job. Press Stop to cancel the job. Replace the photoconductor. Error messages troubleshooting 92 For more information, see Redistributing toner on page 40. 84 Photoconductor Near Life Press Start to clear the message and return to the previous status...
... job. For more information, see Replacing the photoconductor on page 65. For more information, see Replacing the photoconductor on page 65. 84 Replace Photoconductor Replace the photoconductor. Note: Normal printing will not resume until the photoconductor has been replaced. 88 Toner Low Press Start... to cancel the job. Press Stop to cancel the job. Replace the photoconductor. Error messages troubleshooting 92 For more information, see Redistributing toner on page 40. 84 Photoconductor Near Life Press Start to clear the message and return to the previous status...
User's Guide
Page 103
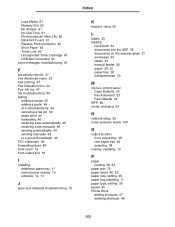
Index Load Media 91 Memory Full 92 No Answer 91 No Dial Tone 91 Photoconductor Near Life 92 Qlink Not Found 91 Replace Photoconductor 92 Short Paper 92 Toner Low 92 Unsupported Toner Cartridge 91 USB Not Connected 91 error messages troubleshooting 91 F fax activity reports 47 Fax Advanced ...
Index Load Media 91 Memory Full 92 No Answer 91 No Dial Tone 91 Photoconductor Near Life 92 Qlink Not Found 91 Replace Photoconductor 92 Short Paper 92 Toner Low 92 Unsupported Toner Cartridge 91 USB Not Connected 91 error messages troubleshooting 91 F fax activity reports 47 Fax Advanced ...
User's Guide
Page 104
...40 transparencies 40 Q QLINK, using 27 R rear cover 19 rear output slot 38 rear paper exit 38 receiving a fax automatically 45 manually 46 recycling Lexmark products 70 redistributing toner 63 reducing an image 53 removing software 74 toner cartridge 61 reports fax activity 47 Fax Call log 47 Fax Job... 35 paper type 35 Speed Dial 47 shortcuts setting up 47 using 48 software installing 12, 13 Presto! editing 48 printing 48 searching 48 photoconductor, replacing 65 power supply port 19 prefix 45 Presto! PageManager 27 print properties 26 QLINK 27 reinstalling 74 removing 74 Speed Dial buttons 48...
...40 transparencies 40 Q QLINK, using 27 R rear cover 19 rear output slot 38 rear paper exit 38 receiving a fax automatically 45 manually 46 recycling Lexmark products 70 redistributing toner 63 reducing an image 53 removing software 74 toner cartridge 61 reports fax activity 47 Fax Call log 47 Fax Job... 35 paper type 35 Speed Dial 47 shortcuts setting up 47 using 48 software installing 12, 13 Presto! editing 48 printing 48 searching 48 photoconductor, replacing 65 power supply port 19 prefix 45 Presto! PageManager 27 print properties 26 QLINK 27 reinstalling 74 removing 74 Speed Dial buttons 48...
Quick Reference
Page 3
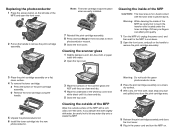
...button on the print cartridge assembly. Avoid contact with water, be careful not to remove the print cartridge assembly. Warning: Do not touch the green photoconductor drum. 3 Place the print cartridge assembly on a clean, dry surface. 4 With a dry, lint-free cloth, wipe away any water drip ...close the front cover. 6 Plug in the power cord and turn the MFP on. b Remove the toner cartridge using the handle. 5 Unpack the photoconductor kit. 6 Install the toner cartridge into place when correctly installed. 7 Reinstall the print cartridge assembly. 8 Press and hold Stop for the MFP to...
...button on the print cartridge assembly. Avoid contact with water, be careful not to remove the print cartridge assembly. Warning: Do not touch the green photoconductor drum. 3 Place the print cartridge assembly on a clean, dry surface. 4 With a dry, lint-free cloth, wipe away any water drip ...close the front cover. 6 Plug in the power cord and turn the MFP on. b Remove the toner cartridge using the handle. 5 Unpack the photoconductor kit. 6 Install the toner cartridge into place when correctly installed. 7 Reinstall the print cartridge assembly. 8 Press and hold Stop for the MFP to...


