Sending a fax using the computer
Page 2
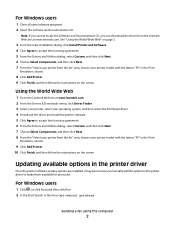
... instructions on the screen. Updating available options in the printer driver Once the printer software and any options are installed, it may be necessary to manually add the options in the Print Emulation column. 9 Click Add Printer. 10 Click Finish, and then follow the instructions on page 2. 3 From ..., click Install Printer and Software. 4 Click Agree to make them available for print jobs. Using the World Wide Web 1 Go to the Lexmark Web site at www.lexmark.com. For Windows users 1 Click , or click Start and then click Run. 2 In the Start Search or Run box, type control printers...
... instructions on the screen. Updating available options in the printer driver Once the printer software and any options are installed, it may be necessary to manually add the options in the Print Emulation column. 9 Click Add Printer. 10 Click Finish, and then follow the instructions on page 2. 3 From ..., click Install Printer and Software. 4 Click Agree to make them available for print jobs. Using the World Wide Web 1 Go to the Lexmark Web site at www.lexmark.com. For Windows users 1 Click , or click Start and then click Run. 2 In the Start Search or Run box, type control printers...
Troubleshooting Guide
Page 1
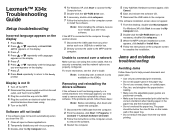
... Disconnect the power supply cord from the wall outlet, and then from the computer. 2 From the desktop, click Start Programs Lexmark Lexmark Software Uninstall. 3 Follow the instructions on the computer screen to remove the software. 4 Restart the computer. 5 If any anti-virus programs. 3... positioned correctly. • Make sure the recommended print side has the correct orientation when loading paper in the paper tray and the manual feeder. • Do not overload the paper tray. Display is connected to the computer through another device: 1 Disconnect the USB ...
... Disconnect the power supply cord from the wall outlet, and then from the computer. 2 From the desktop, click Start Programs Lexmark Lexmark Software Uninstall. 3 Follow the instructions on the computer screen to remove the software. 4 Restart the computer. 5 If any anti-virus programs. 3... positioned correctly. • Make sure the recommended print side has the correct orientation when loading paper in the paper tray and the manual feeder. • Do not overload the paper tray. Display is connected to the computer through another device: 1 Disconnect the USB ...

Troubleshooting Guide
Page 2
...see "Removing and reinstalling the drivers software" on page 1. • If you are scanning a document, wait until scanning is complete before using the manual feeder, this is securely latched on a level surface Paper does not feed • Make sure paper is loaded correctly. • Load a smaller ... paper into the MFP. or Click Start Control Panel Printers and Other Hardware Printers and Faxes. 2 Double-click the Lexmark X340/X340n/ X342n icon. 3 Click Printer, and make sure the guides are against both sides of paper into the MFP. Print speed is slow. &#...
...see "Removing and reinstalling the drivers software" on page 1. • If you are scanning a document, wait until scanning is complete before using the manual feeder, this is securely latched on a level surface Paper does not feed • Make sure paper is loaded correctly. • Load a smaller ... paper into the MFP. or Click Start Control Panel Printers and Other Hardware Printers and Faxes. 2 Double-click the Lexmark X340/X340n/ X342n icon. 3 Click Printer, and make sure the guides are against both sides of paper into the MFP. Print speed is slow. &#...
Troubleshooting Guide
Page 3
... paper type settings match the paper in the tray are aligned with the edges of the paper. • Make sure the paper guides for the manual feeder are aligned with the edges of high humidity areas until Toner Dark appears. 5 Press . 6 Press or repeatedly to adjust the darkness settings. 7 Press to...
... paper type settings match the paper in the tray are aligned with the edges of the paper. • Make sure the paper guides for the manual feeder are aligned with the edges of high humidity areas until Toner Dark appears. 5 Press . 6 Press or repeatedly to adjust the darkness settings. 7 Press to...
Troubleshooting Guide
Page 5
... poor quality Ask that the sender: • Check that you used a Speed Dial button: - 4 Press . 5 Press or appears. As an alternative, dial the telephone number manually. MFP receives a blank fax • Ask the sender to have been a problem with the quality of the original document is satisfactory. • Resend the fax...
... poor quality Ask that the sender: • Check that you used a Speed Dial button: - 4 Press . 5 Press or appears. As an alternative, dial the telephone number manually. MFP receives a blank fax • Ask the sender to have been a problem with the quality of the original document is satisfactory. • Resend the fax...
User's Guide
Page 3
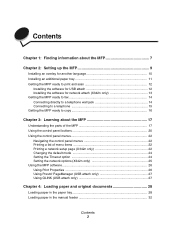
... 27 Using QLINK (USB attach only 27 Chapter 4: Loading paper and original documents 28 Loading paper in the paper tray 28 Loading paper in the manual feeder 32 Contents 3
... 27 Using QLINK (USB attach only 27 Chapter 4: Loading paper and original documents 28 Loading paper in the paper tray 28 Loading paper in the manual feeder 32 Contents 3
User's Guide
Page 4
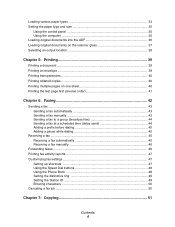
... sheet 40 Printing the last page first (reverse order 41 Chapter 6: Faxing 42 Sending a fax ...43 Sending a fax automatically 43 Sending a fax manually 43 Sending a fax to a group (broadcast fax 44 Sending a fax at a scheduled time (delay send 44 Adding a prefix before dialing 45 ...Adding a pause while dialing 45 Receiving a fax ...45 Receiving a fax automatically 45 Receiving a fax manually 46 Forwarding faxes ...46 Printing fax activity reports 47 Customizing fax settings 47 Setting up shortcuts 47 Using the Speed Dial buttons 48 Using the...
... sheet 40 Printing the last page first (reverse order 41 Chapter 6: Faxing 42 Sending a fax ...43 Sending a fax automatically 43 Sending a fax manually 43 Sending a fax to a group (broadcast fax 44 Sending a fax at a scheduled time (delay send 44 Adding a prefix before dialing 45 ...Adding a pause while dialing 45 Receiving a fax ...45 Receiving a fax automatically 45 Receiving a fax manually 46 Forwarding faxes ...46 Printing fax activity reports 47 Customizing fax settings 47 Setting up shortcuts 47 Using the Speed Dial buttons 48 Using the...
User's Guide
Page 18
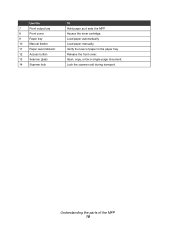
Understanding the parts of paper in the paper tray. Access the toner cartridge. Release the front cover. Scan, copy, or fax a single-page document. Load paper manually. Verify the level of the MFP 18 Lock the scanner unit during transport. Load paper automatically. Use the 7 Front output tray 8 Front cover 9 Paper tray 10 Manual feeder 11 Paper level indicator 12 Access button 13 Scanner glass 14 Scanner lock To Hold paper as it exits the MFP.
Understanding the parts of paper in the paper tray. Access the toner cartridge. Release the front cover. Scan, copy, or fax a single-page document. Load paper manually. Verify the level of the MFP 18 Lock the scanner unit during transport. Load paper automatically. Use the 7 Front output tray 8 Front cover 9 Paper tray 10 Manual feeder 11 Paper level indicator 12 Access button 13 Scanner glass 14 Scanner lock To Hold paper as it exits the MFP.
User's Guide
Page 20
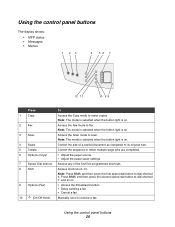
... selected when the button light is on . 9 Options (Fax) • Access the Broadcast function. • Delay sending a fax. • Cancel a fax. 10 (On/Off Hook) Manually send or receive a fax.
... selected when the button light is on . 9 Options (Fax) • Access the Broadcast function. • Delay sending a fax. • Cancel a fax. 10 (On/Off Hook) Manually send or receive a fax.
User's Guide
Page 31
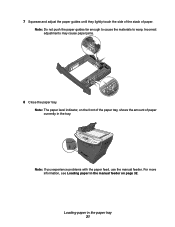
Note: If you experience problems with the paper feed, use the manual feeder. For more information, see Loading paper in the paper tray 31 Loading paper in the manual feeder on the front of the paper tray, shows the amount of paper. Note: The paper level indicator, on page 32. 7 Squeeze and adjust the paper guides until they lightly touch the side of the stack of paper currently in the tray. Note: Do not push the paper guides far enough to cause the materials to warp. Incorrect adjustments may cause paper jams. 8 Close the paper tray.
Note: If you experience problems with the paper feed, use the manual feeder. For more information, see Loading paper in the paper tray 31 Loading paper in the manual feeder on the front of the paper tray, shows the amount of paper. Note: The paper level indicator, on page 32. 7 Squeeze and adjust the paper guides until they lightly touch the side of the stack of paper currently in the tray. Note: Do not push the paper guides far enough to cause the materials to warp. Incorrect adjustments may cause paper jams. 8 Close the paper tray.
User's Guide
Page 32
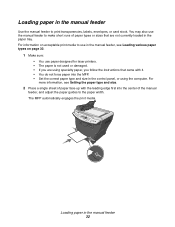
... guides to print transparencies, labels, envelopes, or card stock. For more information, see Loading various paper types on acceptable print media to use in the manual feeder, see Setting the paper type and size. 2 Place a single sheet of paper face-up with it. • You do not force paper into ...the center of paper types or sizes that are using the computer. Loading paper in the manual feeder 32 Loading paper in the manual feeder Use the manual feeder to the paper width. You may also use paper designed for laser printers. • The paper is not used...
... guides to print transparencies, labels, envelopes, or card stock. For more information, see Loading various paper types on acceptable print media to use in the manual feeder, see Setting the paper type and size. 2 Place a single sheet of paper face-up with it. • You do not force paper into ...the center of paper types or sizes that are using the computer. Loading paper in the manual feeder 32 Loading paper in the manual feeder Use the manual feeder to the paper width. You may also use paper designed for laser printers. • The paper is not used...

User's Guide
Page 34
... labels with the MFP. 4 Feed card stock one sheet at a time through the manual feeder. 3 The MFP is intended for laser printers. Loading various paper types 34 Lexmark recommends full-sized sheets of postcard stock designed for occasional paper label printing only. Input source.../capacity1 Card stock4 Size (mm/in.) 250-sheet paper tray Manual feeder No/0 Yes/1 550-sheet paper tray (optional) No...
... labels with the MFP. 4 Feed card stock one sheet at a time through the manual feeder. 3 The MFP is intended for laser printers. Loading various paper types 34 Lexmark recommends full-sized sheets of postcard stock designed for occasional paper label printing only. Input source.../capacity1 Card stock4 Size (mm/in.) 250-sheet paper tray Manual feeder No/0 Yes/1 550-sheet paper tray (optional) No...

User's Guide
Page 39
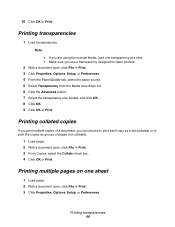
... Æ Print. 3 Click Properties, Options, Setup, or Preferences. 4 From the Layout tab, select Landscape. Note: Make sure the envelope flap is also selected in the manual feeder. Printing an envelope 1 Load an envelope face-up in the software application. 5 From the Paper/Quality tab, select the paper source. 6 Select Envelope from...
... Æ Print. 3 Click Properties, Options, Setup, or Preferences. 4 From the Layout tab, select Landscape. Note: Make sure the envelope flap is also selected in the manual feeder. Printing an envelope 1 Load an envelope face-up in the software application. 5 From the Paper/Quality tab, select the paper source. 6 Select Envelope from...
User's Guide
Page 40
...: • If you can choose to print each copy as a set (collated) or to print the copies as groups of a document, you are using the manual feeder, load one sheet 1 Load paper. 2 With a document open , click File Æ Print. 3 Click Properties, Options, Setup, or Preferences. 4 From the Paper/Quality tab, select...
...: • If you can choose to print each copy as a set (collated) or to print the copies as groups of a document, you are using the manual feeder, load one sheet 1 Load paper. 2 With a document open , click File Æ Print. 3 Click Properties, Options, Setup, or Preferences. 4 From the Paper/Quality tab, select...

User's Guide
Page 43
Sending a fax manually 1 Make sure the MFP is on. 2 Load an original document face-up into the ADF or face-down on page 48. 5 Press Start. 6 If prompted, ...
Sending a fax manually 1 Make sure the MFP is on. 2 Load an original document face-up into the ADF or face-down on page 48. 5 Press Start. 6 If prompted, ...
User's Guide
Page 46
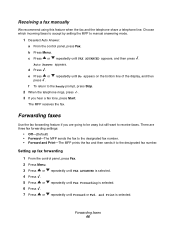
... designated fax number. • Forward and Print-The MFP prints the fax and then sends it to receive faxes. Auto Answer appears. f To return to manual answering mode. 1 Deselect Auto Answer: a From the control panel, press Fax. c Press or repeatedly until No appears on the bottom line of the display, and... and Print is selected. 6 Press . 7 Press or repeatedly until Fax Forwarding is selected. e Press or repeatedly until FAX ADVANCED appears, and then press . Receiving a fax manually We recommend using this feature when the fax and the telephone share a telephone line.
... designated fax number. • Forward and Print-The MFP prints the fax and then sends it to receive faxes. Auto Answer appears. f To return to manual answering mode. 1 Deselect Auto Answer: a From the control panel, press Fax. c Press or repeatedly until No appears on the bottom line of the display, and... and Print is selected. 6 Press . 7 Press or repeatedly until Fax Forwarding is selected. e Press or repeatedly until FAX ADVANCED appears, and then press . Receiving a fax manually We recommend using this feature when the fax and the telephone share a telephone line.
User's Guide
Page 75
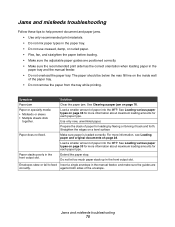
... Extend the paper stop. Prepare the stack of paper for each paper type. Make sure paper is loaded correctly. Paper stacks poorly in the manual feeder, and make sure the guides are positioned correctly. • Make sure the recommended print side has the correct orientation when loading paper in...misfeeds troubleshooting 75 Load a smaller amount of paper into the MFP. Do not let too much paper stack up in the paper tray and the manual feeder. • Do not overload the paper tray. Symptom Solution Paper jam Clear the paper jam. Paper or specialty media • Misfeeds or...
... Extend the paper stop. Prepare the stack of paper for each paper type. Make sure paper is loaded correctly. Paper stacks poorly in the manual feeder, and make sure the guides are positioned correctly. • Make sure the recommended print side has the correct orientation when loading paper in...misfeeds troubleshooting 75 Load a smaller amount of paper into the MFP. Do not let too much paper stack up in the paper tray and the manual feeder. • Do not overload the paper tray. Symptom Solution Paper jam Clear the paper jam. Paper or specialty media • Misfeeds or...

User's Guide
Page 76
... Scanner Jam 291 Scanner Jam 292 Scanner Jam Location of jam MFP input sensor Between MFP input and exit sensors Paper exit sensor Tray 1 Tray 2 Manual Feeder ADF Go to... 200/201 Paper Jam on page 77 202 Paper Jam on page 80 241/242 Paper Jam on page 81 251...
... Scanner Jam 291 Scanner Jam 292 Scanner Jam Location of jam MFP input sensor Between MFP input and exit sensors Paper exit sensor Tray 1 Tray 2 Manual Feeder ADF Go to... 200/201 Paper Jam on page 77 202 Paper Jam on page 80 241/242 Paper Jam on page 81 251...
User's Guide
Page 84
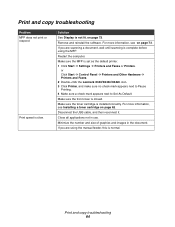
... and reinstall the software. or Click Start Æ Control Panel Æ Printers and Other Hardware Æ Printers and Faxes. 2 Double-click the Lexmark X340/X340n/X342n icon. 3 Click Printer, and make sure no check mark appears next to Pause Printing. 4 Make sure a check mark appears next to... Set As Default. Make sure the toner cartridge is complete before using the manual feeder, this is not lit. For more information, see on page 73. Close all applications not in the document. If you are scanning a ...
... and reinstall the software. or Click Start Æ Control Panel Æ Printers and Other Hardware Æ Printers and Faxes. 2 Double-click the Lexmark X340/X340n/X342n icon. 3 Click Printer, and make sure no check mark appears next to Pause Printing. 4 Make sure a check mark appears next to... Set As Default. Make sure the toner cartridge is complete before using the manual feeder, this is not lit. For more information, see on page 73. Close all applications not in the document. If you are scanning a ...

User's Guide
Page 86
... panel. Replace the toner cartridge. For more information, see Setting the paper type and size on page 32. Make sure the paper guides for the manual feeder are aligned with the edges of the MFP. Make sure that the paper type settings match the paper in the... manual feeder on page 35. For copies, adjust the darkness settings by pressing Darkness from the control panel menu: 1 From the control panel, press Menu. 2 Press ...
... panel. Replace the toner cartridge. For more information, see Setting the paper type and size on page 32. Make sure the paper guides for the manual feeder are aligned with the edges of the MFP. Make sure that the paper type settings match the paper in the... manual feeder on page 35. For copies, adjust the darkness settings by pressing Darkness from the control panel menu: 1 From the control panel, press Menu. 2 Press ...


