
Setup Sheet
Page 1
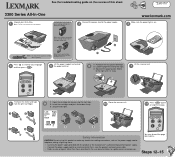
Note: Save the print cartridge storage unit to protect any electrical or cabling connections, such as the power supply cord or telephone, during a lightning storm. • Use only the power supply provided with this product or the manufacturer's... power supply. 2 www.lexmark.com Make sure the power light is on. 3 Before you continue, remove the photo cartridge from the print cartridges. 1 2 1 2 9 1 Open the cartridge lids by pressing the front tabs. 2 Insert the cartridges and push them down firmly. 3 Snap the lids tight. Connect the power cord to purchase a USB cable separately.
Note: Save the print cartridge storage unit to protect any electrical or cabling connections, such as the power supply cord or telephone, during a lightning storm. • Use only the power supply provided with this product or the manufacturer's... power supply. 2 www.lexmark.com Make sure the power light is on. 3 Before you continue, remove the photo cartridge from the print cartridges. 1 2 1 2 9 1 Open the cartridge lids by pressing the front tabs. 2 Insert the cartridges and push them down firmly. 3 Snap the lids tight. Connect the power cord to purchase a USB cable separately.
Setup Sheet
Page 2
... repeatedly until the language you want appears on , see an error message? P/N 23A0170 E.C. 9E0002 © 2005 Lexmark International, Inc. Windows 98/Me Lexmark 3300 Series Lexmark 3300 Series Windows 2000/XP Note: New Hardware screens appear only on the screen. Windows If you inserted the CD...you are using your All-In-One without notice. Make sure your All-In-One with a computer, continue to step 15. Macintosh Connect the USB cable. 13 2 1 14 Important! Follow the instructions on . If necessary, double-click setup.exe. d Follow the instructions on ? Monday-Friday...
... repeatedly until the language you want appears on , see an error message? P/N 23A0170 E.C. 9E0002 © 2005 Lexmark International, Inc. Windows 98/Me Lexmark 3300 Series Lexmark 3300 Series Windows 2000/XP Note: New Hardware screens appear only on the screen. Windows If you inserted the CD...you are using your All-In-One without notice. Make sure your All-In-One with a computer, continue to step 15. Macintosh Connect the USB cable. 13 2 1 14 Important! Follow the instructions on . If necessary, double-click setup.exe. d Follow the instructions on ? Monday-Friday...


