
Wireless Setup Guide
Page 13
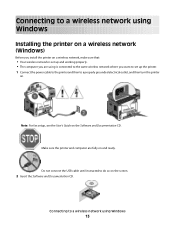
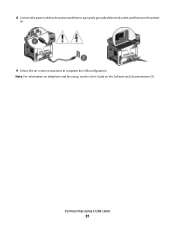
... to set up the printer. 1 Connect the power cable to the printer and then to do so on the Software and Documentation CD. Note: For fax setup, see the User's Guide on the screen. 2 Insert the Software and Documentation CD.
... to set up the printer. 1 Connect the power cable to the printer and then to do so on the Software and Documentation CD. Note: For fax setup, see the User's Guide on the screen. 2 Insert the Software and Documentation CD.

Wireless Setup Guide
Page 17
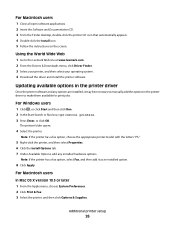
... complete. 2 Add the printer: a For IP printing: In Mac OS X version 10.5 1 From the Apple menu, choose System Preferences. 2 Click Print & Fax. 3 Click +. 4 Select the printer from the list. 6 Click Add. i Click Close when installation is installed on the computer. In Mac OS X version ...and then click Continue. In Mac OS X version 10.4 1 From the Go menu, choose Applications. 2 Double-click Utilities. 3 Locate and double-click Printer Setup Utility or Print Center. 4 From the Printer List, choose Add. 5 Select the printer from the list. 6 Click Add. e Click Continue after viewing ...
... complete. 2 Add the printer: a For IP printing: In Mac OS X version 10.5 1 From the Apple menu, choose System Preferences. 2 Click Print & Fax. 3 Click +. 4 Select the printer from the list. 6 Click Add. i Click Close when installation is installed on the computer. In Mac OS X version ...and then click Continue. In Mac OS X version 10.4 1 From the Go menu, choose Applications. 2 Double-click Utilities. 3 Locate and double-click Printer Setup Utility or Print Center. 4 From the Printer List, choose Add. 5 Select the printer from the list. 6 Click Add. e Click Continue after viewing ...
Wireless Setup Guide
Page 31
Note: For information on telephone and fax setup, see the User's Guide on -screen instructions to complete the USB configuration. 8 Connect the power cable to the printer and then to a properly grounded electrical outlet, and then turn the printer on. 9 Follow the on the Software and Documentation CD. Connecting using a USB cable 31
Note: For information on telephone and fax setup, see the User's Guide on -screen instructions to complete the USB configuration. 8 Connect the power cable to the printer and then to a properly grounded electrical outlet, and then turn the printer on. 9 Follow the on the Software and Documentation CD. Connecting using a USB cable 31
Wireless Setup Guide
Page 32
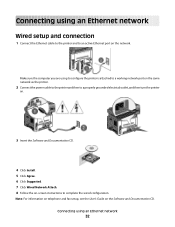
Connecting using an Ethernet network 32 Note: For information on telephone and fax setup, see the User's Guide on the network. Connecting using an Ethernet network Wired setup and connection 1 Connect the Ethernet cable to the printer and to complete the wired configuration. Make sure the computer you are using to configure the ...
Connecting using an Ethernet network 32 Note: For information on telephone and fax setup, see the User's Guide on the network. Connecting using an Ethernet network Wired setup and connection 1 Connect the Ethernet cable to the printer and to complete the wired configuration. Make sure the computer you are using to configure the ...

User's Guide
Page 9
...8226; Connecting the printer • Installing the printer software Additional setup and instructions for using the printer: • Selecting and storing paper and specialty media • Loading paper • Performing printing, copying, scanning, and faxing tasks, depending on your printer model • Configuring printer settings... and maintaining the printer • Troubleshooting and solving problems Find it better. For updates, check our Web site at www.lexmark.com/publications/. If you do encounter any problems along the way, one of your suggestions help you get the most out...
...8226; Connecting the printer • Installing the printer software Additional setup and instructions for using the printer: • Selecting and storing paper and specialty media • Loading paper • Performing printing, copying, scanning, and faxing tasks, depending on your printer model • Configuring printer settings... and maintaining the printer • Troubleshooting and solving problems Find it better. For updates, check our Web site at www.lexmark.com/publications/. If you do encounter any problems along the way, one of your suggestions help you get the most out...

User's Guide
Page 21
2 Unpack the card. Notes: • The entire length of the card. 3 Holding the card by its sides, align the card with the connector on the card must touch and be flush against the system board. • Be careful not to damage the connectors. • If your printer model does not fax, your system board will not have the fax card attached to the system board. 5 Close the system board door. Note: Avoid touching the connection points along the edge of the connector on the system board. 4 Push the card firmly into place. Additional printer setup 21
2 Unpack the card. Notes: • The entire length of the card. 3 Holding the card by its sides, align the card with the connector on the card must touch and be flush against the system board. • Be careful not to damage the connectors. • If your printer model does not fax, your system board will not have the fax card attached to the system board. 5 Close the system board door. Note: Avoid touching the connection points along the edge of the connector on the system board. 4 Push the card firmly into place. Additional printer setup 21

User's Guide
Page 24
... is attached to a network, print a network setup page to verify that all hardware and software options are installed correctly. A list of installed options appears toward the bottom of the page. 1 4 2 3 1 Ethernet port 2 Fax ports Note: The fax ports are available on selected printer models only. ...3 USB port 4 Printer power cord socket Verifying printer setup Once all printer options are installed and the printer is turned on, verify that ...
... is attached to a network, print a network setup page to verify that all hardware and software options are installed correctly. A list of installed options appears toward the bottom of the page. 1 4 2 3 1 Ethernet port 2 Fax ports Note: The fax ports are available on selected printer models only. ...3 USB port 4 Printer power cord socket Verifying printer setup Once all printer options are installed and the printer is turned on, verify that ...
User's Guide
Page 26
... folder opens. 4 Select the printer. Note: If the printer has a fax option, select Fax, and then add it may be necessary to manually add the options in the printer driver to the Lexmark Web site at www.lexmark.com. 2 From the Drivers & Downloads menu, click Driver Finder. 3 ...printer has a fax option, choose the appropriate printer model with the letters "PS." 5 Right-click the printer, and then select Properties. 6 Click the Install Options tab. 7 Under Available Options, add any options are installed, it as an installed option. 8 Click Apply. Additional printer setup 26 For Windows...
... folder opens. 4 Select the printer. Note: If the printer has a fax option, select Fax, and then add it may be necessary to manually add the options in the printer driver to the Lexmark Web site at www.lexmark.com. 2 From the Drivers & Downloads menu, click Driver Finder. 3 ...printer has a fax option, choose the appropriate printer model with the letters "PS." 5 Right-click the printer, and then select Properties. 6 Click the Install Options tab. 7 Under Available Options, add any options are installed, it as an installed option. 8 Click Apply. Additional printer setup 26 For Windows...

User's Guide
Page 28
Additional printer setup 28 Do not connect the USB cable until instructed to do so on the screen. 2 Insert the Software and Documentation CD. 3 Click Install Printer and ... up the printer. 1 Connect the power cable to the printer and then to a properly grounded electrical outlet, and then turn the printer on. 1 2 Note: For fax setup, see the Networking Guide on the Software and Documentation CD. • 802.1X username and password • Certificates Note: For more information on configuring 802...
Additional printer setup 28 Do not connect the USB cable until instructed to do so on the screen. 2 Insert the Software and Documentation CD. 3 Click Install Printer and ... up the printer. 1 Connect the power cable to the printer and then to a properly grounded electrical outlet, and then turn the printer on. 1 2 Note: For fax setup, see the Networking Guide on the Software and Documentation CD. • 802.1X username and password • Certificates Note: For more information on configuring 802...

User's Guide
Page 29
...; If your installation. 10 To allow other computers on the wireless network to complete the software installation. Additional printer setup 29 Choose Advanced only if you want to customize your printer has faxing capabilities, then connect the telephone cable. 9 Follow the on the wireless network and the printer. Notes: • After the...
...; If your installation. 10 To allow other computers on the wireless network to complete the software installation. Additional printer setup 29 Choose Advanced only if you want to customize your printer has faxing capabilities, then connect the telephone cable. 9 Follow the on the wireless network and the printer. Notes: • After the...

User's Guide
Page 30
Prepare to the page where the wireless settings information is stored. b Double-click Internet Connect. Additional printer setup 30 In Mac OS X version 10.4 and earlier a From the Go menu, choose Applications. c From the toolbar, click AirPort. 2 From the Network pop-up menu, ... the MAC address in MAC OS X version 10.3, but is referred to as Rendezvous in the space provided below: MAC address 2 If your printer has faxing capabilities, then connect the telephone cable. 3 Connect the power cable to the printer, and then to a properly grounded electrical outlet, and then turn the printer...
Prepare to the page where the wireless settings information is stored. b Double-click Internet Connect. Additional printer setup 30 In Mac OS X version 10.4 and earlier a From the Go menu, choose Applications. c From the toolbar, click AirPort. 2 From the Network pop-up menu, ... the MAC address in MAC OS X version 10.3, but is referred to as Rendezvous in the space provided below: MAC address 2 If your printer has faxing capabilities, then connect the telephone cable. 3 Connect the power cable to the printer, and then to a properly grounded electrical outlet, and then turn the printer...

User's Guide
Page 82
..., during a lightning storm. Getting the printer ready to access the Embedded Web Server and then enter the Settings menu. Using the printer control panel for fax setup When the printer is turned on the first page of the transmission: station name (identification of the business, other entity, or individual sending the message...
..., during a lightning storm. Getting the printer ready to access the Embedded Web Server and then enter the Settings menu. Using the printer control panel for fax setup When the printer is turned on the first page of the transmission: station name (identification of the business, other entity, or individual sending the message...

User's Guide
Page 83
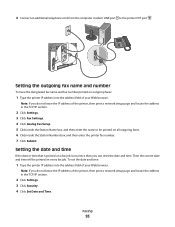
... can connect the printer with the number you press the button again, one of your Web browser. When you want. Contact your DSL provider for fax setup 1 Type the printer IP address into the address field of the letters assigned to that button appears. The first time you do need to connect... filter) is an analog device that can be successfully attached to pass through the printer, as described in the TCP/IP section. 2 Click Settings. 3 Click Fax Settings. 4 Click Analog Fax Setup. 5 Click inside the Station Name box, and then enter the name to be printed on all outgoing...
... can connect the printer with the number you press the button again, one of your Web browser. When you want. Contact your DSL provider for fax setup 1 Type the printer IP address into the address field of the letters assigned to that button appears. The first time you do need to connect... filter) is an analog device that can be successfully attached to pass through the printer, as described in the TCP/IP section. 2 Click Settings. 3 Click Fax Settings. 4 Click Analog Fax Setup. 5 Click inside the Station Name box, and then enter the name to be printed on all outgoing...
User's Guide
Page 93
... the address field of the printer, then print a network setup page and locate the address in the TCP/IP section. 2 Click Settings. 3 Click Fax Settings. 4 Click Analog Fax Setup. 5 Click inside the Station Number box, and then enter the printer fax number. 7 Click Submit. Note: If you can reset ... 6 Connect an additional telephone cord from the computer modem LINE port to be printed on outgoing faxes: 1 Type the printer IP address into the address field of the printer, then print a network setup page and locate the address in the TCP/IP section. 2 Click Settings. 3 Click Security....
... the address field of the printer, then print a network setup page and locate the address in the TCP/IP section. 2 Click Settings. 3 Click Fax Settings. 4 Click Analog Fax Setup. 5 Click inside the Station Number box, and then enter the printer fax number. 7 Click Submit. Note: If you can reset ... 6 Connect an additional telephone cord from the computer modem LINE port to be printed on outgoing faxes: 1 Type the printer IP address into the address field of the printer, then print a network setup page and locate the address in the TCP/IP section. 2 Click Settings. 3 Click Security....

User's Guide
Page 100
...you do not know the IP address of the printer, then print a network setup page and locate the address in the TCP/IP section. 2 Click Settings. 3 Click Fax Settings. 4 Click Analog Fax Setup. 5 Click inside the Fax Forwarding box, and then select one of your Web browser. Set Send Date ...appears. 9 Using the keypad, enter the date you want to a fax number. 1 Type the printer IP address into the ADF...
...you do not know the IP address of the printer, then print a network setup page and locate the address in the TCP/IP section. 2 Click Settings. 3 Click Fax Settings. 4 Click Analog Fax Setup. 5 Click inside the Fax Forwarding box, and then select one of your Web browser. Set Send Date ...appears. 9 Using the keypad, enter the date you want to a fax number. 1 Type the printer IP address into the ADF...

User's Guide
Page 101
...: If you want to block. To cancel a fax: 1 From the printer control panel, press . The printer clears all incoming faxes that was selected in the TCP/IP section. 2 Click Settings. 3 Click Fax Settings. 4 Click Analog Fax Setup. 5 Click the Block No Name Fax option. Canceling an outgoing fax A fax can be a valid shortcut number for the setting that...
...: If you want to block. To cancel a fax: 1 From the printer control panel, press . The printer clears all incoming faxes that was selected in the TCP/IP section. 2 Click Settings. 3 Click Fax Settings. 4 Click Analog Fax Setup. 5 Click the Block No Name Fax option. Canceling an outgoing fax A fax can be a valid shortcut number for the setting that...

User's Guide
Page 177
...printer is complete. Do not turn the printer off while the printer is in the Settings menu under General Fax Settings or Analog Fax Setup. Fax Station Name not set up The Fax Station Name has not been entered. If the message appears again, contact your system support person. DO NOT ... and then press to clear the message. • Complete the Analog Fax Setup. If the message appears again, then contact your system support person. Fax failed The fax failed to clear. Fax Station Number not set up The Fax Station Number has not been entered. Wait for the message to be ...
...printer is complete. Do not turn the printer off while the printer is in the Settings menu under General Fax Settings or Analog Fax Setup. Fax Station Name not set up The Fax Station Name has not been entered. If the message appears again, contact your system support person. DO NOT ... and then press to clear the message. • Complete the Analog Fax Setup. If the message appears again, then contact your system support person. Fax failed The fax failed to clear. Fax Station Number not set up The Fax Station Number has not been entered. Wait for the message to be ...
User's Guide
Page 196
... more of the following : CHECK TO SEE IF THE PAPER TRAY IS EMPTY Load paper in the TCP/IP section. 2 Click Settings. 3 Click Fax Settings. 4 Click Analog Fax Setup. 5 In the Rings to Answer box, enter the number of times the phone line rings before answering. 6 Click Submit. CHECK THE RING COUNT... DELAY SETTINGS The ring count delay sets the number of times you do not know the IP address of the printer, then print a network setup page...
... more of the following : CHECK TO SEE IF THE PAPER TRAY IS EMPTY Load paper in the TCP/IP section. 2 Click Settings. 3 Click Fax Settings. 4 Click Analog Fax Setup. 5 In the Rings to Answer box, enter the number of times the phone line rings before answering. 6 Click Submit. CHECK THE RING COUNT... DELAY SETTINGS The ring count delay sets the number of times you do not know the IP address of the printer, then print a network setup page...
User's Guide
Page 197
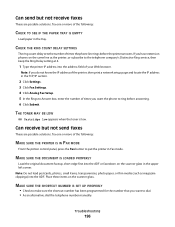
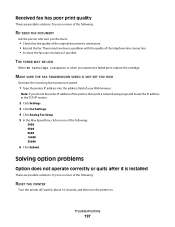
...Note: If you do not know the IP address of the printer, then print a network setup page and locate the IP address in the TCP/IP section. 2 Click Settings. 3 Click Fax Settings. 4 Click Analog Fax Setup. 5 In the Max Speed box, click on . Solving option problems Option does not ...operate correctly or quits after it is satisfactory. • Resend the fax. Received fax has poor print quality These are possible solutions. MAKE...
...Note: If you do not know the IP address of the printer, then print a network setup page and locate the IP address in the TCP/IP section. 2 Click Settings. 3 Click Fax Settings. 4 Click Analog Fax Setup. 5 In the Max Speed box, click on . Solving option problems Option does not ...operate correctly or quits after it is satisfactory. • Resend the fax. Received fax has poor print quality These are possible solutions. MAKE...

User's Guide
Page 229
... 83 creating shortcuts using the Embedded Web Server 97 creating shortcuts using the printer control panel 98 fax setup 82 forwarding faxes 100 improving fax quality 103 making a fax lighter or darker 99 sending a fax at a scheduled time 100 sending using the computer 95, 96 sending using the printer control panel 94 setting the date and...
... 83 creating shortcuts using the Embedded Web Server 97 creating shortcuts using the printer control panel 98 fax setup 82 forwarding faxes 100 improving fax quality 103 making a fax lighter or darker 99 sending a fax at a scheduled time 100 sending using the computer 95, 96 sending using the printer control panel 94 setting the date and...


