User's Guide
Page 2
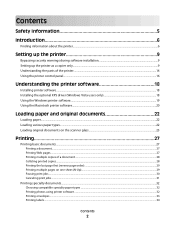
... the parts of the printer...14 Using the printer control panel...16 Understanding the printer software 18 Installing printer software...18 Installing the optional XPS driver (Windows Vista users only 18 Using the Windows printer software...19 Using the Macintosh printer software...20 Loading paper and original documents 22 Loading paper...22 Loading various paper types...22 Loading original documents on the scanner glass 25 Printing 27 Printing basic documents...27 Printing a document...27 Printing Web pages...27 Printing multiple copies of a document...28 Collating printed copies...28...
... the parts of the printer...14 Using the printer control panel...16 Understanding the printer software 18 Installing printer software...18 Installing the optional XPS driver (Windows Vista users only 18 Using the Windows printer software...19 Using the Macintosh printer software...20 Loading paper and original documents 22 Loading paper...22 Loading various paper types...22 Loading original documents on the scanner glass 25 Printing 27 Printing basic documents...27 Printing a document...27 Printing Web pages...27 Printing multiple copies of a document...28 Collating printed copies...28...
User's Guide
Page 3
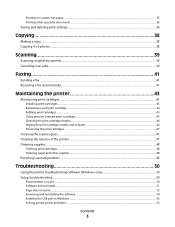
... ...46 Preserving the print cartridges ...47 Cleaning the scanner glass...47 Cleaning the exterior of the printer...47 Ordering supplies...48 Ordering print cartridges ...48 Ordering paper and other supplies...48 Recycling Lexmark products...49 Troubleshooting 50 Using the printer troubleshooting software (Windows only 50 Setup troubleshooting...50 Power button is not lit ...50 Software did not install...51 Page does not print...52 Removing and reinstalling the software ...54 Enabling the USB port in Windows ...55 Solving printer power problems ...56 Contents 3
... ...46 Preserving the print cartridges ...47 Cleaning the scanner glass...47 Cleaning the exterior of the printer...47 Ordering supplies...48 Ordering print cartridges ...48 Ordering paper and other supplies...48 Recycling Lexmark products...49 Troubleshooting 50 Using the printer troubleshooting software (Windows only 50 Setup troubleshooting...50 Power button is not lit ...50 Software did not install...51 Page does not print...52 Removing and reinstalling the software ...54 Enabling the USB port in Windows ...55 Solving printer power problems ...56 Contents 3

User's Guide
Page 5
... to meet strict global safety standards with this product or make any electrical or cabling connections, such as furniture and walls. The safety features of some parts may not always be obvious. Refer service or repairs, other replacement parts. Inspect the power cord regularly for the use of specific Lexmark components. SAVE THESE INSTRUCTIONS. CAUTION-POTENTIAL INJURY: Do not twist, bind, crush, or...
... to meet strict global safety standards with this product or make any electrical or cabling connections, such as furniture and walls. The safety features of some parts may not always be obvious. Refer service or repairs, other replacement parts. Inspect the power cord regularly for the use of specific Lexmark components. SAVE THESE INSTRUCTIONS. CAUTION-POTENTIAL INJURY: Do not twist, bind, crush, or...
User's Guide
Page 6
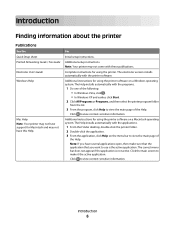
... view context-sensitive information. Introduction Finding information about the printer Publications See the Quick Setup sheet Printed Networking Guide / Fax Guide Electronic User's Guide Windows Help Mac Help Note: Your printer may not have support for Macintosh and may not come with these publications. The electronic version installs automatically with the printer software. Additional instructions for using the printer software on a Windows operating system. The correct menu bar does not appear if the application is the active...
... view context-sensitive information. Introduction Finding information about the printer Publications See the Quick Setup sheet Printed Networking Guide / Fax Guide Electronic User's Guide Windows Help Mac Help Note: Your printer may not have support for Macintosh and may not come with these publications. The electronic version installs automatically with the printer software. Additional instructions for using the printer software on a Windows operating system. The correct menu bar does not appear if the application is the active...
User's Guide
Page 9
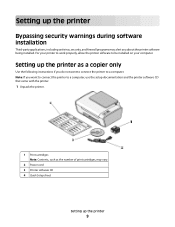
... connect the printer to a computer, use the setup documentation and the printer software CD that came with the printer. 1 Unpack the printer. 1 Print cartridges Note: Contents, such as the number of print cartridges, may vary. 2 Power cord 3 Printer software CD 4 Quick Setup sheet Setting up the printer as a copier only Use the following instructions if you about the printer software being installed. For your printer to work properly, allow the printer software to a computer. Setting up the printer 9 Note: If you want to connect...
... connect the printer to a computer, use the setup documentation and the printer software CD that came with the printer. 1 Unpack the printer. 1 Print cartridges Note: Contents, such as the number of print cartridges, may vary. 2 Power cord 3 Printer software CD 4 Quick Setup sheet Setting up the printer as a copier only Use the following instructions if you about the printer software being installed. For your printer to work properly, allow the printer software to a computer. Setting up the printer 9 Note: If you want to connect...
User's Guide
Page 14
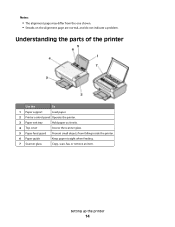
Notes: • The alignment page may differ from falling inside the printer. 6 Paper guide Keep paper straight when feeding. 7 Scanner glass Copy, scan, fax, or remove an item. Setting up the printer 14 Understanding the parts of the printer Use the To 1 Paper support Load paper. 2 Printer control panel Operate the printer. 3 Paper exit tray Hold paper as it exits. 4 Top cover Access the scanner glass. 5 Paper feed guard Prevent small objects from the one shown. • Streaks on the alignment page are normal, and do not indicate a problem.
Notes: • The alignment page may differ from falling inside the printer. 6 Paper guide Keep paper straight when feeding. 7 Scanner glass Copy, scan, fax, or remove an item. Setting up the printer 14 Understanding the parts of the printer Use the To 1 Paper support Load paper. 2 Printer control panel Operate the printer. 3 Paper exit tray Hold paper as it exits. 4 Top cover Access the scanner glass. 5 Paper feed guard Prevent small objects from the one shown. • Streaks on the alignment page are normal, and do not indicate a problem.
User's Guide
Page 15
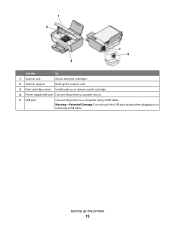
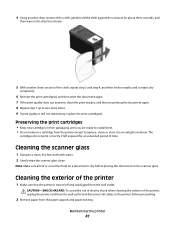
Use the To 1 Scanner unit Access the print cartridges. 2 Scanner support Hold up the printer 15 Warning-Potential Damage: Do not touch the USB port except when plugging in or removing a USB cable. Setting up the scanner unit. 3 Print cartridge carrier Install, replace, or remove a print cartridge. 4 Power supply with port Connect the printer to a power source. 5 USB port Connect the printer to a computer using a USB cable.
Use the To 1 Scanner unit Access the print cartridges. 2 Scanner support Hold up the printer 15 Warning-Potential Damage: Do not touch the USB port except when plugging in or removing a USB cable. Setting up the scanner unit. 3 Print cartridge carrier Install, replace, or remove a print cartridge. 4 Power supply with port Connect the printer to a power source. 5 USB port Connect the printer to a computer using a USB cable.
User's Guide
Page 18
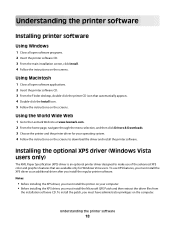
... extract the driver files from the installation software CD. Understanding the printer software Installing printer software Using Windows 1 Close all open software programs. 2 Insert the printer software CD. 3 From the main installation screen, click Install. 4 Follow the instructions on the screens. Installing the optional XPS driver (Windows Vista users only) The XML Paper Specification (XPS) driver is an optional printer driver designed to make use XPS features, you must install the XPS driver as an additional driver after you must have administrator privileges...
... extract the driver files from the installation software CD. Understanding the printer software Installing printer software Using Windows 1 Close all open software programs. 2 Insert the printer software CD. 3 From the main installation screen, click Install. 4 Follow the instructions on the screens. Installing the optional XPS driver (Windows Vista users only) The XML Paper Specification (XPS) driver is an optional printer driver designed to make use XPS features, you must install the XPS driver as an additional driver after you must have administrator privileges...
User's Guide
Page 19
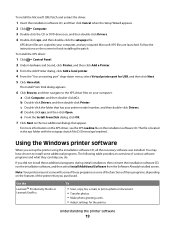
... setupxps file. XPS driver files are copied to install some of the functions of the printer that you set up the printer using the installation software CD, all the necessary software was installed. Note: Your printer may have chosen to your computer: a Click Computer, and then double-click (C:). Use the LexmarkTM Productivity Studio or Lexmark FastPics To • Scan, copy, fax, e-mail, or print a photo or document. • Transfer photos. • Make photo greeting cards. • Adjust settings for USB, and...
... setupxps file. XPS driver files are copied to install some of the functions of the printer that you set up the printer using the installation software CD, all the necessary software was installed. Note: Your printer may have chosen to your computer: a Click Computer, and then double-click (C:). Use the LexmarkTM Productivity Studio or Lexmark FastPics To • Scan, copy, fax, e-mail, or print a photo or document. • Transfer photos. • Make photo greeting cards. • Adjust settings for USB, and...
User's Guide
Page 20
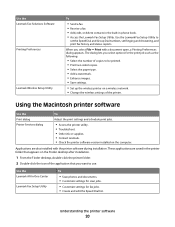
... printer software during installation. Applications are saved in phone book. • Access the Lexmark Fax Setup Utility. Use the Lexmark All-In-One Center Lexmark Fax Setup Utility To • Scan photos and documents. • Customize settings for scan jobs. • Customize settings for the print job such as the following: • Select the number of copies to be printed. • Print two-sided copies. • Select the paper type. • Add a watermark. • Enhance images. • Save settings. • Set up the wireless printer on a wireless network...
... printer software during installation. Applications are saved in phone book. • Access the Lexmark Fax Setup Utility. Use the Lexmark All-In-One Center Lexmark Fax Setup Utility To • Scan photos and documents. • Customize settings for scan jobs. • Customize settings for the print job such as the following: • Select the number of copies to be printed. • Print two-sided copies. • Select the paper type. • Add a watermark. • Enhance images. • Save settings. • Set up the wireless printer on a wireless network...

User's Guide
Page 21
Lexmark Wireless Setup Assistant Set up the printer on the features of a memory device inserted into a network printer. • Transfer photos and documents from a memory device to the computer over a network. Note: Your printer may not come with cartridge installation. • Print a test page. • Print an alignment page. • Clean the print cartridge nozzles. • Order ink or supplies. • Register the printer. • Contact customer support. Understanding the printer software 21 Use the To Lexmark Network Card Reader • View the contents of...
Lexmark Wireless Setup Assistant Set up the printer on the features of a memory device inserted into a network printer. • Transfer photos and documents from a memory device to the computer over a network. Note: Your printer may not come with cartridge installation. • Print a test page. • Print an alignment page. • Clean the print cartridge nozzles. • Order ink or supplies. • Register the printer. • Contact customer support. Understanding the printer software 21 Use the To Lexmark Network Card Reader • View the contents of...
User's Guide
Page 32
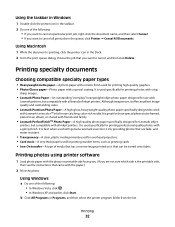
... specialty documents Choosing compatible specialty paper types • Heavyweight matte paper-A photo paper with a matte finish used specifically for printing professional quality photos with crisp, sharp images. • Lexmark Photo Paper-An outstanding "everyday" heavyweight inkjet photo paper designed for printing sturdier items, such as greeting cards. • Iron-On transfer-A type of media that has a reverse image printed on it offers excellent image quality and outstanding value. • Lexmark Premium Photo Paper-A high-gloss, heavyweight quality photo paper specifically...
... specialty documents Choosing compatible specialty paper types • Heavyweight matte paper-A photo paper with a matte finish used specifically for printing professional quality photos with crisp, sharp images. • Lexmark Photo Paper-An outstanding "everyday" heavyweight inkjet photo paper designed for printing sturdier items, such as greeting cards. • Iron-On transfer-A type of media that has a reverse image printed on it offers excellent image quality and outstanding value. • Lexmark Premium Photo Paper-A high-gloss, heavyweight quality photo paper specifically...
User's Guide
Page 36
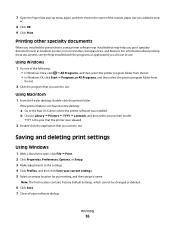
... empty location for your printer model. b Choose Library Printers YYYY Lexmark, and then select your setting, and then assign a name. Note: The first location contains Factory Default Settings, which cannot be changed or deleted. 6 Click Save. 7 Close all open , click File Print. 2 Click Properties, Preferences, Options, or Setup. 3 Make adjustments to use. Printing other specialty documents When you installed the printer driver, some printer software was installed that may help you print specialty documents such...
... empty location for your printer model. b Choose Library Printers YYYY Lexmark, and then select your setting, and then assign a name. Note: The first location contains Factory Default Settings, which cannot be changed or deleted. 6 Click Save. 7 Close all open , click File Print. 2 Click Properties, Preferences, Options, or Setup. 3 Make adjustments to use. Printing other specialty documents When you installed the printer driver, some printer software was installed that may help you print specialty documents such...
User's Guide
Page 47
... ink or corrective fluid on the scanner glass. Cleaning the scanner glass 1 Dampen a clean, lint-free cloth with water. 2 Gently wipe the scanner glass clean. Preserving the print cartridges • Keep new cartridges in the direction shown. 5 With another clean section of the cloth, gently hold the cloth against the contacts for an extended period of time. Note: Make sure all cables to the printer before placing the document on a document...
... ink or corrective fluid on the scanner glass. Cleaning the scanner glass 1 Dampen a clean, lint-free cloth with water. 2 Gently wipe the scanner glass clean. Preserving the print cartridges • Keep new cartridges in the direction shown. 5 With another clean section of the cloth, gently hold the cloth against the contacts for an extended period of time. Note: Make sure all cables to the printer before placing the document on a document...

User's Guide
Page 50
... printer maintenance tasks and customer support. Method 2 1 Do one of the following : PRESS POWER BUTTON Make sure the printer is not lit These are possible solutions. Setup troubleshooting Power button is on an error message dialog, click the For additional assistance, use the Lexmark Service Center link. To open the Lexmark Service Center, use one of these methods: Method 1 If it appears on by -step troubleshooting help and contains links to turn the printer...
... printer maintenance tasks and customer support. Method 2 1 Do one of the following : PRESS POWER BUTTON Make sure the printer is not lit These are possible solutions. Setup troubleshooting Power button is on an error message dialog, click the For additional assistance, use the Lexmark Service Center link. To open the Lexmark Service Center, use one of these methods: Method 1 If it appears on by -step troubleshooting help and contains links to turn the printer...
User's Guide
Page 51
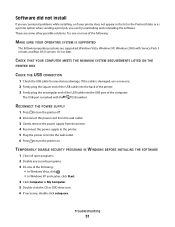
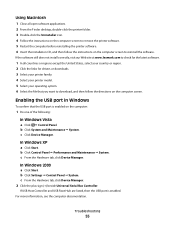
... or DVD drive icon. 6 If necessary, double-click setup.exe. The USB port is damaged, use a new one or more of the computer. Software did not install If you encountered problems while installing, or if your printer does not appear in the list in the Printers folder or as a printer option when sending a print job, you can try uninstalling and reinstalling the software. If the cable is marked with Service Pack...
... or DVD drive icon. 6 If necessary, double-click setup.exe. The USB port is damaged, use a new one or more of the computer. Software did not install If you encountered problems while installing, or if your printer does not appear in the list in the Printers folder or as a printer option when sending a print job, you can try uninstalling and reinstalling the software. If the cable is marked with Service Pack...
User's Guide
Page 55
... or region. 2 Click the links for drivers or downloads. 3 Select your printer family. 4 Select your printer model. 5 Select your operating system. 6 Select the file that the USB port is enabled. In Windows XP a Click Start. b Click System and Maintenance System. b Click Settings Control Panel System. Troubleshooting 55 For more information, see the computer documentation. Enabling the USB port in Windows To confirm that you want to reinstall the software.
... or region. 2 Click the links for drivers or downloads. 3 Select your printer family. 4 Select your printer model. 5 Select your operating system. 6 Select the file that the USB port is enabled. In Windows XP a Click Start. b Click System and Maintenance System. b Click Settings Control Panel System. Troubleshooting 55 For more information, see the computer documentation. Enabling the USB port in Windows To confirm that you want to reinstall the software.

User's Guide
Page 66
... in response to the telephone network, the telephone company will also be connected to the telephone line, ensure the installation of your telephone company or a qualified installer. at www.lexmark.com or your setup documentation for this equipment to your alarm equipment. Contact the state public utility commission, public service commission, or corporation commission for repair or warranty information, contact...
... in response to the telephone network, the telephone company will also be connected to the telephone line, ensure the installation of your telephone company or a qualified installer. at www.lexmark.com or your setup documentation for this equipment to your alarm equipment. Contact the state public utility commission, public service commission, or corporation commission for repair or warranty information, contact...
User's Guide
Page 73
... paper, loading 24 buttons, control panel 4 x 6 color copy 38 buttons, printer control panel 4 x 6 Copy 16 Black Copy 16 Cancel 16 Color Copy 16 Paper Feed 16 Power 16 Scan 16 Up arrow 16 C canceling print jobs 31 scan job 39 cards loading 24 cartridges, print cleaning 46 installing 43 ordering 48 preserving 47 removing 44 using genuine Lexmark 45 wiping 46 cleaning exterior of the printer 47 cleaning print cartridge nozzles 46 copying 38 4 x 6 photos 38 custom-size paper, loading 24, 35 custom-size paper, printing 35 D document multiple copies, printing 28 documents loading on scanner glass...
... paper, loading 24 buttons, control panel 4 x 6 color copy 38 buttons, printer control panel 4 x 6 Copy 16 Black Copy 16 Cancel 16 Color Copy 16 Paper Feed 16 Power 16 Scan 16 Up arrow 16 C canceling print jobs 31 scan job 39 cards loading 24 cartridges, print cleaning 46 installing 43 ordering 48 preserving 47 removing 44 using genuine Lexmark 45 wiping 46 cleaning exterior of the printer 47 cleaning print cartridge nozzles 46 copying 38 4 x 6 photos 38 custom-size paper, loading 24, 35 custom-size paper, printing 35 D document multiple copies, printing 28 documents loading on scanner glass...

User's Guide
Page 74
... print settings 36 scanner glass 14 cleaning 47 loading documents 25, 39 scanner support 15 scanner unit 15 scanning canceling a scan 39 using the printer control panel 39 security information 9 Service Center 50 setup troubleshooting page does not print 52 power button is not lit 50 software did not install 51 setup, printer 9 software removing and reinstalling 54 Service Center 50 XPS driver 18 software did not install 51 solving printer communication problems 56 specialty documents, printing 36 Index 74 T telecommunication notices 66, 67, 68, 69 Toolbar printing a Web page...
... print settings 36 scanner glass 14 cleaning 47 loading documents 25, 39 scanner support 15 scanner unit 15 scanning canceling a scan 39 using the printer control panel 39 security information 9 Service Center 50 setup troubleshooting page does not print 52 power button is not lit 50 software did not install 51 setup, printer 9 software removing and reinstalling 54 Service Center 50 XPS driver 18 software did not install 51 solving printer communication problems 56 specialty documents, printing 36 Index 74 T telecommunication notices 66, 67, 68, 69 Toolbar printing a Web page...


