User's Guide
Page 14
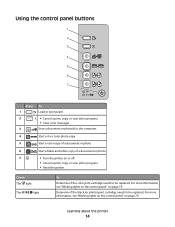
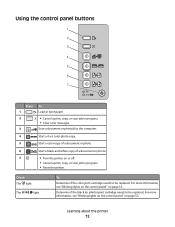
... photo(s) to the computer. 4 Start a 4 x 6 color photo copy. 5 Start a color copy of a document or photo. 6 Start a black-and-white copy of a document or photo. 7 • Turn the printer on page 70.
... photo(s) to the computer. 4 Start a 4 x 6 color photo copy. 5 Start a color copy of a document or photo. 6 Start a black-and-white copy of a document or photo. 7 • Turn the printer on page 70.
User's Guide
Page 18
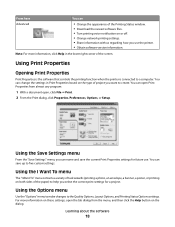
... make changes to a computer. From here Advanced You can • Change the appearance of the Printing Status window. • Download the newest software files. • Turn printing voice notification on the dialog. Using the Save Settings menu From the "Save Settings" menu, you want to five custom settings. Using the I Want...
... make changes to a computer. From here Advanced You can • Change the appearance of the Printing Status window. • Download the newest software files. • Turn printing voice notification on the dialog. Using the Save Settings menu From the "Save Settings" menu, you want to five custom settings. Using the I Want...
User's Guide
Page 46
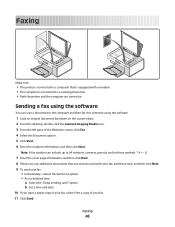
... to send with your fax, add these symbols 7 Enter the cover page information, and then click Next. 8 If there are turned on the scanner glass. 2 From the desktop, double-click the Lexmark Imaging Studio icon. 3 From the left pane of your fax: • Immediately-Select the Send now option. • At a scheduled...
... to send with your fax, add these symbols 7 Enter the cover page information, and then click Next. 8 If there are turned on the scanner glass. 2 From the desktop, double-click the Lexmark Imaging Studio icon. 3 From the left pane of your fax: • Immediately-Select the Send now option. • At a scheduled...

User's Guide
Page 49
... rings before receiving a fax automatically 1 From the desktop, double-click the Lexmark Imaging Studio icon. 2 From the left pane of times you want . 7 Click OK. Receiving Faxes • Select auto answer options. • Manage blocked faxes. • Choose whether to turn on the first try. • Select a default scanning device. Faxing 49...
... rings before receiving a fax automatically 1 From the desktop, double-click the Lexmark Imaging Studio icon. 2 From the left pane of times you want . 7 Click OK. Receiving Faxes • Select auto answer options. • Manage blocked faxes. • Choose whether to turn on the first try. • Select a default scanning device. Faxing 49...
User's Guide
Page 59
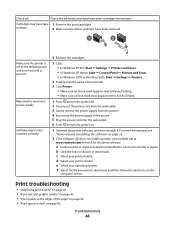
... your printer model. For more information, see "Blinking lights on the control panel" on the computer screen to reinstall the software. 1 Press to turn the printer off and then restart your computer. 2 Click Cancel on all open software applications. 2 Disable any obvious damage. 2 Firmly plug the square... "Removing and reinstalling the software" on page 72. 2 If the software still does not install correctly, visit our Web site at www.lexmark.com to turn the printer on. 1 Close all New Hardware Found screens. 3 Insert the CD, and then follow the directions on page 58. USB ...
... your printer model. For more information, see "Blinking lights on the control panel" on the computer screen to reinstall the software. 1 Press to turn the printer off and then restart your computer. 2 Click Cancel on all open software applications. 2 Disable any obvious damage. 2 Firmly plug the square... "Removing and reinstalling the software" on page 72. 2 If the software still does not install correctly, visit our Web site at www.lexmark.com to turn the printer on. 1 Close all New Hardware Found screens. 3 Insert the CD, and then follow the directions on page 58. USB ...
User's Guide
Page 60
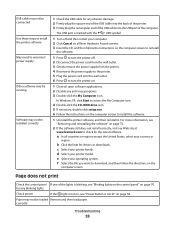
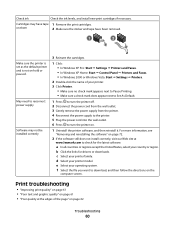
...Make sure no check mark appears next to Pause Printing. • Make sure a check mark does appear next to Set As Default. 1 Press to turn the printer off. 2 Disconnect the power cord from the wall outlet. 3 Gently remove the power supply from the printer. 4 Reconnect the power supply ... latest software. f Select the file you want to download, and then follow the directions on page 61 • "Poor quality at www.lexmark.com to turn the printer on page 62 Troubleshooting 60 on hold or paused. d Select your printer family. Print troubleshooting • "Improving print quality" on...
...Make sure no check mark appears next to Pause Printing. • Make sure a check mark does appear next to Set As Default. 1 Press to turn the printer off. 2 Disconnect the power cord from the wall outlet. 3 Gently remove the power supply from the printer. 4 Reconnect the power supply ... latest software. f Select the file you want to download, and then follow the directions on page 61 • "Poor quality at www.lexmark.com to turn the printer on page 62 Troubleshooting 60 on hold or paused. d Select your printer family. Print troubleshooting • "Improving print quality" on...
User's Guide
Page 65
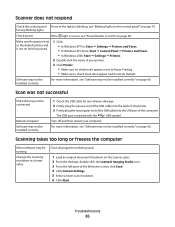
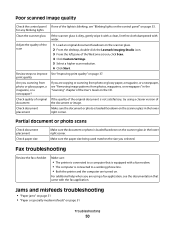
...140; Control Panel Œ Printers and Faxes. • In Windows 2000: Start Œ Settings Œ Printers. 2 Double-click the name of the computer. Turn off and then restart your printer. 3 Click Printer. • Make sure no check mark appears next to Pause Printing. • Make sure a check mark ...a lower value Close all programs not being used. 1 Load an original document facedown on the scanner glass. 2 From the desktop, double-click the Lexmark Imaging Studio icon. 3 From the left pane of the lights is not on , see "Software may not be installed correctly" on page 60. ...
...140; Control Panel Œ Printers and Faxes. • In Windows 2000: Start Œ Settings Œ Printers. 2 Double-click the name of the computer. Turn off and then restart your printer. 3 Click Printer. • Make sure no check mark appears next to Pause Printing. • Make sure a check mark ...a lower value Close all programs not being used. 1 Load an original document facedown on the scanner glass. 2 From the desktop, double-click the Lexmark Imaging Studio icon. 3 From the left pane of the lights is not on , see "Software may not be installed correctly" on page 60. ...
User's Guide
Page 68
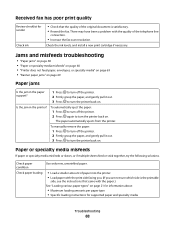
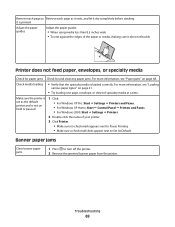
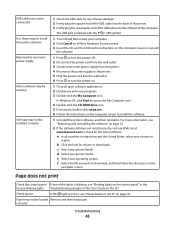
...jams Is the jam in the printer? Is the jam in the paper support? 1 Press to turn off the printer. 2 Firmly grasp the paper, and gently pull it out. 3 Press to turn the printer back on. Paper or specialty media misfeeds If paper or specialty media misfeeds or skews,...loading instructions for supported paper and specialty media Troubleshooting 68 To automatically eject the paper: 1 Press to turn off the printer. 2 Firmly grasp the paper, and gently pull it out. 3 Press to turn the printer back on. Check the ink levels, and install a new print cartridge if necessary. The ...
...jams Is the jam in the printer? Is the jam in the paper support? 1 Press to turn off the printer. 2 Firmly grasp the paper, and gently pull it out. 3 Press to turn the printer back on. Paper or specialty media misfeeds If paper or specialty media misfeeds or skews,...loading instructions for supported paper and specialty media Troubleshooting 68 To automatically eject the paper: 1 Press to turn off the printer. 2 Firmly grasp the paper, and gently pull it out. 3 Press to turn the printer back on. Check the ink levels, and install a new print cartridge if necessary. The ...
User's Guide
Page 69
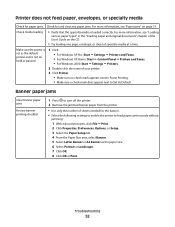
... of your printer. 3 Click Printer. • Make sure no check mark appears next to Pause Printing. • Make sure a check mark does appear next to turn off the printer. 2 Remove the jammed banner paper from the printer. Check media loading • Verify that the specialty media is not on page 21...
... of your printer. 3 Click Printer. • Make sure no check mark appears next to Pause Printing. • Make sure a check mark does appear next to turn off the printer. 2 Remove the jammed banner paper from the printer. Check media loading • Verify that the specialty media is not on page 21...
User's Guide
Page 74
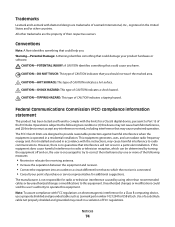
...of a substitute cable not properly shielded and grounded may cause harmful interference to Part 15 of FCC regulations. Trademarks Lexmark and Lexmark with the limits for additional suggestions. Conventions Note: A Note identifies something that to provide reasonable protection against harmful ...CAUTION-POTENTIAL INJURY: A CAUTION identifies something that could help you harm. This equipment generates, uses, and can be determined by turning the equipment off and on, the user is connected. • Consult your product hardware or software. Notices 74 Warning-Potential Damage...
...of a substitute cable not properly shielded and grounded may cause harmful interference to Part 15 of FCC regulations. Trademarks Lexmark and Lexmark with the limits for additional suggestions. Conventions Note: A Note identifies something that to provide reasonable protection against harmful ...CAUTION-POTENTIAL INJURY: A CAUTION identifies something that could help you harm. This equipment generates, uses, and can be determined by turning the equipment off and on, the user is connected. • Consult your product hardware or software. Notices 74 Warning-Potential Damage...
User's Guide
Page 79
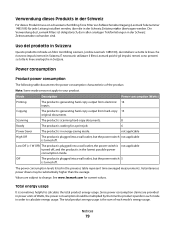
... in Svizzera Questo prodotto richiede un filtro toni Billing svizzero, (codice Lexmark 14B5109), da installare su tutte le linee che ricevono impulsi remoti in Svizzera. È necessario utilizzare il filtro Lexmark poiché gli impulsi remoti sono presenti su tutte le linee analogiche... in der Schweiz Zeitsteuertakte vorhanden sind. Mode Printing Copying Description The product is turned off. Low Off ( Die Verwendung des Lexmark Filters ist obligatorisch, da in allen analogen Telefonleitungen in Svizzera. not applicable The product is plugged into a...
... in Svizzera Questo prodotto richiede un filtro toni Billing svizzero, (codice Lexmark 14B5109), da installare su tutte le linee che ricevono impulsi remoti in Svizzera. È necessario utilizzare il filtro Lexmark poiché gli impulsi remoti sono presenti su tutte le linee analogiche... in der Schweiz Zeitsteuertakte vorhanden sind. Mode Printing Copying Description The product is turned off. Low Off ( Die Verwendung des Lexmark Filters ist obligatorisch, da in allen analogen Telefonleitungen in Svizzera. not applicable The product is plugged into a...
Getting Started
Page 12
... photo(s) to the computer. 4 Start a 4 x 6 color photo copy. 5 Start a color copy of a document or photo. 6 Start a black-and-white copy of a document or photo. 7 • Turn the printer on page 53. For more information, see "Blinking lights on the control panel" on page 53.
... photo(s) to the computer. 4 Start a 4 x 6 color photo copy. 5 Start a color copy of a document or photo. 6 Start a black-and-white copy of a document or photo. 7 • Turn the printer on page 53. For more information, see "Blinking lights on the control panel" on page 53.

Getting Started
Page 16
... Toolbar lets you browse the Web using Microsoft Windows Internet Explorer version 5.5 or later. Advanced • Change the appearance of the Printing Status window. • Turn printing voice notification on or off. • Change network printing settings. • Share information with us by telephone or on the type of the screen...
... Toolbar lets you browse the Web using Microsoft Windows Internet Explorer version 5.5 or later. Advanced • Change the appearance of the Printing Status window. • Turn printing voice notification on or off. • Change network printing settings. • Share information with us by telephone or on the type of the screen...

Getting Started
Page 33
... printer is connected to a computer that you want to a working phone line. • Both the printer and the computer are turned on the scanner glass. 2 From the desktop, double-click the Lexmark Imaging Studio icon. 3 From the left pane of your fax. 11 Click Send. Sending a fax using the software. 1 Load an...
... printer is connected to a computer that you want to a working phone line. • Both the printer and the computer are turned on the scanner glass. 2 From the desktop, double-click the Lexmark Imaging Studio icon. 3 From the left pane of your fax. 11 Click Send. Sending a fax using the software. 1 Load an...
Getting Started
Page 43
...of the printer. 3 Firmly plug the rectangular end of the USB cable into the wall outlet. 6 Press to turn the printer on. 1 Close all countries or regions except the United States, select your country or region. correctly Troubleshooting... you want to download, and then follow the instructions on the computer screen to reinstall the software. 1 Press to turn the printer off. 2 Disconnect the power cord from the wall outlet. 3 Gently remove the power supply from the ... software still does not install correctly, visit our Web site at www.lexmark.com to check for drivers or downloads.
...of the printer. 3 Firmly plug the rectangular end of the USB cable into the wall outlet. 6 Press to turn the printer on. 1 Close all countries or regions except the United States, select your country or region. correctly Troubleshooting... you want to download, and then follow the instructions on the computer screen to reinstall the software. 1 Press to turn the printer off. 2 Disconnect the power cord from the wall outlet. 3 Gently remove the power supply from the ... software still does not install correctly, visit our Web site at www.lexmark.com to check for drivers or downloads.
Getting Started
Page 44
...Make sure no check mark appears next to Pause Printing. • Make sure a check mark does appear next to Set As Default. 1 Press to turn the printer on the computer screen. Print troubleshooting • "Improving print quality" on page 45 • "Poor text and graphic quality" on page 45... • "Poor quality at www.lexmark.com to turn the printer off. 2 Disconnect the power cord from the wall outlet. 3 Gently remove the power supply from the printer. 4 Reconnect the power supply...
...Make sure no check mark appears next to Pause Printing. • Make sure a check mark does appear next to Set As Default. 1 Press to turn the printer on the computer screen. Print troubleshooting • "Improving print quality" on page 45 • "Poor text and graphic quality" on page 45... • "Poor quality at www.lexmark.com to turn the printer off. 2 Disconnect the power cord from the wall outlet. 3 Gently remove the power supply from the printer. 4 Reconnect the power supply...

Getting Started
Page 49
Turn off and then restart your printer. 3 Click Printer. • Make sure no check mark appears next to Pause Printing. • Make sure a check mark does ... next to a lower value Close all programs not being used. 1 Load an original document facedown on the scanner glass. 2 From the desktop, double-click the Lexmark Imaging Studio icon. 3 From the left pane of the computer. Make sure the printer is set as the default printer and is marked with the...
Turn off and then restart your printer. 3 Click Printer. • Make sure no check mark appears next to Pause Printing. • Make sure a check mark does ... next to a lower value Close all programs not being used. 1 Load an original document facedown on the scanner glass. 2 From the desktop, double-click the Lexmark Imaging Studio icon. 3 From the left pane of the computer. Make sure the printer is set as the default printer and is marked with the...
Getting Started
Page 50
...fax application. Adjust the quality of the scan 1 Load an original document facedown on the scanner glass. 2 From the desktop, double-click the Lexmark Imaging Studio icon. 3 From the left pane of document the document or image. for any blinking lights Clean the scanner glass If the scanner glass...quality Check the control panel If one of the lights is connected to a working phone line. • Both the printer and the computer are turned on. Fax troubleshooting Review the fax checklist Make sure: • The printer is connected to improve See "Improving print quality" on page 51 ...
...fax application. Adjust the quality of the scan 1 Load an original document facedown on the scanner glass. 2 From the desktop, double-click the Lexmark Imaging Studio icon. 3 From the left pane of document the document or image. for any blinking lights Clean the scanner glass If the scanner glass...quality Check the control panel If one of the lights is connected to a working phone line. • Both the printer and the computer are turned on. Fax troubleshooting Review the fax checklist Make sure: • The printer is connected to improve See "Improving print quality" on page 51 ...

Getting Started
Page 51
... as it exits, and let it does not buckle Troubleshooting 51 To manually remove the paper: 1 Press to turn off the printer. 2 Firmly grasp the paper, and gently pull it out. 3 Press to turn the printer back on . Check paper loading • Load a smaller amount of paper into the printer. • Load... • "Banner paper jams" on page 52 Paper jams Is the jam in the paper support? 1 Press to turn off the printer. 2 Firmly grasp the paper, and gently pull it out. 3 Press to turn the printer back on the CD. Check paper condition Use only new, unwrinkled paper. Is the jam in...
... as it exits, and let it does not buckle Troubleshooting 51 To manually remove the paper: 1 Press to turn off the printer. 2 Firmly grasp the paper, and gently pull it out. 3 Press to turn the printer back on . Check paper loading • Load a smaller amount of paper into the printer. • Load... • "Banner paper jams" on page 52 Paper jams Is the jam in the paper support? 1 Press to turn off the printer. 2 Firmly grasp the paper, and gently pull it out. 3 Press to turn the printer back on the CD. Check paper condition Use only new, unwrinkled paper. Is the jam in...
Getting Started
Page 52
... paper and original documents" chapter of the User's Guide on page 51. Banner paper jams Clear banner paper jams Review banner printing checklist 1 Press to turn off the printer. 2 Remove the jammed banner paper from the printer. • Use only the number of sheets needed for and clear any paper jams...
... paper and original documents" chapter of the User's Guide on page 51. Banner paper jams Clear banner paper jams Review banner printing checklist 1 Press to turn off the printer. 2 Remove the jammed banner paper from the printer. • Use only the number of sheets needed for and clear any paper jams...


