User's Guide
Page 9
...limited warranty, see the printed warranty that shipped with your printer model. 5 From the Support Tools section, click e- materials and workmanship for a www.lexmark.com. period of Limited Warranty section, click Inkjet & All-In-One Printers. 4 Scroll through the Web page to view the warranty.... Visit our Web site at printer. Note: Support numbers and times may not be free of defects...
...limited warranty, see the printed warranty that shipped with your printer model. 5 From the Support Tools section, click e- materials and workmanship for a www.lexmark.com. period of Limited Warranty section, click Inkjet & All-In-One Printers. 4 Scroll through the Web page to view the warranty.... Visit our Web site at printer. Note: Support numbers and times may not be free of defects...

User's Guide
Page 21
... the edges of the paper. Loading various paper types Load up to Make sure 100 sheets of plain paper • The paper is designed for inkjet printers. • If you are using photo, glossy, or heavyweight matte paper, you load it with the glossy or printable side facing you. (If you...adjust the paper guides to avoid ink smudging. Loading paper and original documents Loading paper 1 Make sure: • You use paper designed for use with inkjet printers. • The paper is loaded in the center of the paper support. • The paper guides rest against the edges of the paper. 25 sheets...
... the edges of the paper. Loading various paper types Load up to Make sure 100 sheets of plain paper • The paper is designed for inkjet printers. • If you are using photo, glossy, or heavyweight matte paper, you load it with the glossy or printable side facing you. (If you...adjust the paper guides to avoid ink smudging. Loading paper and original documents Loading paper 1 Make sure: • You use paper designed for use with inkjet printers. • The paper is loaded in the center of the paper support. • The paper guides rest against the edges of the paper. 25 sheets...

User's Guide
Page 22
...Do not use envelopes that have metal clasps, string ties, or metal folding bars. Remove each strip faces away from you and down toward the printer. • The transparencies are not recommended. • Transparencies require more drying time. Note: Labels require more drying time. Envelopes require more drying...envelopes faces you. • The stamp location is in the upper left corner. • The envelopes are designed for use with inkjet printers. • The envelopes are loaded in the center of the paper support. • The paper guides rest against the edges of the labels....
...Do not use envelopes that have metal clasps, string ties, or metal folding bars. Remove each strip faces away from you and down toward the printer. • The transparencies are not recommended. • Transparencies require more drying time. Note: Labels require more drying time. Envelopes require more drying...envelopes faces you. • The stamp location is in the upper left corner. • The envelopes are designed for use with inkjet printers. • The envelopes are loaded in the center of the paper support. • The paper guides rest against the edges of the labels....

Getting Started
Page 7
... Warranty section, click Inkjet & All-In-One Printers. 4 Scroll through the Web page to find (rest of defects in some instances. 1 Click CUSTOMER SUPPORT. 2 Click Technical Support. 3 Select your printer family. 4 Select your printer. 6 Complete the form, and then click Submit Request. this printer will be available in printer, or set forth at www.lexmark.com. Note...
... Warranty section, click Inkjet & All-In-One Printers. 4 Scroll through the Web page to find (rest of defects in some instances. 1 Click CUSTOMER SUPPORT. 2 Click Technical Support. 3 Select your printer family. 4 Select your printer. 6 Complete the form, and then click Submit Request. this printer will be available in printer, or set forth at www.lexmark.com. Note...
Getting Started
Page 19
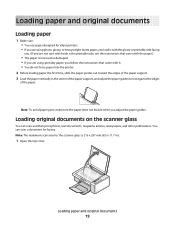
... you are not sure which side is the printable side, see the instructions that came with it. • You do not force paper into the printer. 2 Before loading paper the first time, slide the paper guides out toward the edges of the paper support. 3 Load the paper vertically in .). 1 Open the..., and adjust the paper guides to rest against the edges of the paper. Loading original documents on the scanner glass You can scan a document for inkjet printers. • If you are using photo, glossy, or heavyweight matte paper, you load it with the glossy or printable side facing you. (If you are...
... you are not sure which side is the printable side, see the instructions that came with it. • You do not force paper into the printer. 2 Before loading paper the first time, slide the paper guides out toward the edges of the paper support. 3 Load the paper vertically in .). 1 Open the..., and adjust the paper guides to rest against the edges of the paper. Loading original documents on the scanner glass You can scan a document for inkjet printers. • If you are using photo, glossy, or heavyweight matte paper, you load it with the glossy or printable side facing you. (If you are...


