User Guide
Page 2
... 23 Minimizing your printer's environmental impact 25 Saving paper and toner...25 Using recycled paper ...25 Conserving supplies ...25 Saving energy...26 Using Eco‑Mode...26 Adjusting Power Saver ...27 Recycling...27 Recycling Lexmark products ...27 Recycling Lexmark packaging...27 Returning Lexmark cartridges for reuse or recycling 28 Reducing printer noise...28 Loading...
... 23 Minimizing your printer's environmental impact 25 Saving paper and toner...25 Using recycled paper ...25 Conserving supplies ...25 Saving energy...26 Using Eco‑Mode...26 Adjusting Power Saver ...27 Recycling...27 Recycling Lexmark products ...27 Recycling Lexmark packaging...27 Returning Lexmark cartridges for reuse or recycling 28 Reducing printer noise...28 Loading...

User Guide
Page 6
......116 Storing supplies...118 Checking the status of supplies from a network computer 118 Ordering supplies...119 Ordering toner cartridges ...119 Ordering a photoconductor kit ...119 Replacing supplies...120 Replacing the toner cartridge ...120 Replacing the photoconductor kit ...122 Moving the printer to another location 125 Shipping the printer...... or photo print, copies, or scans 129 Check the document placement...129 Check the paper size setting ...129 Reinstall the toner cartridge ...129 Understanding printer messages...130 Close front door ...130 Invalid Engine Code ...130 Contents 6
......116 Storing supplies...118 Checking the status of supplies from a network computer 118 Ordering supplies...119 Ordering toner cartridges ...119 Ordering a photoconductor kit ...119 Replacing supplies...120 Replacing the toner cartridge ...120 Replacing the photoconductor kit ...122 Moving the printer to another location 125 Shipping the printer...... or photo print, copies, or scans 129 Check the document placement...129 Check the paper size setting ...129 Reinstall the toner cartridge ...129 Understanding printer messages...130 Close front door ...130 Invalid Engine Code ...130 Contents 6

User Guide
Page 7
... System Code DO NOT POWER OFF 130 Cartridge is low ...130 Waiting...131 31.yy Replace defective or missing cartridge 131 30 Invalid refill, change toner cartridge...131 32 Replace unsupported cartridge ...131 34 Short paper ...131 37 Insufficient memory to collate job...131 38 Memory full ...131 39 Complex page...
... System Code DO NOT POWER OFF 130 Cartridge is low ...130 Waiting...131 31.yy Replace defective or missing cartridge 131 30 Invalid refill, change toner cartridge...131 32 Replace unsupported cartridge ...131 34 Short paper ...131 37 Insufficient memory to collate job...131 38 Memory full ...131 39 Complex page...
User Guide
Page 8
... Solid black or white streaks appear on transparencies or paper 159 Streaked horizontal lines ...160 Streaked vertical lines...161 Toner fog or background shading appears on the page 161 Toner rubs off ...162 Toner specks ...162 Transparency print quality is poor...163 Embedded Web Server does not open 163 Check the network connections...
... Solid black or white streaks appear on transparencies or paper 159 Streaked horizontal lines ...160 Streaked vertical lines...161 Toner fog or background shading appears on the page 161 Toner rubs off ...162 Toner specks ...162 Transparency print quality is poor...163 Embedded Web Server does not open 163 Check the network connections...
User Guide
Page 25
...print appears on the environment. Saving paper and toner Studies show that may be able to reduce their impact on one or two sides of the Lexmark Web site at www.lexmark.com/environment • The Lexmark recycling program at www.lexmark.com/recycling By selecting certain printer settings or ... This chapter outlines the settings and tasks that as much as printing on page 40. Using recycled paper As an environmentally conscious company, Lexmark supports the use in mind, engineer our packaging to 16 consecutive pages of a multiple‑page document onto one side of a single...
...print appears on the environment. Saving paper and toner Studies show that may be able to reduce their impact on one or two sides of the Lexmark Web site at www.lexmark.com/environment • The Lexmark recycling program at www.lexmark.com/recycling By selecting certain printer settings or ... This chapter outlines the settings and tasks that as much as printing on page 40. Using recycled paper As an environmentally conscious company, Lexmark supports the use in mind, engineer our packaging to 16 consecutive pages of a multiple‑page document onto one side of a single...
User Guide
Page 28
... list. 3 Follow the instructions on EPS foam recycling locations: 1 Visit EPS Recycling International's Web site at www.lexmark.com/recycle. 2 From the Toner Cartridges section, select your printer or cartridge and use the contact information provided. Reducing printer noise Use Quiet Mode to... settings that the cartridge came with your country from landfills annually by the fax speaker and ringer. You may not exist in Lexmark packaging is recyclable where foam recycling facilities exist. For information on the computer screen. Note: See the table for recycling. Minimizing...
... list. 3 Follow the instructions on EPS foam recycling locations: 1 Visit EPS Recycling International's Web site at www.lexmark.com/recycle. 2 From the Toner Cartridges section, select your printer or cartridge and use the contact information provided. Reducing printer noise Use Quiet Mode to... settings that the cartridge came with your country from landfills annually by the fax speaker and ringer. You may not exist in Lexmark packaging is recyclable where foam recycling facilities exist. For information on the computer screen. Note: See the table for recycling. Minimizing...
User Guide
Page 38
... the same environment as the printer for 24 to it properly. Extend the time several days if the storage or transportation environment is too rough, toner cannot fuse to 48 hours before printing. Grain direction Grain refers to high temperatures. Paper and specialty media guidelines 38 Curl Curl is exposed to...
... the same environment as the printer for 24 to it properly. Extend the time several days if the storage or transportation environment is too rough, toner cannot fuse to 48 hours before printing. Grain direction Grain refers to high temperatures. Paper and specialty media guidelines 38 Curl Curl is exposed to...
User Guide
Page 39
... recognition (OCR) forms In some cases, registration can negatively affect paper handling. This information is made from 100% chemically treated pulped wood. mixing results in toner. Unacceptable paper The following paper types are specifically designed for sizes less than or equal to successfully print on these requirements; latex inks might not...
... recognition (OCR) forms In some cases, registration can negatively affect paper handling. This information is made from 100% chemically treated pulped wood. mixing results in toner. Unacceptable paper The following paper types are specifically designed for sizes less than or equal to successfully print on these requirements; latex inks might not...
User Guide
Page 104
... Off is the factory default setting. The printer driver default is the factory default setting. • Selecting a smaller number can help conserve toner. Lightens or darkens the printed output Notes: • 8 is 1200 Image Q. Understanding printer menus 104 The printer chooses between portrait and landscape... menu Menu item Print Resolution 600 dpi 1200 dpi 1200 Image Q 2400 Image Q Pixel Boost Off Fonts Horizontally Vertically Both Directions Toner Darkness 1-10 Enhance Fine Lines On Off Description Specifies the orientation of a multiple‑page sheet Notes: • Auto is ...
... Off is the factory default setting. The printer driver default is the factory default setting. • Selecting a smaller number can help conserve toner. Lightens or darkens the printed output Notes: • 8 is 1200 Image Q. Understanding printer menus 104 The printer chooses between portrait and landscape... menu Menu item Print Resolution 600 dpi 1200 dpi 1200 Image Q 2400 Image Q Pixel Boost Off Fonts Horizontally Vertically Both Directions Toner Darkness 1-10 Enhance Fine Lines On Off Description Specifies the orientation of a multiple‑page sheet Notes: • Auto is ...
User Guide
Page 119
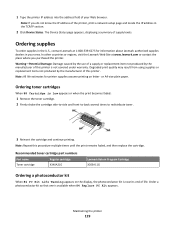
... printer is near its end of this procedure multiple times until the print remains faded, and then replace the cartridge. Recommended toner cartridge part numbers Part name Regular cartridge Toner cartridge X340A21G Lexmark Return Program Cartridge X203A11G Ordering a photoconductor kit When 84 PC Kit Life Warning appears on letter‑ or A4‑...
... printer is near its end of this procedure multiple times until the print remains faded, and then replace the cartridge. Recommended toner cartridge part numbers Part name Regular cartridge Toner cartridge X340A21G Lexmark Return Program Cartridge X203A11G Ordering a photoconductor kit When 84 PC Kit Life Warning appears on letter‑ or A4‑...

User Guide
Page 120
... door. 1@!. 4 GHI 2 ABC 5 JKL 3 DEF 7 PQRS 8 TUV 6 MNO * 9 WXYZ 0 # Maintaining the printer 120 To replace the toner cartridge: 1 Open the front door by pressing the button on the left in your cartridge by printing a network setup page. You can check to redistribute... the toner, and then reinsert it and continue printing. Part name Photoconductor kit Part number X203H22G Replacing supplies Replacing the toner cartridge When 88 Cartridge is left side of the photoconductor kit by printing ...
... door. 1@!. 4 GHI 2 ABC 5 JKL 3 DEF 7 PQRS 8 TUV 6 MNO * 9 WXYZ 0 # Maintaining the printer 120 To replace the toner cartridge: 1 Open the front door by pressing the button on the left in your cartridge by printing a network setup page. You can check to redistribute... the toner, and then reinsert it and continue printing. Part name Photoconductor kit Part number X203H22G Replacing supplies Replacing the toner cartridge When 88 Cartridge is left side of the photoconductor kit by printing ...
User Guide
Page 121
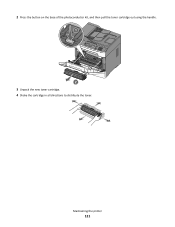
Maintaining the printer 121 2 Press the button on the base of the photoconductor kit, and then pull the toner cartridge out using the handle. 1 1@!. 4 GHI 2 ABC 5 JKL 3 DEF 7 PQRS 8 TUV 6 MNO * 9 WXYZ 0 # 2 3 Unpack the new toner cartridge. 4 Shake the cartridge in all directions to distribute the toner.
Maintaining the printer 121 2 Press the button on the base of the photoconductor kit, and then pull the toner cartridge out using the handle. 1 1@!. 4 GHI 2 ABC 5 JKL 3 DEF 7 PQRS 8 TUV 6 MNO * 9 WXYZ 0 # 2 3 Unpack the new toner cartridge. 4 Shake the cartridge in all directions to distribute the toner.
User Guide
Page 122
... continue to function properly after the photoconductor kit has reached its official end‑of the photoconductor kit by printing a menu settings page. Push the toner cartridge in as far as it will go. Note: The photoconductor kit is one item only. 5 Install the new...
... continue to function properly after the photoconductor kit has reached its official end‑of the photoconductor kit by printing a menu settings page. Push the toner cartridge in as far as it will go. Note: The photoconductor kit is one item only. 5 Install the new...
User Guide
Page 123
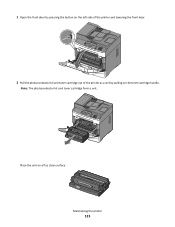
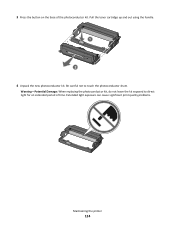
1 Open the front door by pressing the button on the left side of the printer and lowering the front door. 1@!. 4 GHI 2 ABC 5 JKL 3 DEF 7 PQRS 8 TUV 6 MNO * 9 WXYZ 0 # 2 Pull the photoconductor kit and toner cartridge out of the printer as a unit by pulling on a flat, clean surface. Maintaining the printer 123 Note: The photoconductor kit and toner cartridge form a unit. 1@!. 4 GHI 2 ABC 5 JKL 3 DEF 7 PQRS 8 TUV 6 MNO * 9 WXYZ 0 # Place the unit on the toner cartridge handle.
1 Open the front door by pressing the button on the left side of the printer and lowering the front door. 1@!. 4 GHI 2 ABC 5 JKL 3 DEF 7 PQRS 8 TUV 6 MNO * 9 WXYZ 0 # 2 Pull the photoconductor kit and toner cartridge out of the printer as a unit by pulling on a flat, clean surface. Maintaining the printer 123 Note: The photoconductor kit and toner cartridge form a unit. 1@!. 4 GHI 2 ABC 5 JKL 3 DEF 7 PQRS 8 TUV 6 MNO * 9 WXYZ 0 # Place the unit on the toner cartridge handle.
User Guide
Page 124
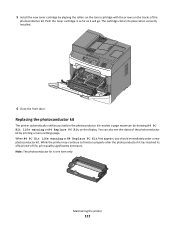
3 Press the button on the base of time. Extended light exposure can cause significant print quality problems. Maintaining the printer 124 Pull the toner cartridge up and out using the handle. 1 2 4 Unpack the new photoconductor kit. Be careful not to direct light for an extended period of the photoconductor kit. Warning-Potential Damage: When replacing the photoconductor kit, do not leave the kit exposed to touch the photoconductor drum.
3 Press the button on the base of time. Extended light exposure can cause significant print quality problems. Maintaining the printer 124 Pull the toner cartridge up and out using the handle. 1 2 4 Unpack the new photoconductor kit. Be careful not to direct light for an extended period of the photoconductor kit. Warning-Potential Damage: When replacing the photoconductor kit, do not leave the kit exposed to touch the photoconductor drum.

User Guide
Page 125
Push the toner cartridge until it clicks into place. 6 Install the unit into the photoconductor kit by aligning the rollers on the guides of the unit with the ... replacing the photoconductor may damage your printer and void your warranty. 8 Close the front door. Maintaining the printer 125 5 Insert the toner cartridge into the printer by aligning the arrows on the toner cartridge with the new photoconductor kit. To reset the counter, see the instruction sheet that came with the tracks.
Push the toner cartridge until it clicks into place. 6 Install the unit into the photoconductor kit by aligning the rollers on the guides of the unit with the ... replacing the photoconductor may damage your printer and void your warranty. 8 Close the front door. Maintaining the printer 125 5 Insert the toner cartridge into the printer by aligning the arrows on the toner cartridge with the new photoconductor kit. To reset the counter, see the instruction sheet that came with the tracks.
User Guide
Page 128
... and messages, and Network/Port menu settings. Restoring Factory Defaults appears. Setting up e‑mail alerts You can view paper tray settings, the level of toner in the print cartridge, the percentage of life remaining in flash memory or on page 22. Restoring the factory default settings If you want to... Settings. 3 Under Other Settings, click E‑mail Alert Setup. 4 Select the items for reference, then print a menu settings page before you an e‑mail when toner is getting low.
... and messages, and Network/Port menu settings. Restoring Factory Defaults appears. Setting up e‑mail alerts You can view paper tray settings, the level of toner in the print cartridge, the percentage of life remaining in flash memory or on page 22. Restoring the factory default settings If you want to... Settings. 3 Under Other Settings, click E‑mail Alert Setup. 4 Select the items for reference, then print a menu settings page before you an e‑mail when toner is getting low.
User Guide
Page 129
... Windows users, specify the size from Print Properties. • For Macintosh users, specify the size from the Page Setup dialog. REINSTALL THE TONER CARTRIDGE Remove and reinstall the toner cartridge, making sure that it is blank or displays only diamonds The printer self test failed. Once you have checked each of the...
... Windows users, specify the size from Print Properties. • For Macintosh users, specify the size from the Page Setup dialog. REINSTALL THE TONER CARTRIDGE Remove and reinstall the toner cartridge, making sure that it is blank or displays only diamonds The printer self test failed. Once you have checked each of the...
User Guide
Page 130
... of the printer. Cartridge is connected to the network. Understanding printer messages Close front door Close the front door of the following : • Replace the toner cartridge, and then press to clear the message and continue printing. • Press to clear the message and continue printing. Network/Network The printer is...
... of the printer. Cartridge is connected to the network. Understanding printer messages Close front door Close the front door of the following : • Replace the toner cartridge, and then press to clear the message and continue printing. • Press to clear the message and continue printing. Network/Network The printer is...
User Guide
Page 131
to clear the message. Try one or more of the following: • Remove the toner cartridge, and then reinstall it. • Remove the toner cartridge, and then install a new one . 34 Short paper The printer paper size setting did not match the length of the print job. • Cancel ... stored 38 Memory full Try one or more of the buffer. • Cancel the current print job. 31.yy Replace defective or missing cartridge The toner cartridge is either missing or not functioning properly. Troubleshooting 131 Waiting The printer has received data to print, but is waiting for an End‑...
to clear the message. Try one or more of the following: • Remove the toner cartridge, and then reinstall it. • Remove the toner cartridge, and then install a new one . 34 Short paper The printer paper size setting did not match the length of the print job. • Cancel ... stored 38 Memory full Try one or more of the buffer. • Cancel the current print job. 31.yy Replace defective or missing cartridge The toner cartridge is either missing or not functioning properly. Troubleshooting 131 Waiting The printer has received data to print, but is waiting for an End‑...

