Setup Guide
Page 3
Table of contents Preface vii About your printer vii About this book ix Other sources of information x Step 1: Select a location for your printer 1 Allowing enough space 1 Considering environmental issues 4 Moving the printer 4 Step 2: Unpack the printer 5 Step 3: Install the multipurpose feeder 6 Step 4: Set up the optional high capacity feeder 9 Attaching a high capacity feeder or base cabinet 11 Step 5: Set up printer supplies 17 Installing the print cartridge 17 Preparing the fuser 20 Applying the operator panel overlay (non-English only) . . . . .22 iii
Table of contents Preface vii About your printer vii About this book ix Other sources of information x Step 1: Select a location for your printer 1 Allowing enough space 1 Considering environmental issues 4 Moving the printer 4 Step 2: Unpack the printer 5 Step 3: Install the multipurpose feeder 6 Step 4: Set up the optional high capacity feeder 9 Attaching a high capacity feeder or base cabinet 11 Step 5: Set up printer supplies 17 Installing the print cartridge 17 Preparing the fuser 20 Applying the operator panel overlay (non-English only) . . . . .22 iii
Setup Guide
Page 7
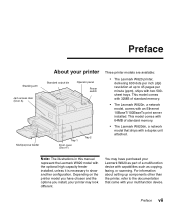
...) resolution at up components other than the printer, refer to the documentation that ships with a duplex unit attached. You may look different. For information about setting up to show another configuration. Note: The illustrations in this manual represent the Lexmark W820 model with the optional high capacity feeder installed, unless it is necessary to 45 pages...
...) resolution at up components other than the printer, refer to the documentation that ships with a duplex unit attached. You may look different. For information about setting up to show another configuration. Note: The illustrations in this manual represent the Lexmark W820 model with the optional high capacity feeder installed, unless it is necessary to 45 pages...
Setup Guide
Page 8
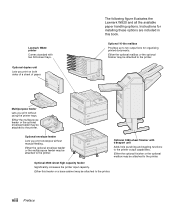
... print without manual feeding. Optional 2500-sheet high capacity feeder Significantly increases the printer input capacity. Either the optional mailbox or the optional finisher may be attached to the printer. The following figure illustrates the Lexmark W820 and all the available paper handling options. Multipurpose feeder Lets you print envelopes without using the printer trays. Either the optional finisher or...
... print without manual feeding. Optional 2500-sheet high capacity feeder Significantly increases the printer input capacity. Either the optional mailbox or the optional finisher may be attached to the printer. The following figure illustrates the Lexmark W820 and all the available paper handling options. Multipurpose feeder Lets you print envelopes without using the printer trays. Either the optional finisher or...

Setup Guide
Page 14
200 mm (8 in.) 364 mm (14 in.) (4120i6n0.)mm 460 mm (18 in the figure. If you install a base cabinet rather than a high capacity feeder, your printer will require the same amount of space as shown in the figure. 200 mm (8 in.) 364 mm (14 in.) (4120i6n0.)mm (1486i0n.m) m 1220... mm (48 in.) 200 mm (8 in.) 1(04834inm.)m 2 Select a location for a printer with a high capacity feeder and duplex unit, make sure you have at least the amount of space indicated in the figure. 200 mm (8 in.) 700 mm (28 in.) 1(04834inm...
200 mm (8 in.) 364 mm (14 in.) (4120i6n0.)mm 460 mm (18 in the figure. If you install a base cabinet rather than a high capacity feeder, your printer will require the same amount of space as shown in the figure. 200 mm (8 in.) 364 mm (14 in.) (4120i6n0.)mm (1486i0n.m) m 1220... mm (48 in.) 200 mm (8 in.) 1(04834inm.)m 2 Select a location for a printer with a high capacity feeder and duplex unit, make sure you have at least the amount of space indicated in the figure. 200 mm (8 in.) 700 mm (28 in.) 1(04834inm...
Setup Guide
Page 18
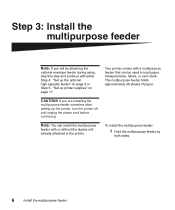
..." on page 17. To install the multipurpose feeder: 1 Hold the multipurpose feeder by both sides. 6 Install the multipurpose feeder CAUTION! Your printer comes with a multipurpose feeder that can install the multipurpose feeder with either Step 4: "Set up the optional high capacity feeder" on page 9 or Step 5: "Set up the printer, turn the printer off and unplug the power cord before continuing...
..." on page 17. To install the multipurpose feeder: 1 Hold the multipurpose feeder by both sides. 6 Install the multipurpose feeder CAUTION! Your printer comes with a multipurpose feeder that can install the multipurpose feeder with either Step 4: "Set up the optional high capacity feeder" on page 9 or Step 5: "Set up the printer, turn the printer off and unplug the power cord before continuing...
Setup Guide
Page 20
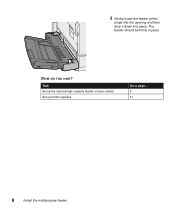
Task Set up the optional high capacity feeder or base cabinet Set up printer supplies Go to page... 9 17 8 Install the multipurpose feeder The feeder should be firmly in place. What do I do next? 3 Gently insert the feeder at this angle into the opening and then drop it down into place.
Task Set up the optional high capacity feeder or base cabinet Set up printer supplies Go to page... 9 17 8 Install the multipurpose feeder The feeder should be firmly in place. What do I do next? 3 Gently insert the feeder at this angle into the opening and then drop it down into place.
Setup Guide
Page 21
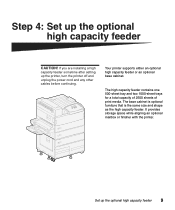
... optional mailbox or finisher with the printer. If you are installing a high capacity feeder sometime after setting up the optional high capacity feeder 9 Set up the printer, turn the printer off and unplug the power cord and any other cables before continuing. Your printer supports either an optional high capacity feeder or an optional base cabinet. The high capacity feeder contains one 500-sheet tray and...
... optional mailbox or finisher with the printer. If you are installing a high capacity feeder sometime after setting up the optional high capacity feeder 9 Set up the printer, turn the printer off and unplug the power cord and any other cables before continuing. Your printer supports either an optional high capacity feeder or an optional base cabinet. The high capacity feeder contains one 500-sheet tray and...

Setup Guide
Page 22
... set up the optional high capacity feeder Lift the high capacity feeder from its packing materials. Warning! Save the carton and packing materials in case you need to remove the foam packing and tape from the high capacity feeder. tray labels 10 Set up the high capacity feeder or base cabinet: 1 Remove the high capacity feeder or cabinet from the bottom. High capacity feeder Locking clips, thumbscrews, and...
... set up the optional high capacity feeder Lift the high capacity feeder from its packing materials. Warning! Save the carton and packing materials in case you need to remove the foam packing and tape from the high capacity feeder. tray labels 10 Set up the high capacity feeder or base cabinet: 1 Remove the high capacity feeder or cabinet from the bottom. High capacity feeder Locking clips, thumbscrews, and...
Setup Guide
Page 23
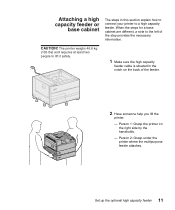
... the step provides the necessary information. When the steps for a base cabinet are different, a note to lift it safely. 1 Make sure the high capacity feeder cable is situated in this section explain how to connect your printer to a high capacity feeder. Attaching a high capacity feeder or base cabinet The steps in the notch on the right side by the handholds. -
... the step provides the necessary information. When the steps for a base cabinet are different, a note to lift it safely. 1 Make sure the high capacity feeder cable is situated in this section explain how to connect your printer to a high capacity feeder. Attaching a high capacity feeder or base cabinet The steps in the notch on the right side by the handholds. -
Setup Guide
Page 24
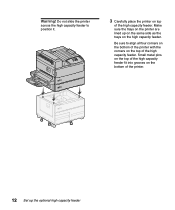
Be sure to position it. 3 Carefully place the printer on the top of the high capacity feeder. Warning! Do not slide the printer across the high capacity feeder to align all four corners on the bottom of the printer with the corners on top of the high capacity feeder. Small metal pins on the top of the printer. 12 Set up on the same side as the trays on the bottom of the high capacity feeder fit into grooves on the high capacity feeder. Make sure the trays on the printer are lined up the optional high capacity feeder
Be sure to position it. 3 Carefully place the printer on the top of the high capacity feeder. Warning! Do not slide the printer across the high capacity feeder to align all four corners on the bottom of the printer with the corners on top of the high capacity feeder. Small metal pins on the top of the printer. 12 Set up on the same side as the trays on the bottom of the high capacity feeder fit into grooves on the high capacity feeder. Make sure the trays on the printer are lined up the optional high capacity feeder

Setup Guide
Page 25
Set up the optional high capacity feeder 13 c Gently pull the tray out. Attaching the locking clips The locking clips keep the printer and the high capacity feeder properly aligned, helping to prevent them from being separated accidently. 1 Remove tray 2. b Tilt the front of the tray upward. a Pull the tray out fully.
Set up the optional high capacity feeder 13 c Gently pull the tray out. Attaching the locking clips The locking clips keep the printer and the high capacity feeder properly aligned, helping to prevent them from being separated accidently. 1 Remove tray 2. b Tilt the front of the tray upward. a Pull the tray out fully.

Setup Guide
Page 26
Note: If you are installing a base cabinet, open the cabinet door. 2 Open tray 3. 3 Attach the locking clips to the left and right sides of the trays. 4 Secure the locking clips using the thumbscrews. 14 Set up the optional high capacity feeder
Note: If you are installing a base cabinet, open the cabinet door. 2 Open tray 3. 3 Attach the locking clips to the left and right sides of the trays. 4 Secure the locking clips using the thumbscrews. 14 Set up the optional high capacity feeder

Setup Guide
Page 27
Note: If you are installing a base cabinet, close the cabinet door. 5 Close tray 3. 6 Reinsert tray 2. Set up the optional high capacity feeder 15
Note: If you are installing a base cabinet, close the cabinet door. 5 Close tray 3. 6 Reinsert tray 2. Set up the optional high capacity feeder 15
Setup Guide
Page 28
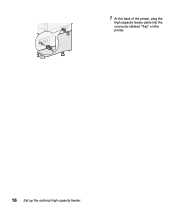
7 At the back of the printer, plug the high capacity feeder cable into the connector labeled "Tray" on the printer. 16 Set up the optional high capacity feeder
7 At the back of the printer, plug the high capacity feeder cable into the connector labeled "Tray" on the printer. 16 Set up the optional high capacity feeder

Setup Guide
Page 49
Secure the wheels and leveling feet 37 Once you need to stabilize it. 1 Lock the wheels by pushing down on the lever attached to the printer. Step 8: Secure the wheels and leveling feet Note: This only applies if you have all the printer components attached and the printer is positioned where you want it, you have a high capacity feeder or a base cabinet attached to them. 2 Rotate all the leveling feet until they touch the ground.
Secure the wheels and leveling feet 37 Once you need to stabilize it. 1 Lock the wheels by pushing down on the lever attached to the printer. Step 8: Secure the wheels and leveling feet Note: This only applies if you have all the printer components attached and the printer is positioned where you want it, you have a high capacity feeder or a base cabinet attached to them. 2 Rotate all the leveling feet until they touch the ground.

Setup Guide
Page 51
Your printer supports an optional10-bin mailbox that helps you must install either a mailbox or a finisher, but not both at the same time. For help setting up the optional mailbox 39 Note: The illustrations in this section show the printer with a high capacity feeder attached. Set up a high capacity feeder or a base cabinet, see page 9. Step 9: Set up the optional mailbox Note: The printer can attach a mailbox, you organize your printed documents. Before you can support either a high capacity feeder or a base cabinet.
Your printer supports an optional10-bin mailbox that helps you must install either a mailbox or a finisher, but not both at the same time. For help setting up the optional mailbox 39 Note: The illustrations in this section show the printer with a high capacity feeder attached. Set up a high capacity feeder or a base cabinet, see page 9. Step 9: Set up the optional mailbox Note: The printer can attach a mailbox, you organize your printed documents. Before you can support either a high capacity feeder or a base cabinet.

Setup Guide
Page 58
5 Insert a thumbscrew through the hole in the middle of each side stand piece, and then tighten the screws. 6 Slide the stabilizing foot over it off the ground before the stabilizing foot will properly fit over the high capacity feeder back foot. If the high capacity feeder back foot is completely lowered, especially on a carpeted surface, you may need to raise it . 46 Set up the optional mailbox
5 Insert a thumbscrew through the hole in the middle of each side stand piece, and then tighten the screws. 6 Slide the stabilizing foot over it off the ground before the stabilizing foot will properly fit over the high capacity feeder back foot. If the high capacity feeder back foot is completely lowered, especially on a carpeted surface, you may need to raise it . 46 Set up the optional mailbox

Setup Guide
Page 65
Note: The illustrations in this section show the printer with a high capacity feeder attached. Your printer supports an optional finisher that adds hole punching and stapling functions to the printer output capabilities. For help setting up the optional finisher 53 Set up a high capacity feeder or a base cabinet, see page 9. Step 10: Set up the optional finisher Note: The printer can attach a finisher, you can support either a high capacity feeder or a base cabinet. Before you must install either a mailbox or a finisher, but not both at the same time.
Note: The illustrations in this section show the printer with a high capacity feeder attached. Your printer supports an optional finisher that adds hole punching and stapling functions to the printer output capabilities. For help setting up the optional finisher 53 Set up a high capacity feeder or a base cabinet, see page 9. Step 10: Set up the optional finisher Note: The printer can attach a finisher, you can support either a high capacity feeder or a base cabinet. Before you must install either a mailbox or a finisher, but not both at the same time.

Setup Guide
Page 85
... following table lists page numbers where you have installed an optional high capacity feeder, its three trays can find loading instructions for the standard and optional trays, and for a total capacity of 1000 sheets. If you can hold an additional 2500 sheets, for a total printer capacity of labels or card stock 7¾, 10, DL, C5, other... sheets of 20 lb paper 83 • 25 transparencies • 15 sheets of 3500 sheets. Load print media 73 Step 12: Load print media Your Lexmark W820 has two standard trays that combine for the multipurpose feeder and optional envelope...
... following table lists page numbers where you have installed an optional high capacity feeder, its three trays can find loading instructions for the standard and optional trays, and for a total capacity of 1000 sheets. If you can hold an additional 2500 sheets, for a total printer capacity of labels or card stock 7¾, 10, DL, C5, other... sheets of 20 lb paper 83 • 25 transparencies • 15 sheets of 3500 sheets. Load print media 73 Step 12: Load print media Your Lexmark W820 has two standard trays that combine for the multipurpose feeder and optional envelope...

Setup Guide
Page 86
Refer to the publications CD for more information. Note: If you load print media other than plain paper in the optional high capacity feeder, can each hold 500 sheets of plain paper. If you load JIS B4, JIS B5, or universal size paper, make sure you turn auto-size ...
Refer to the publications CD for more information. Note: If you load print media other than plain paper in the optional high capacity feeder, can each hold 500 sheets of plain paper. If you load JIS B4, JIS B5, or universal size paper, make sure you turn auto-size ...


