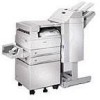
Setup Guide
Page 2
... 3 language. This printer is a trademark of the information you supply in the United States and/ or other countries. S. therefore, this statement may use or distribute any of Lexmark International, Inc. In... as set of Lab Operations Lexmark International, Inc. 740 West New Circle Road Lexington, KY 40550 (859) 232-3000 Please refer to the Lexmark W820 Publications CD for details. In...with the use of other replacement parts. • Your product uses a laser, exercise CAUTION: Use of controls or adjustments or performance of procedures other countries, contact ...
... 3 language. This printer is a trademark of the information you supply in the United States and/ or other countries. S. therefore, this statement may use or distribute any of Lexmark International, Inc. In... as set of Lab Operations Lexmark International, Inc. 740 West New Circle Road Lexington, KY 40550 (859) 232-3000 Please refer to the Lexmark W820 Publications CD for details. In...with the use of other replacement parts. • Your product uses a laser, exercise CAUTION: Use of controls or adjustments or performance of procedures other countries, contact ...
Setup Guide
Page 3
Table of contents Preface vii About your printer vii About this book ix Other sources of information x Step 1: Select a location for your printer 1 Allowing enough space 1 Considering environmental issues 4 Moving the printer 4 Step 2: Unpack the printer 5 Step 3: Install the multipurpose feeder 6 Step 4: Set up the optional high capacity feeder 9 Attaching a high capacity feeder or base cabinet 11 Step 5: Set up printer supplies 17 Installing the print cartridge 17 Preparing the fuser 20 Applying the operator panel overlay (non-English only) . . . . .22 iii
Table of contents Preface vii About your printer vii About this book ix Other sources of information x Step 1: Select a location for your printer 1 Allowing enough space 1 Considering environmental issues 4 Moving the printer 4 Step 2: Unpack the printer 5 Step 3: Install the multipurpose feeder 6 Step 4: Set up the optional high capacity feeder 9 Attaching a high capacity feeder or base cabinet 11 Step 5: Set up printer supplies 17 Installing the print cartridge 17 Preparing the fuser 20 Applying the operator panel overlay (non-English only) . . . . .22 iii
Setup Guide
Page 9
... on the inside front cover before setting up the printer, installing supplies and options, loading media, launching the drivers CD to install printer drivers and utilities, and printing information from the Lexmark W820 Publications CD. A caution identifies something that might damage your new Lexmark W820, Lexmark W820n, or Lexmark W820dn printer. Preface ix Note: A note provides information you to set...
... on the inside front cover before setting up the printer, installing supplies and options, loading media, launching the drivers CD to install printer drivers and utilities, and printing information from the Lexmark W820 Publications CD. A caution identifies something that might damage your new Lexmark W820, Lexmark W820n, or Lexmark W820dn printer. Preface ix Note: A note provides information you to set...
Setup Guide
Page 10
... Other sources of the drivers CD shipped with your printer up and running. Note: The Lexmark W820 Publications CD is referred to get your printer, it may also contain MarkVision™ Professional, other printer utilities, worldwide customer support phone numbers, screen fonts,...necessary printer drivers to as the "publications CD." The information on the CD is also available on which version of information Lexmark W820 Publications CD The Lexmark W820 Publications CD provides information about loading paper, clearing error messages, ordering and replacing supplies, installing...
... Other sources of the drivers CD shipped with your printer up and running. Note: The Lexmark W820 Publications CD is referred to get your printer, it may also contain MarkVision™ Professional, other printer utilities, worldwide customer support phone numbers, screen fonts,...necessary printer drivers to as the "publications CD." The information on the CD is also available on which version of information Lexmark W820 Publications CD The Lexmark W820 Publications CD provides information about loading paper, clearing error messages, ordering and replacing supplies, installing...
Setup Guide
Page 18
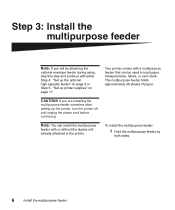
The multipurpose feeder holds approximately 35 sheets of paper. If you will be used to the printer. Your printer comes with a multipurpose feeder that can install the multipurpose feeder with either Step 4: "Set up the optional high capacity feeder" on ... card stock. Step 3: Install the multipurpose feeder Note: If you are installing the multipurpose feeder sometime after setting up printer supplies" on page 9 or Step 5: "Set up the printer, turn the printer off and unplug the power cord before continuing. To install the multipurpose feeder: 1 Hold the multipurpose feeder by both...
The multipurpose feeder holds approximately 35 sheets of paper. If you will be used to the printer. Your printer comes with a multipurpose feeder that can install the multipurpose feeder with either Step 4: "Set up the optional high capacity feeder" on ... card stock. Step 3: Install the multipurpose feeder Note: If you are installing the multipurpose feeder sometime after setting up printer supplies" on page 9 or Step 5: "Set up the printer, turn the printer off and unplug the power cord before continuing. To install the multipurpose feeder: 1 Hold the multipurpose feeder by both...
Setup Guide
Page 20
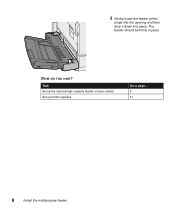
3 Gently insert the feeder at this angle into the opening and then drop it down into place. What do I do next? The feeder should be firmly in place. Task Set up the optional high capacity feeder or base cabinet Set up printer supplies Go to page... 9 17 8 Install the multipurpose feeder
3 Gently insert the feeder at this angle into the opening and then drop it down into place. What do I do next? The feeder should be firmly in place. Task Set up the optional high capacity feeder or base cabinet Set up printer supplies Go to page... 9 17 8 Install the multipurpose feeder
Setup Guide
Page 29
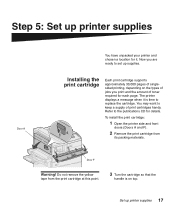
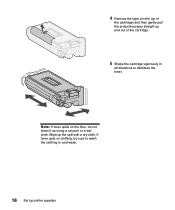
...cartridge supports approximately 30,000 pages of singlesided printing, depending on top. Door F Warning! The printer displays a message when it . Step 5: Set up printer supplies Door A You have unpacked your printer and chosen a location for it is on the types of jobs you are ready to the publications... CD for each page. Set up printer supplies 17 You may want to replace the cartridge. Now you print and the amount of print cartridges handy. To install the print cartridge: 1 Open the printer side and front doors (Doors A and F). 2 Remove ...
...cartridge supports approximately 30,000 pages of singlesided printing, depending on top. Door F Warning! The printer displays a message when it . Step 5: Set up printer supplies Door A You have unpacked your printer and chosen a location for it is on the types of jobs you are ready to the publications... CD for each page. Set up printer supplies 17 You may want to replace the cartridge. Now you print and the amount of print cartridges handy. To install the print cartridge: 1 Open the printer side and front doors (Doors A and F). 2 Remove ...
Setup Guide
Page 30
Note: If toner spills on clothing, be sure to wash the clothing in all directions to distribute the toner. 4 Remove the tape (on the top of the cartridge) and then gently pull the protective paper straight up and out of the cartridge. 5 Shake the cartridge vigorously in cold water. 18 Set up printer supplies Wipe up using a vacuum or a wet cloth. If toner gets on the floor, do not clean it up the spill with a dry cloth.
Note: If toner spills on clothing, be sure to wash the clothing in all directions to distribute the toner. 4 Remove the tape (on the top of the cartridge) and then gently pull the protective paper straight up and out of the cartridge. 5 Shake the cartridge vigorously in cold water. 18 Set up printer supplies Wipe up using a vacuum or a wet cloth. If toner gets on the floor, do not clean it up the spill with a dry cloth.
Setup Guide
Page 31
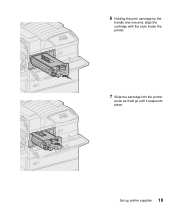
6 Holding the print cartridge by the handle and one end, align the cartridge with the slots inside the printer. 7 Slide the cartridge into the printer as far as it will go until it snaps into place. Set up printer supplies 19
6 Holding the print cartridge by the handle and one end, align the cartridge with the slots inside the printer. 7 Slide the cartridge into the printer as far as it will go until it snaps into place. Set up printer supplies 19
Setup Guide
Page 32
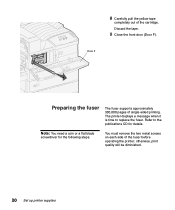
The printer displays a message when it is time to the publications CD for the following steps. Note: You need a coin or a flat blade screwdriver for details. Door F Preparing the fuser The fuser supports approximately 300,000 pages of the cartridge. Refer to replace the fuser. otherwise, print quality will be diminished. 20 Set up printer supplies Discard the tape. 9 Close the front door (Door F). 8 Carefully pull the yellow tape completely out of single-sided printing. You must remove the two metal screws on each side of the fuser before operating the printer;
The printer displays a message when it is time to the publications CD for the following steps. Note: You need a coin or a flat blade screwdriver for details. Door F Preparing the fuser The fuser supports approximately 300,000 pages of the cartridge. Refer to replace the fuser. otherwise, print quality will be diminished. 20 Set up printer supplies Discard the tape. 9 Close the front door (Door F). 8 Carefully pull the yellow tape completely out of single-sided printing. You must remove the two metal screws on each side of the fuser before operating the printer;

Setup Guide
Page 33
1 Remove the two labels covering the screws on each side of the fuser. 2 Turn each screw one third turn counterclockwise. 3 Pull both screws straight out and then discard them. 4 Close the side door (Door A). Door A Set up printer supplies 21
1 Remove the two labels covering the screws on each side of the fuser. 2 Turn each screw one third turn counterclockwise. 3 Pull both screws straight out and then discard them. 4 Close the side door (Door A). Door A Set up printer supplies 21

Setup Guide
Page 34
... overlay. Task Install memory and option cards Install the optional duplex unit Secure the wheels and leveling feet Go to the printer operator panel. 1 Locate the overlay packaged with your printer. 2 Peel the protective backing off the overlay. 3 Align the holes in the overlay with the buttons on the operator panel display...-English only) If English is not your preferred language, attach the overlay with the translated button names to page... 23 34 37 22 Set up printer supplies
... overlay. Task Install memory and option cards Install the optional duplex unit Secure the wheels and leveling feet Go to the printer operator panel. 1 Locate the overlay packaged with your printer. 2 Peel the protective backing off the overlay. 3 Align the holes in the overlay with the buttons on the operator panel display...-English only) If English is not your preferred language, attach the overlay with the translated button names to page... 23 34 37 22 Set up printer supplies
Setup Guide
Page 121
... 91 Parallel Interface Card 30 power 92 print cartridge 17 print media 73 print server installed in network models vii installing printer memory vii, 25 models vii moving 4 options viii powering on 92 settings 94 supplies 17 unpack 5 printer drivers 99 publications CD x Pull Printing 98 R resolution vii S safety information ii Index 109
... 91 Parallel Interface Card 30 power 92 print cartridge 17 print media 73 print server installed in network models vii installing printer memory vii, 25 models vii moving 4 options viii powering on 92 settings 94 supplies 17 unpack 5 printer drivers 99 publications CD x Pull Printing 98 R resolution vii S safety information ii Index 109

User's Guide
Page 3
... 7 Chapter 2: Sending a job to print 9 Chapter 3: Canceling a print job 10 From the printer operator panel 10 From a computer running Windows 10 From a Macintosh computer 11 Chapter 4: Conserving supplies 12 Chapter 5: Using the Print and Hold function 13 Selecting a user name 13 Printing and deleting held jobs 13 Repeat Print ...14 Reserve Print...
... 7 Chapter 2: Sending a job to print 9 Chapter 3: Canceling a print job 10 From the printer operator panel 10 From a computer running Windows 10 From a Macintosh computer 11 Chapter 4: Conserving supplies 12 Chapter 5: Using the Print and Hold function 13 Selecting a user name 13 Printing and deleting held jobs 13 Repeat Print ...14 Reserve Print...
User's Guide
Page 5
... optional finisher 90 Chapter 25: Clearing staple jams 99 Chapter 26: Ordering supplies and maintenance items 102 Chapter 27: Replacing the print cartridge 103 Removing the old print cartridge 103 Installing the new print cartridge 105 Chapter 28: Cleaning the printer 109 Chapter 29: Replacing a staple cartridge 110 Chapter 30: Emptying the... 128 Closing up ...131 Chapter 35: Cleaning the wiper blade 132 Chapter 36: Resetting the maintenance page counter 135 Chapter 37: Determining the status of supplies 136 Chapter 38: Storing supplies 137 Chapter 39: Recycling used...
... optional finisher 90 Chapter 25: Clearing staple jams 99 Chapter 26: Ordering supplies and maintenance items 102 Chapter 27: Replacing the print cartridge 103 Removing the old print cartridge 103 Installing the new print cartridge 105 Chapter 28: Cleaning the printer 109 Chapter 29: Replacing a staple cartridge 110 Chapter 30: Emptying the... 128 Closing up ...131 Chapter 35: Cleaning the wiper blade 132 Chapter 36: Resetting the maintenance page counter 135 Chapter 37: Determining the status of supplies 136 Chapter 38: Storing supplies 137 Chapter 39: Recycling used...
User's Guide
Page 14
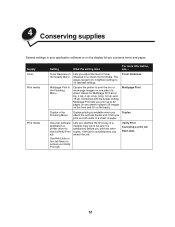
...Up, 12 Up, and 16 Up. Use your software application or printer driver to print the two or more information, see ... 4 Conserving supplies Several settings in your application software or on the display let you conserve toner and paper: Supply Toner Print media Print media Setting What the setting does For more... on both sides of a sheet of a multiple-copy job to 10 (darkest setting). Use Held Jobs in the Finishing Menu Causes the printer to send a Verify Print job. Combined with the duplex setting, Multipage Print lets you examine the first copy of paper. Toner Darkness in...
...Up, 12 Up, and 16 Up. Use your software application or printer driver to print the two or more information, see ... 4 Conserving supplies Several settings in your application software or on the display let you conserve toner and paper: Supply Toner Print media Print media Setting What the setting does For more... on both sides of a sheet of a multiple-copy job to 10 (darkest setting). Use Held Jobs in the Finishing Menu Causes the printer to send a Verify Print job. Combined with the duplex setting, Multipage Print lets you examine the first copy of paper. Toner Darkness in...

User's Guide
Page 23
The printer has three standard print media sources: trays 1 and 2, each of the sources. For JIS B4 or JIS B5, see Sensing special print media sizes. ‡ ... 3, 4, and 5 comprise the optional high capacity feeder. † Executive and Legal are supported under factory default conditions. Print media sizes must be selected from the printer operator panel. 21 The following table details the types, sizes, and quantities of print media you can also attach an optional high capacity feeder, which...
The printer has three standard print media sources: trays 1 and 2, each of the sources. For JIS B4 or JIS B5, see Sensing special print media sizes. ‡ ... 3, 4, and 5 comprise the optional high capacity feeder. † Executive and Legal are supported under factory default conditions. Print media sizes must be selected from the printer operator panel. 21 The following table details the types, sizes, and quantities of print media you can also attach an optional high capacity feeder, which...
User's Guide
Page 47
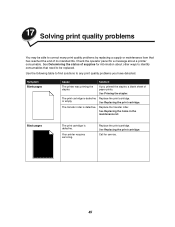
... may be replaced. Symptom Blank pages Cause Solution The printer was priming the stapler. See Replacing the print cartridge. Call for information about a printer consumable. See Priming the stapler. or empty. Black pages The print cartridge is defective. See Determining the status of supplies for service. 45 Use the following table to find...
... may be replaced. Symptom Blank pages Cause Solution The printer was priming the stapler. See Replacing the print cartridge. Call for information about a printer consumable. See Priming the stapler. or empty. Black pages The print cartridge is defective. See Determining the status of supplies for service. 45 Use the following table to find...
User's Guide
Page 104
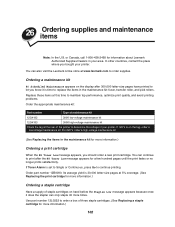
... on the display after 300,000 letter-size pages have printed to print after the 88 Toner Low message appears for information about Lexmark Authorized Supplies Dealers in the maintenance kit: fuser, transfer roller, and pick rollers. Its average yield is on the tag, order a low...is set to Single or Continuous, press Go to replace the items in your printer. 26 Ordering supplies and maintenance items Note: In the U.S. Use part number 12L0252 to order supplies. You can also visit the Lexmark online store at 5% coverage. (See Replacing the print cartridge for more information...
... on the display after 300,000 letter-size pages have printed to print after the 88 Toner Low message appears for information about Lexmark Authorized Supplies Dealers in the maintenance kit: fuser, transfer roller, and pick rollers. Its average yield is on the tag, order a low...is set to Single or Continuous, press Go to replace the items in your printer. 26 Ordering supplies and maintenance items Note: In the U.S. Use part number 12L0252 to order supplies. You can also visit the Lexmark online store at 5% coverage. (See Replacing the print cartridge for more information...
User's Guide
Page 138
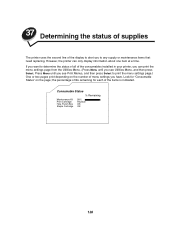
...you have. If you want to determine the status of all of the consumables installed in your printer, you to any supply or maintenance items that need replacing. 37 Determining the status of supplies The printer uses the second line of the items is indicated. Look for each of the display to print... the menu settings page.) One or two pages print depending on the page; However, the printer can print the menu settings page from the...
...you have. If you want to determine the status of all of the consumables installed in your printer, you to any supply or maintenance items that need replacing. 37 Determining the status of supplies The printer uses the second line of the items is indicated. Look for each of the display to print... the menu settings page.) One or two pages print depending on the page; However, the printer can print the menu settings page from the...


