User's Guide
Page 5
...: Replacing the print cartridge 103 Removing the old print cartridge 103 Installing the new print cartridge 105 Chapter 28: Cleaning the printer 109 Chapter 29: Replacing a staple cartridge 110 Chapter 30: Emptying the hole punch box 113 Chapter 31: Replacing the items in the... maintenance kit 115 Chapter 32: Replacing the fuser 116 Removing the old fuser 116 Installing a new fuser 119 Chapter 33: Replacing the transfer roller 122 Removing the old transfer roller 122 Installing the new ...
...: Replacing the print cartridge 103 Removing the old print cartridge 103 Installing the new print cartridge 105 Chapter 28: Cleaning the printer 109 Chapter 29: Replacing a staple cartridge 110 Chapter 30: Emptying the hole punch box 113 Chapter 31: Replacing the items in the... maintenance kit 115 Chapter 32: Replacing the fuser 116 Removing the old fuser 116 Installing a new fuser 119 Chapter 33: Replacing the transfer roller 122 Removing the old transfer roller 122 Installing the new ...
User's Guide
Page 49
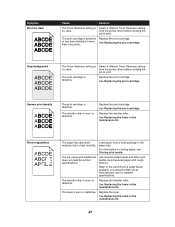
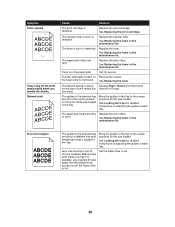
... site at www.lexmark.com for detailed specifications. Avoid textured paper with rough finishes. The fuser is Select a different Toner Darkness setting too dark. Symptom Print too dark Cause Solution The Toner Darkness setting is defective Replace the print cartridge. from the printer driver before sending ... worn or defective. The transfer roller is defective. See Replacing the items in more than one printer. Refer to print. or has been installed in the maintenance kit. Print irregularities The paper has absorbed moisture due to print. You are using print media that ...
... site at www.lexmark.com for detailed specifications. Avoid textured paper with rough finishes. The fuser is Select a different Toner Darkness setting too dark. Symptom Print too dark Cause Solution The Toner Darkness setting is defective Replace the print cartridge. from the printer driver before sending ... worn or defective. The transfer roller is defective. See Replacing the items in more than one printer. Refer to print. or has been installed in the maintenance kit. Print irregularities The paper has absorbed moisture due to print. You are using print media that ...
User's Guide
Page 50
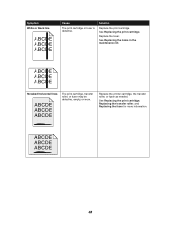
See Replacing the print cartridge. Replace the printer cartridge, the transfer roller, or fuser as needed. See Replacing the print cartridge, Replacing the transfer roller, and Replacing the fuser for more information. 48 Solution Replace the print cartridge. Symptom White or black line Cause The print cartridge or fuser is defective. Replace the fuser. See Replacing the items in the maintenance kit. Streaked horizontal lines The print cartridge, transfer roller, or fuser may be defective, empty, or worn.
See Replacing the print cartridge. Replace the printer cartridge, the transfer roller, or fuser as needed. See Replacing the print cartridge, Replacing the transfer roller, and Replacing the fuser for more information. 48 Solution Replace the print cartridge. Symptom White or black line Cause The print cartridge or fuser is defective. Replace the fuser. See Replacing the items in the maintenance kit. Streaked horizontal lines The print cartridge, transfer roller, or fuser may be defective, empty, or worn.
User's Guide
Page 52
...loaded in each tray. The paper pick rollers are set for the type of print media you handle the sheets. See Replacing the fuser. See Loading the trays for detailed instructions on adjusting the guides in the tray. For example, you loaded a different size print ...size loaded. See Replacing the print cartridge. Replace the transfer roller. the fuser were not removed. The guides in the selected tray are not in a tray. See Replacing the items in the maintenance kit. Toner is defective. See Loading the trays for detailed instructions on adjusting the...
...loaded in each tray. The paper pick rollers are set for the type of print media you handle the sheets. See Replacing the fuser. See Loading the trays for detailed instructions on adjusting the guides in the tray. For example, you loaded a different size print ...size loaded. See Replacing the print cartridge. Replace the transfer roller. the fuser were not removed. The guides in the selected tray are not in a tray. See Replacing the items in the maintenance kit. Toner is defective. See Loading the trays for detailed instructions on adjusting the...
User's Guide
Page 104
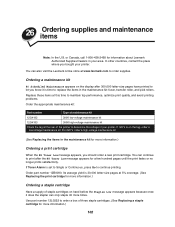
... the stapler can also visit the Lexmark online store at the rear of the printer to determine the voltage of maintenance kit 12G4182 300K low-voltage maintenance kit 12G4183 300K high-voltage maintenance kit Check the tag at www.lexmark.com to replace the items in the maintenance kit for information about Lexmark Authorized Supplies Dealers in your...
... the stapler can also visit the Lexmark online store at the rear of the printer to determine the voltage of maintenance kit 12G4182 300K low-voltage maintenance kit 12G4183 300K high-voltage maintenance kit Check the tag at www.lexmark.com to replace the items in the maintenance kit for information about Lexmark Authorized Supplies Dealers in your...
User's Guide
Page 117
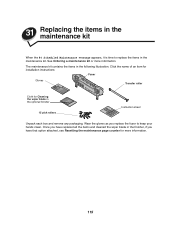
Click the name of an item for installation instructions: Fuser Gloves Transfer roller Cloth for more information. See Ordering a maintenance kit or more information. 115 Wear the gloves as you have that option attached, see Resetting the maintenance page counter for Cleaning the wiper blade...your hands clean. The maintenance kit contains the items in the optional finisher 15 pick rollers Instruction sheet Unpack each box and remove any packaging. Once you have replaced all the items and cleaned the wiper blade in the finisher, if you replace the fuser to replace the items in ...
Click the name of an item for installation instructions: Fuser Gloves Transfer roller Cloth for more information. See Ordering a maintenance kit or more information. 115 Wear the gloves as you have that option attached, see Resetting the maintenance page counter for Cleaning the wiper blade...your hands clean. The maintenance kit contains the items in the optional finisher 15 pick rollers Instruction sheet Unpack each box and remove any packaging. Once you have replaced all the items and cleaned the wiper blade in the finisher, if you replace the fuser to replace the items in ...
User's Guide
Page 118
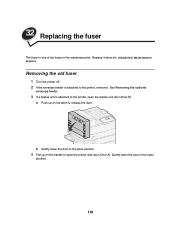
Replace it . See Removing the optional envelope feeder. 3 If a duplex unit is attached to the printer, open position. 116 Gently lower the door to the open the duplex unit door (Door E). a Push up on the latch to release the door. b Gently lower the door to the open position. 4 Pull up on the handle to open the printer side door (Door A). Removing the old fuser 1 Turn the printer off. 2 If the envelope feeder is one of the items in the maintenance kit. 32 Replacing the fuser The fuser is attached to the printer, remove it when 80 Scheduled Maintenance appears.
Replace it . See Removing the optional envelope feeder. 3 If a duplex unit is attached to the printer, open position. 116 Gently lower the door to the open the duplex unit door (Door E). a Push up on the latch to release the door. b Gently lower the door to the open position. 4 Pull up on the handle to open the printer side door (Door A). Removing the old fuser 1 Turn the printer off. 2 If the envelope feeder is one of the items in the maintenance kit. 32 Replacing the fuser The fuser is attached to the printer, remove it when 80 Scheduled Maintenance appears.
User's Guide
Page 287
See also: Loading the trays LocalTalk What this message means: A LocalTalk interface is empty. Replacing the fuser; Replacing pick rollers 285 Maintenance What this message means: The printer requires replacement of routine maintenance items to maintain top performance and to avoid print quality and paper feed problems....Load paper of the size and type requested on the second line of the display in the maintenance kit; See also: Replacing the items in the specified tray. The printer automatically clears the message and continues printing the job. • Press Menu to open the Job Menu...
See also: Loading the trays LocalTalk What this message means: A LocalTalk interface is empty. Replacing the fuser; Replacing pick rollers 285 Maintenance What this message means: The printer requires replacement of routine maintenance items to maintain top performance and to avoid print quality and paper feed problems....Load paper of the size and type requested on the second line of the display in the maintenance kit; See also: Replacing the items in the specified tray. The printer automatically clears the message and continues printing the job. • Press Menu to open the Job Menu...
User's Guide
Page 314
...message number and description of routine maintenance items to printer problems that may notice reduced print quality. What you can do : Turn the printer off and check all cable connections. Cleaning the wiper blade; Replacing the fuser; Turn the printer back on toner. See also: Replacing the print...and avoid print quality and paper feed problems. What you can do : Replace the maintenance items and reset the printer maintenance page counter. 80 Scheduled Maintenance What this message means: The print cartridge is low on . See also: Replacing the items in the maintenance kit;
...message number and description of routine maintenance items to printer problems that may notice reduced print quality. What you can do : Turn the printer off and check all cable connections. Cleaning the wiper blade; Replacing the fuser; Turn the printer back on toner. See also: Replacing the print...and avoid print quality and paper feed problems. What you can do : Replace the maintenance items and reset the printer maintenance page counter. 80 Scheduled Maintenance What this message means: The print cartridge is low on . See also: Replacing the items in the maintenance kit;
User's Guide
Page 327
... 38 handling tool 150 attaching 152 storage area 150 using 150 output bins 38 removing 149, 153 maintenance 115 maintenance kit 115 items in the box 115 ordering 102 replacing 115 fuser 116 pick rollers 126 transfer roller 122 wiper blade, cleaning 132 maintenance page counter, resetting 135 Max Baud Rate (Infrared...
... 38 handling tool 150 attaching 152 storage area 150 using 150 output bins 38 removing 149, 153 maintenance 115 maintenance kit 115 items in the box 115 ordering 102 replacing 115 fuser 116 pick rollers 126 transfer roller 122 wiper blade, cleaning 132 maintenance page counter, resetting 135 Max Baud Rate (Infrared...
Service Manual
Page 335
... Exiting Diagnostic Mode 3-1 F Finisher Control 1-5 Finisher Paper Path 1-26 Finisher Power 1-4 Finisher Tests Sensor Test 3-2 Staple Test 3-2 G General Information Glossary 1-44 Safety Details Caution Labels 1-3 Fuser Components 1-3 Laser Components 1-2 Mechanical Components 1-2 Power Supply/Electrical Components 1-2 Glossary 1-44 Abbreviations 1-44 Acronyms 1-44 Terms 1-44 H H-Tra Section 1-27 I Introduction 1-1 L Location Map 1 5-6 Location...Roll and Roll Shaft 4-80 Cover Top H-Tra Assembly 4-13 Cover Top Left 4-33 Cover-Jogging 4-23 Cover-Open, Cover-Front and Kit Stud Cover 4-26 Index I-1
... Exiting Diagnostic Mode 3-1 F Finisher Control 1-5 Finisher Paper Path 1-26 Finisher Power 1-4 Finisher Tests Sensor Test 3-2 Staple Test 3-2 G General Information Glossary 1-44 Safety Details Caution Labels 1-3 Fuser Components 1-3 Laser Components 1-2 Mechanical Components 1-2 Power Supply/Electrical Components 1-2 Glossary 1-44 Abbreviations 1-44 Acronyms 1-44 Terms 1-44 H H-Tra Section 1-27 I Introduction 1-1 L Location Map 1 5-6 Location...Roll and Roll Shaft 4-80 Cover Top H-Tra Assembly 4-13 Cover Top Left 4-33 Cover-Jogging 4-23 Cover-Open, Cover-Front and Kit Stud Cover 4-26 Index I-1
Service Manual
Page 336
... 4-28 Top Center Cover Assembly 4-34 Top Cover Interlock Switch 4-139 Transport Gear Kit 4-9 Transport Motor Assembly 4-54 Traverse Motor Assembly 4-102 Tray Harness Assembly 4-7 Tray-Lower 4-24 Upper Roll and Roll Transport 4-147 S Safety Details Caution Labels 1-3 Fuser Components 1-3 Laser Components 1-2 Mechanical Components 1-2 Power Supply/Electrical Components 1-2 Safety Components 1-3 Safety Information x Safety...
... 4-28 Top Center Cover Assembly 4-34 Top Cover Interlock Switch 4-139 Transport Gear Kit 4-9 Transport Motor Assembly 4-54 Traverse Motor Assembly 4-102 Tray Harness Assembly 4-7 Tray-Lower 4-24 Upper Roll and Roll Transport 4-147 S Safety Details Caution Labels 1-3 Fuser Components 1-3 Laser Components 1-2 Mechanical Components 1-2 Power Supply/Electrical Components 1-2 Safety Components 1-3 Safety Information x Safety...


