Clearing Jams Guide
Page 1
...or specialty media. Envelope recommendations • To reduce wrinkling, use paper that : - Have an interlocking design - Have bent corners - Warning-Potential Damage: Do not leave the cartridge exposed to load them prior to printing, or wait for a prompt to light for extended periods. Lexmark™ T65x ...Make sure the paper lies flat in the tray. • Do not remove trays while the printer is printing. • Do not load trays, the multipurpose feeder, or the envelope feeder while the printer is in firmly after loading paper. For more information, see the User's Guide. ...
...or specialty media. Envelope recommendations • To reduce wrinkling, use paper that : - Have an interlocking design - Have bent corners - Warning-Potential Damage: Do not leave the cartridge exposed to load them prior to printing, or wait for a prompt to light for extended periods. Lexmark™ T65x ...Make sure the paper lies flat in the tray. • Do not remove trays while the printer is printing. • Do not load trays, the multipurpose feeder, or the envelope feeder while the printer is in firmly after loading paper. For more information, see the User's Guide. ...
Clearing Jams Guide
Page 5
...the 5-bin mailbox, or the StapleSmart II Finisher: 1 If the paper is exiting into place. 5 Flex and stack the envelopes. 6 Load the envelopes in the envelope feeder. 7 Adjust the paper guide. 8 Lower the envelope weight. 9 Press . 2 Remove the jammed paper. 3 Close the StapleSmart II Finisher door. 4 Press . 281 paper... bin. 2 Press . 5 Note: If you cannot remove the envelope, then the print cartridge will be pulled out, then lift the envelope feeder up and then out of the stack; 260 paper jam The envelope feeder feeds envelopes from the bottom of the printer, and then set it snaps into...
...the 5-bin mailbox, or the StapleSmart II Finisher: 1 If the paper is exiting into place. 5 Flex and stack the envelopes. 6 Load the envelopes in the envelope feeder. 7 Adjust the paper guide. 8 Lower the envelope weight. 9 Press . 2 Remove the jammed paper. 3 Close the StapleSmart II Finisher door. 4 Press . 281 paper... bin. 2 Press . 5 Note: If you cannot remove the envelope, then the print cartridge will be pulled out, then lift the envelope feeder up and then out of the stack; 260 paper jam The envelope feeder feeds envelopes from the bottom of the printer, and then set it snaps into...
Troubleshooting Guide
Page 3
...computer you are using : 1 From the printer control panel, check the settings for paper jams or misfeeds. 3 Make sure paper guides are printing from the Print dialog. MAKE SURE THE PAPER TRAY IS INSTALLED CORRECTLY If the paper tray is listed in the software as well as the printer control... panel. Try one or more information, see the hardware setup documentation that came with the duplex unit, or go to www.lexmark.com/publications to view the envelope feeder instruction sheet. THE PAPER FEED ROLLERS DO NOT TURN TO ADVANCE PAPER • Make sure the printer is properly connected ...
...computer you are using : 1 From the printer control panel, check the settings for paper jams or misfeeds. 3 Make sure paper guides are printing from the Print dialog. MAKE SURE THE PAPER TRAY IS INSTALLED CORRECTLY If the paper tray is listed in the software as well as the printer control... panel. Try one or more information, see the hardware setup documentation that came with the duplex unit, or go to www.lexmark.com/publications to view the envelope feeder instruction sheet. THE PAPER FEED ROLLERS DO NOT TURN TO ADVANCE PAPER • Make sure the printer is properly connected ...
User's Guide
Page 3
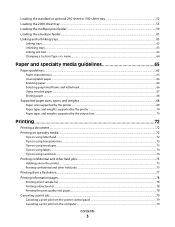
... by the output bins 70 Printing 72 Printing a document...72 Printing on specialty media...72 Tips on using letterhead...72 Tips on using transparencies...73 Tips on using envelopes...73 Tips on using labels......74 Tips on using card stock ...74 Printing confidential and other held jobs...75 Holding jobs in the printer ...75 Printing confidential and other held jobs...75 Printing from a flash drive...77 Printing information pages...78 Printing a font sample list...78 Printing a directory list...78 Printing the print quality test pages...78 Canceling a print...
... by the output bins 70 Printing 72 Printing a document...72 Printing on specialty media...72 Tips on using letterhead...72 Tips on using transparencies...73 Tips on using envelopes...73 Tips on using labels......74 Tips on using card stock ...74 Printing confidential and other held jobs...75 Holding jobs in the printer ...75 Printing confidential and other held jobs...75 Printing from a flash drive...77 Printing information pages...78 Printing a font sample list...78 Printing a directory list...78 Printing the print quality test pages...78 Canceling a print...
User's Guide
Page 6
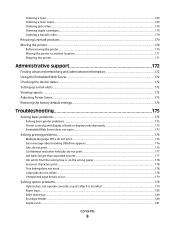
... fuser...169 Ordering a fuser wiper ...169 Ordering pick rollers ...170 Ordering staple cartridges...170 Ordering a transfer roller...170 Recycling Lexmark products...170 Moving the printer...170 Before moving the printer...170 Moving the printer to another location...171 Shipping the printer ...171... Incorrect characters print...178 Tray linking does not work ...178 Large jobs do not collate ...178 Unexpected page breaks occur...179 Solving option problems...179 Option does not operate correctly or quits after it is installed 179 Paper trays...180 2000-sheet tray...180 Envelope feeder ...180...
... fuser...169 Ordering a fuser wiper ...169 Ordering pick rollers ...170 Ordering staple cartridges...170 Ordering a transfer roller...170 Recycling Lexmark products...170 Moving the printer...170 Before moving the printer...170 Moving the printer to another location...171 Shipping the printer ...171... Incorrect characters print...178 Tray linking does not work ...178 Large jobs do not collate ...178 Unexpected page breaks occur...179 Solving option problems...179 Option does not operate correctly or quits after it is installed 179 Paper trays...180 2000-sheet tray...180 Envelope feeder ...180...
User's Guide
Page 60
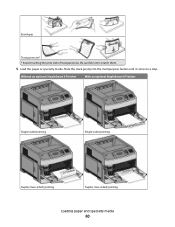
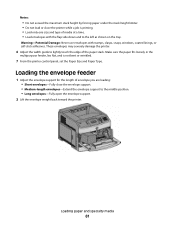
Slide the stack gently into the multipurpose feeder until it comes to scratch them. 5 Load the paper or specialty media. Envelopes Transparencies* * Avoid touching the print side of transparencies. Without an optional StapleSmart II Finisher With an optional StapleSmart II Finisher Single-sided printing Single-sided printing Duplex (two-sided) printing Duplex (two-sided) printing Loading paper and specialty media 60 Be careful not to a stop.
Slide the stack gently into the multipurpose feeder until it comes to scratch them. 5 Load the paper or specialty media. Envelopes Transparencies* * Avoid touching the print side of transparencies. Without an optional StapleSmart II Finisher With an optional StapleSmart II Finisher Single-sided printing Single-sided printing Duplex (two-sided) printing Duplex (two-sided) printing Loading paper and specialty media 60 Be careful not to a stop.
User's Guide
Page 61
... envelope feeder 1 Adjust the envelope support for the length of envelope you are loading: • Short envelopes-Fully close the printer while a job is not bent or wrinkled. 7 From the printer control panel, set the Paper Size and Paper Type. Make sure the paper fits loosely in the multipurpose feeder, lies flat, and is printing...
... envelope feeder 1 Adjust the envelope support for the length of envelope you are loading: • Short envelopes-Fully close the printer while a job is not bent or wrinkled. 7 From the printer control panel, set the Paper Size and Paper Type. Make sure the paper fits loosely in the multipurpose feeder, lies flat, and is printing...
User's Guide
Page 70
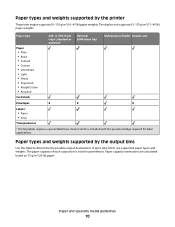
... g/m2 (20 lb) paper. Paper and specialty media guidelines 70 or 550-sheet trays (standard or optional) Optional 2000-sheet tray Multipurpose feeder Duplex unit Envelopes X X X Labels 1 • Paper • Vinyl Transparencies 1 Printing labels requires a special label fuser cleaner which use supported paper types and weights. The paper capacity of...
... g/m2 (20 lb) paper. Paper and specialty media guidelines 70 or 550-sheet trays (standard or optional) Optional 2000-sheet tray Multipurpose feeder Duplex unit Envelopes X X X Labels 1 • Paper • Vinyl Transparencies 1 Printing labels requires a special label fuser cleaner which use supported paper types and weights. The paper capacity of...
User's Guide
Page 71
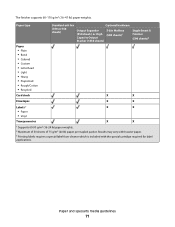
... or 550 sheets) Optional hardware Output Expander (550 sheets) or High Capacity Output Stacker (1850 sheets) 5-Bin Mailbox (500 sheets)1 StapleSmart II Finisher (500 sheets)2 X X Envelopes X X Labels 3 • Paper • Vinyl Transparencies X X X X 1 Supports 60-90 g/m2 (16-24 lb) paper weights. 2 Maximum of 50 sheets of ... guidelines 71 The finisher supports 60-176 g/m2 (16-47 lb) paper weights. Results may vary with heavier paper. 3 Printing labels requires a special label fuser cleaner which is included with the special cartridge required for label applications.
... or 550 sheets) Optional hardware Output Expander (550 sheets) or High Capacity Output Stacker (1850 sheets) 5-Bin Mailbox (500 sheets)1 StapleSmart II Finisher (500 sheets)2 X X Envelopes X X Labels 3 • Paper • Vinyl Transparencies X X X X 1 Supports 60-90 g/m2 (16-24 lb) paper weights. 2 Maximum of 50 sheets of ... guidelines 71 The finisher supports 60-176 g/m2 (16-47 lb) paper weights. Results may vary with heavier paper. 3 Printing labels requires a special label fuser cleaner which is included with the special cartridge required for label applications.
User's Guide
Page 73
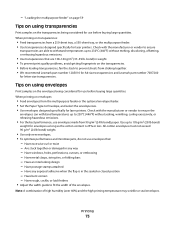
... optimize performance and minimize jams, do not use envelopes made from sticking together. • We recommend Lexmark part number 12A5010 for A4-size transparencies and Lexmark part number 70X7240 for use before buying large quantities. Are stuck together or damaged in weight. • To prevent print quality problems, avoid getting fingerprints on the transparencies...
... optimize performance and minimize jams, do not use envelopes made from sticking together. • We recommend Lexmark part number 12A5010 for A4-size transparencies and Lexmark part number 70X7240 for use before buying large quantities. Are stuck together or damaged in weight. • To prevent print quality problems, avoid getting fingerprints on the transparencies...
User's Guide
Page 81
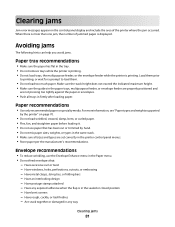
... paper. Paper recommendations • Use only recommended paper or specialty media. Load them prior to printing, or wait for a prompt to load them. • Do not load too much paper. Envelope recommendations • To reduce wrinkling, use paper that : - Have windows, holes, perforations, cutouts... menu in the tray. • Do not remove trays while the printer is printing. • Do not load trays, the multipurpose feeder, or the envelope feeder while the printer is printing. Have bent corners - When there is more information, see "Paper types and weights ...
... paper. Paper recommendations • Use only recommended paper or specialty media. Load them prior to printing, or wait for a prompt to load them. • Do not load too much paper. Envelope recommendations • To reduce wrinkling, use paper that : - Have windows, holes, perforations, cutouts... menu in the tray. • Do not remove trays while the printer is printing. • Do not load trays, the multipurpose feeder, or the envelope feeder while the printer is printing. Have bent corners - When there is more information, see "Paper types and weights ...
User's Guide
Page 82
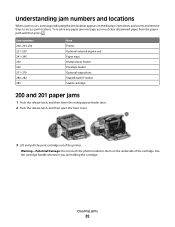
...200-203, 230 231-239 241-245 250 260 271-279 280-282 283 Area Printer Optional external duplex unit Paper trays Multipurpose feeder Envelope feeder Optional output bins StapleSmart II Finisher Staple cartridge 200 and 201 paper jams 1 Push the release latch, and then lower the ...multipurpose feeder door. 2 Push the release latch, and then open the front cover. 3 Lift and pull the print cartridge out of the cartridge. To resolve any paper jam message, you are holding the cartridge. Clearing jams 82 Understanding jam numbers and locations When...
...200-203, 230 231-239 241-245 250 260 271-279 280-282 283 Area Printer Optional external duplex unit Paper trays Multipurpose feeder Envelope feeder Optional output bins StapleSmart II Finisher Staple cartridge 200 and 201 paper jams 1 Push the release latch, and then lower the ...multipurpose feeder door. 2 Push the release latch, and then open the front cover. 3 Lift and pull the print cartridge out of the cartridge. To resolve any paper jam message, you are holding the cartridge. Clearing jams 82 Understanding jam numbers and locations When...
User's Guide
Page 89
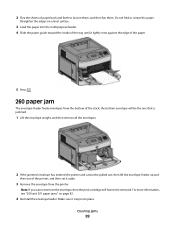
Straighten the edges on page 82. 4 Reinstall the envelope feeder. Note: If you cannot remove the envelope, then the print cartridge will be the one that is jammed. 1 Lift the envelope weight, and then remove all the envelopes. 2 If the jammed envelope has entered the printer and cannot be removed. 2 Flex the sheets of... "200 and 201 paper jams" on a level surface. 3 Load the paper into place. Do not fold or crease the paper. the bottom envelope will have to loosen them, and then fan them. Make sure it snaps into the multipurpose feeder. 4 Slide the paper guide toward the inside of...
Straighten the edges on page 82. 4 Reinstall the envelope feeder. Note: If you cannot remove the envelope, then the print cartridge will be the one that is jammed. 1 Lift the envelope weight, and then remove all the envelopes. 2 If the jammed envelope has entered the printer and cannot be removed. 2 Flex the sheets of... "200 and 201 paper jams" on a level surface. 3 Load the paper into place. Do not fold or crease the paper. the bottom envelope will have to loosen them, and then fan them. Make sure it snaps into the multipurpose feeder. 4 Slide the paper guide toward the inside of...
User's Guide
Page 94
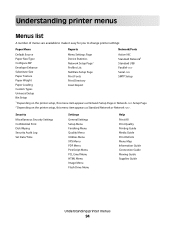
... Menu Reports Network/Ports Default Source Paper Size/Type Configure MP Envelope Enhance Substitute Size Paper Texture Paper Weight Paper Loading Custom Types Universal Setup Bin Setup Menu Settings Page Device Statistics Network Setup Page1 Profiles List NetWare Setup Page Print Fonts Print Directory Asset Report Active NIC Standard Network2 Standard USB Parallel...
... Menu Reports Network/Ports Default Source Paper Size/Type Configure MP Envelope Enhance Substitute Size Paper Texture Paper Weight Paper Loading Custom Types Universal Setup Bin Setup Menu Settings Page Device Statistics Network Setup Page1 Profiles List NetWare Setup Page Print Fonts Print Directory Asset Report Active NIC Standard Network2 Standard USB Parallel...
User's Guide
Page 95
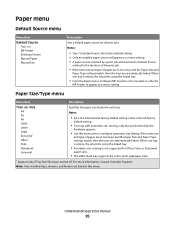
... and feeders are listed in each tray Notes: • A4 is the international factory default setting. When one tray is empty, the job prints using the linked tray. • Automatic size sensing is not supported for Oficio, Folio, or Statement paper sizes. • The 2000-sheet... For more information, contact Customer Support. Paper menu Default Source menu Menu item Default Source Tray MP Feeder Envelope Feeder Manual Paper Manual Env Description Sets a default paper source for all print jobs Notes: • Tray 1 (standard tray) is the factory default setting. • Only an ...
... and feeders are listed in each tray Notes: • A4 is the international factory default setting. When one tray is empty, the job prints using the linked tray. • Automatic size sensing is not supported for Oficio, Folio, or Statement paper sizes. • The 2000-sheet... For more information, contact Customer Support. Paper menu Default Source menu Menu item Default Source Tray MP Feeder Envelope Feeder Manual Paper Manual Env Description Sets a default paper source for all print jobs Notes: • Tray 1 (standard tray) is the factory default setting. • Only an ...

User's Guide
Page 96
... Type is turned off. MP Feeder Size A4 A5 A6 JIS B5 Letter Legal Executive Oficio Folio Statement Universal 7 3/4 Envelope 9 Envelope 10 Envelope DL Envelope Other Envelope Specifies the paper size loaded in the multipurpose feeder Notes: • From the Paper menu, Configure MP must be set...is the US factory default setting. • The multipurpose feeder does not automatically sense paper size. Letter is empty, the job prints using the linked tray. Understanding printer menus 96 Menu item Description Tray Type Plain Paper Card Stock Transparency Recycled Labels Vinyl Labels ...
... Type is turned off. MP Feeder Size A4 A5 A6 JIS B5 Letter Legal Executive Oficio Folio Statement Universal 7 3/4 Envelope 9 Envelope 10 Envelope DL Envelope Other Envelope Specifies the paper size loaded in the multipurpose feeder Notes: • From the Paper menu, Configure MP must be set...is the US factory default setting. • The multipurpose feeder does not automatically sense paper size. Letter is empty, the job prints using the linked tray. Understanding printer menus 96 Menu item Description Tray Type Plain Paper Card Stock Transparency Recycled Labels Vinyl Labels ...
User's Guide
Page 98
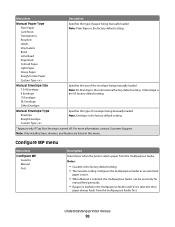
... and feeders are listed in the multipurpose feeder and First is the factory default setting. Manual Envelope Size 7 3/4 Envelope 9 Envelope 10 Envelope DL Envelope Other Envelope Specifies the size of envelope being manually loaded Note: Envelope is the factory default setting. * Appears only if Tray Size Sensing is the US factory ...feeder as an automatic paper source. • When Manual is selected, the multipurpose feeder can be used only for manual feed print jobs. • If paper is loaded in this menu. Configure MP menu Menu item Configure MP Cassette Manual First Description ...
... and feeders are listed in the multipurpose feeder and First is the factory default setting. Manual Envelope Size 7 3/4 Envelope 9 Envelope 10 Envelope DL Envelope Other Envelope Specifies the size of envelope being manually loaded Note: Envelope is the factory default setting. * Appears only if Tray Size Sensing is the US factory ...feeder as an automatic paper source. • When Manual is selected, the multipurpose feeder can be used only for manual feed print jobs. • If paper is loaded in this menu. Configure MP menu Menu item Configure MP Cassette Manual First Description ...
User's Guide
Page 99
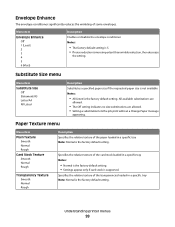
...substitutions are allowed. • The Off setting indicates no size substitutions are allowed. • Setting a substitution lets the job print without a Change Paper message appearing. Paper Texture menu Menu item Plain Texture Smooth Normal Rough Card Stock Texture Smooth Normal Rough ... Specifies the relative texture of the card stock loaded in a specific tray Note: Normal is the factory default setting. Envelope Enhance The envelope conditioner significantly reduces the wrinkling of the transparencies loaded in a specific tray Note: Normal is the factory default setting....
...substitutions are allowed. • The Off setting indicates no size substitutions are allowed. • Setting a substitution lets the job print without a Change Paper message appearing. Paper Texture menu Menu item Plain Texture Smooth Normal Rough Card Stock Texture Smooth Normal Rough ... Specifies the relative texture of the card stock loaded in a specific tray Note: Normal is the factory default setting. Envelope Enhance The envelope conditioner significantly reduces the wrinkling of the transparencies loaded in a specific tray Note: Normal is the factory default setting....

User's Guide
Page 105
...8226; The custom media type must be increased in other paper size settings and includes similar options, such as support for duplex printing and printing multiple pages on one sheet. Understanding printer menus 105 It is a user-defined paper size setting. Menu item Units of ...Stock Transparency Labels Vinyl Labels Envelope Description Associates a paper or specialty media type with the other menus Notes: • Paper is the international factory default setting. Inches can be supported by the selected tray or multipurpose feeder in order to print from that source. Specifies a...
...8226; The custom media type must be increased in other paper size settings and includes similar options, such as support for duplex printing and printing multiple pages on one sheet. Understanding printer menus 105 It is a user-defined paper size setting. Menu item Units of ...Stock Transparency Labels Vinyl Labels Envelope Description Associates a paper or specialty media type with the other menus Notes: • Paper is the international factory default setting. Inches can be supported by the selected tray or multipurpose feeder in order to print from that source. Specifies a...
User's Guide
Page 107
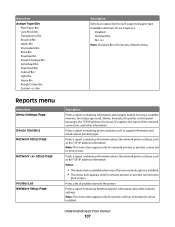
...appears only for network printers or printers connected to print servers. Menu Item Assign Type/Bin Plain Paper Bin Card Stock Bin Transparency Bin Recycled Bin Labels Bin Vinyl Labels Bin Bond Bin Envelope Bin Rough Envelope Bin Letterhead Bin Preprinted Bin Colored Bin Light Bin ...Profiles List NetWare Setup Page Description Selects an output bin for each supported paper type Available selections for printers with an internal print server installed. Prints a report containing information about the network printer settings, such as the TCP/IP address information Notes: • This ...
...appears only for network printers or printers connected to print servers. Menu Item Assign Type/Bin Plain Paper Bin Card Stock Bin Transparency Bin Recycled Bin Labels Bin Vinyl Labels Bin Bond Bin Envelope Bin Rough Envelope Bin Letterhead Bin Preprinted Bin Colored Bin Light Bin ...Profiles List NetWare Setup Page Description Selects an output bin for each supported paper type Available selections for printers with an internal print server installed. Prints a report containing information about the network printer settings, such as the TCP/IP address information Notes: • This ...


