
User's Guide
Page 9
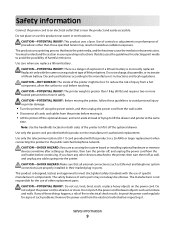
CAUTION-POTENTIAL INJURY: This product uses a laser. You must understand the section in your operating instructions that all cords and cables from a hot component, allow the surface to the printer, then turn the printer off using the power switch, and then unplug the power cord from the wall outlet... you are properly installed in their marked plug-in hazardous radiation exposure. CAUTION-POTENTIAL INJURY: Before moving it. • Lift the printer off the optional drawer. Use only the power cord provided with this product or a 26 AWG or larger replacement when connecting this ...
CAUTION-POTENTIAL INJURY: This product uses a laser. You must understand the section in your operating instructions that all cords and cables from a hot component, allow the surface to the printer, then turn the printer off using the power switch, and then unplug the power cord from the wall outlet... you are properly installed in their marked plug-in hazardous radiation exposure. CAUTION-POTENTIAL INJURY: Before moving it. • Lift the printer off the optional drawer. Use only the power cord provided with this product or a 26 AWG or larger replacement when connecting this ...
User's Guide
Page 66
... information is made from 100% chemically treated pulped wood. For detailed information on paper with heat-resistant inks designed for use with laser printers: • Chemically treated papers used to make copies without melting or releasing hazardous emissions. mixing results in jams. • Do... precise location on the page) greater than 60 g/m2 (16 lb) • Multiple part forms or documents For more information about Lexmark, visit www.lexmark.com. The ink must be adjusted with a software application to 230°C (446°F) without carbon paper, also known as carbonless...
... information is made from 100% chemically treated pulped wood. For detailed information on paper with heat-resistant inks designed for use with laser printers: • Chemically treated papers used to make copies without melting or releasing hazardous emissions. mixing results in jams. • Do... precise location on the page) greater than 60 g/m2 (16 lb) • Multiple part forms or documents For more information about Lexmark, visit www.lexmark.com. The ink must be adjusted with a software application to 230°C (446°F) without carbon paper, also known as carbonless...
User's Guide
Page 67
... and socially responsible forest management and restoration practices. 3 Choose the most appropriate paper for use of paper in laser (electro-photographic) printers. Lexmark is another. However, the following : • Amount of post-consumer waste (Lexmark tests up to de-ink and deal with additives such as letterhead must be made that all over foreign...
... and socially responsible forest management and restoration practices. 3 Choose the most appropriate paper for use of paper in laser (electro-photographic) printers. Lexmark is another. However, the following : • Amount of post-consumer waste (Lexmark tests up to de-ink and deal with additives such as letterhead must be made that all over foreign...
User's Guide
Page 72
...page 52 - c Click OK, and then click Print. Printing on specialty media Tips on using letterhead • Use letterhead designed specifically for laser printers. • Print samples on the letterhead being considered for use before buying large quantities. • Before loading letterhead, fan the stack to ...match the loaded paper, or select the appropriate tray or feeder. 3 Click Print. For information on letterhead. Printing This chapter covers printing, printer reports, and job cancelation. Note: To print on page 55 Printing 72 "Loading the 2000-sheet tray" on a specific paper type, ...
...page 52 - c Click OK, and then click Print. Printing on specialty media Tips on using letterhead • Use letterhead designed specifically for laser printers. • Print samples on the letterhead being considered for use before buying large quantities. • Before loading letterhead, fan the stack to ...match the loaded paper, or select the appropriate tray or feeder. 3 Click Print. For information on letterhead. Printing This chapter covers printing, printer reports, and job cancelation. Note: To print on page 55 Printing 72 "Loading the 2000-sheet tray" on a specific paper type, ...
User's Guide
Page 73
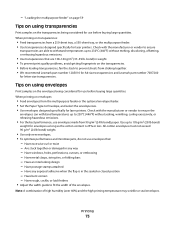
... quantities. When printing on the transparencies. • Before loading transparencies, fan the stack to 105 g/m2 (28 lb bond) weight for laser printers. Use up to prevent sheets from 90 g/m2 (24 lb bond) paper. Are stuck together or damaged in weight. • To ... printing on the transparencies being considered for use envelopes made from sticking together. • We recommend Lexmark part number 12A5010 for A4-size transparencies and Lexmark part number 70X7240 for laser printers. Check with the manufacturer or vendor to ensure transparencies are 138-146 g/m2 (37-39 lb....
... quantities. When printing on the transparencies. • Before loading transparencies, fan the stack to 105 g/m2 (28 lb bond) weight for laser printers. Use up to prevent sheets from 90 g/m2 (24 lb bond) paper. Are stuck together or damaged in weight. • To ... printing on the transparencies being considered for use envelopes made from sticking together. • We recommend Lexmark part number 12A5010 for A4-size transparencies and Lexmark part number 70X7240 for laser printers. Check with the manufacturer or vendor to ensure transparencies are 138-146 g/m2 (37-39 lb....
User's Guide
Page 74
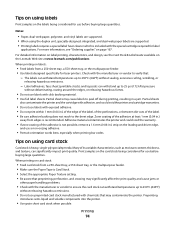
...stock from a 250-sheet tray, a 550-sheet tray, or the multipurpose feeder. • Use labels designed specifically for laser printers. Preprinting introduces semi-liquid and volatile components into the printer. • Use grain short card stock when possible. For detailed information on label printing, characteristics, and design, see "...resulting in .) of the edge of the label, of the perforations, or between die-cuts of the adhesive at www.lexmark.com/publications. Tips on using labels Print samples on the labels being considered for use before buying large quantities.
...stock from a 250-sheet tray, a 550-sheet tray, or the multipurpose feeder. • Use labels designed specifically for laser printers. Preprinting introduces semi-liquid and volatile components into the printer. • Use grain short card stock when possible. For detailed information on label printing, characteristics, and design, see "...resulting in .) of the edge of the label, of the perforations, or between die-cuts of the adhesive at www.lexmark.com/publications. Tips on using labels Print samples on the labels being considered for use before buying large quantities.
User's Guide
Page 199
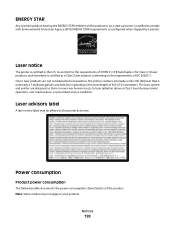
... power consumption The following table documents the power consumption characteristics of IEC 60825-1. Laser notice The printer is certified in the wavelength of 655-675 nanometers. Notices 199 ENERGY STAR Any Lexmark product bearing the ENERGY STAR emblem on the product or on a start-up... screen is certified to the requirements of the product. The printer contains internally a Class IIIb (3b) laser that is certified as configured when shipped by Lexmark. The laser system and printer are not considered to be affixed to your product. Note: Some modes may be...
... power consumption The following table documents the power consumption characteristics of IEC 60825-1. Laser notice The printer is certified in the wavelength of 655-675 nanometers. Notices 199 ENERGY STAR Any Lexmark product bearing the ENERGY STAR emblem on the product or on a start-up... screen is certified to the requirements of the product. The printer contains internally a Class IIIb (3b) laser that is certified as configured when shipped by Lexmark. The laser system and printer are not considered to be affixed to your product. Note: Some modes may be...
Service Manual
Page 3
......2-144 Sensor (pass through) late jam service check ...2-145 Table of contents ...iii Notices and safety information ...xv Laser notice ...xv Lithium warning ...ii-xxi Safety information...xxi Preface ...xxiv Conventions...xxiv General information ... 1-1 1-1 1-2 1-2 ...Options ...Available internal options ...Media handling options ...Printer configurations ...Basic model ...Fully configured model ...Supported paper sizes, types, and weights ...Paper sizes supported by the printer ...Paper types and weights supported by the printer ...Paper types and weights supported by the output ...
......2-144 Sensor (pass through) late jam service check ...2-145 Table of contents ...iii Notices and safety information ...xv Laser notice ...xv Lithium warning ...ii-xxi Safety information...xxi Preface ...xxiv Conventions...xxiv General information ... 1-1 1-1 1-2 1-2 ...Options ...Available internal options ...Media handling options ...Printer configurations ...Basic model ...Fully configured model ...Supported paper sizes, types, and weights ...Paper sizes supported by the printer ...Paper types and weights supported by the printer ...Paper types and weights supported by the output ...
Service Manual
Page 25
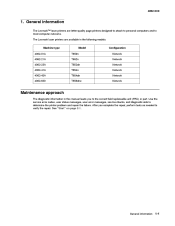
4062-XXX 1. General information The Lexmark™ laser printers are available in the following models: Machine type 4062-01A 4062-21A 4062-23A 4062-41A 4062-43A 4062-630 Model T650n T652n T652dn T654n ... codes, user status messages, user error messages, service checks, and diagnostic aids to most computer networks. After you to verify the repair. General information 1-1 The Lexmark laser printers are letter-quality page printers designed to attach to personal computers and to determine the...
4062-XXX 1. General information The Lexmark™ laser printers are available in the following models: Machine type 4062-01A 4062-21A 4062-23A 4062-41A 4062-43A 4062-630 Model T650n T652n T652dn T654n ... codes, user status messages, user error messages, service checks, and diagnostic aids to most computer networks. After you to verify the repair. General information 1-1 The Lexmark laser printers are letter-quality page printers designed to attach to personal computers and to determine the...
Service Manual
Page 227
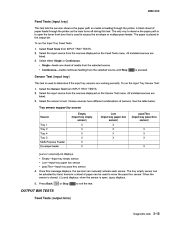
...until Stop Sensor Test (input tray) is pressed. Select either Single or Continuous. • Single-feeds one sheet of paper feeds through the printer. Various sources have different combinations of paper can manually actuate each sensor. To run the Input Tray Sensor Test: 1. Select Feed Tests from ...this test. 4062-XXX Feed Tests (input tray) This test lets the servicer observe the paper path as media is feeding through the printer as the laser turns off during this message displays, the servicer can be used to cover the pass thru sensor. To run the Input Tray Feed...
...until Stop Sensor Test (input tray) is pressed. Select either Single or Continuous. • Single-feeds one sheet of paper feeds through the printer. Various sources have different combinations of paper can manually actuate each sensor. To run the Input Tray Sensor Test: 1. Select Feed Tests from ...this test. 4062-XXX Feed Tests (input tray) This test lets the servicer observe the paper path as media is feeding through the printer as the laser turns off during this message displays, the servicer can be used to cover the pass thru sensor. To run the Input Tray Feed...
Service Manual
Page 252
...: Oe Max. INPUT TRAY TESTS Feed Tests (input tray) This test lets the servicer observe the paper path as media is feeding through the printer as the laser turns off during this test. The paper is feeding, and the message Duplex Feed 2 Feeding...displays. Touch to select Duplex Feed 1 from DUPLEX TESTS... 2 from INPUT TRAY TESTS. 2. Touch Back or press Stop to select Feed Tests from DUPLEX TESTS. To run using any of paper feeds through the printer. Touch to exit the test.
...: Oe Max. INPUT TRAY TESTS Feed Tests (input tray) This test lets the servicer observe the paper path as media is feeding through the printer as the laser turns off during this test. The paper is feeding, and the message Duplex Feed 2 Feeding...displays. Touch to select Duplex Feed 1 from DUPLEX TESTS... 2 from INPUT TRAY TESTS. 2. Touch Back or press Stop to select Feed Tests from DUPLEX TESTS. To run using any of paper feeds through the printer. Touch to exit the test.
Service Manual
Page 288
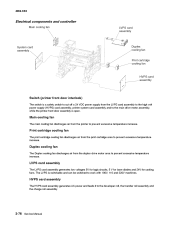
... card assembly and to the main drive motor assembly, while the printer front door assembly is open. LVPS card assembly The LVPS card assembly generates low voltages 5V for logic circuits, 5 V for laser diodes and 24V for cooling fans. 4062-XXX Electrical components and controller... Main cooling fan LVPS card assembly System card assembly Duplex cooling fan Print cartridge cooling fan HVPS card assembly Switch (printer front door interlock) The switch is a...
... card assembly and to the main drive motor assembly, while the printer front door assembly is open. LVPS card assembly The LVPS card assembly generates low voltages 5V for logic circuits, 5 V for laser diodes and 24V for cooling fans. 4062-XXX Electrical components and controller... Main cooling fan LVPS card assembly System card assembly Duplex cooling fan Print cartridge cooling fan HVPS card assembly Switch (printer front door interlock) The switch is a...

Service Manual
Page 371
...above as a method of the following components: • Operator panel assembly • System card assembly Only replace one or the printer will be used in a machine, it can not be rendered inoperable. Once a component has been installed in another machine. ...of troubleshooting components. C D A B Repair Information 4-49 Replace the required component and perform a POR before replacing a second component listed above. See "Laser cover removal (models X651, X652, X654, and X656)" on both sides. 3. It must be rendered inoperable. Remove the pins (D) on page 4-105...
...above as a method of the following components: • Operator panel assembly • System card assembly Only replace one or the printer will be used in a machine, it can not be rendered inoperable. Once a component has been installed in another machine. ...of troubleshooting components. C D A B Repair Information 4-49 Replace the required component and perform a POR before replacing a second component listed above. See "Laser cover removal (models X651, X652, X654, and X656)" on both sides. 3. It must be rendered inoperable. Remove the pins (D) on page 4-105...
Service Manual
Page 380
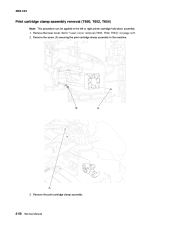
Go to the machine. B A A 3. Remove the screw (A) securing the print cartridge clamp assembly to "Laser cover removal (T650, T652, T654)" on page 4-27. 2. Remove the print cartridge clamp assembly. 4-58 Service Manual 4062-XXX Print cartridge clamp assembly removal (T650, T652, T654) Note: This procedure can be applied to the left or right printer cartridge hold down assembly. 1. Remove the laser cover.
Go to the machine. B A A 3. Remove the screw (A) securing the print cartridge clamp assembly to "Laser cover removal (T650, T652, T654)" on page 4-27. 2. Remove the print cartridge clamp assembly. 4-58 Service Manual 4062-XXX Print cartridge clamp assembly removal (T650, T652, T654) Note: This procedure can be applied to the left or right printer cartridge hold down assembly. 1. Remove the laser cover.


