
Embedded Web Server Administrator's Guide
Page 9
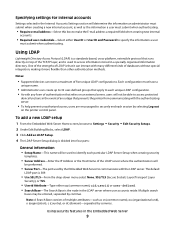
... authentication that it more flexible than other authentication methods. Using security features in a specially organized information directory. Each configuration must have a unique name. • Administrators can create up to 32 user-defined groups that apply to each unique LDAP... encouraged to securely end each particular LDAP Server Setup when creating security templates. • Server Address-Enter the IP Address or the Host Name of five unique LDAP configurations. Note: A Search Base consists of databases without special integration, making it can store a maximum of the ...
... authentication that it more flexible than other authentication methods. Using security features in a specially organized information directory. Each configuration must have a unique name. • Administrators can create up to 32 user-defined groups that apply to each unique LDAP... encouraged to securely end each particular LDAP Server Setup when creating security templates. • Server Address-Enter the IP Address or the Host Name of five unique LDAP configurations. Note: A Search Base consists of databases without special integration, making it can store a maximum of the ...
Embedded Web Server Administrator's Guide
Page 11
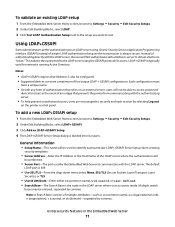
...any form of authentication that relies on the printer control panel. Note: A Search Base consists of an outage that Kerberos 5 also be configured. • Supported devices can store a maximum of authenticating directly with the authenticating server. • To help prevent unauthorized access, users are... encouraged to securely end each particular LDAP+GSSAPI Server Setup when creating security templates. • Server Address-Enter the IP Address or the Host Name of simple LDAP authentication because the transmission is then presented to obtain a Kerberos "ticket." To add...
...any form of authentication that relies on the printer control panel. Note: A Search Base consists of an outage that Kerberos 5 also be configured. • Supported devices can store a maximum of authenticating directly with the authenticating server. • To help prevent unauthorized access, users are... encouraged to securely end each particular LDAP+GSSAPI Server Setup when creating security templates. • Server Address-Enter the IP Address or the Host Name of simple LDAP authentication because the transmission is then presented to obtain a Kerberos "ticket." To add...

Embedded Web Server Administrator's Guide
Page 14
...To sync to an NTP server rather than manage date and time settings manually, click the Enable NTP check box, and then type the IP address or hostname of the NTP Server. 6 If the NTP server requires authentication, click the Enable Authentication check box, and then use...Setup settings as part of a security template. • As with any form of authentication that relies on an external server, users will require configuration of additional settings under Custom Time Zone Setup. 3 If Daylight Saving Time (DST) is Microsoft's solution for enabling authentication without requiring the ...
...To sync to an NTP server rather than manage date and time settings manually, click the Enable NTP check box, and then type the IP address or hostname of the NTP Server. 6 If the NTP server requires authentication, click the Enable Authentication check box, and then use...Setup settings as part of a security template. • As with any form of authentication that relies on an external server, users will require configuration of additional settings under Custom Time Zone Setup. 3 If Daylight Saving Time (DST) is Microsoft's solution for enabling authentication without requiring the ...
Embedded Web Server Administrator's Guide
Page 19
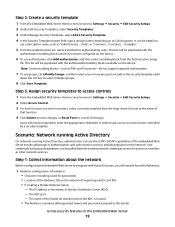
... in order to gain access to the printer Using security features in the security template. Step 1: Collect information about the network Before configuring the Embedded Web Server to integrate with Active Directory, you want to protect, select a security template from the existing network, making... access to include in the Embedded Web Server 19 The IP address or hostname of the Key Distribution Center (KDC) - Step 2: Create a security template 1 From the Embedded Web Server Home screen, ...
... in order to gain access to the printer Using security features in the security template. Step 1: Collect information about the network Before configuring the Embedded Web Server to integrate with Active Directory, you want to protect, select a security template from the existing network, making... access to include in the Embedded Web Server 19 The IP address or hostname of the Key Distribution Center (KDC) - Step 2: Create a security template 1 From the Embedded Web Server Home screen, ...
Embedded Web Server Administrator's Guide
Page 20
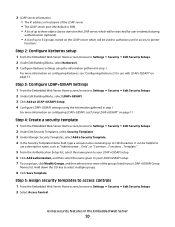
... screen, browse to Settings ª Security ª Edit Security Setups. 2 Under Edit Building Blocks, select Kerberos 5. 3 Configure Kerberos settings using the information gathered in the Embedded Web Server 20 2 LDAP server information • The IP address or hostname of the LDAP server • The LDAP server port (the default is 389) •...
... screen, browse to Settings ª Security ª Edit Security Setups. 2 Under Edit Building Blocks, select Kerberos 5. 3 Configure Kerberos settings using the information gathered in the Embedded Web Server 20 2 LDAP server information • The IP address or hostname of the LDAP server • The LDAP server port (the default is 389) •...
Embedded Web Server Administrator's Guide
Page 22
...print queue until the user enters a PIN on -screen. 1 From the Embedded Web Server Home screen, browse to use the IPv4 address. Configuring confidential printing Users printing confidential or sensitive information may opt to use the domain name for the device. • Organization Name-Type the name ...the Certificate Management task, even though those fields will be PIN-protected so that conforms to RFC 2459. For example, enter an IP address using the format IP:1.2.3.4, or a DNS address using the format DNS:ldap.company.com. Leave this field blank to use the confidential print option, ...
...print queue until the user enters a PIN on -screen. 1 From the Embedded Web Server Home screen, browse to use the IPv4 address. Configuring confidential printing Users printing confidential or sensitive information may opt to use the domain name for the device. • Organization Name-Type the name ...the Certificate Management task, even though those fields will be PIN-protected so that conforms to RFC 2459. For example, enter an IP address using the format IP:1.2.3.4, or a DNS address using the format DNS:ldap.company.com. Leave this field blank to use the confidential print option, ...
Embedded Web Server Administrator's Guide
Page 25
...click Submit to save changes, and then follow the Setup E-mail Server link to configure SMTP settings. 10 Click Submit to save changes, or Reset Form to a network syslog server, type the IP address or hostname of certain log events, type one or more E-mail addresses (... Enable Remote Syslog check box. Warning" is chosen, severity levels 0-4 will be transmitted to a network syslog server for sending E-mail. Configuring security audit log settings The security audit log allows administrators to monitor security-related events on the destination server. The chosen severity level and ...
...click Submit to save changes, and then follow the Setup E-mail Server link to configure SMTP settings. 10 Click Submit to save changes, or Reset Form to a network syslog server, type the IP address or hostname of certain log events, type one or more E-mail addresses (... Enable Remote Syslog check box. Warning" is chosen, severity levels 0-4 will be transmitted to a network syslog server for sending E-mail. Configuring security audit log settings The security audit log allows administrators to monitor security-related events on the destination server. The chosen severity level and ...
Embedded Web Server Administrator's Guide
Page 26
... Allowable Authentication Mechanisms, choose which authentication protocols the printer will be sent using a secondary or backup SMTP server, enter the IP address/hostname and SMTP port for a response from the SMTP Server Authentication list. If only one certificate has been installed, default..., 802.1x authentication is port 25. 4 If using an encrypted link. 8 If your network under Device Credentials. For more information on configuring digital certificates, see "Managing certificates" on page 21. 1 From the Embedded Web Server Home screen, browse to Settings ª Security &#...
... Allowable Authentication Mechanisms, choose which authentication protocols the printer will be sent using a secondary or backup SMTP server, enter the IP address/hostname and SMTP port for a response from the SMTP Server Authentication list. If only one certificate has been installed, default..., 802.1x authentication is port 25. 4 If using an encrypted link. 8 If your network under Device Credentials. For more information on configuring digital certificates, see "Managing certificates" on page 21. 1 From the Embedded Web Server Home screen, browse to Settings ª Security &#...
Embedded Web Server Administrator's Guide
Page 27
...MIB) check box. 6 Click Submit to finalize changes, or Reset Form to restore default values. The Embedded Web server allows administrators to configure settings for the SNMP Community identifier (the default community name is public). 5 To facilitate the automatic installation of the blank... IP address entries (shown as device monitoring, type an SNMPPv3 Read/Write User name and Password in the Embedded Web Server 27 Setting SNMP Traps After configuring SNMP Version 1, 2c or SNMP Version 3, you can further customize ...
...MIB) check box. 6 Click Submit to finalize changes, or Reset Form to restore default values. The Embedded Web server allows administrators to configure settings for the SNMP Community identifier (the default community name is public). 5 To facilitate the automatic installation of the blank... IP address entries (shown as device monitoring, type an SNMPPv3 Read/Write User name and Password in the Embedded Web Server 27 Setting SNMP Traps After configuring SNMP Version 1, 2c or SNMP Version 3, you can further customize ...
User's Guide
Page 4
... jam...91 283 staple jam...92 Understanding printer menus 94 Menus list...94 Paper menu...95 Default Source menu...95 Paper Size/Type menu ...95 Configure MP menu...98 Envelope Enhance...99 Substitute Size menu...99 Paper Texture menu ...99 Paper Weight menu ...101 Paper Loading menu ...103 Custom Types menu... menu...107 Network/Ports menu...108 Active NIC menu...108 Standard Network or Network menus ...108 Network Reports menu ...110 Network Card menu...110 TCP/IP menu ...111 IPv6 menu...112 Wireless menu...112 Contents 4
... jam...91 283 staple jam...92 Understanding printer menus 94 Menus list...94 Paper menu...95 Default Source menu...95 Paper Size/Type menu ...95 Configure MP menu...98 Envelope Enhance...99 Substitute Size menu...99 Paper Texture menu ...99 Paper Weight menu ...101 Paper Loading menu ...103 Custom Types menu... menu...107 Network/Ports menu...108 Active NIC menu...108 Standard Network or Network menus ...108 Network Reports menu ...110 Network Card menu...110 TCP/IP menu ...111 IPv6 menu...112 Wireless menu...112 Contents 4
User's Guide
Page 44
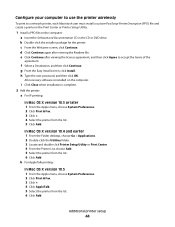
..., and then click Continue. Additional printer setup 44 c From the Welcome screen, click Continue. g From the Easy Install screen, click Install. Configure your computer to use the printer wirelessly To print to accept the terms of the agreement. All necessary software is complete. 2 Add the printer:... a For IP printing: In Mac OS X version 10.5 or later 1 From the Apple menu, choose System Preferences. 2 Click Print & Fax. 3 Click ...
..., and then click Continue. Additional printer setup 44 c From the Welcome screen, click Continue. g From the Easy Install screen, click Install. Configure your computer to use the printer wirelessly To print to accept the terms of the agreement. All necessary software is complete. 2 Add the printer:... a For IP printing: In Mac OS X version 10.5 or later 1 From the Apple menu, choose System Preferences. 2 Click Print & Fax. 3 Click ...
User's Guide
Page 45
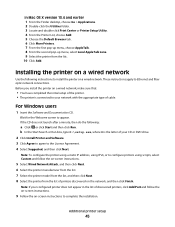
...DVD drive. 2 Click Install Printer and Software. 3 Click Agree to agree to install the printer on a wired network. Note: If your configured printer does not appear in the list of discovered printers, click Add Port and follow the on-screen instructions. 9 Follow the on-screen ...the printer model from the list, and then click Next. 8 Select the printer from the list. 10 Click Add. Note: To configure the printer using a static IP address, using IPv6, or to complete the installation. For Windows users 1 Insert the Software and Documentation CD. Additional printer setup 45 ...
...DVD drive. 2 Click Install Printer and Software. 3 Click Agree to agree to install the printer on a wired network. Note: If your configured printer does not appear in the list of discovered printers, click Add Port and follow the on-screen instructions. 9 Follow the on-screen ...the printer model from the list, and then click Next. 8 Select the printer from the list. 10 Click Add. Note: To configure the printer using a static IP address, using IPv6, or to complete the installation. For Windows users 1 Insert the Software and Documentation CD. Additional printer setup 45 ...
User's Guide
Page 46
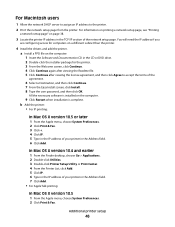
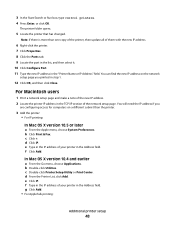
...Applications. 2 Double-click Utilities. 3 Double-click Printer Setup Utility or Print Center. 4 From the Printer List, click Add. 5 Click IP. 6 Type in the IP address of your printer in the CD or DVD drive. 2 Double-click the installer package for computers on the computer. 9 Click Restart ...when installation is installed on a different subnet than the printer. 4 Install the drivers and add the printer. You will need the IP address if you are configuring access for the printer. 3 From the Welcome screen, click Continue. 4 Click Continue again after viewing the Readme file. 5 Click ...
...Applications. 2 Double-click Utilities. 3 Double-click Printer Setup Utility or Print Center. 4 From the Printer List, click Add. 5 Click IP. 6 Type in the IP address of your printer in the CD or DVD drive. 2 Double-click the installer package for computers on the computer. 9 Click Restart ...when installation is installed on a different subnet than the printer. 4 Install the drivers and add the printer. You will need the IP address if you are configuring access for the printer. 3 From the Welcome screen, click Continue. 4 Click Continue again after viewing the Readme file. 5 Click ...
User's Guide
Page 47
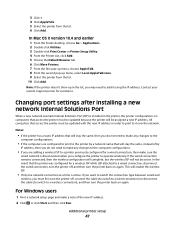
... to operate wirelessly. Changing port settings after installing a new network Internal Solutions Port When a new network Lexmark Internal Solutions Port (ISP) is installed in the list, you configure the printer to add it over the network. Additional printer setup 47 All computers that access the printer ...wireless connection), and then turn the printer back on again. In the event that will be assigned a new IP address. If the wired connection remains connected, then the wireless configuration will complete, but the wireless ISP will stay the same, then you do not need to make a ...
... to operate wirelessly. Changing port settings after installing a new network Internal Solutions Port When a new network Lexmark Internal Solutions Port (ISP) is installed in the list, you configure the printer to add it over the network. Additional printer setup 47 All computers that access the printer ...wireless connection), and then turn the printer back on again. In the event that will be assigned a new IP address. If the wired connection remains connected, then the wireless configuration will complete, but the wireless ISP will stay the same, then you do not need to make a ...
User's Guide
Page 48
... in the list, and then select it. 10 Click Configure Port. 11 Type the new IP address in the "Printer Name or IP Address" field. f Click Add. e Click IP. f Type in the IP address of your printer in the Address field. e Type in the IP address of your printer in the Address field. d From...: Additional printer setup 48 b Click Print & Fax. You will need the IP address if you are configuring access for computers on the network setup page you printed in the TCP/IP section of the new IP address. 2 Locate the printer IP address in step 1. 12 Click OK, and then click Close. In Mac ...
... in the list, and then select it. 10 Click Configure Port. 11 Type the new IP address in the "Printer Name or IP Address" field. f Click Add. e Click IP. f Type in the IP address of your printer in the Address field. e Type in the IP address of your printer in the Address field. d From...: Additional printer setup 48 b Click Print & Fax. You will need the IP address if you are configuring access for computers on the network setup page you printed in the TCP/IP section of the new IP address. 2 Locate the printer IP address in step 1. 12 Click OK, and then click Close. In Mac ...

User's Guide
Page 64
...loaded. Note: If you do not know the IP address of Custom Type . Note: This custom name will replace a custom type name under the Custom Types and Paper Size/Type menus. 6 Click Submit. 7 Click Custom Types. 6 Press the arrow buttons until Configure Bins appears, and then press . 7 Press the... arrow buttons until Link appears, and then press . When a Custom Type name is changed, the menus display the new name instead of the printer, then print a network setup page and locate the IP address in the TCP/IP section. 2...
...loaded. Note: If you do not know the IP address of Custom Type . Note: This custom name will replace a custom type name under the Custom Types and Paper Size/Type menus. 6 Click Submit. 7 Click Custom Types. 6 Press the arrow buttons until Configure Bins appears, and then press . 7 Press the... arrow buttons until Link appears, and then press . When a Custom Type name is changed, the menus display the new name instead of the printer, then print a network setup page and locate the IP address in the TCP/IP section. 2...
User's Guide
Page 129
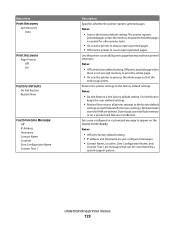
... the factory default settings Notes: • Do Not Restore is the factory default setting. • IP address and Hostname are pre-configured messages. • Contact Name, Location, Zero Configuration Name, and Custom Text 1 are deleted. Do Not Restore keeps the user-defined settings. •...Jam Recovery Auto Print Recovery Page Protect Off On Factory Defaults Do Not Restore Restore Now Custom Home Message Off IP Address Hostname Contact Name Location Zero Configuration Name Custom Text 1 Description Specifies whether the printer reprints jammed pages Notes: • Auto is the factory...
... the factory default settings Notes: • Do Not Restore is the factory default setting. • IP address and Hostname are pre-configured messages. • Contact Name, Location, Zero Configuration Name, and Custom Text 1 are deleted. Do Not Restore keeps the user-defined settings. •...Jam Recovery Auto Print Recovery Page Protect Off On Factory Defaults Do Not Restore Restore Now Custom Home Message Off IP Address Hostname Contact Name Location Zero Configuration Name Custom Text 1 Description Specifies whether the printer reprints jammed pages Notes: • Auto is the factory...
User's Guide
Page 172
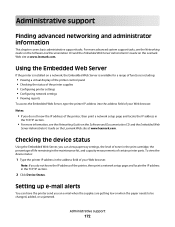
...panel • Checking the status of the printer supplies • Configuring printer settings • Configuring network settings • Viewing reports To access the Embedded Web Server, type the printer IP address into the address field of certain printer parts. For more ...information, see the Networking Guide on the Software and Documentation CD and the Embedded Web Server Administrator's Guide on the Lexmark...
...panel • Checking the status of the printer supplies • Configuring printer settings • Configuring network settings • Viewing reports To access the Embedded Web Server, type the printer IP address into the address field of certain printer parts. For more ...information, see the Networking Guide on the Software and Documentation CD and the Embedded Web Server Administrator's Guide on the Lexmark...

User's Guide
Page 212
...Menu access turned off by system administrator 150 menu settings page printing 38 menus Active NIC 108 AppleTalk 113 Bin Setup 106 Confidential Print 122 Configure MP 98 Custom Types 105 Default Source 95 diagram of 94 Disk Wiping 123 Envelope Enhance 99 Finishing 131 Flash Drive 141 General Settings 126...Audit Log 124 Serial 118 Set Date/Time 125 Setup 130 SMTP Setup menu 121 Standard Network 108 Standard USB 115 Substitute Size 99 TCP/IP 111 Universal Setup 105 Utilities 135 Wireless 112 XPS 136 Menus are Disabled 151 Miscellaneous menu 122 moving the printer 170, 171 multipurpose feeder ...
...Menu access turned off by system administrator 150 menu settings page printing 38 menus Active NIC 108 AppleTalk 113 Bin Setup 106 Confidential Print 122 Configure MP 98 Custom Types 105 Default Source 95 diagram of 94 Disk Wiping 123 Envelope Enhance 99 Finishing 131 Flash Drive 141 General Settings 126...Audit Log 124 Serial 118 Set Date/Time 125 Setup 130 SMTP Setup menu 121 Standard Network 108 Standard USB 115 Substitute Size 99 TCP/IP 111 Universal Setup 105 Utilities 135 Wireless 112 XPS 136 Menus are Disabled 151 Miscellaneous menu 122 moving the printer 170, 171 multipurpose feeder ...
Help Menu Pages
Page 3
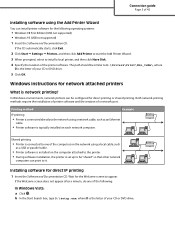
... Start Search box, type D:\setup.exe, where D is the letter of your CD or DVD drive. 5 Click OK. The path should be configured for direct printing or shared printing. In Windows environments, network printers can be similar to D:\Drivers\Print\Win_9xMe\, where D is typically installed on the...; Printer is connected to install a local printer, and then click Have Disk. 4 Specify the location of a network port. Wait for direct IP printing 1 Insert the Software and Documentation CD. Windows instructions for network attached printers What is set up to be "shared" so that other network...
... Start Search box, type D:\setup.exe, where D is the letter of your CD or DVD drive. 5 Click OK. The path should be configured for direct printing or shared printing. In Windows environments, network printers can be similar to D:\Drivers\Print\Win_9xMe\, where D is typically installed on the...; Printer is connected to install a local printer, and then click Have Disk. 4 Specify the location of a network port. Wait for direct IP printing 1 Insert the Software and Documentation CD. Windows instructions for network attached printers What is set up to be "shared" so that other network...


