User Guide
Page 37
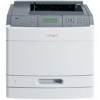
..., they replace the factory default settings as user default settings. Additional printer setup 37 Verifying printer setup Once all hardware and software options are installed and the printer is turned on, verify that the printer is set up correctly by printing the following: • Menu settings page-Use this page to verify that Status is "Connected." If an option you access the menu again, choose another network setup page. If Status is on and Ready appears. 2 From the printer control panel, press . 3 Press the arrow buttons until...
..., they replace the factory default settings as user default settings. Additional printer setup 37 Verifying printer setup Once all hardware and software options are installed and the printer is turned on, verify that the printer is set up correctly by printing the following: • Menu settings page-Use this page to verify that Status is "Connected." If an option you access the menu again, choose another network setup page. If Status is on and Ready appears. 2 From the printer control panel, press . 3 Press the arrow buttons until...
User Guide
Page 49
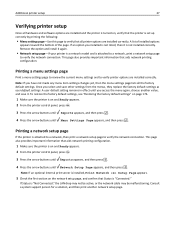
... letter of your printer. 1 Set the parameters in the Add a New Port window. k Make any necessary changes to the menu with serial port settings. Additional printer setup 49 Setting up serial printing In serial printing, data is available under Select Components. After installing the serial port, you will need to finish adding the port. c Make any configuration changes necessary in the printer: a From the printer control panel, navigate to the serial settings. It launches automatically. j Make sure the correct port is transferred one bit at a time. This is checked...
... letter of your printer. 1 Set the parameters in the Add a New Port window. k Make any necessary changes to the menu with serial port settings. Additional printer setup 49 Setting up serial printing In serial printing, data is available under Select Components. After installing the serial port, you will need to finish adding the port. c Make any configuration changes necessary in the printer: a From the printer control panel, navigate to the serial settings. It launches automatically. j Make sure the correct port is transferred one bit at a time. This is checked...
User Guide
Page 51
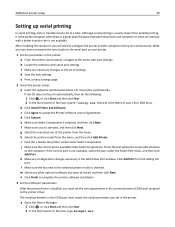
... factory default Paper Type setting is a user‑defined setting that are not preset in .). Ready appears. the largest is on and Ready appears. 2 From the printer control panel, press . 3 Press the arrow buttons until Paper Menu appears, and then press . 4 Press the arrow buttons until the correct Paper Type setting appears, and then press . It also includes information about paper orientation, setting the Paper Size and Paper Type, and linking and unlinking trays. Loading paper...
... factory default Paper Type setting is a user‑defined setting that are not preset in .). Ready appears. the largest is on and Ready appears. 2 From the printer control panel, press . 3 Press the arrow buttons until Paper Menu appears, and then press . 4 Press the arrow buttons until the correct Paper Type setting appears, and then press . It also includes information about paper orientation, setting the Paper Size and Paper Type, and linking and unlinking trays. Loading paper...
User Guide
Page 108
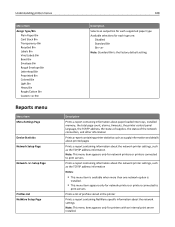
...each supported paper type Available selections for each type are: Disabled Standard Bin Bin Note: Standard Bin is installed. • This menu item appears only for network printers or printers connected to print servers. Prints a report containing information about the network settings Note: This menu item appears only for printers with an internal print server installed. Description Prints a report containing information about paper loaded into trays, installed memory, the total page count, alarms, timeouts, the printer control panel language, the TCP/IP address, the status of supplies...
...each supported paper type Available selections for each type are: Disabled Standard Bin Bin Note: Standard Bin is installed. • This menu item appears only for network printers or printers connected to print servers. Prints a report containing information about the network settings Note: This menu item appears only for printers with an internal print server installed. Description Prints a report containing information about paper loaded into trays, installed memory, the total page count, alarms, timeouts, the printer control panel language, the TCP/IP address, the status of supplies...
User Guide
Page 109
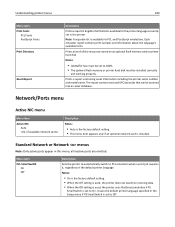
Standard Network or Network menus Note: Only active ports appear in this menu; It uses the default printer language specified in the Setup menu if PS SmartSwitch is installed. all the resources stored on an optional flash memory card or printer hard disk Notes: • Job Buffer Size must be set to On. Prints a report containing asset information including the printer serial number and model name. Network/Ports menu Active NIC menu Menu item Active NIC Auto Description Notes: • Auto is the factory default setting. • This...
Standard Network or Network menus Note: Only active ports appear in this menu; It uses the default printer language specified in the Setup menu if PS SmartSwitch is installed. all the resources stored on an optional flash memory card or printer hard disk Notes: • Job Buffer Size must be set to On. Prints a report containing asset information including the printer serial number and model name. Network/Ports menu Active NIC menu Menu item Active NIC Auto Description Notes: • Auto is the factory default setting. • This...

User Guide
Page 130
... Now Custom Home Message Off IP Address Hostname Contact Name Location Zero Configuration Name Custom Text 1 Setup menu Menu item Printer Language PCL Emulation PS Emulation 130 Description Lets the printer successfully print a page that can be customized by a system support person. Do Not Restore keeps the user‑defined settings. • Restore Now returns all printer settings to the factory default settings Notes: • Do Not Restore is the factory default setting. Returns the printer settings to the factory default settings except Network/Ports menu settings. Downloads...
... Now Custom Home Message Off IP Address Hostname Contact Name Location Zero Configuration Name Custom Text 1 Setup menu Menu item Printer Language PCL Emulation PS Emulation 130 Description Lets the printer successfully print a page that can be customized by a system support person. Do Not Restore keeps the user‑defined settings. • Restore Now returns all printer settings to the factory default settings Notes: • Do Not Restore is the factory default setting. Returns the printer settings to the factory default settings except Network/Ports menu settings. Downloads...
User Guide
Page 177
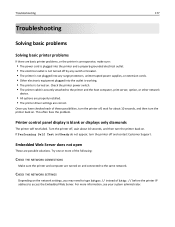
... seconds, and then turn the printer back on and connected to the same network. Embedded Web Server does not open These are correct. Check the printer power switch. • The printer cable is securely attached to access the Embedded Web Server. Turn the printer off, wait about 10 seconds, and then turn the printer back on . Printer control panel display is turned on . Try one or more information, see your system administrator. This often fixes the problem.
... seconds, and then turn the printer back on and connected to the same network. Embedded Web Server does not open These are correct. Check the printer power switch. • The printer cable is securely attached to access the Embedded Web Server. Turn the printer off, wait about 10 seconds, and then turn the printer back on . Printer control panel display is turned on . Try one or more information, see your system administrator. This often fixes the problem.
User Guide
Page 213
... 171 fuser wiper ordering 171 G General Settings menu 127 guidelines card stock 75 envelopes 74 labels 75 letterhead 73 transparencies 74 H hard disk with adapter troubleshooting 184 held jobs 76 printing for Macintosh users 76 printing for Windows users 76 Help menu 144 Hex Trace ready 149 HTML menu 141 I Image menu 142 Insert staple cartridge 149 Insert Tray 150 Install bin 150 Install duplex 150 Install envelope feeder 150 Install MICR Cartridge 151 Install tray 151 installation wireless network 40, 42 installing options in driver 38 printer software 38 installing options...
... 171 fuser wiper ordering 171 G General Settings menu 127 guidelines card stock 75 envelopes 74 labels 75 letterhead 73 transparencies 74 H hard disk with adapter troubleshooting 184 held jobs 76 printing for Macintosh users 76 printing for Windows users 76 Help menu 144 Hex Trace ready 149 HTML menu 141 I Image menu 142 Insert staple cartridge 149 Insert Tray 150 Install bin 150 Install duplex 150 Install envelope feeder 150 Install MICR Cartridge 151 Install tray 151 installation wireless network 40, 42 installing options in driver 38 printer software 38 installing options...
User Guide
Page 214
... letterhead in trays 52 multipurpose feeder 59 transparencies 59 M Macintosh wireless network installation 42 maintenance kit ordering 171 memory card installing 19 troubleshooting 184 Menu access turned off by system administrator 152 menu settings page printing 37 menus Active NIC 109 AppleTalk 114 Bin Setup 107 Confidential Print 123 Configure MP 99 Custom Types 106 Default Source 96 diagram of 95 Disk Wiping 124 Envelope Enhance 100 Finishing 133 Flash Drive 142 General Settings 127 Help 144 HTML 141 Image 142 IPv6...
... letterhead in trays 52 multipurpose feeder 59 transparencies 59 M Macintosh wireless network installation 42 maintenance kit ordering 171 memory card installing 19 troubleshooting 184 Menu access turned off by system administrator 152 menu settings page printing 37 menus Active NIC 109 AppleTalk 114 Bin Setup 107 Confidential Print 123 Configure MP 99 Custom Types 106 Default Source 96 diagram of 95 Disk Wiping 124 Envelope Enhance 100 Finishing 133 Flash Drive 142 General Settings 127 Help 144 HTML 141 Image 142 IPv6...

User Guide
Page 216
... 158 Toner low 159 Too many failed panel logins 158 Tray Empty 159 Tray Low 159 Tray Missing 159 Unsupported disk 159 Unsupported USB device, please remove 159 Unsupported USB hub, please remove 159 USB drive removed 159 USB/USB 159 View supplies 160 Waiting 160 printer options troubleshooting 2000‑sheet tray 182 5‑bin mailbox 183 duplex unit 183 envelope feeder 183 flash memory card 184 hard disk with adapter 184 high capacity output expander 183 Internal Solutions Port 184 memory card 184 option not working 181 output expander 183 paper trays 182...
... 158 Toner low 159 Too many failed panel logins 158 Tray Empty 159 Tray Low 159 Tray Missing 159 Unsupported disk 159 Unsupported USB device, please remove 159 Unsupported USB hub, please remove 159 USB drive removed 159 USB/USB 159 View supplies 160 Waiting 160 printer options troubleshooting 2000‑sheet tray 182 5‑bin mailbox 183 duplex unit 183 envelope feeder 183 flash memory card 184 hard disk with adapter 184 high capacity output expander 183 Internal Solutions Port 184 memory card 184 option not working 181 output expander 183 paper trays 182...
User Guide
Page 217
... Toner low 159 Too many failed panel logins 158 transfer roller ordering 172 transparencies loading 59 tips on using 74 Tray Empty 159 Tray Low 159 Tray Missing 159 tray linking 64 tray unlinking 64 trays linking 63 unlinking 64 troubleshooting checking an unresponsive printer 177 contacting Customer Support 196 solving basic printer problems 177 troubleshooting, display display is blank 177 display shows only diamonds 177 troubleshooting, paper feed message remains after jam is cleared 185 page that jammed does not reprint 185 troubleshooting, print error reading USB drive 178 held jobs...
... Toner low 159 Too many failed panel logins 158 transfer roller ordering 172 transparencies loading 59 tips on using 74 Tray Empty 159 Tray Low 159 Tray Missing 159 tray linking 64 tray unlinking 64 trays linking 63 unlinking 64 troubleshooting checking an unresponsive printer 177 contacting Customer Support 196 solving basic printer problems 177 troubleshooting, display display is blank 177 display shows only diamonds 177 troubleshooting, paper feed message remains after jam is cleared 185 page that jammed does not reprint 185 troubleshooting, print error reading USB drive 178 held jobs...
Service Manual
Page 37
... then turn the power back on page 4-74. 4. Go to "Switch (media size) assembly removal (T650, T652, T654)" on . Replace the media tray assembly if problem remains. Error 32 displays when the top cover is closed and a defective print cartridge is detected. Install the proper print cartridge. 1. Replace the print cartridge ID connector assembly if problem remains. Ensure the media tray guides are properly set for the size paper that is properly connected. 3. Make sure the Paper Size setting is being used . Possible repair actions Turn the power...
... then turn the power back on page 4-74. 4. Go to "Switch (media size) assembly removal (T650, T652, T654)" on . Replace the media tray assembly if problem remains. Error 32 displays when the top cover is closed and a defective print cartridge is detected. Install the proper print cartridge. 1. Replace the print cartridge ID connector assembly if problem remains. Ensure the media tray guides are properly set for the size paper that is properly connected. 3. Make sure the Paper Size setting is being used . Possible repair actions Turn the power...
Service Manual
Page 56
...) late jam service check. Check all media present in media path. 2. Go to paper jam or bind. The media is late reaching the sensor (fuser output) within the specified time. See "Sensor (narrow media) late jam service check." Remove all connections on page 4-54. Replace the main drive motor assembly if problem remains. Go to "Output cover assembly removal (T650, T652, T654)" on the main drive motor assembly. 3. Possible repair actions 1. on page 2-139. Main drive motor assembly load error. Sensor (fuser output) late jam Type 2 fuser Fuser page count has exceeded life...
...) late jam service check. Check all media present in media path. 2. Go to paper jam or bind. The media is late reaching the sensor (fuser output) within the specified time. See "Sensor (narrow media) late jam service check." Remove all connections on page 4-54. Replace the main drive motor assembly if problem remains. Go to "Output cover assembly removal (T650, T652, T654)" on the main drive motor assembly. 3. Possible repair actions 1. on page 2-139. Main drive motor assembly load error. Sensor (fuser output) late jam Type 2 fuser Fuser page count has exceeded life...

Service Manual
Page 69
... (duplex input) late jam service check. Possible repair actions 1. Go to sensor (duplex input) lingering jam service check. Remove all connections on the duplex media entrance drive motor assembly. 3. Check all connections on the system card assembly. 4. Replace the duplex drive motor assembly if problem remains. Check all media present in media path. 2. Ensure the external duplex assembly is late reaching the sensor (duplex double-feed) within the specified time. Replace the external duplex assembly if problem remains. Media is properly installed. 4. on page...
... (duplex input) late jam service check. Possible repair actions 1. Go to sensor (duplex input) lingering jam service check. Remove all connections on the duplex media entrance drive motor assembly. 3. Check all connections on the system card assembly. 4. Replace the duplex drive motor assembly if problem remains. Check all media present in media path. 2. Ensure the external duplex assembly is late reaching the sensor (duplex double-feed) within the specified time. Replace the external duplex assembly if problem remains. Media is properly installed. 4. on page...
Service Manual
Page 211
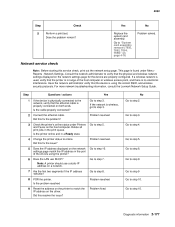
... address displayed on the driver. Step Questions / actions Yes 1 If the device is physically connected to verify that the ethernet cable is in a Ready state. 4 Change the printer status to step 3. 2 Connect the ethernet cable. Did this fix the issue? Did this fix the problem? Problem fixed. Delete all print jobs in the port of the host computer or wireless access point, and there is wireless, got to online. Note: A printer should use DHCP? Problem resolved 9 Reset the address on a network...
... address displayed on the driver. Step Questions / actions Yes 1 If the device is physically connected to verify that the ethernet cable is in a Ready state. 4 Change the printer status to step 3. 2 Connect the ethernet cable. Did this fix the issue? Did this fix the problem? Problem fixed. Delete all print jobs in the port of the host computer or wireless access point, and there is wireless, got to online. Note: A printer should use DHCP? Problem resolved 9 Reset the address on a network...
Service Manual
Page 214
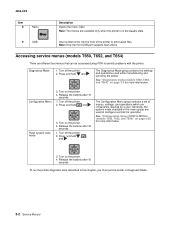
... used while manufacturing and servicing the printer. Turn on page 3-25 for operation. Generally, the options made available in this chapter, you must put the printer in the Ready state. 9 USB Insert a flash drive into the front of menus, settings, and operations which are different test menus that can be accessed during POR to print saved files. See "Configuration menu (CONFIG MENU) (models T650, T652, and T654)" on the printer. 4. Accessing service menus (models...
... used while manufacturing and servicing the printer. Turn on page 3-25 for operation. Generally, the options made available in this chapter, you must put the printer in the Ready state. 9 USB Insert a flash drive into the front of menus, settings, and operations which are different test menus that can be accessed during POR to print saved files. See "Configuration menu (CONFIG MENU) (models T650, T652, and T654)" on the printer. 4. Accessing service menus (models...
Service Manual
Page 232
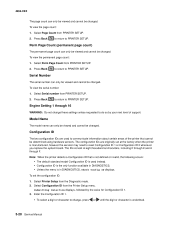
... default standard model Configuration ID is used instead. • Configuration ID is the only function available in DIAGNOSTICS. • Unless the menu is in DIAGNOSTICS, Check Config ID displays. Select Printer Setup from the Printer Setup menu. Select Configuration ID from the Diagnostic mode. 2. Perm Page Count (permanent page count) The permanent page count can only be viewed and cannot be changed. Serial Number The serial number can only be viewed and cannot be changed. The IDs consist of support...
... default standard model Configuration ID is used instead. • Configuration ID is the only function available in DIAGNOSTICS. • Unless the menu is in DIAGNOSTICS, Check Config ID displays. Select Printer Setup from the Printer Setup menu. Select Configuration ID from the Diagnostic mode. 2. Perm Page Count (permanent page count) The permanent page count can only be viewed and cannot be changed. Serial Number The serial number can only be viewed and cannot be changed. The IDs consist of support...
Service Manual
Page 256
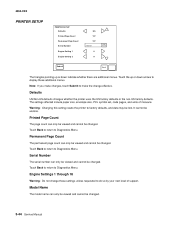
... Diagnostics Menu. Engine Settings 1 through 16 Warning: Do not change effective. Model Name The model name can only be viewed and cannot be changed . Serial Number The serial number can only be viewed and cannot be changed . Touch Back to return to factory defaults, and data may be undone. Permanent Page Count The permanent page count can only be viewed and cannot be changed . The settings affected include paper size, envelope size, PCL symbol set, code pages, and units of support. Defaults...
... Diagnostics Menu. Engine Settings 1 through 16 Warning: Do not change effective. Model Name The model name can only be viewed and cannot be changed . Serial Number The serial number can only be viewed and cannot be changed . Touch Back to return to factory defaults, and data may be undone. Permanent Page Count The permanent page count can only be viewed and cannot be changed . The settings affected include paper size, envelope size, PCL symbol set, code pages, and units of support. Defaults...

Service Manual
Page 263
... printed on , the pages are printed: Maintenance Counter Value Reports PPDS Emulation Min Copy Memory Disable Scanner Disk Encryption Required Standby Key Repeat Rate USB Speed USB Scan to Local SIZE SENSING Factory Defaults NumPad Job Assist Paper Prompts Wipe Disk LES Applications Wiper Message Print Quality Pages Panel Menu Energy Conserve Fax Storage Location Envelope Prompts ADF Edge Erase Key Repeat Initial Delay Clear Custom Status Touch Back to return to include page count, installed memory, processor speed, serial number, engine ID, system card...
... printed on , the pages are printed: Maintenance Counter Value Reports PPDS Emulation Min Copy Memory Disable Scanner Disk Encryption Required Standby Key Repeat Rate USB Speed USB Scan to Local SIZE SENSING Factory Defaults NumPad Job Assist Paper Prompts Wipe Disk LES Applications Wiper Message Print Quality Pages Panel Menu Energy Conserve Fax Storage Location Envelope Prompts ADF Edge Erase Key Repeat Initial Delay Clear Custom Status Touch Back to return to include page count, installed memory, processor speed, serial number, engine ID, system card...
Service Manual
Page 573
Index Numerics 5-bin mailbox output sensor test 3-18 A acronyms 1-9, 3-89 adjustments fuser solenoid 4-6 gap adjustment 4-6 B Button Test 3-8, 3-36 buttons accessing service menus 3-2, 3-30 Button Test 3-8, 3-36 C Clear Custom Status 3-58 code update 3-2 Configuration ID 3-20, 3-45 configuration menu accessing 3-2, 3-25, 3-30, 3-49 available menus 3-25, 3-49 Demo Mode 3-27 Disk Encryption 3-56 Energy Conserve 3-28, 3-54 Env Prompts 3-28 Envelope Prompts 3-55 Factory Defaults 3-28, 3-54 Font Sharpening 3-57 Jobs On Disk 3-55 Key Repeat Initial Delay 3-58 Key Repeat Rate 3-58...
Index Numerics 5-bin mailbox output sensor test 3-18 A acronyms 1-9, 3-89 adjustments fuser solenoid 4-6 gap adjustment 4-6 B Button Test 3-8, 3-36 buttons accessing service menus 3-2, 3-30 Button Test 3-8, 3-36 C Clear Custom Status 3-58 code update 3-2 Configuration ID 3-20, 3-45 configuration menu accessing 3-2, 3-25, 3-30, 3-49 available menus 3-25, 3-49 Demo Mode 3-27 Disk Encryption 3-56 Energy Conserve 3-28, 3-54 Env Prompts 3-28 Envelope Prompts 3-55 Factory Defaults 3-28, 3-54 Font Sharpening 3-57 Jobs On Disk 3-55 Key Repeat Initial Delay 3-58 Key Repeat Rate 3-58...


